
Instruction Manual
Page 1
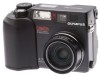
PREPARATION BASIC FUNCTIONS MOVIE FUNCTIONS INSTRUCTIONS STORING DATA FOR PRINTING PICTURES USING A PERSONAL COMPUTER CAMERA SETTINGS DIGITAL CAMERA MISCELLANEOUS C-3030ZOOM Ⅲ Before using your camera, read this manual carefully to ensure correct use. Ⅲ We recommend that you take test shots to get accustomed to your camera before taking important photographs.
PREPARATION BASIC FUNCTIONS MOVIE FUNCTIONS INSTRUCTIONS STORING DATA FOR PRINTING PICTURES USING A PERSONAL COMPUTER CAMERA SETTINGS DIGITAL CAMERA MISCELLANEOUS C-3030ZOOM Ⅲ Before using your camera, read this manual carefully to ensure correct use. Ⅲ We recommend that you take test shots to get accustomed to your camera before taking important photographs.
Instruction Manual
Page 2
...to constitute a risk of uninsulated "dangerous voltage" within an equilateral triangle is intended to alert the user to retain this manual for purchasing an Olympus digital camera. CAUTION RISK OF ELECTRIC SHOCK DO NOT OPEN CAUTION: TO REDUCE THE RISK OF ELECTRIC SHOCK, DO NOT REMOVE COVER ...MOISTURE. 2 NO USER-SERVICEABLE PARTS INSIDE. Before you for future reference. IMPORTANT SAFETY INSTRUCTlONS Thank you start to use your new camera, please read these instructions carefully to persons. The lightning flash with the arrowhead symbol, within an equilateral triangle, is intended to ...
...to constitute a risk of uninsulated "dangerous voltage" within an equilateral triangle is intended to alert the user to retain this manual for purchasing an Olympus digital camera. CAUTION RISK OF ELECTRIC SHOCK DO NOT OPEN CAUTION: TO REDUCE THE RISK OF ELECTRIC SHOCK, DO NOT REMOVE COVER ...MOISTURE. 2 NO USER-SERVICEABLE PARTS INSIDE. Before you for future reference. IMPORTANT SAFETY INSTRUCTlONS Thank you start to use your new camera, please read these instructions carefully to persons. The lightning flash with the arrowhead symbol, within an equilateral triangle, is intended to ...

Instruction Manual
Page 7
... are the "Design Rule for personal use metallic tweezers to hold the battery, and never short circuit the (+) and (-) sides of this manual. 7 If you are caused by the Japan Electronics Industry Development Association (JEIDA). Macintosh™ is a trademark of Microsoft Corporation. WARNING &#... please contact us. •No part of this publication may be reproduced or reprinted except for Camera File System/DCF" standards stipulated by erasing the picture data. • Olympus reserves all rights to this publication have been carefully checked to avoid errors, some may present the...
... are the "Design Rule for personal use metallic tweezers to hold the battery, and never short circuit the (+) and (-) sides of this manual. 7 If you are caused by the Japan Electronics Industry Development Association (JEIDA). Macintosh™ is a trademark of Microsoft Corporation. WARNING &#... please contact us. •No part of this publication may be reproduced or reprinted except for Camera File System/DCF" standards stipulated by erasing the picture data. • Olympus reserves all rights to this publication have been carefully checked to avoid errors, some may present the...

Instruction Manual
Page 8
DO NOT LOAD BATTERIES FORCEFULLY. 3. WHEN USING NiMH BATTERIES, USE OLYMPUS BRAND NiMH BATTERIES AND CHARGER. 2. IT MAY DESTROY THE TERMINALS OR CAUSE BATTERY FLUID TO LEAK. 4. IF BATTERY FLUID GETS IN YOUR EYES, DO NOT ... BATTERIES WITH THEIR +/- TERMINALS UPSIDE DOWN. DO NOT MODIFY OR DISASSEMBLE BATTERIES OR CONNECT THEM TO THE CAMERA USING SOLDER OR IN ANY OTHER WAY THAN INSTRUCTED IN THIS MANUAL. DANGER 1. DO NOT CONNECT THE CAMERA DIRECTLY TO A POWER OUTLET OR CIGARETTE LIGHTER IN A VEHICLE. 6. BATTERY HANDLING IGNORING THE WARNINGS BELOW MAY LEAD...
DO NOT LOAD BATTERIES FORCEFULLY. 3. WHEN USING NiMH BATTERIES, USE OLYMPUS BRAND NiMH BATTERIES AND CHARGER. 2. IT MAY DESTROY THE TERMINALS OR CAUSE BATTERY FLUID TO LEAK. 4. IF BATTERY FLUID GETS IN YOUR EYES, DO NOT ... BATTERIES WITH THEIR +/- TERMINALS UPSIDE DOWN. DO NOT MODIFY OR DISASSEMBLE BATTERIES OR CONNECT THEM TO THE CAMERA USING SOLDER OR IN ANY OTHER WAY THAN INSTRUCTED IN THIS MANUAL. DANGER 1. DO NOT CONNECT THE CAMERA DIRECTLY TO A POWER OUTLET OR CIGARETTE LIGHTER IN A VEHICLE. 6. BATTERY HANDLING IGNORING THE WARNINGS BELOW MAY LEAD...

Instruction Manual
Page 15
... 61 Zoom 62 Exposure compensation 63 Using the flash 64 Spot metering mode 68 Macro mode 69 Macro + Spot metering mode 70 Manual focus 71 Still picture record menu 73 Sequence mode 74 Selftimer/Remote control 76 Auto bracket 80 White balance 82 ISO 84 Flash correction... the FL-40 extension flash ...........90 Taking photographs with the FL-40 extension flash only 92 Taking photographs with another brand of extension flash 93 Digital zoom mode 96 Picture effects 98 Sound record mode 99 Panorama mode 101 Card setup (card format 103 Selecting the recording mode 105 A/S/M mode...
... 61 Zoom 62 Exposure compensation 63 Using the flash 64 Spot metering mode 68 Macro mode 69 Macro + Spot metering mode 70 Manual focus 71 Still picture record menu 73 Sequence mode 74 Selftimer/Remote control 76 Auto bracket 80 White balance 82 ISO 84 Flash correction... the FL-40 extension flash ...........90 Taking photographs with the FL-40 extension flash only 92 Taking photographs with another brand of extension flash 93 Digital zoom mode 96 Picture effects 98 Sound record mode 99 Panorama mode 101 Card setup (card format 103 Selecting the recording mode 105 A/S/M mode...

Instruction Manual
Page 16
... Mode] Recording movies 128 Recording movies using the LCD monitor 128 Quick view 130 Focus lock 131 Working range 132 Zoom 133 Exposure compensation 134 Manual focus 135 Movie picture record menu 137 Selftimer/Remote control 138 White balance 142 ISO 144 Picture effect 146 Card setup (card format 147 Selecting...
... Mode] Recording movies 128 Recording movies using the LCD monitor 128 Quick view 130 Focus lock 131 Working range 132 Zoom 133 Exposure compensation 134 Manual focus 135 Movie picture record menu 137 Selftimer/Remote control 138 White balance 142 ISO 144 Picture effect 146 Card setup (card format 147 Selecting...

Instruction Manual
Page 26
NAMES OF PARTS (Cont.) CONTROL PANEL Flash exposure correction (P. 86) Slow shutter synchroniza- tion flash (P. 88) Battery check (P. 41) Manual focus (P. 71/135) Flash mode (P. 64) Macro mode (P. 69) Card error (P. 227) White balance (P. 82/142) Spot metering mode (P. 68) Sequential shooting (P. 74) ISO (P. 84/...
NAMES OF PARTS (Cont.) CONTROL PANEL Flash exposure correction (P. 86) Slow shutter synchroniza- tion flash (P. 88) Battery check (P. 41) Manual focus (P. 71/135) Flash mode (P. 64) Macro mode (P. 69) Card error (P. 227) White balance (P. 82/142) Spot metering mode (P. 68) Sequential shooting (P. 74) ISO (P. 84/...

Instruction Manual
Page 37
Aperture priority Shutter priority Manual Program Power off or change the mode using the Mode dial. HOW TO USE THE MODE DIAL You can observe the pictures you can set ... SQ mode and 46 seconds in the HQ mode (when a 16MB card is used). (p. 128 ~ 149) OFF (Power off) (Display) You can easily turn the camera on or off A/S/M P OFF POW DIAL ER/MODE Movie picture recording Display P or A/S/M (Still picture recording) (p. 48 ~ 107) With P, the...
Aperture priority Shutter priority Manual Program Power off or change the mode using the Mode dial. HOW TO USE THE MODE DIAL You can observe the pictures you can set ... SQ mode and 46 seconds in the HQ mode (when a 16MB card is used). (p. 128 ~ 149) OFF (Power off) (Display) You can easily turn the camera on or off A/S/M P OFF POW DIAL ER/MODE Movie picture recording Display P or A/S/M (Still picture recording) (p. 48 ~ 107) With P, the...

Instruction Manual
Page 54
When this happens, try the procedure below or use Manual focus. (p. 71) 1 Subjects with no vertical lines Lock the focus on an object that is pressed halfway. AUTOFOCUS There are certain conditions where the autofocus may not work properly even when the Green lamp lights when the Shutter release button is at the same distance from the camera as the subject, then aim at the subject to take the picture. (p. 53) 2 Subjects with low contrast Lock the focus on the subject by holding the camera vertically, then change it to the horizontal position to take the picture. (p. 53) 54
When this happens, try the procedure below or use Manual focus. (p. 71) 1 Subjects with no vertical lines Lock the focus on an object that is pressed halfway. AUTOFOCUS There are certain conditions where the autofocus may not work properly even when the Green lamp lights when the Shutter release button is at the same distance from the camera as the subject, then aim at the subject to take the picture. (p. 53) 2 Subjects with low contrast Lock the focus on the subject by holding the camera vertically, then change it to the horizontal position to take the picture. (p. 53) 54

Instruction Manual
Page 58
APERTURE PRIORITY MODE You can set to select the aperture. : Increases the value. : Decreases the value. It is set the aperture manually for taking portrait pictures with blurred backgrounds. 31 A/S/M P OFF POWER/MO DE DIAL 1 Set the Mode dial to A/S/M. • The LCD monitor turns on automatically, ...
APERTURE PRIORITY MODE You can set to select the aperture. : Increases the value. : Decreases the value. It is set the aperture manually for taking portrait pictures with blurred backgrounds. 31 A/S/M P OFF POWER/MO DE DIAL 1 Set the Mode dial to A/S/M. • The LCD monitor turns on automatically, ...

Instruction Manual
Page 59
Set it to a fast speed to select the shutter speed. 59 Set it to a slow speed to express motion. 31 A/S/M P OFF POWER/MO DE DIAL 1 Set the Mode dial to A/S/M. • The LCD monitor turns on automatically, and the shutter speed setting will be displayed. 2 Select the Shutter priority mode from the Menu. (p. 107) Shutter speed S F 2 .8 1/800 +2.0 3 Press the top/bottom arrows on the Jog dial to capture a moving object. SHUTTER PRIORITY MODE You can set the shutter speed manually for the Shutter priority mode.
Set it to a fast speed to select the shutter speed. 59 Set it to a slow speed to express motion. 31 A/S/M P OFF POWER/MO DE DIAL 1 Set the Mode dial to A/S/M. • The LCD monitor turns on automatically, and the shutter speed setting will be displayed. 2 Select the Shutter priority mode from the Menu. (p. 107) Shutter speed S F 2 .8 1/800 +2.0 3 Press the top/bottom arrows on the Jog dial to capture a moving object. SHUTTER PRIORITY MODE You can set the shutter speed manually for the Shutter priority mode.

Instruction Manual
Page 61
...M F2.8 1/800 -3.0 3 Press the right/left arrows on automatically, and the aperture and shutter speed settings are displayed. 2 Select the Manual mode from -3.0 to +3.0) between the exposure determined by the currently selected aperture and shutter speed compared to the exposure level considered optimal by the... camera appears in the upper right-hand corner of the LCD monitor. • If the exposure compensation value is lower than -3.0 or...
...M F2.8 1/800 -3.0 3 Press the right/left arrows on automatically, and the aperture and shutter speed settings are displayed. 2 Select the Manual mode from -3.0 to +3.0) between the exposure determined by the currently selected aperture and shutter speed compared to the exposure level considered optimal by the... camera appears in the upper right-hand corner of the LCD monitor. • If the exposure compensation value is lower than -3.0 or...

Instruction Manual
Page 63
Adjust + to decrease the exposure. Note: • Not available in the Manual mode. • Unless OFF is selected in All Reset, the setting will be changed with the flash. 63 In such a case, display the recorded picture ... off. (p. 194) • Although the brightness of the LCD monitor can also adjust it may not work properly when shooting with the exposure compensation, it manually by +/- 2 (approx. 1/3 steps). to increase the exposure, and - ER/MODE 31 A/S/M P OFF POW DIAL 2 Exposure compensation P F2.8 1/800 +2.0 1 Set the Mode dial to P or A/S/M. •...
Adjust + to decrease the exposure. Note: • Not available in the Manual mode. • Unless OFF is selected in All Reset, the setting will be changed with the flash. 63 In such a case, display the recorded picture ... off. (p. 194) • Although the brightness of the LCD monitor can also adjust it may not work properly when shooting with the exposure compensation, it manually by +/- 2 (approx. 1/3 steps). to increase the exposure, and - ER/MODE 31 A/S/M P OFF POW DIAL 2 Exposure compensation P F2.8 1/800 +2.0 1 Set the Mode dial to P or A/S/M. •...

Instruction Manual
Page 71
... panel, press the OK button. 4 While looking at the LCD monitor, press the top/bottom arrows on the Jog dial to make focusing easy. 71 MANUAL FOCUS With Manual focus, you can select a pre-adjusted focal length.
... panel, press the OK button. 4 While looking at the LCD monitor, press the top/bottom arrows on the Jog dial to make focusing easy. 71 MANUAL FOCUS With Manual focus, you can select a pre-adjusted focal length.

Instruction Manual
Page 72
... setting. 6 P F2.8 1/800 +2.0 31inch 24inch 16inch 8inch AF MF Note: • The picture may become out of focus when the Zoom lever is pressed after Manual focus is turned off. (p. 194) • The distances on the LCD monitor. 6 Press the OK button to auto focus when the power is selected. In...
... setting. 6 P F2.8 1/800 +2.0 31inch 24inch 16inch 8inch AF MF Note: • The picture may become out of focus when the Zoom lever is pressed after Manual focus is turned off. (p. 194) • The distances on the LCD monitor. 6 Press the OK button to auto focus when the power is selected. In...

Instruction Manual
Page 73
... (p. 34), Meters/feet (p. 217)] Selecting the recording mode (SQ/HQ/SHQ). (p. 105) A/S/M MODE Setting Aperture priority, Shutter priority or Manual mode for the Mode dial A/S/M. (p. 107) 73 WB Selecting the white balance. (p. 82) ISO Selecting the ISO sensitivity. (p. 84) Correcting...amount of light from the flash. (p. 86) SLOW Taking photographs of night views. (p. 88) FLASH DIGITAL ZOOM Selecting the extension flash or main flash + extension flash. (p. 92) Using the Digital zoom mode. (p. 96) FUNCTION Using picture effects. (p. 98) Recording sound in the still picture recording...
... (p. 34), Meters/feet (p. 217)] Selecting the recording mode (SQ/HQ/SHQ). (p. 105) A/S/M MODE Setting Aperture priority, Shutter priority or Manual mode for the Mode dial A/S/M. (p. 107) 73 WB Selecting the white balance. (p. 82) ISO Selecting the ISO sensitivity. (p. 84) Correcting...amount of light from the flash. (p. 86) SLOW Taking photographs of night views. (p. 88) FLASH DIGITAL ZOOM Selecting the extension flash or main flash + extension flash. (p. 92) Using the Digital zoom mode. (p. 96) FUNCTION Using picture effects. (p. 98) Recording sound in the still picture recording...


