
STYLUS-7040 Instruction Manual (English)
Page 3
... used . 1 IMAGE SIZE 14M 2 COMPRESSION NORMAL SHADOW ADJUST AUTO AF MODE FACE/iESP 1 ESP/ ESP 2 FINE ZOOM OFF 3 DIGITAL ZOOM OFF EXIT MENU SET OK SEL. X Y M D TIME 2010. 02 . 26 12 : 30 Y/M/D CANCEL MENU SET OK 4/30 SINGLE PRINT NORM 14M FILE 100 0004 '10/02/26 12:30 PRINT OK MORE Wheel controller F (up) / INFO button (changing information display) (p. 17, 19) H (left) I (right) A button G (down) / D button (erase) (p. 18) Operation guides displayed at the bottom of the screen indicate...
... used . 1 IMAGE SIZE 14M 2 COMPRESSION NORMAL SHADOW ADJUST AUTO AF MODE FACE/iESP 1 ESP/ ESP 2 FINE ZOOM OFF 3 DIGITAL ZOOM OFF EXIT MENU SET OK SEL. X Y M D TIME 2010. 02 . 26 12 : 30 Y/M/D CANCEL MENU SET OK 4/30 SINGLE PRINT NORM 14M FILE 100 0004 '10/02/26 12:30 PRINT OK MORE Wheel controller F (up) / INFO button (changing information display) (p. 17, 19) H (left) I (right) A button G (down) / D button (erase) (p. 18) Operation guides displayed at the bottom of the screen indicate...
STYLUS-7040 Instruction Manual (English)
Page 4
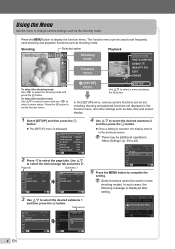
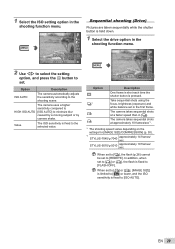
... the shooting mode and press the A button. Shooting mode Function menu o [SETUP] menu SLIDESHOW PHOTO SURFING EVENT BEAUTY FIX EDIT ERASE SETUP Use FG to the previous screen. A-V-:E-- 2 WORLD TIME HOME TV OUT VIDEO OUT POWER SAVEOFF OFF 1 ON 2 3 EXIT MENU SET OK 4 Use FG to select the desired submenu 2 and then press the A button. ● Once a setting is displayed after setting. 1 IMAGE SIZE 14M 2 COMPRESSION NORMAL SHADOW ADJUST AUTO ACFONMFOLDICETING SETTiIENSGPS 1 ESP/*1 ESP 2 FINE ZOOM OFF 3 DIGITAL ZOOM OFF EXIT MENU SET OK...
... the shooting mode and press the A button. Shooting mode Function menu o [SETUP] menu SLIDESHOW PHOTO SURFING EVENT BEAUTY FIX EDIT ERASE SETUP Use FG to the previous screen. A-V-:E-- 2 WORLD TIME HOME TV OUT VIDEO OUT POWER SAVEOFF OFF 1 ON 2 3 EXIT MENU SET OK 4 Use FG to select the desired submenu 2 and then press the A button. ● Once a setting is displayed after setting. 1 IMAGE SIZE 14M 2 COMPRESSION NORMAL SHADOW ADJUST AUTO ACFONMFOLDICETING SETTiIENSGPS 1 ESP/*1 ESP 2 FINE ZOOM OFF 3 DIGITAL ZOOM OFF EXIT MENU SET OK...

STYLUS-7040 Instruction Manual (English)
Page 5
... 25 2 Flash p. 26 3 Macro p. 26 4 Self-timer p. 27 5 Exposure compensation....p. 27 6 White balance p. 27 7 ISO p. 28 8 Drive p. 29 9 o (SETUP) IMAGE SIZE (Still images p. 30 IMAGE SIZE (Movies) .......p. 30 COMPRESSION (Still images) p. 30 IMAGE QUALITY (Movies) p. 30 SHADOW ADJUST ...........p. 31 AF MODE p. 31 ESP/n p. 31 FINE ZOOM p. 32 DIGITAL ZOOM p. 32 R (Still images p. 32 R (Movies p. 32 IMAGE STABILIZER (Still images)/ IS MOVIE MODE (Movies p. 32 REC VIEW p. 33 PIC ORIENTATION ...........p. 33 ICON GUIDE p. 33 Menus for Playback, Editing, and Printing Functions...
... 25 2 Flash p. 26 3 Macro p. 26 4 Self-timer p. 27 5 Exposure compensation....p. 27 6 White balance p. 27 7 ISO p. 28 8 Drive p. 29 9 o (SETUP) IMAGE SIZE (Still images p. 30 IMAGE SIZE (Movies) .......p. 30 COMPRESSION (Still images) p. 30 IMAGE QUALITY (Movies) p. 30 SHADOW ADJUST ...........p. 31 AF MODE p. 31 ESP/n p. 31 FINE ZOOM p. 32 DIGITAL ZOOM p. 32 R (Still images p. 32 R (Movies p. 32 IMAGE STABILIZER (Still images)/ IS MOVIE MODE (Movies p. 32 REC VIEW p. 33 PIC ORIENTATION ...........p. 33 ICON GUIDE p. 33 Menus for Playback, Editing, and Printing Functions...

STYLUS-7040 Instruction Manual (English)
Page 11
... Double-click the icon for the camera drive (Removable Disk), and then execute Setup.exe to the computer, the battery may not be charged. ● When charging, the indicator lamp light. install the camera instruction manual and PC software (ib). Check that are stored on the computer screen and setup the camera. If the indicator lamp does not light, the camera may be incorrectly connected, or the battery, camera, computer, or USB cable may be exhausted...
... Double-click the icon for the camera drive (Removable Disk), and then execute Setup.exe to the computer, the battery may not be charged. ● When charging, the indicator lamp light. install the camera instruction manual and PC software (ib). Check that are stored on the computer screen and setup the camera. If the indicator lamp does not light, the camera may be incorrectly connected, or the battery, camera, computer, or USB cable may be exhausted...

STYLUS-7040 Instruction Manual (English)
Page 13
... be used to change the date and time, adjust the setting from the menu. [X] (Date/time) (p. 43) 5 Use HI to select the [x] time zone and then press the A button. ● Use FG to turn on the camera. ● The date and time setting screen is displayed when the date and time are saved to image file names, date prints, and other data. 1 Press the n button to turn daylight saving time ([SUMMER]) on or off. For precise time setting, press the A button as the time...
... be used to change the date and time, adjust the setting from the menu. [X] (Date/time) (p. 43) 5 Use HI to select the [x] time zone and then press the A button. ● Use FG to turn on the camera. ● The date and time setting screen is displayed when the date and time are saved to image file names, date prints, and other data. 1 Press the n button to turn daylight saving time ([SUMMER]) on or off. For precise time setting, press the A button as the time...
STYLUS-7040 Instruction Manual (English)
Page 14
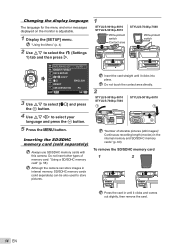
...pictures (still images)/ Continuous recording length (movies) in the internal memory and SD/SDHC memory cards" (p. 60) To remove the SD/SDHC memory card 1 2 Press the card in internal memory, SD/SDHC memory cards (sold separately) Always use SD/SDHC memory cards with this camera. "Using the Menu" (p. 4) 2 Use FG to select the r (Settings 1) tab and then press I. 1 STYLUS-9010/μ-9010 STYLUS-5010/μ-5010 Write-protect switch Contact area STYLUS-7040/μ-7040 Write-protect switch 1 INTERNAL/SD 2 MEMORY FORMAT DATA REPAIR COPY 1 2 RESET 3 USB CONNECTION EXIT MENU AUTO ENGLISH...
...pictures (still images)/ Continuous recording length (movies) in the internal memory and SD/SDHC memory cards" (p. 60) To remove the SD/SDHC memory card 1 2 Press the card in internal memory, SD/SDHC memory cards (sold separately) Always use SD/SDHC memory cards with this camera. "Using the Menu" (p. 4) 2 Use FG to select the r (Settings 1) tab and then press I. 1 STYLUS-9010/μ-9010 STYLUS-5010/μ-5010 Write-protect switch Contact area STYLUS-7040/μ-7040 Write-protect switch 1 INTERNAL/SD 2 MEMORY FORMAT DATA REPAIR COPY 1 2 RESET 3 USB CONNECTION EXIT MENU AUTO ENGLISH...

STYLUS-7040 Instruction Manual (English)
Page 15
... grip P 0.0 WB AUTO ISO AUTO 00:34 4 14M Number of storable still pictures (p. 60) Monitor (standby mode screen) If P mode is locked (shutter speed and aperture value are activated while also allowing changes to a wide range of other shooting menu functions, such as needed. 1 Press the n button to turn on the subject, the exposure is not displayed, press the m button to display the function menu screen and then set the shooting mode to turn off the camera. as exposure compensation, white balance, etc. Press...
... grip P 0.0 WB AUTO ISO AUTO 00:34 4 14M Number of storable still pictures (p. 60) Monitor (standby mode screen) If P mode is locked (shutter speed and aperture value are activated while also allowing changes to a wide range of other shooting menu functions, such as needed. 1 Press the n button to turn on the subject, the exposure is not displayed, press the m button to display the function menu screen and then set the shooting mode to turn off the camera. as exposure compensation, white balance, etc. Press...

STYLUS-7040 Instruction Manual (English)
Page 19
... software (ib). 1 Press the zoom buttons. To scroll an image in event index Use HI to select the representative image and press the A button. To select an image in close -up view, and event index Index view enables quick selection of image details. Index view, close -up view Use FGHI to move the viewing area. Changing the image information display Shooting information settings displayed on the screen can be changed. 1 Press F (INFO). ● The displayed image...
... software (ib). 1 Press the zoom buttons. To scroll an image in event index Use HI to select the representative image and press the A button. To select an image in close -up view, and event index Index view enables quick selection of image details. Index view, close -up view Use FGHI to move the viewing area. Changing the image information display Shooting information settings displayed on the screen can be changed. 1 Press F (INFO). ● The displayed image...

STYLUS-7040 Instruction Manual (English)
Page 23
... installing the PC software (ib), see "Battery charge and camera setup" (p. 10). To exit the panorama function without saving an image, press the m button. The user only composes the shots so that were taken are locked at the first frame. When set . The focus, exposure (p. 27), zoom position (p. 16), and white balance (p. 27) are combined into a panorama image using the guide frame and manually releases the shutter. The flash (p. 26) is displayed. EN 23 Taking pictures with [AUTO...
... installing the PC software (ib), see "Battery charge and camera setup" (p. 10). To exit the panorama function without saving an image, press the m button. The user only composes the shots so that were taken are locked at the first frame. When set . The focus, exposure (p. 27), zoom position (p. 16), and white balance (p. 27) are combined into a panorama image using the guide frame and manually releases the shutter. The flash (p. 26) is displayed. EN 23 Taking pictures with [AUTO...
STYLUS-7040 Instruction Manual (English)
Page 25
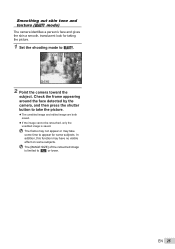
..., only the unedited image is limited to Q. The frame may not appear or may have no visible effect on some subjects. EN 25 The [IMAGE SIZE] of the retouched image is saved. Check the frame appearing around the face detected by the camera, and then press the shutter button to take some time to appear for taking the picture. 1 Set the shooting mode to [n] or...
..., only the unedited image is limited to Q. The frame may not appear or may have no visible effect on some subjects. EN 25 The [IMAGE SIZE] of the retouched image is saved. Check the frame appearing around the face detected by the camera, and then press the shutter button to take some time to appear for taking the picture. 1 Set the shooting mode to [n] or...
STYLUS-7040 Instruction Manual (English)
Page 29
..., and press the A button to set in the shooting function menu. The camera takes sequential shots at a faster speed than in the shooting function menu. Value The ISO sensitivity is fixed to [ISO AUTO]. Take sequential shots using the focus, brightness (exposure) and white balance set . When set to [j], the flash (p.26) cannot be set to [c] or [d], [IMAGE SIZE] is limited to [3] or lower, and the ISO sensitivity is fixed to [FLASH OFF]. In addition, when...
..., and press the A button to set in the shooting function menu. The camera takes sequential shots at a faster speed than in the shooting function menu. Value The ISO sensitivity is fixed to [ISO AUTO]. Take sequential shots using the focus, brightness (exposure) and white balance set . When set to [j], the flash (p.26) cannot be set to [c] or [d], [IMAGE SIZE] is limited to [3] or lower, and the ISO sensitivity is fixed to [FLASH OFF]. In addition, when...
STYLUS-7040 Instruction Manual (English)
Page 33
... the camera during shooting is not displayed. Icon guide PROGRAM AUTO P Functions can be enlarged somewhat before saving. The image being recorded is not recorded with images. Images are [IMAGE STABILIZER] (still images) to [ON] and [IS MOVIE MODE] (movies) to [OFF]. The camera's default settings are automatically rotated during playback. This function may not be a noise coming from inside the camera when the shutter button is set to make a brief check of the selected icon will be changed manually. 0.0 WB AUTO ISO AUTO...
... the camera during shooting is not displayed. Icon guide PROGRAM AUTO P Functions can be enlarged somewhat before saving. The image being recorded is not recorded with images. Images are [IMAGE STABILIZER] (still images) to [ON] and [IS MOVIE MODE] (movies) to [OFF]. The camera's default settings are automatically rotated during playback. This function may not be a noise coming from inside the camera when the shutter button is set to make a brief check of the selected icon will be changed manually. 0.0 WB AUTO ISO AUTO...

STYLUS-7040 Instruction Manual (English)
Page 41
.... The opening screen is displayed. Select when connecting to a computer via a storage device. Saving the mode when the camera is turned off [SAVE SETTINGS] s (Settings 2) X SAVE SETTINGS Submenu 2 YES NO Application The shooting mode is saved when the camera is turned off and is reactivated the next time the camera is not guaranteed in the following menu functions to the default settings. • Flash (p. 26) • Macro (p. 26) • Self-timer (p. 27) • Exposure compensation (p. 27) • White balance (p. 27) • ISO...
.... The opening screen is displayed. Select when connecting to a computer via a storage device. Saving the mode when the camera is turned off [SAVE SETTINGS] s (Settings 2) X SAVE SETTINGS Submenu 2 YES NO Application The shooting mode is saved when the camera is turned off and is reactivated the next time the camera is not guaranteed in the following menu functions to the default settings. • Flash (p. 26) • Macro (p. 26) • Self-timer (p. 27) • Exposure compensation (p. 27) • White balance (p. 27) • ISO...

STYLUS-7040 Instruction Manual (English)
Page 45
... Multi-connector Connect to [1080i], 1080i format takes priority for HDMI output. However, if this setting does not match the input setting of connected TV ([NTSC]/[PAL]). 2 Connect the TV and camera. EN 45 AV cable (supplied) ● Connection via AV cable 1 Use the camera to the TV's instruction manual. To play back camera images on changing the input setting of the TV, refer to select the same video signal system...
... Multi-connector Connect to [1080i], 1080i format takes priority for HDMI output. However, if this setting does not match the input setting of connected TV ([NTSC]/[PAL]). 2 Connect the TV and camera. EN 45 AV cable (supplied) ● Connection via AV cable 1 Use the camera to the TV's instruction manual. To play back camera images on changing the input setting of the TV, refer to select the same video signal system...

STYLUS-7040 Instruction Manual (English)
Page 47
... displayed on the printer, and then connect the printer and camera. "Using the Menu" (p. 4) 1 Display the image to be set [USB CONNECTION] to [PRINT]. To find out if your printer supports PictBridge, refer to the printer's instruction manual. *1 PictBridge is used. For details, refer to select an image, and press the A button. The printing modes, paper sizes, and other parameters that is a standard for connecting digital cameras and printers of different makers and printing out pictures directly. Printing Direct printing (PictBridge*1) By connecting the camera...
... displayed on the printer, and then connect the printer and camera. "Using the Menu" (p. 4) 1 Display the image to be set [USB CONNECTION] to [PRINT]. To find out if your printer supports PictBridge, refer to the printer's instruction manual. *1 PictBridge is used. For details, refer to select an image, and press the A button. The printing modes, paper sizes, and other parameters that is a standard for connecting digital cameras and printers of different makers and printing out pictures directly. Printing Direct printing (PictBridge*1) By connecting the camera...

STYLUS-7040 Instruction Manual (English)
Page 50
.... Make changes using only the print reservations on the card. 11 Press the m button. 12 When the message [REMOVE USB CABLE] is a standard for storing automatic printout information from the camera and printer. Single-frame print reservations [ DPOF print reservations can be made by this camera will erase the reservations made for the images stored on the card without a computer or a camera. *1 DPOF is displayed, disconnect the USB cable from digital cameras. DPOF reservations set...
.... Make changes using only the print reservations on the card. 11 Press the m button. 12 When the message [REMOVE USB CABLE] is a standard for storing automatic printout information from the camera and printer. Single-frame print reservations [ DPOF print reservations can be made by this camera will erase the reservations made for the images stored on the card without a computer or a camera. *1 DPOF is displayed, disconnect the USB cable from digital cameras. DPOF reservations set...

STYLUS-7040 Instruction Manual (English)
Page 52
... is no operation is normal and does not indicate malfunction. 52 EN Date and time function "Date and time settings return to the default setting". ● If the batteries are removed and left for a while. "The light is turned on. Take the batteries out of the camera, and warm them by putting them in the final image. "Setting the date, time and time zone" (p. 13) Miscellaneous "The camera makes a noise when taking a picture. Monitor "Dif...
... is no operation is normal and does not indicate malfunction. 52 EN Date and time function "Date and time settings return to the default setting". ● If the batteries are removed and left for a while. "The light is turned on. Take the batteries out of the camera, and warm them by putting them in the final image. "Setting the date, time and time zone" (p. 13) Miscellaneous "The camera makes a noise when taking a picture. Monitor "Dif...

STYLUS-7040 Instruction Manual (English)
Page 53
.... CANNOT PRINT*4 *1 Before erasing important images, download them . BATTERY EMPTY Battery problem Charge the battery. to the status where the printer can be viewed, the image file is corrupted. Error message When one of the messages below is displayed on a computer. Internal memory problem • Insert a card. PICTURE ERROR Problem with selected image Use photo retouch software, etc. Problem with selected image Use a computer to edit the image on the monitor, check the corrective action. JAMMED SETTINGS CHANGED*3 PRINT ERROR Printer problem Remove the...
.... CANNOT PRINT*4 *1 Before erasing important images, download them . BATTERY EMPTY Battery problem Charge the battery. to the status where the printer can be viewed, the image file is corrupted. Error message When one of the messages below is displayed on a computer. Internal memory problem • Insert a card. PICTURE ERROR Problem with selected image Use photo retouch software, etc. Problem with selected image Use a computer to edit the image on the monitor, check the corrective action. JAMMED SETTINGS CHANGED*3 PRINT ERROR Printer problem Remove the...

STYLUS-7040 Instruction Manual (English)
Page 59
... open the battery/card compartment cover or unplug the USB cable. IMAGE], or [ALL ERASE] is performed, the data in red '10/02/26 12:30 Playback mode Even if [MEMORY FORMAT]/[FORMAT], [ERASE], [ERASE EVENT], [SEL. Using a new card Cards must be formatted with this camera before first use or after being used with other cameras or computers. [MEMORY FORMAT]/[FORMAT] (p. 40) Checking the image saving location The memory indicator shows whether the internal memory or card is being used during shooting and playback. P 0.0 WB AUTO ISO AUTO...
... open the battery/card compartment cover or unplug the USB cable. IMAGE], or [ALL ERASE] is performed, the data in red '10/02/26 12:30 Playback mode Even if [MEMORY FORMAT]/[FORMAT], [ERASE], [ERASE EVENT], [SEL. Using a new card Cards must be formatted with this camera before first use or after being used with other cameras or computers. [MEMORY FORMAT]/[FORMAT] (p. 40) Checking the image saving location The memory indicator shows whether the internal memory or card is being used during shooting and playback. P 0.0 WB AUTO ISO AUTO...

STYLUS-7040 Instruction Manual (English)
Page 64
... recycle batteries to help save our planet's resources. Olympus assumes no responsibility for a long period. • When operating the camera with high-precision technology. Do not use any consequential, incidental or indirect damages (including but this is not a malfunction. • When a subject is viewed diagonally in color and brightness. Warning Unauthorized photographing or use of the information contained therein. No part...
... recycle batteries to help save our planet's resources. Olympus assumes no responsibility for a long period. • When operating the camera with high-precision technology. Do not use any consequential, incidental or indirect damages (including but this is not a malfunction. • When a subject is viewed diagonally in color and brightness. Warning Unauthorized photographing or use of the information contained therein. No part...


