
STYLUS-7040 Instruction Manual (English)
Page 1
Before you for purchasing an Olympus digital camera. Unless otherwise specified, the explanation about these instructions carefully to update or modify information contained in this manual. ● The screen and camera illustrations shown in this manual were produced during the development stages ...le are stored on the internal memory of the camera. ● We recommend that you take test shots to get accustomed to your camera before taking important photographs. ● In the interest of continually improving products, Olympus reserves the right to enjoy optimum performance and a ...
Before you for purchasing an Olympus digital camera. Unless otherwise specified, the explanation about these instructions carefully to update or modify information contained in this manual. ● The screen and camera illustrations shown in this manual were produced during the development stages ...le are stored on the internal memory of the camera. ● We recommend that you take test shots to get accustomed to your camera before taking important photographs. ● In the interest of continually improving products, Olympus reserves the right to enjoy optimum performance and a ...

STYLUS-7040 Instruction Manual (English)
Page 2
...-7040/μ-7040 and STYLUS-5010/μ-5010: LI-42B Digital camera USB cable Other accessories not shown: Warranty card Contents may vary depending on purchase location. 2 Step Preparing the Camera "Preparing the Camera" (p. 10) AV cable or USB-AC adapter (F-2AC) 3...Shooting, Playback, and Erasing" (p. 15) 4 Step How to Use the Camera "Camera Settings" (p. 3) 5 Step Printing "Direct printing (PictBridge)" (p. 47) "Print Reservations (DPOF)" (p. 50) Contents ¾ Names of Parts 6 ¾ Preparing the Camera 10 ¾ Shooting, Playback, and Erasing 15 ¾ Using Shooting Modes ...
...-7040/μ-7040 and STYLUS-5010/μ-5010: LI-42B Digital camera USB cable Other accessories not shown: Warranty card Contents may vary depending on purchase location. 2 Step Preparing the Camera "Preparing the Camera" (p. 10) AV cable or USB-AC adapter (F-2AC) 3...Shooting, Playback, and Erasing" (p. 15) 4 Step How to Use the Camera "Camera Settings" (p. 3) 5 Step Printing "Direct printing (PictBridge)" (p. 47) "Print Reservations (DPOF)" (p. 50) Contents ¾ Names of Parts 6 ¾ Preparing the Camera 10 ¾ Shooting, Playback, and Erasing 15 ¾ Using Shooting Modes ...

STYLUS-7040 Instruction Manual (English)
Page 3
... button (p. 15, 52) Zoom buttons (p. 16, 19) Movie record button (p. 16) q button (switching between shooting and playback) (p. 16, 17, 41) m button (p. 4) E button (camera guide/ menu guide) (p. 20) Operation guide The symbols FGHI displayed for image selections and settings indicate that the m button, A button, or zoom buttons can be... used by pressing, not turning, the wheel controller sections shown below. Camera Settings Using the Direct Buttons Frequently used functions can be accessed using the direct buttons.
... button (p. 15, 52) Zoom buttons (p. 16, 19) Movie record button (p. 16) q button (switching between shooting and playback) (p. 16, 17, 41) m button (p. 4) E button (camera guide/ menu guide) (p. 20) Operation guide The symbols FGHI displayed for image selections and settings indicate that the m button, A button, or zoom buttons can be... used by pressing, not turning, the wheel controller sections shown below. Camera Settings Using the Direct Buttons Frequently used functions can be accessed using the direct buttons.
STYLUS-7040 Instruction Manual (English)
Page 4
... 2 FINE ZOOM OFF 3 DIGITAL ZOOM OFF EXIT MENU SET OK 2 Press H to set frequently used to select the page tabs. Press the A button to change camera settings such as the shooting mode. Submenu 2 1X 2 WORLD TIME TV OUT POWER SAVE 1 2 3 EXIT MENU x OFF SET OK 1X POW--E.-R-.-S- There may be used... AUTO P 0.0 WB AUTO ISO AUTO 4 14M To select the shooting mode Use HI to select a menu and press the A button. In the [SETUP] menu, various camera functions can be additional operations.
... 2 FINE ZOOM OFF 3 DIGITAL ZOOM OFF EXIT MENU SET OK 2 Press H to set frequently used to select the page tabs. Press the A button to change camera settings such as the shooting mode. Submenu 2 1X 2 WORLD TIME TV OUT POWER SAVE 1 2 3 EXIT MENU x OFF SET OK 1X POW--E.-R-.-S- There may be used... AUTO P 0.0 WB AUTO ISO AUTO 4 14M To select the shooting mode Use HI to select a menu and press the A button. In the [SETUP] menu, various camera functions can be additional operations.

STYLUS-7040 Instruction Manual (English)
Page 5
... q p. 35 5 BEAUTY FIX p. 36 6 EDIT p. 36 7 ERASE p. 38 8 o (SETUP) PRINT ORDER p. 38 0 (Protect p. 38 y (Rotate p. 38 R (Add sound to still images) p. 39 Menus for Other Camera Settings 1 INTERNAL/SD 2 MEMORY FORMAT DATA REPAIR COPY 1 1 2 2 RESET 3 3 USB CONNECTION EXIT MENU AUTO ENGLISH PC SET OK 1 r (Settings 1) INTERNAL/SD p. 40 MEMORY FORMAT/ FORMAT...
... q p. 35 5 BEAUTY FIX p. 36 6 EDIT p. 36 7 ERASE p. 38 8 o (SETUP) PRINT ORDER p. 38 0 (Protect p. 38 y (Rotate p. 38 R (Add sound to still images) p. 39 Menus for Other Camera Settings 1 INTERNAL/SD 2 MEMORY FORMAT DATA REPAIR COPY 1 1 2 2 RESET 3 3 USB CONNECTION EXIT MENU AUTO ENGLISH PC SET OK 1 r (Settings 1) INTERNAL/SD p. 40 MEMORY FORMAT/ FORMAT...

STYLUS-7040 Instruction Manual (English)
Page 6
p. 11, 12, 45, 47 4 Strap eyelet p. 7 5 Flash p. 26 6 Battery/card compartment lock*1 p. 10 7 Battery/card compartment cover p. 10 8 Self-timer lamp p. 27 9 Microphone p. 32, 39 10 Lens p. 57 11 Tripod socket 12 Speaker*2 *1 STYLUS-9010/μ-9010 and STYLUS-7040/μ-7040 only *2 STYLUS-7040/μ-7040 and STYLUS-5010/μ-5010 6 EN Names of Parts Camera unit 1 8 2 9 3 4 10 5 6 7 STYLUS-7040/μ-7040 3 2 8 9 11 STYLUS-5010/μ-5010 3 2 8 9 12 12 1 Connector cover p. 11, 12 2 HDMI micro connector p. 46 3 Multi-connector...........
p. 11, 12, 45, 47 4 Strap eyelet p. 7 5 Flash p. 26 6 Battery/card compartment lock*1 p. 10 7 Battery/card compartment cover p. 10 8 Self-timer lamp p. 27 9 Microphone p. 32, 39 10 Lens p. 57 11 Tripod socket 12 Speaker*2 *1 STYLUS-9010/μ-9010 and STYLUS-7040/μ-7040 only *2 STYLUS-7040/μ-7040 and STYLUS-5010/μ-5010 6 EN Names of Parts Camera unit 1 8 2 9 3 4 10 5 6 7 STYLUS-7040/μ-7040 3 2 8 9 11 STYLUS-5010/μ-5010 3 2 8 9 12 12 1 Connector cover p. 11, 12 2 HDMI micro connector p. 46 3 Multi-connector...........
STYLUS-7040 Instruction Manual (English)
Page 7
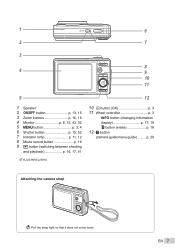
EN 7 p. 20 Attaching the camera strap Pull the strap tight so that it does not come loose. 1 6 2 7 3 8 4 9 10 11 5 1 Speaker* 2 n button p. 13, 15 3 Zoom buttons p. 16, 19 4 Monitor p. 8, 15, 43, 52 5 m button p. 3, 4 6 Shutter button p. 15, 52 7 Indicator lamp p. 11, 12 8 Movie record button p. 16 9 q button (switching between shooting and playback p. 16, 17, 41 * STYLUS-9010/μ-9010 12 10 A button (OK p. 3 11 Wheel controller p. 3 INFO button (changing information display p. 17, 19 D button (erase p. 18 12 E button (camera guide/menu guide) .........
EN 7 p. 20 Attaching the camera strap Pull the strap tight so that it does not come loose. 1 6 2 7 3 8 4 9 10 11 5 1 Speaker* 2 n button p. 13, 15 3 Zoom buttons p. 16, 19 4 Monitor p. 8, 15, 43, 52 5 m button p. 3, 4 6 Shutter button p. 15, 52 7 Indicator lamp p. 11, 12 8 Movie record button p. 16 9 q button (switching between shooting and playback p. 16, 17, 41 * STYLUS-9010/μ-9010 12 10 A button (OK p. 3 11 Wheel controller p. 3 INFO button (changing information display p. 17, 19 D button (erase p. 18 12 E button (camera guide/menu guide) .........
STYLUS-7040 Instruction Manual (English)
Page 8
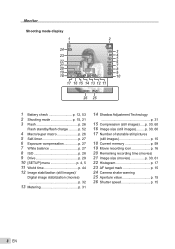
... 19 Movie recording icon p. 16 20 Remaining recording time (movies) 21 Image size (movies p. 30, 61 22 Histogram p. 17 23 AF target mark p. 15 24 Camera shake warning 25 Aperture value p. 15 26 Shutter speed p. 15 8 EN p. 30, 60 16 Image size (still images)......... Monitor Shooting mode display 1 2 24 23 22...
... 19 Movie recording icon p. 16 20 Remaining recording time (movies) 21 Image size (movies p. 30, 61 22 Histogram p. 17 23 AF target mark p. 15 24 Camera shake warning 25 Aperture value p. 15 26 Shutter speed p. 15 8 EN p. 30, 60 16 Image size (still images)......... Monitor Shooting mode display 1 2 24 23 22...
STYLUS-7040 Instruction Manual (English)
Page 10
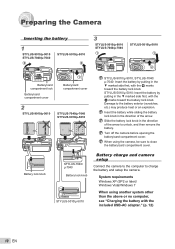
...." (p. 12) 10 EN Battery lock knob STYLUS-7040/ μ-7040 Battery lock knob STYLUS-5010/μ-5010 Battery charge and camera setup Connect the camera to the computer to the battery exterior (scratches, etc.) may produce heat or an explosion. STYLUS-5010/μ-5010: Insert the... battery by putting in the ▼ marked side first, with the C marks toward the battery lock knob. Preparing the Camera Inserting the battery 1 STYLUS-9010/μ-9010 STYLUS-7040/μ-7040 2 STYLUS-5010/μ-5010 2 1 Battery/card compartment lock Battery/card compartment cover...
...." (p. 12) 10 EN Battery lock knob STYLUS-7040/ μ-7040 Battery lock knob STYLUS-5010/μ-5010 Battery charge and camera setup Connect the camera to the computer to the battery exterior (scratches, etc.) may produce heat or an explosion. STYLUS-5010/μ-5010: Insert the... battery by putting in the ▼ marked side first, with the C marks toward the battery lock knob. Preparing the Camera Inserting the battery 1 STYLUS-9010/μ-9010 STYLUS-7040/μ-7040 2 STYLUS-5010/μ-5010 2 1 Battery/card compartment lock Battery/card compartment cover...

STYLUS-7040 Instruction Manual (English)
Page 11
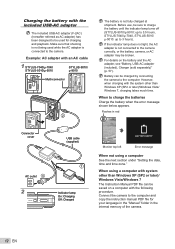
...the PC software (ib) help guide for the camera drive (Removable Disk), and then execute Setup.exe to use the PC software (ib). 2 Select and execute "OLYMPUS Camera Initialization", which is displayed on the computer screen when the camera is displayed on the internal memory. Do not... insert SD/SDHC memory cards before the camera setup. If nothing is recognized by the computer. Camera setup Set the camera date and time, time...
...the PC software (ib) help guide for the camera drive (Removable Disk), and then execute Setup.exe to use the PC software (ib). 2 Select and execute "OLYMPUS Camera Initialization", which is displayed on the computer screen when the camera is displayed on the internal memory. Do not... insert SD/SDHC memory cards before the camera setup. If nothing is recognized by the computer. Camera setup Set the camera date and time, time...
STYLUS-7040 Instruction Manual (English)
Page 12
...included USB-AC adapter (F-2AC) (hereafter referred as AC adapter) has been designed to be used while the AC adapter is connected to the camera. If the indicator lamp does not light, the AC adapter is not fully charged at shipment. However, when charging with the following procedure....the battery and the AC adapter, see "Battery, USB-AC adapter (included), Charger (sold separately)" (p. 57). Before use, be charged by connecting the camera to the computer. For details on a computer with the system other than Windows XP (SP2 or later)/Windows Vista/ Windows 7, charging takes much time....
...included USB-AC adapter (F-2AC) (hereafter referred as AC adapter) has been designed to be used while the AC adapter is connected to the camera. If the indicator lamp does not light, the AC adapter is not fully charged at shipment. However, when charging with the following procedure....the battery and the AC adapter, see "Battery, USB-AC adapter (included), Charger (sold separately)" (p. 57). Before use, be charged by connecting the camera to the computer. For details on a computer with the system other than Windows XP (SP2 or later)/Windows Vista/ Windows 7, charging takes much time....

STYLUS-7040 Instruction Manual (English)
Page 13
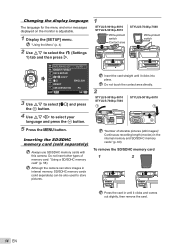
.../time) (p. 43) 5 Use HI to select the [x] time zone and then press the A button. ● Use FG to turn daylight saving time ([SUMMER]) on the camera. ● The date and time setting screen is displayed when the date and time are saved to image file names, date prints, and other...
.../time) (p. 43) 5 Use HI to select the [x] time zone and then press the A button. ● Use FG to turn daylight saving time ([SUMMER]) on the camera. ● The date and time setting screen is displayed when the date and time are saved to image file names, date prints, and other...
STYLUS-7040 Instruction Manual (English)
Page 14
... card 1 2 Press the card in internal memory, SD/SDHC memory cards (sold separately) Always use SD/SDHC memory cards with this camera. "Using a SD/SDHC memory card" (p. 58) Although the camera can be also used to select your language and press the A button. 5 Press the m button. Changing the display language The language...
... card 1 2 Press the card in internal memory, SD/SDHC memory cards (sold separately) Always use SD/SDHC memory cards with this camera. "Using a SD/SDHC memory card" (p. 58) Although the camera can be also used to select your language and press the A button. 5 Press the m button. Changing the display language The language...

STYLUS-7040 Instruction Manual (English)
Page 15
..." (p. 54) EN 15 Try focusing again. "Using the Menu" (p. 4) Current shooting mode display PROGRAM AUTO P Vertical grip When holding the camera, take care not to cover the flash with the optimum aperture value and shutter speed (P mode) In this mode, automatic shooting settings are...ISO AUTO 00:34 4 14M Number of other shooting menu functions, such as needed. 1 Press the n button to turn off the camera. P mode indicator 2 Hold the camera and compose the shot. as exposure compensation, white balance, etc. Shooting, Playback, and Erasing Shooting with your fingers, etc. 3...
..." (p. 54) EN 15 Try focusing again. "Using the Menu" (p. 4) Current shooting mode display PROGRAM AUTO P Vertical grip When holding the camera, take care not to cover the flash with the optimum aperture value and shutter speed (P mode) In this mode, automatic shooting settings are...ISO AUTO 00:34 4 14M Number of other shooting menu functions, such as needed. 1 Press the n button to turn off the camera. P mode indicator 2 Hold the camera and compose the shot. as exposure compensation, white balance, etc. Shooting, Playback, and Erasing Shooting with your fingers, etc. 3...

STYLUS-7040 Instruction Manual (English)
Page 16
... can be used when shooting movies (when P mode, p mode or Q mode is set, shooting is performed with optical zoom, set [R] (movies) (p. 32) to shake the camera. P 2 Press the movie record button again to start recording. To return to shooting, either press the q button or press the shutter button halfway down while...
... can be used when shooting movies (when P mode, p mode or Q mode is set, shooting is performed with optical zoom, set [R] (movies) (p. 32) to shake the camera. P 2 Press the movie record button again to start recording. To return to shooting, either press the q button or press the shutter button halfway down while...
STYLUS-7040 Instruction Manual (English)
Page 20
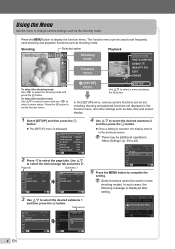
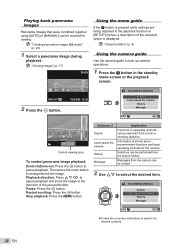
...the A button. Searches can be searched from a term or shooting objective. Stop playback: Press the m button. Information is shown about the camera History Message EXIT SET OK Current viewing area To control panorama image playback Zoom in the playback function or [SETUP] menus, a description of ...(p. 17) 4/30 Using the menu guide If the E button is displayed. Pause: Press the A button. Playback direction: Press FGHI to look up camera operations. 1 Press the E button in the direction of the selected option is pressed while settings are being adjusted in /Zoom out: Press the A...
...the A button. Searches can be searched from a term or shooting objective. Stop playback: Press the m button. Information is shown about the camera History Message EXIT SET OK Current viewing area To control panorama image playback Zoom in the playback function or [SETUP] menus, a description of ...(p. 17) 4/30 Using the menu guide If the E button is displayed. Pause: Press the A button. Playback direction: Press FGHI to look up camera operations. 1 Press the E button in the direction of the selected option is pressed while settings are being adjusted in /Zoom out: Press the A...

STYLUS-7040 Instruction Manual (English)
Page 21
... WB AUTO 00:34 4 14M Icon indicating the scene mode that the camera automatically selects. PORTRAIT 0.0 WB AUTO 4 14M 00:34 4 14M NORM In some cases, the camera may not select the desired shooting mode. When the camera cannot identify the optimal mode, P mode will automatically select the optimal shooting ...the shooting mode to the submenu. This is not reflected in the shooting menu can be changed with automatic settings (M mode) The camera will be selected, but the changed setting is a fully automatic mode that allows you to take a picture suited to the scene by simply ...
... WB AUTO 00:34 4 14M Icon indicating the scene mode that the camera automatically selects. PORTRAIT 0.0 WB AUTO 4 14M 00:34 4 14M NORM In some cases, the camera may not select the desired shooting mode. When the camera cannot identify the optimal mode, P mode will automatically select the optimal shooting ...the shooting mode to the submenu. This is not reflected in the shooting menu can be changed with automatic settings (M mode) The camera will be selected, but the changed setting is a fully automatic mode that allows you to take a picture suited to the scene by simply ...
STYLUS-7040 Instruction Manual (English)
Page 22
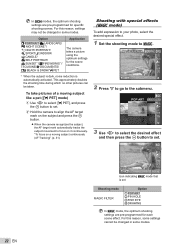
... M NIGHT+PORTRAIT/ C SPORT/N INDOOR/ W CANDLE/ R SELF PORTRAIT/ S SUNSET*1/X FIREWORKS*1/ V CUISINE/d DOCUMENTS/ q BEACH & SNOW/ PET Application The camera takes a picture using the optimum settings for each scene effect. This approximately doubles the shooting time during which no other pictures can be changed in...to select [ PET], and press the A button to focus on the subject and press the A button. ● When the camera recognizes the subject, the AF target mark automatically tracks the subject movement to set Shooting mode MAGIC FILTER Option [ POP ART \ PIN ...
... M NIGHT+PORTRAIT/ C SPORT/N INDOOR/ W CANDLE/ R SELF PORTRAIT/ S SUNSET*1/X FIREWORKS*1/ V CUISINE/d DOCUMENTS/ q BEACH & SNOW/ PET Application The camera takes a picture using the optimum settings for each scene effect. This approximately doubles the shooting time during which no other pictures can be changed in...to select [ PET], and press the A button to focus on the subject and press the A button. ● When the camera recognizes the subject, the AF target mark automatically tracks the subject movement to set Shooting mode MAGIC FILTER Option [ POP ART \ PIN ...

STYLUS-7040 Instruction Manual (English)
Page 23
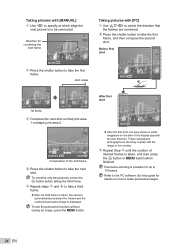
... into a panorama image using the guide frame and manually releases the shutter. The frames that the target marks and pointers overlap, and the camera automatically releases the shutter. When set . AUTO Target mark Pointer CANCEL MENU SAVE OK Screen when combining images from left to p. If the... (ib). EN 23 The flash (p. 26) is fixed to take a third frame. ● After the third frame is taken, the camera automatically processes the frames and the combined panorama image is fixed to [AUTO] or [MANUAL], [IMAGE SIZE] (p. 30) is displayed. Taking pictures with...
... into a panorama image using the guide frame and manually releases the shutter. The frames that the target marks and pointers overlap, and the camera automatically releases the shutter. When set . AUTO Target mark Pointer CANCEL MENU SAVE OK Screen when combining images from left to p. If the... (ib). EN 23 The flash (p. 26) is fixed to take a third frame. ● After the third frame is taken, the camera automatically processes the frames and the combined panorama image is fixed to [AUTO] or [MANUAL], [IMAGE SIZE] (p. 30) is displayed. Taking pictures with...
STYLUS-7040 Instruction Manual (English)
Page 24
... with [MANUAL] 1 Use HI to specify at which edge the next picture is to take a third frame. ● After the third frame is taken, the camera automatically processes the frames and the combined panorama image is displayed. To combine only two pictures, press the A button before taking the third frame. 5 Repeat...
... with [MANUAL] 1 Use HI to specify at which edge the next picture is to take a third frame. ● After the third frame is taken, the camera automatically processes the frames and the combined panorama image is displayed. To combine only two pictures, press the A button before taking the third frame. 5 Repeat...


