
PrintSuperVision Configuration Guide
Page 4
...(Optional Link 55 Supplies Ordering Calendar 56 Reporting 57 Available Reports 57 Selecting Report Attributes 57 Toner Changes Report 58 Generating a Toner Changes Report 58 Scheduling a Toner Changes Report 59 Schedule Log Report 60 Supplies Usage Report 61 Printed Pages Report 62 Color/...69 Quickly Access a Group of Devices 69 Changing the Device Properties Displayed 70 Searching for a Device 72 Changing Languages 72 Downloading Oki Drivers 73 Print to Remote Locations 74 Creating a Maintenance Log / Managing Supplies Inventory 75 Viewing a Login Log 76 Clearing (Deleting...
...(Optional Link 55 Supplies Ordering Calendar 56 Reporting 57 Available Reports 57 Selecting Report Attributes 57 Toner Changes Report 58 Generating a Toner Changes Report 58 Scheduling a Toner Changes Report 59 Schedule Log Report 60 Supplies Usage Report 61 Printed Pages Report 62 Color/...69 Quickly Access a Group of Devices 69 Changing the Device Properties Displayed 70 Searching for a Device 72 Changing Languages 72 Downloading Oki Drivers 73 Print to Remote Locations 74 Creating a Maintenance Log / Managing Supplies Inventory 75 Viewing a Login Log 76 Clearing (Deleting...

PrintSuperVision Configuration Guide
Page 57
... dates, indicate pages printed and export device properties. Reports available depend on the PSV edition installed and user access rights. Available Reports • Toner Changes Report (see page 58) • Schedule Log Report (see page 60) • Supplied Usage Report (see page 61) • Printed Pages Report (see page ...
... dates, indicate pages printed and export device properties. Reports available depend on the PSV edition installed and user access rights. Available Reports • Toner Changes Report (see page 58) • Schedule Log Report (see page 60) • Supplied Usage Report (see page 61) • Printed Pages Report (see page ...

PrintSuperVision Configuration Guide
Page 58
... Professional Edition. This report is not available in identifying wasted toner as a result of changing the cartridge too soon. Toner Changes Report The "Toner Changes" Report shows the dates of the last toner cartridge replacement for a group of devices and indicates if there was any toner remaining at the bottom of replacement. Click the Save...
... Professional Edition. This report is not available in identifying wasted toner as a result of changing the cartridge too soon. Toner Changes Report The "Toner Changes" Report shows the dates of the last toner cartridge replacement for a group of devices and indicates if there was any toner remaining at the bottom of replacement. Click the Save...

PrintSuperVision Configuration Guide
Page 59
... format and the method to generate the report. Indicate either HTML or Excel format and click Show to display results; Scheduling a Toner Changes Report A Toner Changes report can help you pinpoint toner remaining at on . Enter a range of devices to make the data more readable. 3. Additional details for... toner replacement are available by various table sizes to report on a particular date. Select a group of dates or click on the...
... format and the method to generate the report. Indicate either HTML or Excel format and click Show to display results; Scheduling a Toner Changes Report A Toner Changes report can help you pinpoint toner remaining at on . Enter a range of devices to make the data more readable. 3. Additional details for... toner replacement are available by various table sizes to report on a particular date. Select a group of dates or click on the...

PrintSuperVision Configuration Guide
Page 60
Enter a date range and select the desired activity. 60 • Reporting Click Schedule Logs. 2. The toner changes report will be generated and sent to be generated and sent, indicate email recipients and click Save. 2. Select a starting date and time, select a recurring interval for the report to the recipient on the dates and times indicated. Schedule Log Report The Schedule Log Report provides an activity status log. 1.
Enter a date range and select the desired activity. 60 • Reporting Click Schedule Logs. 2. The toner changes report will be generated and sent to be generated and sent, indicate email recipients and click Save. 2. Select a starting date and time, select a recurring interval for the report to the recipient on the dates and times indicated. Schedule Log Report The Schedule Log Report provides an activity status log. 1.
PrintSuperVision Configuration Guide
Page 61
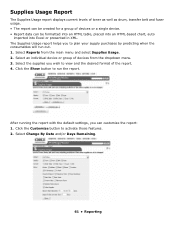
... out. 1. Click the Show button to view and the desired format of the report. 4. Supplies Usage Report The Supplies Usage report displays current levels of toner as well as drum, transfer belt and fuser usage. • The report can be formatted into an HTML table, placed into an HTML-based chart...
... out. 1. Click the Show button to view and the desired format of the report. 4. Supplies Usage Report The Supplies Usage report displays current levels of toner as well as drum, transfer belt and fuser usage. • The report can be formatted into an HTML table, placed into an HTML-based chart...

PrintSuperVision Configuration Guide
Page 69
... displays only the devices that you when a device needs attention, or routinely deliver usage reports. The information icon indicates an event has occurred, such as toner or drum replacement, cassette drawer is open or the device is displayed. But there will notice after clicking Refresh, a teal color moves from the main...
... displays only the devices that you when a device needs attention, or routinely deliver usage reports. The information icon indicates an event has occurred, such as toner or drum replacement, cassette drawer is open or the device is displayed. But there will notice after clicking Refresh, a teal color moves from the main...
Repack Procedure
Page 1
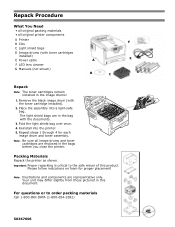
...F LED lens cleaner G Manuals (not shown) A B C F E D Repack Note: The toner cartridges remain installed in the image drums! 1. Important: Proper repacking is critical to order packing materials Call 1-800-OKI-DATA (1-800-654-3282) 58367606 Your unit may differ slightly from those pictured in the bags before...to the safe return of this document. Repack Procedure What You Need • all original packing materials • all image drums and toner cartridges are in the bag with the documents. 3. The light shield bags are enclosed in this product. Note: Be sure all original...
...F LED lens cleaner G Manuals (not shown) A B C F E D Repack Note: The toner cartridges remain installed in the image drums! 1. Important: Proper repacking is critical to order packing materials Call 1-800-OKI-DATA (1-800-654-3282) 58367606 Your unit may differ slightly from those pictured in the bags before...to the safe return of this document. Repack Procedure What You Need • all original packing materials • all image drums and toner cartridges are in the bag with the documents. 3. The light shield bags are enclosed in this product. Note: Be sure all original...

Setup Guide (English, Fran栩s, Espa?ol, Portugu鱩
Page 3
Safety, Warranty, Regulatory Information booklet Note: Drum/Toner Cartridge is shipped) 3 Power Cable 4 CD-ROM 5 This Setup Guide; With consumables installed the printer weighs C710n - 61 lbs. (28 kg) C710dn - 68 lbs. (31 kg) C710dtn - 81 lbs. (37 kg) 28kg 61lbs. The printer is contained in case...the Printer Lift printer and place it on the selected location. Check Package Contents 1 Printer 2 Black light-shield bags (to protect drum/toner cartridge if unit is inside the printer. Note: We recommend you need to lift the printer alone. Never attempt to ship or transport ...
Safety, Warranty, Regulatory Information booklet Note: Drum/Toner Cartridge is shipped) 3 Power Cable 4 CD-ROM 5 This Setup Guide; With consumables installed the printer weighs C710n - 61 lbs. (28 kg) C710dn - 68 lbs. (31 kg) C710dtn - 81 lbs. (37 kg) 28kg 61lbs. The printer is contained in case...the Printer Lift printer and place it on the selected location. Check Package Contents 1 Printer 2 Black light-shield bags (to protect drum/toner cartridge if unit is inside the printer. Note: We recommend you need to lift the printer alone. Never attempt to ship or transport ...
Setup Guide (English, Fran栩s, Espa?ol, Portugu鱩
Page 4
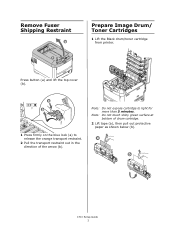
Note: Do not touch shiny green surface at bottom of the arrow (b). Press button (a) and lift the top cover (b). Note: Do not expose cartridge to release the orange transport restraint. 2 Pull the transport restraint out in the direction of drum cartridge. 2 Lift tape (a), then pull out protective paper as shown below (b). Remove Fuser Shipping Restraint b a Prepare Image Drum/ Toner Cartridges 1 Lift the Black drum/toner cartridge from printer. a b 1 Press firmly on the blue lock (a) to light for more than 5 minutes. a b C710 Setup Guide 2
Note: Do not touch shiny green surface at bottom of the arrow (b). Press button (a) and lift the top cover (b). Note: Do not expose cartridge to release the orange transport restraint. 2 Pull the transport restraint out in the direction of drum cartridge. 2 Lift tape (a), then pull out protective paper as shown below (b). Remove Fuser Shipping Restraint b a Prepare Image Drum/ Toner Cartridges 1 Lift the Black drum/toner cartridge from printer. a b 1 Press firmly on the blue lock (a) to light for more than 5 minutes. a b C710 Setup Guide 2

Setup Guide (English, Fran栩s, Espa?ol, Portugu鱩
Page 5
a c b 4 Lock toner cartridge with colored lever. 3 Fan the paper to be loaded then tap the edges of the stack on a flat surface to paper size. Load Paper 1 Pull out the paper tray (a). 2 Set guides (b,c) to make it flush. 5 Repeat steps 1-4 for remaining drum/ toner cartridges. 6 Close the top cover. C710 Setup Guide 3 3 Reinstall drum/toner cartridge in printer.
a c b 4 Lock toner cartridge with colored lever. 3 Fan the paper to be loaded then tap the edges of the stack on a flat surface to paper size. Load Paper 1 Pull out the paper tray (a). 2 Set guides (b,c) to make it flush. 5 Repeat steps 1-4 for remaining drum/ toner cartridges. 6 Close the top cover. C710 Setup Guide 3 3 Reinstall drum/toner cartridge in printer.
C710 User's Guide, English
Page 4
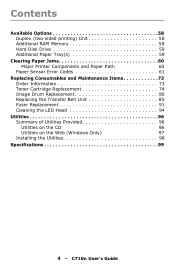
... Clearing Paper Jams 60 Major Printer Components and Paper Path 60 Paper Sensor Error Codes 61 Replacing Consumables and Maintenance Items 73 Order Information 73 Toner Cartridge Replacement 74 Image Drum Replacement 80 Replacing the Transfer Belt Unit 85 Fuser Replacement 91 Cleaning the LED Head 94 Utilities 96 Summary of...
... Clearing Paper Jams 60 Major Printer Components and Paper Path 60 Paper Sensor Error Codes 61 Replacing Consumables and Maintenance Items 73 Order Information 73 Toner Cartridge Replacement 74 Image Drum Replacement 80 Replacing the Transfer Belt Unit 85 Fuser Replacement 91 Cleaning the LED Head 94 Utilities 96 Summary of...
C710 User's Guide, English
Page 8
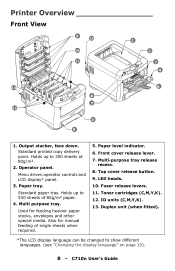
Printer Overview Front View 9 13 10 1 2 11 7 4 13 6 8 7 12 3 5 1. Standard paper tray. Also for feeding heavier paper stocks, envelopes and other special media. Toner cartridges (C,M,Y,K). 12. Duplex unit (when fitted). *The LCD display language can be changed to 530 sheets of single sheets when required. 5. Multi purpose tray. Used ...
Printer Overview Front View 9 13 10 1 2 11 7 4 13 6 8 7 12 3 5 1. Standard paper tray. Also for feeding heavier paper stocks, envelopes and other special media. Toner cartridges (C,M,Y,K). 12. Duplex unit (when fitted). *The LCD display language can be changed to 530 sheets of single sheets when required. 5. Multi purpose tray. Used ...
C710 User's Guide, English
Page 22
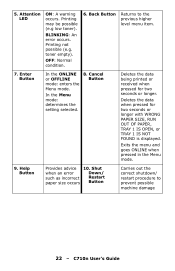
... the data when pressed for two seconds or longer. Printing not possible (e.g. Help Button Provides advice 10. OFF: Normal condition. 6. Printing may be possible (e.g low toner). BLINKING: An error occurs. 5. Attention LED ON: A warning occurs...
... the data when pressed for two seconds or longer. Printing not possible (e.g. Help Button Provides advice 10. OFF: Normal condition. 6. Printing may be possible (e.g low toner). BLINKING: An error occurs. 5. Attention LED ON: A warning occurs...
C710 User's Guide, English
Page 25
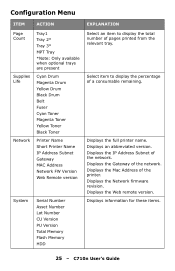
... 3* MPT Tray *Note: Only available when optional trays are present Supplies Life Cyan Drum Magenta Drum Yellow Drum Black Drum Belt Fuser Cyan Toner Magenta Toner Yellow Toner Black Toner Network Printer Name Short Printer Name IP Address Subnet Gateway MAC Address Network FW Version Web Remote version System Serial Number Asset Number Lot...
... 3* MPT Tray *Note: Only available when optional trays are present Supplies Life Cyan Drum Magenta Drum Yellow Drum Black Drum Belt Fuser Cyan Toner Magenta Toner Yellow Toner Black Toner Network Printer Name Short Printer Name IP Address Subnet Gateway MAC Address Network FW Version Web Remote version System Serial Number Asset Number Lot...
C710 User's Guide, English
Page 31
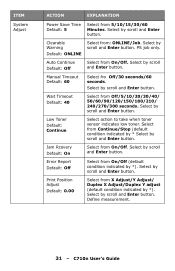
.../120/150/180/210/ 240/270/300 seconds. Wait Timeout Default: 40 Select from : ONLINE/Job. C710n User's Guide Low Toner Default: Continue Select action to take when toner sensor indicates low toner. Select by scroll and Enter button. Select by scroll and Enter button. Select by scroll and Enter button. PS job...
.../120/150/180/210/ 240/270/300 seconds. Wait Timeout Default: 40 Select from : ONLINE/Job. C710n User's Guide Low Toner Default: Continue Select action to take when toner sensor indicates low toner. Select by scroll and Enter button. Select by scroll and Enter button. Select by scroll and Enter button. PS job...
C710 User's Guide, English
Page 37
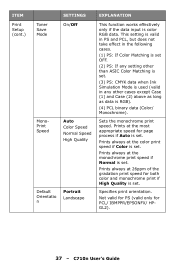
... if Auto is set . Not valid for PS (valid only for both color and monochrome print if High Quality is set. ITEM Print Setup (cont.) Toner Save Mode MonoPrint Speed Default Orientatio n SETTINGS On/Off Auto Color Speed Normal Speed High Quality Portrait Landscape EXPLANATION This function works effectively only if...
... if Auto is set . Not valid for PS (valid only for both color and monochrome print if High Quality is set. ITEM Print Setup (cont.) Toner Save Mode MonoPrint Speed Default Orientatio n SETTINGS On/Off Auto Color Speed Normal Speed High Quality Portrait Landscape EXPLANATION This function works effectively only if...
C710 User's Guide, English
Page 45
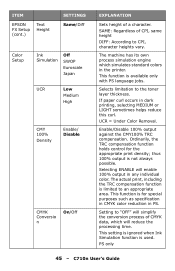
... not always possible. Setting to an appropriate area. C710n User's Guide UCR = Under Color Removal. SAME: Regardless of CPI, same height DIFF: According to the toner layer thickness. If paper curl occurs in any individual color. Selecting ENABLE will enable 100% output in dark printing, selecting MEDIUM or LIGHT sometimes helps...
... not always possible. Setting to an appropriate area. C710n User's Guide UCR = Under Color Removal. SAME: Regardless of CPI, same height DIFF: According to the toner layer thickness. If paper curl occurs in any individual color. Selecting ENABLE will enable 100% output in dark printing, selecting MEDIUM or LIGHT sometimes helps...
C710 User's Guide, English
Page 48
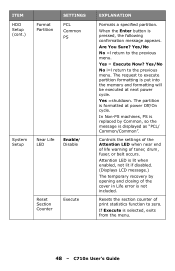
... following confirmation message appears. C710n User's Guide Yes =shutdown. Yes/No No i=l return to the previous menu. Are You Sure? Resets the section counter of toner, drum, fuser, or belt occurs. ITEM HDD Setup (cont.) Format Partition SETTINGS PCL Common PS System Setup Near Life LED Enable/ Disable Reset Section Counter...
... following confirmation message appears. C710n User's Guide Yes =shutdown. Yes/No No i=l return to the previous menu. Are You Sure? Resets the section counter of toner, drum, fuser, or belt occurs. ITEM HDD Setup (cont.) Format Partition SETTINGS PCL Common PS System Setup Near Life LED Enable/ Disable Reset Section Counter...
C710 User's Guide, English
Page 62
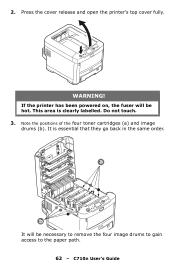
Press the cover release and open the printer's top cover fully. WARNING! This area is essential that they go back in the same order. Do not touch. 3. a b It will be necessary to remove the four image drums to gain access to the paper path. 62 - C710n User's Guide Note the positions of the four toner cartridges (a) and image drums (b). If the printer has been powered on, the fuser will be hot. It is clearly labelled. 2.
Press the cover release and open the printer's top cover fully. WARNING! This area is essential that they go back in the same order. Do not touch. 3. a b It will be necessary to remove the four image drums to gain access to the paper path. 62 - C710n User's Guide Note the positions of the four toner cartridges (a) and image drums (b). If the printer has been powered on, the fuser will be hot. It is clearly labelled. 2.


