B411 B431 Setup Guide (English, Fran栩s, Espa?ol, Portugu鱩
Page 4
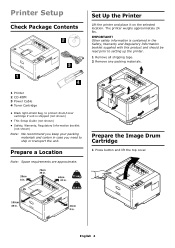
English 4 Prepare a Location Note: Space requirements are approximate. Prepare the Image Drum Cartridge 1 Press button and lift the top cover. The printer weighs approximately 24 lbs. Other safety information is contained in the Safety, Warranty ... printer. 1 Remove all shipping tape. 2 Remove any packing materials. 1 Printer 2 CD-ROM 3 Power Cable 4 Toner Cartridge • Black light-shield bag, to protect drum/toner cartridge if unit is shipped (not shown) • This Setup Guide (not shown) • Safety, Warranty, Regulatory Information booklet (not shown) Note: We recommend...
English 4 Prepare a Location Note: Space requirements are approximate. Prepare the Image Drum Cartridge 1 Press button and lift the top cover. The printer weighs approximately 24 lbs. Other safety information is contained in the Safety, Warranty ... printer. 1 Remove all shipping tape. 2 Remove any packing materials. 1 Printer 2 CD-ROM 3 Power Cable 4 Toner Cartridge • Black light-shield bag, to protect drum/toner cartridge if unit is shipped (not shown) • This Setup Guide (not shown) • Safety, Warranty, Regulatory Information booklet (not shown) Note: We recommend...
B411 B431 Setup Guide (English, Fran栩s, Espa?ol, Portugu鱩
Page 6
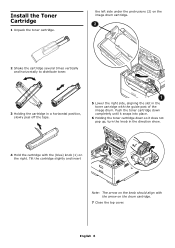
... cartridge down so it does not pop up, turn the knob in the toner cartridge with the guide post of the image drum. the left side under the protrusions (2) on the image drum cartridge. 2 Shake the cartridge several times vertically and horizontally to distribute toner. 3 Holding the cartridge in a horizontal position, slowly peel off...
... cartridge down so it does not pop up, turn the knob in the toner cartridge with the guide post of the image drum. the left side under the protrusions (2) on the image drum cartridge. 2 Shake the cartridge several times vertically and horizontally to distribute toner. 3 Holding the cartridge in a horizontal position, slowly peel off...
B411/B431 Safety/Warranty/Regulatory Guide
Page 3
... prevent possible risk of fire. There is a risk of moving these items so as measured in the User's Guide. Do not throw toner cartridges or image drum cartridges into the ventilation holes or operate this range could result in order to prevent any risk of fire. If the product is replaced by...
... prevent possible risk of fire. There is a risk of moving these items so as measured in the User's Guide. Do not throw toner cartridges or image drum cartridges into the ventilation holes or operate this range could result in order to prevent any risk of fire. If the product is replaced by...
B411/B431 Safety/Warranty/Regulatory Guide
Page 4
...by contacting the Oki Data dealer from date of the warranted item. THERE ARE NO EXPRESS WARRANTIES OTHER THAN THOSE ON THE FACE HEREOF AND DESCRIBED ABOVE. Overnight Exchange is limited to , the terms of the 4 - If you ship the Product, remove the image drums and toner cartridges.... The exchange printer will be performed under this information. Call 1-800-654-3282 (1-800-OKI-DATA) for work to you would like to consumable items or supplies, such as toner cartridges, image drums, ribbon cartridges, fuses, etc. This Limited Warranty shall not apply to normal wear and ...
...by contacting the Oki Data dealer from date of the warranted item. THERE ARE NO EXPRESS WARRANTIES OTHER THAN THOSE ON THE FACE HEREOF AND DESCRIBED ABOVE. Overnight Exchange is limited to , the terms of the 4 - If you ship the Product, remove the image drums and toner cartridges.... The exchange printer will be performed under this information. Call 1-800-654-3282 (1-800-OKI-DATA) for work to you would like to consumable items or supplies, such as toner cartridges, image drums, ribbon cartridges, fuses, etc. This Limited Warranty shall not apply to normal wear and ...
B411 B431 User Guide - Eng
Page 4
...project 87 Test printing the overlay 88 Defining overlays 89 Printing with PostScript overlays 90 Creating PCL Overlays 91 Creating the overlay image 91 Create and download macros 91 Test printing the macro 93 Defining overlays 93 Printing with PCL overlays 94 Consumables and ...details 96 Toner cartridge life 96 When to replace the toner cartridge 96 Replacing the toner cartridge 97 Image drum life 104 When to replace the image drum 104 Replacing the image drum 104 Generating a cleaning page 111 B411 111 B431 112 Cleaning the LED array 115 Troubleshooting 117 Status...
...project 87 Test printing the overlay 88 Defining overlays 89 Printing with PostScript overlays 90 Creating PCL Overlays 91 Creating the overlay image 91 Create and download macros 91 Test printing the macro 93 Defining overlays 93 Printing with PCL overlays 94 Consumables and ...details 96 Toner cartridge life 96 When to replace the toner cartridge 96 Replacing the toner cartridge 97 Image drum life 104 When to replace the image drum 104 Replacing the image drum 104 Generating a cleaning page 111 B411 111 B431 112 Cleaning the LED array 115 Troubleshooting 117 Status...
B411 B431 User Guide - Eng
Page 11
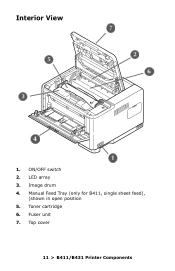
Interior View 1. Toner cartridge 6. Manual Feed Tray (only for B411, single sheet feed), (shown in open position 5. LED array 3. Image drum 4. Fuser unit 7. Top cover 11 > B411/B431 Printer Components ON/OFF switch 2.
Interior View 1. Toner cartridge 6. Manual Feed Tray (only for B411, single sheet feed), (shown in open position 5. LED array 3. Image drum 4. Fuser unit 7. Top cover 11 > B411/B431 Printer Components ON/OFF switch 2.
B411 B431 User Guide - Eng
Page 15
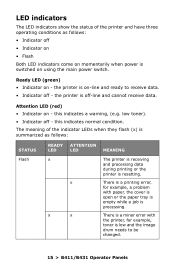
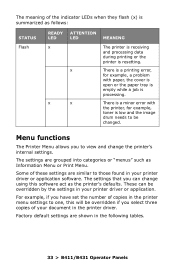
... LED (red) • Indicator on using the main power switch. this indicates normal condition. There is a printing error, for example, toner is low and the image drum needs to receive data. • Indicator off • Indicator on • Flash Both LED indicators come on momentarily when power is switched on - LED indicators...
... LED (red) • Indicator on using the main power switch. this indicates normal condition. There is a printing error, for example, toner is low and the image drum needs to receive data. • Indicator off • Indicator on • Flash Both LED indicators come on momentarily when power is switched on - LED indicators...
B411 B431 User Guide - Eng
Page 33
... or the printer is processing. Factory default settings are shown in the printer driver. There is a printing error, for example, toner is low and the image drum needs to those found in your document in the following tables. 33 > B411/B431 Operator Panels There is a minor error with the printer, for example...
... or the printer is processing. Factory default settings are shown in the printer driver. There is a printing error, for example, toner is low and the image drum needs to those found in your document in the following tables. 33 > B411/B431 Operator Panels There is a minor error with the printer, for example...
B411 B431 User Guide - Eng
Page 45
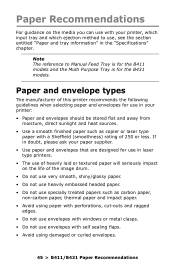
Paper Recommendations For guidance on the life of the image drum. • Do not use very smooth, shiny/glossy paper. • Do not use heavily embossed headed paper. • Do not use specially treated papers such ...
Paper Recommendations For guidance on the life of the image drum. • Do not use very smooth, shiny/glossy paper. • Do not use heavily embossed headed paper. • Do not use specially treated papers such ...
B411 B431 User Guide - Eng
Page 96
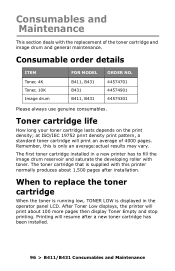
... a standard toner cartridge will print an average of the toner cartridge and image drum and general maintenance. The first toner cartridge installed in the operator panel LCD. When to fill the image drum reservoir and saturate the developing roller with the replacement of 4000 pages. Printing ... a new toner cartridge has been installed. 96 > B411/B431 Consumables and Maintenance Consumable order details ITEM Toner, 4K Toner, 10K Image drum FOR MODEL B411, B431 B431 B411, B431 ORDER NO. 44574701 44574901 44574301 Please always use genuine consumables. The toner cartridge that is...
... a standard toner cartridge will print an average of the toner cartridge and image drum and general maintenance. The first toner cartridge installed in the operator panel LCD. When to fill the image drum reservoir and saturate the developing roller with the replacement of 4000 pages. Printing ... a new toner cartridge has been installed. 96 > B411/B431 Consumables and Maintenance Consumable order details ITEM Toner, 4K Toner, 10K Image drum FOR MODEL B411, B431 B431 B411, B431 ORDER NO. 44574701 44574901 44574301 Please always use genuine consumables. The toner cartridge that is...
B411 B431 User Guide - Eng
Page 100
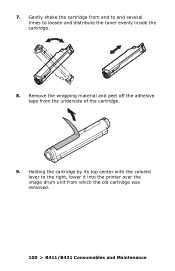
Remove the wrapping material and peel off the adhesive tape from which the old cartridge was removed. 100 > B411/B431 Consumables and Maintenance Holding the cartridge by its top center with the colored lever to loosen and distribute the toner evenly inside the cartridge. 8. Gently shake the cartridge from end to end several times to the right, lower it into the printer over the image drum unit from the underside of the cartridge. 9. 7.
Remove the wrapping material and peel off the adhesive tape from which the old cartridge was removed. 100 > B411/B431 Consumables and Maintenance Holding the cartridge by its top center with the colored lever to loosen and distribute the toner evenly inside the cartridge. 8. Gently shake the cartridge from end to end several times to the right, lower it into the printer over the image drum unit from the underside of the cartridge. 9. 7.

B411 B431 User Guide - Eng
Page 101
Align it against the pins (1) on the drum unit. Insert the left end of the cartridge down into the image drum unit. Then lower the right end of the cartridge into the image drum unit (2). 101 > B411/B431 Consumables and Maintenance 10.
Align it against the pins (1) on the drum unit. Insert the left end of the cartridge down into the image drum unit. Then lower the right end of the cartridge into the image drum unit (2). 101 > B411/B431 Consumables and Maintenance 10.
B411 B431 User Guide - Eng
Page 102
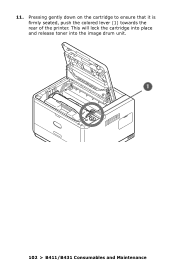
This will lock the cartridge into place and release toner into the image drum unit. 102 > B411/B431 Consumables and Maintenance Pressing gently down on the cartridge to ensure that it is firmly seated, push the colored lever (1) towards the rear of the printer. 11.
This will lock the cartridge into place and release toner into the image drum unit. 102 > B411/B431 Consumables and Maintenance Pressing gently down on the cartridge to ensure that it is firmly seated, push the colored lever (1) towards the rear of the printer. 11.

B411 B431 User Guide - Eng
Page 104
.../B431 Consumables and Maintenance WARNING > Never expose the image drum to deteriorate. NOTE > It is displayed in the operator panel LCD. When to replace the image drum When the drum reaches 90% of its life, a CHANGE DRUM message is recommended that you change the toner cartridge ... a live machine's interior can cause an explosion and you change the image drum. > The B431 model has been illustrated below. It can cause electric shock. Replacing the image drum. Image drum life The life of an image drum depends on a number of factors, including temperature and humidity, the type...
.../B431 Consumables and Maintenance WARNING > Never expose the image drum to deteriorate. NOTE > It is displayed in the operator panel LCD. When to replace the image drum When the drum reaches 90% of its life, a CHANGE DRUM message is recommended that you change the toner cartridge ... a live machine's interior can cause an explosion and you change the image drum. > The B431 model has been illustrated below. It can cause electric shock. Replacing the image drum. Image drum life The life of an image drum depends on a number of factors, including temperature and humidity, the type...
B411 B431 User Guide - Eng
Page 106
... needs to be out of paper to prevent toner from marking your furniture and to keep it away from light. The green image drum surface at the base of the printer. 3. Holding it to direct sunlight or very bright room lighting. 106 > B411/B431 Consumables and Maintenance Put the ... cartridge inside a black plastic bag to avoid damaging the green drum surface. 2. Never expose the drum to normal room light for longer than 5 minutes. CAUTION! Do not touch it and do not expose it by its top centre, remove the used image drum and toner cartridge, out of the ID unit is very delicate...
... needs to be out of paper to prevent toner from marking your furniture and to keep it away from light. The green image drum surface at the base of the printer. 3. Holding it to direct sunlight or very bright room lighting. 106 > B411/B431 Consumables and Maintenance Put the ... cartridge inside a black plastic bag to avoid damaging the green drum surface. 2. Never expose the drum to normal room light for longer than 5 minutes. CAUTION! Do not touch it and do not expose it by its top centre, remove the used image drum and toner cartridge, out of the ID unit is very delicate...
B411 B431 User Guide - Eng
Page 107
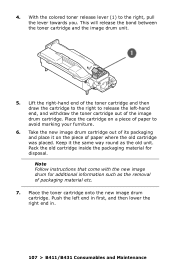
... in first, and then lower the right end in. 107 > B411/B431 Consumables and Maintenance Place the toner cartridge onto the new image drum cartridge. 4. Take the new image drum cartridge out of its packaging and place it the same way round as the removal of paper to the right, pull the lever... towards you. Note Follow instructions that come with the new image drum for disposal. Pack the old cartridge inside the packaging material for additional information such as the old unit. Push the left -hand end, and...
... in first, and then lower the right end in. 107 > B411/B431 Consumables and Maintenance Place the toner cartridge onto the new image drum cartridge. 4. Take the new image drum cartridge out of its packaging and place it the same way round as the removal of paper to the right, pull the lever... towards you. Note Follow instructions that come with the new image drum for disposal. Pack the old cartridge inside the packaging material for additional information such as the old unit. Push the left -hand end, and...
B411 B431 User Guide - Eng
Page 108
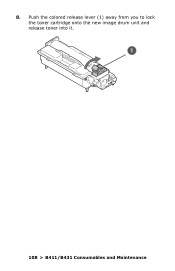
Push the colored release lever (1) away from you to lock the toner cartridge onto the new image drum unit and release toner into it. 108 > B411/B431 Consumables and Maintenance 8.
Push the colored release lever (1) away from you to lock the toner cartridge onto the new image drum unit and release toner into it. 108 > B411/B431 Consumables and Maintenance 8.
B411 B431 User Guide - Eng
Page 120
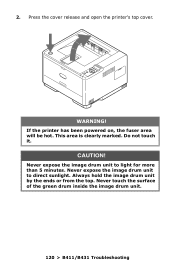
Do not touch it. Never expose the image drum unit to light for more than 5 minutes. This area is clearly marked. Press the cover release and open the printer's top cover. Always hold the image drum unit by the ends or from the top. Never expose the image drum unit to direct sunlight. Never touch the surface of the green drum inside the image drum unit. 120 > B411/B431 Troubleshooting WARNING! If the printer has been powered on, the fuser area will be hot. 2. CAUTION!
Do not touch it. Never expose the image drum unit to light for more than 5 minutes. This area is clearly marked. Press the cover release and open the printer's top cover. Always hold the image drum unit by the ends or from the top. Never expose the image drum unit to direct sunlight. Never touch the surface of the green drum inside the image drum unit. 120 > B411/B431 Troubleshooting WARNING! If the printer has been powered on, the fuser area will be hot. 2. CAUTION!

B411 B431 User Guide - Eng
Page 121
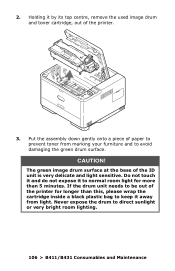
3. Carefully lift out the image drum, complete with the toner cartridge. Put the assembly down gently onto a piece of paper to prevent toner from marking your furniture and to touch or scratch the green drum surface. 4. Be careful not to avoid damaging the green drum surface, and cover. 121 > B411/B431 Troubleshooting
3. Carefully lift out the image drum, complete with the toner cartridge. Put the assembly down gently onto a piece of paper to prevent toner from marking your furniture and to touch or scratch the green drum surface. 4. Be careful not to avoid damaging the green drum surface, and cover. 121 > B411/B431 Troubleshooting
B411 B431 User Guide - Eng
Page 125
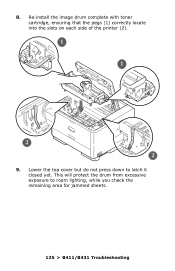
Lower the top cover but do not press down to room lighting, while you check the remaining area for jammed sheets. 125 > B411/B431 Troubleshooting 8. This will protect the drum from excessive exposure to latch it closed yet. Re-install the image drum complete with toner cartridge, ensuring that the pegs (1) correctly locate into the slots on each side of the printer (2). 9.
Lower the top cover but do not press down to room lighting, while you check the remaining area for jammed sheets. 125 > B411/B431 Troubleshooting 8. This will protect the drum from excessive exposure to latch it closed yet. Re-install the image drum complete with toner cartridge, ensuring that the pegs (1) correctly locate into the slots on each side of the printer (2). 9.


