PrintSuperVision Configuration Guide
Page 15
..., click Apply to the next setup module. 15 • Setup and Configuration If your settings. 9. Emails are sent without buffering once the connection is 25 and 456 or 587 if using the default setting. 3. Set to start and stop the PrintSuperVision Service from your organization uses these communication protocols. 4. First, enter the desired Email Server Address and SMTP server port (default port number is established • Method 3 - Test the email connection by clicking the Test button.
..., click Apply to the next setup module. 15 • Setup and Configuration If your settings. 9. Emails are sent without buffering once the connection is 25 and 456 or 587 if using the default setting. 3. Set to start and stop the PrintSuperVision Service from your organization uses these communication protocols. 4. First, enter the desired Email Server Address and SMTP server port (default port number is established • Method 3 - Test the email connection by clicking the Test button.
2nd Paper Tray Installation
Page 1
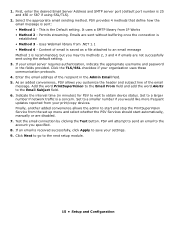
...Tray 2. (If you need help with Control Button: 6. Position the paper guides in place. © 2004 Oki Data Americas, Inc. Plug in your on the display. Press the Menu button one or more times until INFO. MENU appears on -line User's Guide. The MenuMap prints. b. 2nd Paper Tray Installation Instructions Oki PN-40834406 - 500 Sheet Second Paper Tray Install the Tray 1. Unpack the tray and remove the shipping materials. 2. Turn off -line. Attach the connection cable. 8. Load Paper 1. Press SELECT twice. a. Press and hold down the printer's manual feed tray...
...Tray 2. (If you need help with Control Button: 6. Position the paper guides in place. © 2004 Oki Data Americas, Inc. Plug in your on the display. Press the Menu button one or more times until INFO. MENU appears on -line User's Guide. The MenuMap prints. b. 2nd Paper Tray Installation Instructions Oki PN-40834406 - 500 Sheet Second Paper Tray Install the Tray 1. Unpack the tray and remove the shipping materials. 2. Turn off -line. Attach the connection cable. 8. Load Paper 1. Press SELECT twice. a. Press and hold down the printer's manual feed tray...
RAM Memory Expansion Options Installation Instructions
Page 1
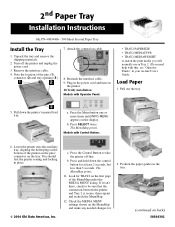
... cord and power cable, then turn on back) Oki Data Americas, Inc., 2000 Bishops Gate Blvd., Mt. Replace the access panel: a. Align the tabs at least 2 seconds, but no more that 5 seconds. The MenuMap Prints. (continued on the printer. 9. Note: The printer has only one slot in its packaging. 5. Press and release CONTROL. To avoid damage by static electricity or rough handling, keep the memory card in...
... cord and power cable, then turn on back) Oki Data Americas, Inc., 2000 Bishops Gate Blvd., Mt. Replace the access panel: a. Align the tabs at least 2 seconds, but no more that 5 seconds. The MenuMap Prints. (continued on the printer. 9. Note: The printer has only one slot in its packaging. 5. Press and release CONTROL. To avoid damage by static electricity or rough handling, keep the memory card in...
Guide: User's B4200/B4300
Page 17
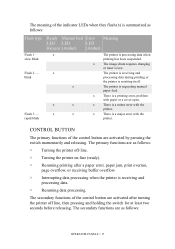
... the switch momentarily and releasing. The printer is a major error with the printer. The meaning of the indicator LEDs when they flash (x) is low. x The image drum requires changing or toner is summarized as follows: OPERATOR PANELS > 17 x There is processing data when printing has been suspended. rapid blink Ready Manual feed Error Meaning LED LED LED (Green) (Amber) (Amber) x x x x x x x The printer is a minor error with paper or a cover open. slow blink Flash 2 - x There is a printing error, problem...
... the switch momentarily and releasing. The printer is a major error with the printer. The meaning of the indicator LEDs when they flash (x) is low. x The image drum requires changing or toner is summarized as follows: OPERATOR PANELS > 17 x There is processing data when printing has been suspended. rapid blink Ready Manual feed Error Meaning LED LED LED (Green) (Amber) (Amber) x x x x x x x The printer is a minor error with paper or a cover open. slow blink Flash 2 - x There is a printing error, problem...
Guide: User's B4200/B4300
Page 18
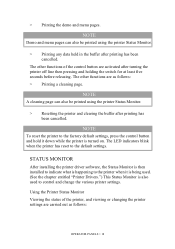
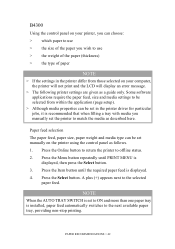
...: OPERATOR PANELS > 18 NOTE Demo and menu pages can also be printed using the printer Status Monitor. > Resetting the printer and clearing the buffer after turning the printer off line then pressing and holding the switch for at least five seconds before releasing. Using the Printer Status Monitor Viewing the status of the control button are carried out as follows: > Printing a cleaning page. > Printing the demo and menu pages. The LED indicators blink when the printer has reset to control and change...
...: OPERATOR PANELS > 18 NOTE Demo and menu pages can also be printed using the printer Status Monitor. > Resetting the printer and clearing the buffer after turning the printer off line then pressing and holding the switch for at least five seconds before releasing. Using the Printer Status Monitor Viewing the status of the control button are carried out as follows: > Printing a cleaning page. > Printing the demo and menu pages. The LED indicators blink when the printer has reset to control and change...
Guide: User's B4200/B4300
Page 20
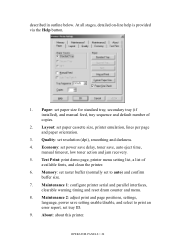
...3. Test Print: print demo page, printer menu setting list, a list of copies. 2. Layout: set paper size for standard tray, secondary tray (if installed), and manual feed, tray sequence and default number of available fonts, and clean the printer. 6. About: about this printer. Maintenance 2: adjust print and page positions, settings, language, power save , auto eject time, manual timeout, low toner action and jam recovery. 5. Maintenance 1: configure printer serial and parallel interfaces, clearable warning timing and reset drum counter and menu. 8. Quality: set power save delay, toner...
...3. Test Print: print demo page, printer menu setting list, a list of copies. 2. Layout: set paper size for standard tray, secondary tray (if installed), and manual feed, tray sequence and default number of available fonts, and clean the printer. 6. About: about this printer. Maintenance 2: adjust print and page positions, settings, language, power save , auto eject time, manual timeout, low toner action and jam recovery. 5. Maintenance 1: configure printer serial and parallel interfaces, clearable warning timing and reset drum counter and menu. 8. Quality: set power save delay, toner...
Guide: User's B4200/B4300
Page 22
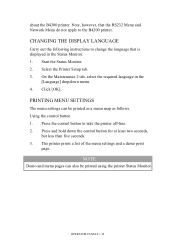
... Printer Setup tab. 3. Press the control button to the B4200 printer. NOTE Demo and menu pages can be printed using the printer Status Monitor. The printer prints a list of the menu settings and a demo print page. OPERATOR PANELS > 22 Click [OK]. Using the control button 1. On the Maintenance 2 tab, select the required language in the Status Monitor. 1. PRINTING MENU SETTINGS The menu settings can also be printed as a menu map as follows. CHANGING THE DISPLAY LANGUAGE Carry out the following instructions to change the language that the RS232 Menu and Network Menu...
... Printer Setup tab. 3. Press the control button to the B4200 printer. NOTE Demo and menu pages can be printed using the printer Status Monitor. The printer prints a list of the menu settings and a demo print page. OPERATOR PANELS > 22 Click [OK]. Using the control button 1. On the Maintenance 2 tab, select the required language in the Status Monitor. 1. PRINTING MENU SETTINGS The menu settings can also be printed as a menu map as follows. CHANGING THE DISPLAY LANGUAGE Carry out the following instructions to change the language that the RS232 Menu and Network Menu...
Guide: User's B4200/B4300
Page 42
... next available paper tray, providing non-stop printing. B4300 Using the control panel on your computer, the printer will not print and the LCD will display an error message. > The following printer settings are given as a guide only. NOTE When the AUTO TRAY SWITCH is set manually on the printer using the control panel as follows. 1. Some software applications require the paper feed, size and media settings to the selected paper feed. PAPER RECOMMENDATIONS > 42 Press the Item button until PRINT MENU is installed, paper feed automatically switches to offline status. 2. A plus...
... next available paper tray, providing non-stop printing. B4300 Using the control panel on your computer, the printer will not print and the LCD will display an error message. > The following printer settings are given as a guide only. NOTE When the AUTO TRAY SWITCH is set manually on the printer using the control panel as follows. 1. Some software applications require the paper feed, size and media settings to the selected paper feed. PAPER RECOMMENDATIONS > 42 Press the Item button until PRINT MENU is installed, paper feed automatically switches to offline status. 2. A plus...
Guide: User's B4200/B4300
Page 73
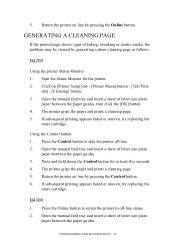
... [Printer Menu] button - [Test Print tab] - [Cleaning] button. 3. If subsequent printing appears faded or uneven, try replacing the toner cartridge. Click on line by pressing the Control button. 6. Open the manual feed tray and insert a sheet of letter size plain paper between the paper guides. Open the manual feed tray and insert a sheet of letter size plain paper between the paper guides. 3. Press the Online button to return the printer to take the printer off -line status. 2. CONSUMABLES AND MAINTENANCE > 73 Return the printer on line by generating a drum cleaning page...
... [Printer Menu] button - [Test Print tab] - [Cleaning] button. 3. If subsequent printing appears faded or uneven, try replacing the toner cartridge. Click on line by pressing the Control button. 6. Open the manual feed tray and insert a sheet of letter size plain paper between the paper guides. Open the manual feed tray and insert a sheet of letter size plain paper between the paper guides. 3. Press the Online button to return the printer to take the printer off -line status. 2. CONSUMABLES AND MAINTENANCE > 73 Return the printer on line by generating a drum cleaning page...
Guide: User's B4200/B4300
Page 77
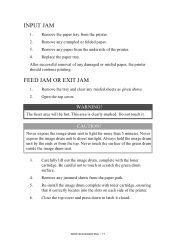
...-install the image drum complete with the toner cartridge. TROUBLESHOOTING > 77 Replace the paper tray. Never expose the image drum unit to touch or scratch the green drum surface. 4. Never touch the surface of any jammed sheets from the printer. 2. Close the top cover and press down to direct sunlight. Remove the tray and clear any crumpled or folded paper. 3. Open the top cover. Never expose the image drum unit to latch it . Always hold the image drum unit by...
...-install the image drum complete with the toner cartridge. TROUBLESHOOTING > 77 Replace the paper tray. Never expose the image drum unit to touch or scratch the green drum surface. 4. Never touch the surface of any jammed sheets from the printer. 2. Close the top cover and press down to direct sunlight. Remove the tray and clear any crumpled or folded paper. 3. Open the top cover. Never expose the image drum unit to latch it . Always hold the image drum unit by...
Guide: User's B4200/B4300
Page 78
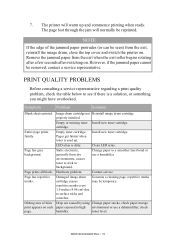
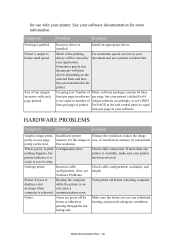
... Damaged image drum Generate a cleaning page, repetitive marks marks. may be removed, contact a service representative. Oblong area of the jammed paper protrudes (or can be reprinted. Symptom Problem Solution Blank sheets printed. Change paper to see if there is dirty. TROUBLESHOOTING > 78 The page lost through the jam will warm up . PRINT QUALITY PROBLEMS Before consulting a service representative regarding a print quality problem, check the table below to a smoother laser bond or use a dehumidifier; Empty toner cartridge. toner level. NOTE...
... Damaged image drum Generate a cleaning page, repetitive marks marks. may be removed, contact a service representative. Oblong area of the jammed paper protrudes (or can be reprinted. Symptom Problem Solution Blank sheets printed. Change paper to see if there is dirty. TROUBLESHOOTING > 78 The page lost through the jam will warm up . PRINT QUALITY PROBLEMS Before consulting a service representative regarding a print quality problem, check the table below to a smoother laser bond or use a dehumidifier; Empty toner cartridge. toner level. NOTE...

Guide: User's B4200/B4300
Page 79
... laser Use recommended paper. Recommended operating humidity: 20-80% SOFTWARE PROBLEMS Your software (operating environment, applications and printer drivers) controls the printing process. Faded print. Paper path, lamp Generate cleaning page. toner Replace image drum and toner. paper package). Fuzzy print. Distorted print. Print is low. LED array is worn out. Moisture in tray. High humidity. Smeared or blotched print. Pages curl excessively. Contact drum is dirty. Dirty rollers; Install paper print side down in paper. problem. image drum problem...
... laser Use recommended paper. Recommended operating humidity: 20-80% SOFTWARE PROBLEMS Your software (operating environment, applications and printer drivers) controls the printing process. Faded print. Paper path, lamp Generate cleaning page. toner Replace image drum and toner. paper package). Fuzzy print. Distorted print. Print is low. LED array is worn out. Moisture in tray. High humidity. Smeared or blotched print. Pages curl excessively. Contact drum is dirty. Dirty rollers; Install paper print side down in paper. problem. image drum problem...
Guide: User's B4200/B4300
Page 80
slowly depending on one printer is available, make sure your printer. partly on message when can withstand heating, and provide adequate ventilation. Software Problems. Printer freezes or Booting the computer displays error while the printer is rebooted. Gases are transferred to print Configuration error. TROUBLESHOOTING > 80 Printer's output is installed. is 64. has been selected. See your software documentation for more memory in your printer's default is not equal to number of printer. Size of top margin increases...
slowly depending on one printer is available, make sure your printer. partly on message when can withstand heating, and provide adequate ventilation. Software Problems. Printer freezes or Booting the computer displays error while the printer is rebooted. Gases are transferred to print Configuration error. TROUBLESHOOTING > 80 Printer's output is installed. is 64. has been selected. See your software documentation for more memory in your printer's default is not equal to number of printer. Size of top margin increases...
Guide: User's B4200/B4300
Page 88
... Maintenance menu 31 Media menu 26 Memory menu 31 Network menu 30 Parallel menu 28 PCL menu 27 PPR menu 27 Print menu 25 RS232C menu 29 System adjustment menu 31 System configuration menu .........26 Usage menu 32 USB menu 30 O operator panel B4200 16 B4300 23 options installing 82 P Page orientation setting in Windows 53, 56 Paper Envelope types 34 Exit jam 77 Feed jam 77 feed sequence 38 Input jam 77 Installing 36 Label types 35 Paper types 34 size setting in Windows 51 Transparencies 35 tray selection in Windows 51 Paper and envelope types...
... Maintenance menu 31 Media menu 26 Memory menu 31 Network menu 30 Parallel menu 28 PCL menu 27 PPR menu 27 Print menu 25 RS232C menu 29 System adjustment menu 31 System configuration menu .........26 Usage menu 32 USB menu 30 O operator panel B4200 16 B4300 23 options installing 82 P Page orientation setting in Windows 53, 56 Paper Envelope types 34 Exit jam 77 Feed jam 77 feed sequence 38 Input jam 77 Installing 36 Label types 35 Paper types 34 size setting in Windows 51 Transparencies 35 tray selection in Windows 51 Paper and envelope types...

Guide: Software Installation B4300 (American English)
Page 6
USB Install: Windows® 2000 INSTALL THE PRINTER DRIVER Before you start the install, be sure the USB cable is connected to your CD-ROM drive\ Drivers\Network\Win2k\English\PCLEmul\Win2k.inf. Select Specify a location. Files are copied. Click Next. 3. Browse to your printer and PC, and your CD-ROM drive. 6. Click Finish. Clear other selections. Insert the CD into your printer is located. Click Open. Found New Hardware Wizard displays. Select Search for...
USB Install: Windows® 2000 INSTALL THE PRINTER DRIVER Before you start the install, be sure the USB cable is connected to your CD-ROM drive\ Drivers\Network\Win2k\English\PCLEmul\Win2k.inf. Select Specify a location. Files are copied. Click Next. 3. Browse to your printer and PC, and your CD-ROM drive. 6. Click Finish. Clear other selections. Insert the CD into your printer is located. Click Open. Found New Hardware Wizard displays. Select Search for...
OkiLAN 8100 SoftNIC User's Guide
Page 28
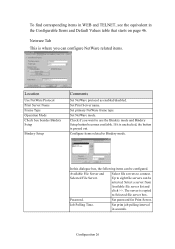
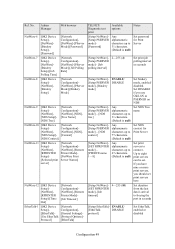
... button is greyed out. Select a server from Available file server list and click >>. Set Print Server name. In this dialogue box, the following items can configure NetWare related items. Location Use NetWare Protocol Print Server Name Frame Type Operation Mode Check box besides Bindery Setup Bindery Setup Comments Set NetWare protocol as enabled/disabled. To find corresponding items in WEB and TELNET, see the equivalent in seconds. Password. Set primary NetWare frame type. Job Polling Time. Select file servers to...
... button is greyed out. Select a server from Available file server list and click >>. Set Print Server name. In this dialogue box, the following items can configure NetWare related items. Location Use NetWare Protocol Print Server Name Frame Type Operation Mode Check box besides Bindery Setup Bindery Setup Comments Set NetWare protocol as enabled/disabled. To find corresponding items in WEB and TELNET, see the equivalent in seconds. Password. Set primary NetWare frame type. Job Polling Time. Select file servers to...
OkiLAN 8100 SoftNIC User's Guide
Page 31
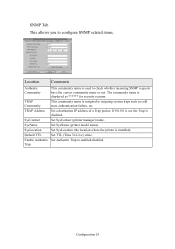
If 0.0.0.0 is set, the Trap is installed). SysContact Set SysContact (printer manager) name. TRAP Address Set a destination IP address of a Trap packet. SysLocation Set SysLocation (the location where the printer is disabled. Default TTL Set TTL (Time To Live) value. Enable Authentic Set Authentic Trap to outgoing system traps such as ****** for security reasons. Trap Configuration 29 SysName Set SysName (printer model name). The community name is displayed as cold start, authentication...
If 0.0.0.0 is set, the Trap is installed). SysContact Set SysContact (printer manager) name. TRAP Address Set a destination IP address of a Trap packet. SysLocation Set SysLocation (the location where the printer is disabled. Default TTL Set TTL (Time To Live) value. Enable Authentic Set Authentic Trap to outgoing system traps such as ****** for security reasons. Trap Configuration 29 SysName Set SysName (printer model name). The community name is displayed as cold start, authentication...
OkiLAN 8100 SoftNIC User's Guide
Page 51
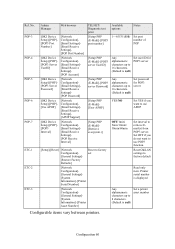
... NetWare][Setup PSERVER mode]- [Job polling interval] 2-255 (4) Set print job polling interval in seconds [Setup EtherTalk]- Ref. Up to eight print servers can be set print servers here [Setup NetWare][SET RPRINTER mode]-[Job timeout] 4-255 (10) Set duration from the last data's arrival to 77 characters. (Default is null) Set password for Print Server [Setup NetWare][SET RPRINTER mode] - [PSERVE name 1-8] Any alphanumeric characters up to freeing the port in seconds [Setup NetWare][Setup PSERVER mode]-[Bindery mode] ENABLE/ DISABLE Set bindery mode, enabled/ disabled...
... NetWare][Setup PSERVER mode]- [Job polling interval] 2-255 (4) Set print job polling interval in seconds [Setup EtherTalk]- Ref. Up to eight print servers can be set print servers here [Setup NetWare][SET RPRINTER mode]-[Job timeout] 4-255 (10) Set duration from the last data's arrival to 77 characters. (Default is null) Set password for Print Server [Setup NetWare][SET RPRINTER mode] - [PSERVE name 1-8] Any alphanumeric characters up to freeing the port in seconds [Setup NetWare][Setup PSERVER mode]-[Bindery mode] ENABLE/ DISABLE Set bindery mode, enabled/ disabled...
OkiLAN 8100 SoftNIC User's Guide
Page 62
... Password] [Network Configuration][Email Settings][Email Receive Settings][APOP Support] [Network Configuration][Email Settings][Email Receive Settings][POP Receive Interval] TELNET/ Diagnostic test print [Setup POP (E-Mail)]-[POP3 port number] [Setup POP (E-Mail)]-[POP3 server UserID] [Setup POP (E-Mail)]-[POP3 server Password] [Setup POP (E-Mail)][User APOP] [Setup POP (E-Mail)][Retrieve every(min.)] [Setup]-[Reset] [Network Configuration][General Settings][Restore Factory Defaults] Reset to factory set [Network Configuration][General Settings][System Information]- [Printer Serial Number...
... Password] [Network Configuration][Email Settings][Email Receive Settings][APOP Support] [Network Configuration][Email Settings][Email Receive Settings][POP Receive Interval] TELNET/ Diagnostic test print [Setup POP (E-Mail)]-[POP3 port number] [Setup POP (E-Mail)]-[POP3 server UserID] [Setup POP (E-Mail)]-[POP3 server Password] [Setup POP (E-Mail)][User APOP] [Setup POP (E-Mail)][Retrieve every(min.)] [Setup]-[Reset] [Network Configuration][General Settings][Restore Factory Defaults] Reset to factory set [Network Configuration][General Settings][System Information]- [Printer Serial Number...
OkiLAN 8100 SoftNIC User's Guide
Page 72
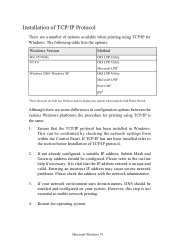
... displayed as options when using TCP/IP is not essential to enable network printing. 4. If not already configured, a suitable IP address, Subnet Mask and Gateway address should be confirmed by checking the network settings from within the Control Panel. The following table lists the options: Windows Version Win 95/98/Me NT 4.0 Windows 2000/ Windows XP Method OKI LPR Utility OKI LPR Utility Microsoft LPR1 OKI LPR Utility Microsoft LPR1 Port...
... displayed as options when using TCP/IP is not essential to enable network printing. 4. If not already configured, a suitable IP address, Subnet Mask and Gateway address should be confirmed by checking the network settings from within the Control Panel. The following table lists the options: Windows Version Win 95/98/Me NT 4.0 Windows 2000/ Windows XP Method OKI LPR Utility OKI LPR Utility Microsoft LPR1 OKI LPR Utility Microsoft LPR1 Port...


