
2nd Paper Tray Installation
Page 1
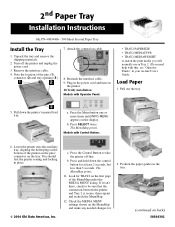
...(2) and tray opening (3). 7. Note the location of the MenuMap under the MEDIA MENU listing. The MenuMap prints. Press and hold down the printer's manual feed tray. If it isn't there, check to be sure that the connection between the printer and Tray 2 is secure, then reprint and recheck the... the auxiliary tray, aligning the holes/plug on the bottom of the printer on the pins/ connector on the display. 2nd Paper Tray Installation Instructions Oki PN-40834406 - 500 Sheet Second Paper Tray Install the Tray 1. Turn off -line. Remove the interface cable. 4. Reattach the interface cable. 9. ...
...(2) and tray opening (3). 7. Note the location of the MenuMap under the MEDIA MENU listing. The MenuMap prints. Press and hold down the printer's manual feed tray. If it isn't there, check to be sure that the connection between the printer and Tray 2 is secure, then reprint and recheck the... the auxiliary tray, aligning the holes/plug on the bottom of the printer on the pins/ connector on the display. 2nd Paper Tray Installation Instructions Oki PN-40834406 - 500 Sheet Second Paper Tray Install the Tray 1. Turn off -line. Remove the interface cable. 4. Reattach the interface cable. 9. ...
Guide: Software Installation B4200 (American English)
Page 9
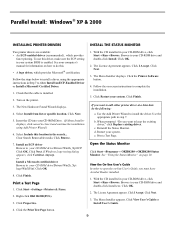
... Next. Click Properties. 1. Browse to your computer's manual for information on how to open the on the printer. 3. The Menu Installer displays. View the On-line User's Guide In order to do the following: a. Follow the on page 10. c. e. Click OK. 2. Right-click OKI B4200(PCL). 3. The Menu Installer appears. Parallel Install: Windows...
... Next. Click Properties. 1. Browse to your computer's manual for information on how to open the on the printer. 3. The Menu Installer displays. View the On-line User's Guide In order to do the following: a. Follow the on page 10. c. e. Click OK. 2. Right-click OKI B4200(PCL). 3. The Menu Installer appears. Parallel Install: Windows...
Guide: Software Installation B4200 (American English)
Page 11
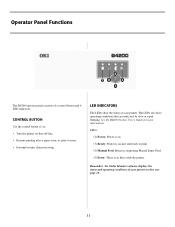
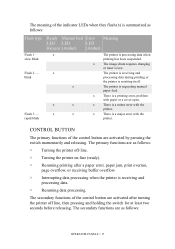
...• Interrupt/resume data processing. LEDs: (2) Power: Power is on. (3) Ready: Printer is an Error with the printer. See the B4200 On-line User's Guide for more information. Remember, the Status Monitor software displays the status and operating conditions of a control button and 4 ...LED indicators. Operator Panel Functions The B4200 operator panel consists of your printer. CONTROL BUTTON Use the control button (1) to print. (4) Manual Feed: Printer is requesting Manual Paper Feed. (5) Error: There is on-line and ready to : •...
...• Interrupt/resume data processing. LEDs: (2) Power: Power is on. (3) Ready: Printer is an Error with the printer. See the B4200 On-line User's Guide for more information. Remember, the Status Monitor software displays the status and operating conditions of a control button and 4 ...LED indicators. Operator Panel Functions The B4200 operator panel consists of your printer. CONTROL BUTTON Use the control button (1) to print. (4) Manual Feed: Printer is requesting Manual Paper Feed. (5) Error: There is on-line and ready to : •...
Guide: User's B4200/B4300
Page 3
CONTENTS Introduction 7 Printer features 7 Using your printer 8 About this manual 9 Online usage 9 Printing Pages 10 Abbreviations used 11 Printer components 12 Operator panels 15 B4200 16 Operator panel 16 LED indicators 16 Control button 17 Status Monitor 18 Menu functions 21 Changing the display language 22 Printing menu settings 22 ... up and face down printing 37 Automatic feed sequence 38 Printing envelopes 38 Heavyweight paper or cardstock 39 Paper feed, size and media setting 40 B4200 40 B4300 42 Interfaces 45 CONTENTS > 3
CONTENTS Introduction 7 Printer features 7 Using your printer 8 About this manual 9 Online usage 9 Printing Pages 10 Abbreviations used 11 Printer components 12 Operator panels 15 B4200 16 Operator panel 16 LED indicators 16 Control button 17 Status Monitor 18 Menu functions 21 Changing the display language 22 Printing menu settings 22 ... up and face down printing 37 Automatic feed sequence 38 Printing envelopes 38 Heavyweight paper or cardstock 39 Paper feed, size and media setting 40 B4200 40 B4300 42 Interfaces 45 CONTENTS > 3

Guide: User's B4200/B4300
Page 6
WARNING! A warning provides additional information which may help you to supplement the main text which , if ignored, may result in equipment malfunction or damage. A note provides additional information to use and understand the product. A warning appears in this manual like this. CONTENTS > 6 CAUTION! A caution appears in this manual like this . NOTES, CAUTIONS AND WARNINGS NOTE A note appears in this manual like this . A caution provides additional information which, if ignored, may result in a risk of personal injury.
WARNING! A warning provides additional information which may help you to supplement the main text which , if ignored, may result in equipment malfunction or damage. A note provides additional information to use and understand the product. A warning appears in this manual like this. CONTENTS > 6 CAUTION! A caution appears in this manual like this . NOTES, CAUTIONS AND WARNINGS NOTE A note appears in this manual like this . A caution provides additional information which, if ignored, may result in a risk of personal injury.
Guide: User's B4200/B4300
Page 8
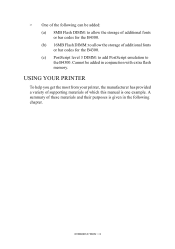
... following chapter. USING YOUR PRINTER To help you get the most from your printer, the manufacturer has provided a variety of supporting materials of which this manual is given in conjunction with extra flash memory.
... following chapter. USING YOUR PRINTER To help you get the most from your printer, the manufacturer has provided a variety of supporting materials of which this manual is given in conjunction with extra flash memory.
Guide: User's B4200/B4300
Page 9
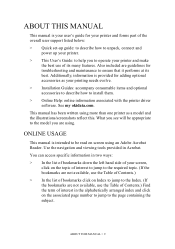
... been written using an Adobe Acrobat Reader. ONLINE USAGE This manual is intended to be appropriate to the model you are not available, use the Table of Contents.) Find the term of interest in the alphabetically ... at its many features. What you see will be read on Index to jump to the Index. (If the bookmarks are using. ABOUT THIS MANUAL > 9 ABOUT THIS MANUAL This manual is your user's guide for your printer and forms part of the overall user support listed below: > Quick set-up guide: to describe...
... been written using an Adobe Acrobat Reader. ONLINE USAGE This manual is intended to be appropriate to the model you are not available, use the Table of Contents.) Find the term of interest in the alphabetically ... at its many features. What you see will be read on Index to jump to the Index. (If the bookmarks are using. ABOUT THIS MANUAL > 9 ABOUT THIS MANUAL This manual is your user's guide for your printer and forms part of the overall user support listed below: > Quick set-up guide: to describe...
Guide: User's B4200/B4300
Page 10
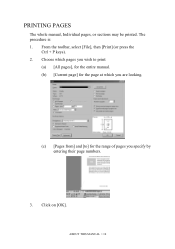
PRINTING PAGES The whole manual, Individual pages, or sections may be printed. Click on [OK]. ABOUT THIS MANUAL > 10 The procedure is: 1. Choose which pages you wish to print: (a) [All pages], for the entire manual. (b) [Current page] for the page at which you are looking. (c) [Pages from] and [to] for the range of pages you specify by entering their page numbers. 3. From the toolbar, select [File], then [Print] (or press the Ctrl + P keys). 2.
PRINTING PAGES The whole manual, Individual pages, or sections may be printed. Click on [OK]. ABOUT THIS MANUAL > 10 The procedure is: 1. Choose which pages you wish to print: (a) [All pages], for the entire manual. (b) [Current page] for the page at which you are looking. (c) [Pages from] and [to] for the range of pages you specify by entering their page numbers. 3. From the toolbar, select [File], then [Print] (or press the Ctrl + P keys). 2.
Guide: User's B4200/B4300
Page 11
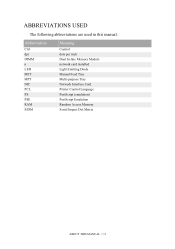
ABBREVIATIONS USED The following abbreviations are used in this manual: Abbreviation Ctrl dpi DIMM n LED MFT MPT NIC PCL PS PSE RAM SIDM Meaning Control dots per inch Dual In-line Memory Module network card installed Light Emitting Diode Manual Feed Tray Multi-purpose Tray Network Interface Card Printer Control Language PostScript (emulation) PostScript Emulation Random Access Memory Serial Impact Dot Matrix ABOUT THIS MANUAL > 11
ABBREVIATIONS USED The following abbreviations are used in this manual: Abbreviation Ctrl dpi DIMM n LED MFT MPT NIC PCL PS PSE RAM SIDM Meaning Control dots per inch Dual In-line Memory Module network card installed Light Emitting Diode Manual Feed Tray Multi-purpose Tray Network Interface Card Printer Control Language PostScript (emulation) PostScript Emulation Random Access Memory Serial Impact Dot Matrix ABOUT THIS MANUAL > 11

Guide: User's B4200/B4300
Page 13
LED array 11. Toner cartridge 15. Fuser unit 16. 10. Paper feed tray (250 sheets) 14. Top cover 16 10 11 · ¯ 15 12 13 14 PRINTER COMPONENTS > 13 Manual feed tray (single sheet) (shown in closed position) 13. Image drum 12.
LED array 11. Toner cartridge 15. Fuser unit 16. 10. Paper feed tray (250 sheets) 14. Top cover 16 10 11 · ¯ 15 12 13 14 PRINTER COMPONENTS > 13 Manual feed tray (single sheet) (shown in closed position) 13. Image drum 12.

Guide: User's B4200/B4300
Page 16
...per second > Flash 3 - the printer is turned on when the printer is off-line and cannot receive data. OPERATOR PANELS > 16 B4200 OPERATOR PANEL The B4200 operator panel consists of the printer and have five operating conditions as follows: > Indicator off - blink - 1 flash per second. All four... LED indicators come on momentarily when power is on-line and ready to right, the LEDs indicate Power On, Ready, Manual feed and ...
...per second > Flash 3 - the printer is turned on when the printer is off-line and cannot receive data. OPERATOR PANELS > 16 B4200 OPERATOR PANEL The B4200 operator panel consists of the printer and have five operating conditions as follows: > Indicator off - blink - 1 flash per second. All four... LED indicators come on momentarily when power is on-line and ready to right, the LEDs indicate Power On, Ready, Manual feed and ...
Guide: User's B4200/B4300
Page 17
... control button are activated by pressing the switch momentarily and releasing. The printer is receiving and processing data during printing or the printer is requesting manual paper feed. x There is a minor error with the printer. The secondary functions of the control button are activated after a paper error, ... off line, then pressing and holding the switch for at least two seconds before releasing. slow blink Flash 2 - rapid blink Ready Manual feed Error Meaning LED LED LED (Green) (Amber) (Amber) x x x x x x x The printer is a printing error, problem with the printer...
... control button are activated by pressing the switch momentarily and releasing. The printer is receiving and processing data during printing or the printer is requesting manual paper feed. x There is a minor error with the printer. The secondary functions of the control button are activated after a paper error, ... off line, then pressing and holding the switch for at least two seconds before releasing. slow blink Flash 2 - rapid blink Ready Manual feed Error Meaning LED LED LED (Green) (Amber) (Amber) x x x x x x x The printer is a printing error, problem with the printer...
Guide: User's B4200/B4300
Page 20
..., tray sequence and default number of available fonts, and clean the printer. 6. Maintenance 2: adjust print and page positions, settings, language, power save , auto eject time, manual timeout, low toner action and jam recovery. 5. Layout: set resolution (dpi), smoothing and darkness. 4. Economy: set tray ID. 9. Maintenance 1: configure printer serial and parallel interfaces...
..., tray sequence and default number of available fonts, and clean the printer. 6. Maintenance 2: adjust print and page positions, settings, language, power save , auto eject time, manual timeout, low toner action and jam recovery. 5. Layout: set resolution (dpi), smoothing and darkness. 4. Economy: set tray ID. 9. Maintenance 1: configure printer serial and parallel interfaces...

Guide: User's B4200/B4300
Page 25
Information Menu This menu provides a quick method of various print job related functions. PRINT MENU item COPIES MANUAL PAPER IN AUTOTRAY TRAY SEQ SIZE CHK DPI MODE TNR SAVE ORIENT LINES/PG EDT SIZE Default 1 OFF TRAY1 OFF ON DOWN ENABLE 600 DISABLE ...
Information Menu This menu provides a quick method of various print job related functions. PRINT MENU item COPIES MANUAL PAPER IN AUTOTRAY TRAY SEQ SIZE CHK DPI MODE TNR SAVE ORIENT LINES/PG EDT SIZE Default 1 OFF TRAY1 OFF ON DOWN ENABLE 600 DISABLE ...

Guide: User's B4200/B4300
Page 35
TRANSPARENCIES AND ADHESIVE LABELS The manufacturer of this printer recommends the following guidelines when selecting transparencies and adhesive labels for use in your printer: > Always use manual feed. > Always use rear output. > Media must be designed for use in laser printers or photocopiers and must be able to withstand 200°C for 0.1 sec. > Do not use media designed for use in color laser printers and photocopiers > Labels should cover entire carrier sheet. > Carrier sheet or adhesive must not be exposed to any part of the printer. PAPER RECOMMENDATIONS > 35
TRANSPARENCIES AND ADHESIVE LABELS The manufacturer of this printer recommends the following guidelines when selecting transparencies and adhesive labels for use in your printer: > Always use manual feed. > Always use rear output. > Media must be designed for use in laser printers or photocopiers and must be able to withstand 200°C for 0.1 sec. > Do not use media designed for use in color laser printers and photocopiers > Labels should cover entire carrier sheet. > Carrier sheet or adhesive must not be exposed to any part of the printer. PAPER RECOMMENDATIONS > 35
Guide: User's B4200/B4300
Page 37
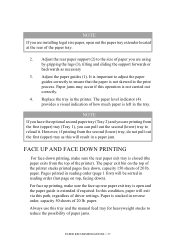
... in the tray. However, if printing from the top of the printer). Paper jams may occur if this will exit via this tray and the manual feed tray for heavyweight stocks to reduce the possibility of the paper tray. 2. The paper exit bin on top, facing down printing, make sure the...
... in the tray. However, if printing from the top of the printer). Paper jams may occur if this will exit via this tray and the manual feed tray for heavyweight stocks to reduce the possibility of the paper tray. 2. The paper exit bin on top, facing down printing, make sure the...

Guide: User's B4200/B4300
Page 38
... the printer grips it locks and lift out the paper guide (2). 2 1 3 2. Pull down and to the left, until it . 4. Insert the envelope, flap down the manual feed tray (3) and adjust the paper guides to DOWN. Set envelope size and landscape orientation in the order Tray 1, Tray 2 (if installed), provided that the...
... the printer grips it locks and lift out the paper guide (2). 2 1 3 2. Pull down and to the left, until it . 4. Insert the envelope, flap down the manual feed tray (3) and adjust the paper guides to DOWN. Set envelope size and landscape orientation in the order Tray 1, Tray 2 (if installed), provided that the...

Guide: User's B4200/B4300
Page 39
HEAVYWEIGHT PAPER OR CARDSTOCK The normal paper path from a main paper tray to jam or misfeed. This gives a nearly straight paper path through the machine and may sometimes cause very heavyweight paper or cardstock to the top output stack involves two complete U-turns. This may prove more reliable in this type of paper and the rear paper exit to feed this type of application. Use the manual feed (multi-purpose) tray to collect printed output. PAPER RECOMMENDATIONS > 39
HEAVYWEIGHT PAPER OR CARDSTOCK The normal paper path from a main paper tray to jam or misfeed. This gives a nearly straight paper path through the machine and may sometimes cause very heavyweight paper or cardstock to the top output stack involves two complete U-turns. This may prove more reliable in this type of paper and the rear paper exit to feed this type of application. Use the manual feed (multi-purpose) tray to collect printed output. PAPER RECOMMENDATIONS > 39
Guide: User's B4200/B4300
Page 40
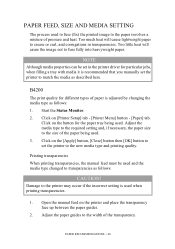
... Click on the [Apply] button, [Close] button then [OK] button to fuse fully into heavyweight paper. Printing transparencies When printing transparencies, the manual feed must be set the printer to the width of paper is adjusted by changing the media type as described here. Click on [Printer Setup...] tab - [Printer Menu] button - [Paper] tab. B4200 The print quality for the paper tray being used to fuse (fix) the printed image to match the media as follows: 1. PAPER FEED, SIZE...
... Click on the [Apply] button, [Close] button then [OK] button to fuse fully into heavyweight paper. Printing transparencies When printing transparencies, the manual feed must be set the printer to the width of paper is adjusted by changing the media type as described here. Click on [Printer Setup...] tab - [Printer Menu] button - [Paper] tab. B4200 The print quality for the paper tray being used to fuse (fix) the printed image to match the media as follows: 1. PAPER FEED, SIZE...

Guide: User's B4200/B4300
Page 41
PAPER RECOMMENDATIONS > 41 3. Click on [Printer Setup] tab - [Printer Menu] button - [Paper tab] - [Manual Feed] button. Click on the [Apply] button, [Close] button then [OK] button to reset the printer for transparencies. NOTE Remember to set the printer for normal paper after printing transparencies. Start the Status Monitor. 4. Adjust the media type to Transparency and the paper size to the size of the transparency being used. 5.
PAPER RECOMMENDATIONS > 41 3. Click on [Printer Setup] tab - [Printer Menu] button - [Paper tab] - [Manual Feed] button. Click on the [Apply] button, [Close] button then [OK] button to reset the printer for transparencies. NOTE Remember to set the printer for normal paper after printing transparencies. Start the Status Monitor. 4. Adjust the media type to Transparency and the paper size to the size of the transparency being used. 5.

