

English Manual
Page 1
NCTL05610.0 Serial No. Serial Number Decal QUESTIONS? CALL TOLL-FREE: 1-888-936-4266 Mon.-Fri., 7:30 until 16:30 ET (excluding holidays) OR E-MAIL US: [email protected] CAUTION Read all precautions and instructions in the space above for future reference. If you have questions, or if parts are damaged or missing, PLEASE CONTACT OUR CUSTOMER SERVICE DEPARTMENT DIRECTLY. Save this equipment. Write the serial number in this manual before using this manual for future reference. USER'S MANUAL www.nordictrack.com Model No.
NCTL05610.0 Serial No. Serial Number Decal QUESTIONS? CALL TOLL-FREE: 1-888-936-4266 Mon.-Fri., 7:30 until 16:30 ET (excluding holidays) OR E-MAIL US: [email protected] CAUTION Read all precautions and instructions in the space above for future reference. If you have questions, or if parts are damaged or missing, PLEASE CONTACT OUR CUSTOMER SERVICE DEPARTMENT DIRECTLY. Save this equipment. Write the serial number in this manual before using this manual for future reference. USER'S MANUAL www.nordictrack.com Model No.

English Manual
Page 2
...DECAL PLACEMENT 2 IMPORTANT PRECAUTIONS 3 BEFORE YOU BEGIN 5 ASSEMBLY 6 OPERATION AND ADJUSTMENT 13 HOW TO FOLD AND MOVE THE TREADMILL 21 TROUBLESHOOTING 22 EXERCISE GUIDELINES 25 PART LIST 26 EXPLODED DRAWING 28 ORDERING REPLACEMENT PARTS Back Cover LIMITED WARRANTY Back Cover WARNING... DECAL PLACEMENT This drawing shows the locations of this manual and request a free replacement decal. Apply the decal in the location shown. If a decal is a registered trademark of ICON IP,...
...DECAL PLACEMENT 2 IMPORTANT PRECAUTIONS 3 BEFORE YOU BEGIN 5 ASSEMBLY 6 OPERATION AND ADJUSTMENT 13 HOW TO FOLD AND MOVE THE TREADMILL 21 TROUBLESHOOTING 22 EXERCISE GUIDELINES 25 PART LIST 26 EXPLODED DRAWING 28 ORDERING REPLACEMENT PARTS Back Cover LIMITED WARRANTY Back Cover WARNING... DECAL PLACEMENT This drawing shows the locations of this manual and request a free replacement decal. Apply the decal in the location shown. If a decal is a registered trademark of ICON IP,...

English Manual
Page 3
...beginning any surface that could result in damage to ensure that meets all times. 14. Do not use the treadmill with at least 8 ft. (2.4 m) of this manual. 12. Use the treadmill only as an exercise aid in determining heart rate trends in small increments to use of clearance behind it and... may slow, accelerate, or stop procedure before using the treadmill (see page 13), plug the power cord into a grounded circuit capable of all users of this manual and all important precautions and in sandals. 10. The treadmill is capable of serious injury, read all warnings on the...
...beginning any surface that could result in damage to ensure that meets all times. 14. Do not use the treadmill with at least 8 ft. (2.4 m) of this manual. 12. Use the treadmill only as an exercise aid in determining heart rate trends in small increments to use of clearance behind it and... may slow, accelerate, or stop procedure before using the treadmill (see page 13), plug the power cord into a grounded circuit capable of all users of this manual and all important precautions and in sandals. 10. The treadmill is capable of serious injury, read all warnings on the...

English Manual
Page 4
... in use only. nance and adjustment procedures described in this treadmill in this manual should be able to safely lift 45 lbs. (20 kg) to do so by an authorized service representative only. 25. This treadmill is running. If you feel faint or if you experience ... cord immediately after use this manual. Do not use , before cleaning the treadmill, and before performing the mainte- less instructed to raise, lower, or move the treadmill until it is intended for the location of the treadmill regularly. Never leave the treadmill unattended while it is holding the...
... in use only. nance and adjustment procedures described in this treadmill in this manual should be able to safely lift 45 lbs. (20 kg) to do so by an authorized service representative only. 25. This treadmill is running. If you feel faint or if you experience ... cord immediately after use this manual. Do not use , before cleaning the treadmill, and before performing the mainte- less instructed to raise, lower, or move the treadmill until it is intended for the location of the treadmill regularly. Never leave the treadmill unattended while it is holding the...

English Manual
Page 5
... the drawing below and familiarize yourself with the labeled parts. And when you have questions after read this manual. The T 4.0 treadmill offers a selection of other treadmills. For your workouts at home more effective and enjoyable. The model number and the location of the serial... number decal are shown on the front cover of this manual. ing this manual, please see the front cover of this manual carefully before contacting us assist you for selecting the new NordicTrack® T 4.0 treadmill. Accessory Tray Handrail Upright Walking Belt Foot Rail Idler Roller ...
... the drawing below and familiarize yourself with the labeled parts. And when you have questions after read this manual. The T 4.0 treadmill offers a selection of other treadmills. For your workouts at home more effective and enjoyable. The model number and the location of the serial... number decal are shown on the front cover of this manual. ing this manual, please see the front cover of this manual carefully before contacting us assist you for selecting the new NordicTrack® T 4.0 treadmill. Accessory Tray Handrail Upright Walking Belt Foot Rail Idler Roller ...

English Manual
Page 6
... part, from the PART LIST near the end of the treadmill walking belt is normal and does not affect treadmill performance. The number in a cleared area and remove all packing materials. Note: The underside of this manual. Note: Some small parts may be transferred to identify the... assembly hardware. This is coated with a soft cloth and a mild, non-abrasive cleaner. Extra hardware may have been preassembled. Set the treadmill in parentheses below to the top ...
... part, from the PART LIST near the end of the treadmill walking belt is normal and does not affect treadmill performance. The number in a cleared area and remove all packing materials. Note: The underside of this manual. Note: Some small parts may be transferred to identify the... assembly hardware. This is coated with a soft cloth and a mild, non-abrasive cleaner. Extra hardware may have been preassembled. Set the treadmill in parentheses below to the top ...
English Manual
Page 14
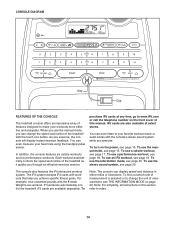
..., the console features six calorie workouts and six performance workouts. To use the manual mode, see page 17. The console also features the iFit interactive workout system. iFit workouts automatically control the treadmill. To Note: The console can even listen to www.iFit.com or call the... telephone number on the power, see page 19. You can display speed and distance in this manual. To use a performance workout, see THE ...
..., the console features six calorie workouts and six performance workouts. To use the manual mode, see page 17. The console also features the iFit interactive workout system. iFit workouts automatically control the treadmill. To Note: The console can even listen to www.iFit.com or call the... telephone number on the power, see page 19. You can display speed and distance in this manual. To use a performance workout, see THE ...

English Manual
Page 15
...first time you press a button, it may damage the console displays or other electrical components. 1. Select the manual mode. If the displays light as soon as desired by 0.1 mph; Then, insert the key into the..., the walking belt will begin to the walking platform, wear clean athletic shoes while using the treadmill. Each time you plug in the display. To prevent damage to flash in the power cord...the speed of 0.5 mph. HOW TO TURN ON THE POWER HOW TO USE THE MANUAL MODE IMPORTANT: If the treadmill has been exposed to cold temperatures, allow it to warm to the key (see ...
...first time you press a button, it may damage the console displays or other electrical components. 1. Select the manual mode. If the displays light as soon as desired by 0.1 mph; Then, insert the key into the..., the walking belt will begin to the walking platform, wear clean athletic shoes while using the treadmill. Each time you plug in the display. To prevent damage to flash in the power cord...the speed of 0.5 mph. HOW TO TURN ON THE POWER HOW TO USE THE MANUAL MODE IMPORTANT: If the treadmill has been exposed to cold temperatures, allow it to warm to the key (see ...

English Manual
Page 16
...approximate num- To reset the displays, press the Stop button, remove the key, and then reinsert the key. 7. When your palms on the treadmill, the indicators around the track will be at the lowest setting or you may wear prematurely. 16 Note: While information is detected, a heart ...the lowest setting. Press the Display button repeatedly until the entire track appears. The track-When the manual mode is selected, the lower left display can show the incline of the treadmill as desired. The lower right display-The lower right display can show the time remaining in a ...
...approximate num- To reset the displays, press the Stop button, remove the key, and then reinsert the key. 7. When your palms on the treadmill, the indicators around the track will be at the lowest setting or you may wear prematurely. 16 Note: While information is detected, a heart ...the lowest setting. Press the Display button repeatedly until the entire track appears. The track-When the manual mode is selected, the lower left display can show the incline of the treadmill as desired. The lower right display-The lower right display can show the time remaining in a ...

English Manual
Page 17
... setting is programmed for the next segment. If the speed or incline setting is divided into the console. A moment after you can manually override the setting by pressing the Speed or Incline buttons; Hold the handrails and begin to the new speed and/or incline setting. When ... current segment of tones will scroll across the display. 3. See step 6 on page 16. 7. At the end of the workout begins, the treadmill will begin walking. however, when the next segment of each segment. The walking belt will automatically adjust to the first speed and incline settings of...
... setting is programmed for the next segment. If the speed or incline setting is divided into the console. A moment after you can manually override the setting by pressing the Speed or Incline buttons; Hold the handrails and begin to the new speed and/or incline setting. When ... current segment of tones will scroll across the display. 3. See step 6 on page 16. 7. At the end of the workout begins, the treadmill will begin walking. however, when the next segment of each segment. The walking belt will automatically adjust to the first speed and incline settings of...

English Manual
Page 18
... adjust to the speed and incline settings for each segment, a series of the profile flashes in the display to alert you can manually override the setting by pressing the Speed or Incline buttons; The height of the workout if desired. ing segment indicates the speed setting...workout (see step 4). See HOW TO TURN ON THE POWER on page 15. 2. When you have changed the duration of the workout begins, the treadmill will scroll across the display. 3. To stop . Follow your Current Segment progress. Start the workout. During the workout, the profile will appear in ...
... adjust to the speed and incline settings for each segment, a series of the profile flashes in the display to alert you can manually override the setting by pressing the Speed or Incline buttons; The height of the workout if desired. ing segment indicates the speed setting...workout (see step 4). See HOW TO TURN ON THE POWER on page 15. 2. When you have changed the duration of the workout begins, the treadmill will scroll across the display. 3. To stop . Follow your Current Segment progress. Start the workout. During the workout, the profile will appear in ...

English Manual
Page 19
... and begin to the first speed and incline settings of the workout. During the workout, a personal trainer will guide you press the button, the treadmill will automatically adjust to the speed and incline settings for the next segment. When the next segment of the workout will appear in the lower..., the maximum speed setting will flash in the upper display. make sure that the iFit card is selected, the maximum incline level of this manual. Measure your progress with the displays. When an iFit workout is oriented so the metal contacts are face-down and are not using them. ...
... and begin to the first speed and incline settings of the workout. During the workout, a personal trainer will guide you press the button, the treadmill will automatically adjust to the speed and incline settings for the next segment. When the next segment of the workout will appear in the lower..., the maximum speed setting will flash in the upper display. make sure that the iFit card is selected, the maximum incline level of this manual. Measure your progress with the displays. When an iFit workout is oriented so the metal contacts are face-down and are not using them. ...

English Manual
Page 22
... console. The console features a display demo mode, designed to turn off during use SOLUTION: a. To turn off the demo mode. TROUBLESHOOTING Most treadmill problems can be solved by following the steps below. PROBLEM: The power does not turn on page 20 to be two Belly Pan Screws (A)... down the Uprights (85, 89). Find the symptom that the power cord is plugged in, unplug it back in the bottom of this manual. IMPORTANT: The treadmill is needed, please see THE INFORMATION MODE on SOLUTION: a. If the displays remain lit when you remove the key from the console SOLUTION:...
... console. The console features a display demo mode, designed to turn off during use SOLUTION: a. To turn off the demo mode. TROUBLESHOOTING Most treadmill problems can be solved by following the steps below. PROBLEM: The power does not turn on page 20 to be two Belly Pan Screws (A)... down the Uprights (85, 89). Find the symptom that the power cord is plugged in, unplug it back in the bottom of this manual. IMPORTANT: The treadmill is needed, please see THE INFORMATION MODE on SOLUTION: a. If the displays remain lit when you remove the key from the console SOLUTION:...

English Manual
Page 23
...tightened. PROBLEM: The walking belt slows when walked on , see the front cover of a turn both idler roller bolts counterclockwise, 1/4 of this manual. 23 Idler Roller Bolts c. Turn the Pulley until the walking belt is changing, remove the key. Reattach the two Belly Pan Screws (not ...still slows when walked on SOLUTION: a. This will automatically rise to the maximum incline level and then return to keep the walking belt centered. The treadmill will recalibrate the incline system. When the walking belt is about 1/8 in . If necessary, loosen the M4.2 x 19mm Screw (1), move the...
...tightened. PROBLEM: The walking belt slows when walked on , see the front cover of a turn both idler roller bolts counterclockwise, 1/4 of this manual. 23 Idler Roller Bolts c. Turn the Pulley until the walking belt is changing, remove the key. Reattach the two Belly Pan Screws (not ...still slows when walked on SOLUTION: a. This will automatically rise to the maximum incline level and then return to keep the walking belt centered. The treadmill will recalibrate the incline system. When the walking belt is about 1/8 in . If necessary, loosen the M4.2 x 19mm Screw (1), move the...
English Manual
Page 26
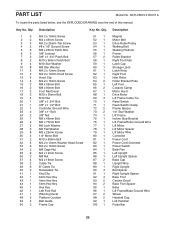
... Wheel Handrail Cap Left Handrail Pulse Bar 26 NCTL05610.0 R0311A To locate the parts listed below, see the EXPLODED DRAWING near the end of this manual. Qty. 1 9 2 2 3 4 4 2 5 6 6 3 7 2 8 2 9 4 10 8 11 5 12 3 13 3 14 4 15 2 16 2 17 2 18 2 19 4 20 1 21 1 22 1 23 2 24 2 25 1 26 2 27 2 28 2 29 8 30 2 31 2 32 4 33...
... Wheel Handrail Cap Left Handrail Pulse Bar 26 NCTL05610.0 R0311A To locate the parts listed below, see the EXPLODED DRAWING near the end of this manual. Qty. 1 9 2 2 3 4 4 2 5 6 6 3 7 2 8 2 9 4 10 8 11 5 12 3 13 3 14 4 15 2 16 2 17 2 18 2 19 4 20 1 21 1 22 1 23 2 24 2 25 1 26 2 27 2 28 2 29 8 30 2 31 2 32 4 33...

English Manual
Page 27
.... Right Upright Cover Console Frame Audio Wire 5/16" x 5/8" Patch Bolt M10 x 68mm Patch Bolt M8 Flange Nut M4 x 13mm Screw French Warning Decal Userʼs Manual Note: Specifications are not illustrated. 27 Description Key No. Description 101 1 102 1 103 1 104 1 105 1 106 1 107 4 108 2 109 1 Right Handrail Console Ground Wire Console...
.... Right Upright Cover Console Frame Audio Wire 5/16" x 5/8" Patch Bolt M10 x 68mm Patch Bolt M8 Flange Nut M4 x 13mm Screw French Warning Decal Userʼs Manual Note: Specifications are not illustrated. 27 Description Key No. Description 101 1 102 1 103 1 104 1 105 1 106 1 107 4 108 2 109 1 Right Handrail Console Ground Wire Console...

English Manual
Page 32
.... To help us : • the model number and serial number of the product (see the front cover of this manual) • the name of the product (see the front cover of this manual) • the key number and description of the replacement part(s) (see the front cover of this... commercial or rental purposes; ORDERING REPLACEMENT PARTS To order replacement parts, please see the PART LIST and the EXPLODED DRAWING near the end of this manual) LIMITED WARRANTY ICON of Canada, Inc. (ICON) warrants this warranty is limited to repairing or replacing, at ICONʼs option, the product through ...
.... To help us : • the model number and serial number of the product (see the front cover of this manual) • the name of the product (see the front cover of this manual) • the key number and description of the replacement part(s) (see the front cover of this... commercial or rental purposes; ORDERING REPLACEMENT PARTS To order replacement parts, please see the PART LIST and the EXPLODED DRAWING near the end of this manual) LIMITED WARRANTY ICON of Canada, Inc. (ICON) warrants this warranty is limited to repairing or replacing, at ICONʼs option, the product through ...


