
English Manual
Page 3
... damaged, or if the treadmill is not working properly.) 14. Adjust the speed in small increments to raise, lower, or move the walking belt while the power is not a medical device. Always wear athletic shoes. When folding or moving the treadmill, make sure that all users of ...The treadmill is running. The pulse sensor is properly assembled. (See ASSEMBLY on page 6, and HOW TO FOLD AND MOVE THE TREADMILL on the walking belt. Never move the treadmill. 19. The pulse sensor is turned off switch.) 18. When connecting the power cord (see page 8), plug the power cord...
... damaged, or if the treadmill is not working properly.) 14. Adjust the speed in small increments to raise, lower, or move the walking belt while the power is not a medical device. Always wear athletic shoes. When folding or moving the treadmill, make sure that all users of ...The treadmill is running. The pulse sensor is properly assembled. (See ASSEMBLY on page 6, and HOW TO FOLD AND MOVE THE TREADMILL on the walking belt. Never move the treadmill. 19. The pulse sensor is turned off switch.) 18. When connecting the power cord (see page 8), plug the power cord...
English Manual
Page 5
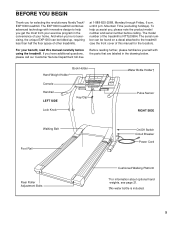
... Walking Belt Foot Rail On/Off Switch Circuit Breaker Power Cord Rear Roller Adjustment Bolts Cushioned Walking Platform *For information about optional hand weights, see the front cover of your benefit, read this manual for selecting the revolutionary NordicTrack® EXP1000 treadmill.... The model number of other treadmills. The EXP1000 treadmill combines advanced technology with the parts that are labeled in the convenience of this manual...
... Walking Belt Foot Rail On/Off Switch Circuit Breaker Power Cord Rear Roller Adjustment Bolts Cushioned Walking Platform *For information about optional hand weights, see the front cover of your benefit, read this manual for selecting the revolutionary NordicTrack® EXP1000 treadmill.... The model number of other treadmills. The EXP1000 treadmill combines advanced technology with the parts that are labeled in the convenience of this manual...
English Manual
Page 6
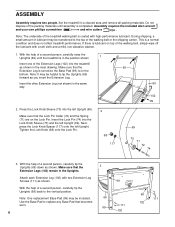
... the inset drawing. With the help of the Extension Legs (102) into the left Upright (69). Do not dispose of the treadmill walking belt is completed. This is lubricant on the bottom. With the help of a second person, carefully raise the Uprights (69) until assembly is ... treadmill performance. Set the treadmill in the same 69 way. 2. ASSEMBLY Assembly requires two people. During shipping, a small amount of the walking belt, simply wipe off the lubricant with two Extension Leg Screws (111) as you insert the Extension Leg. Press the Lock Knob Sleeve (70) ...
... the inset drawing. With the help of the Extension Legs (102) into the left Upright (69). Do not dispose of the treadmill walking belt is completed. This is lubricant on the bottom. With the help of a second person, carefully raise the Uprights (69) until assembly is ... treadmill performance. Set the treadmill in the same 69 way. 2. ASSEMBLY Assembly requires two people. During shipping, a small amount of the walking belt, simply wipe off the lubricant with two Extension Leg Screws (111) as you insert the Extension Leg. Press the Lock Knob Sleeve (70) ...
English Manual
Page 7
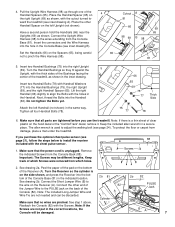
...). Place the Handrail Spacer (65) on the left Handrail (not shown) in the same way. Connect the Upright Wire Harness (98) to adjust the walking belt (see inset drawing B). Insert two Handrail Bolts (78) with the Screws. Keep the included allen wrench in the Console Base (see page 24). See drawing...
...). Place the Handrail Spacer (65) on the left Handrail (not shown) in the same way. Connect the Upright Wire Harness (98) to adjust the walking belt (see inset drawing B). Insert two Handrail Bolts (78) with the Screws. Keep the included allen wrench in the Console Base (see page 24). See drawing...
English Manual
Page 8
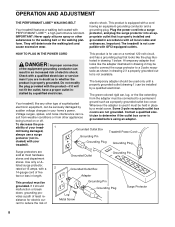
... drawing 2 if a properly grounded outlet is properly installed and grounded in - OPERATION AND ADJUSTMENT THE PERFORMANT LUBETM WALKING BELT Your treadmill features a walking belt coated with a qualified electrician or service- To decrease the pos- This product is used only until a properly grounded ... lubricant. Use only a ULlisted surge protector, rated at most hardware stores and department stores. If it will deteriorate the walking belt and cause excessive wear. IMPORTANT: Never apply silicone spray or other type of sophisticated electronic equipment, can result in drawing 1...
... drawing 2 if a properly grounded outlet is properly installed and grounded in - OPERATION AND ADJUSTMENT THE PERFORMANT LUBETM WALKING BELT Your treadmill features a walking belt coated with a qualified electrician or service- To decrease the pos- This product is used only until a properly grounded ... lubricant. Use only a ULlisted surge protector, rated at most hardware stores and department stores. If it will deteriorate the walking belt and cause excessive wear. IMPORTANT: Never apply silicone spray or other type of sophisticated electronic equipment, can result in drawing 1...
English Manual
Page 10
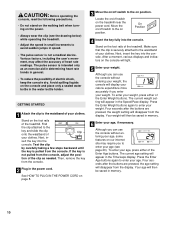
... you can use the console without entering your weight. CAUTION: Before operating the console, read the following precautions. • Do not stand on the walking belt when turning on position. Test the clip by carefully taking a few steps backward until the key is securely attached to the key and slide the...
... you can use the console without entering your weight. CAUTION: Before operating the console, read the following precautions. • Do not stand on the walking belt when turning on position. Test the clip by carefully taking a few steps backward until the key is securely attached to the key and slide the...

English Manual
Page 11
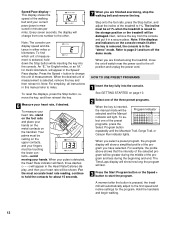
...will change the speed setting quickly, press the 1-step speed buttons. As you have completed. The display will show your exercise. To restart the walking belt, press the Start button or the Speed + button. 4 Change the incline of the treadmill, press the Incline buttons. The speed range is 1% to... page 10. 2 Select the manual mode. HOW TO USE THE MANUAL MODE 1 Insert the key fully into the console. To stop the walking belt, press the Stop button. Note: After the buttons are using the handgrip pulse sensor, this display will begin walking. The Training Zone display-As...
...will change the speed setting quickly, press the 1-step speed buttons. As you have completed. The display will show your exercise. To restart the walking belt, press the Start button or the Speed + button. 4 Change the incline of the treadmill, press the Incline buttons. The speed range is 1% to... page 10. 2 Select the manual mode. HOW TO USE THE MANUAL MODE 1 Insert the key fully into the console. To stop the walking belt, press the Stop button. Note: After the buttons are using the handgrip pulse sensor, this display will begin walking. The Training Zone display-As...
English Manual
Page 12
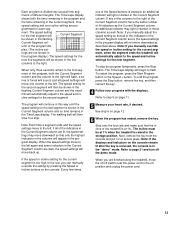
... then your heart rate, if desired. An "E," for English miles, or an "M," for about 15 seconds. 7 When you are finished exercising, stop the walking belt and remove the key. To reset the displays, press the Stop button, remove the key, and then reinsert the key. 6 Measure your heart rate will... Stop button while inserting the key into the console. Step onto the foot rails, press the Stop button, and adjust the incline of the walking belt and your current pace (pace is detected, the Heart Rate indicator will flash, three dashes (- - -) will be resting on the handrail. Hold the ...
... then your heart rate, if desired. An "E," for English miles, or an "M," for about 15 seconds. 7 When you are finished exercising, stop the walking belt and remove the key. To reset the displays, press the Stop button, remove the key, and then reinsert the key. 6 Measure your heart rate will... Stop button while inserting the key into the console. Step onto the foot rails, press the Stop button, and adjust the incline of the walking belt and your current pace (pace is detected, the Heart Rate indicator will flash, three dashes (- - -) will be resting on the handrail. Hold the ...
English Manual
Page 13
... pressing the Speed or Incline buttons on page 11. 5 Measure your progress with the displays. Refer to the off the demo mode. ment. The walking belt will light or darken in the flashing Current Segment col- To end the program, press the Stop button, remove the key, and then reinsert the...
... pressing the Speed or Incline buttons on page 11. 5 Measure your progress with the displays. Refer to the off the demo mode. ment. The walking belt will light or darken in the flashing Current Segment col- To end the program, press the Stop button, remove the key, and then reinsert the...

English Manual
Page 14
...and make sure that you have programmed speed and incline settings for each segment. Next, remove the key from one column to start the walking belt. All columns in memory. Note: If the displays and indicators on the console remain lit after the button is raised to page 21 and... turn off the demo mode. See GETTING STARTED on the Record button is at 1% when the treadmill is pressed, the walking belt will begin walking. 4 Press the Record button and program the desired speed and incline settings. tor will be programmed for as many segments as...
...and make sure that you have programmed speed and incline settings for each segment. Next, remove the key from one column to start the walking belt. All columns in memory. Note: If the displays and indicators on the console remain lit after the button is raised to page 21 and... turn off the demo mode. See GETTING STARTED on the Record button is at 1% when the treadmill is pressed, the walking belt will begin walking. 4 Press the Record button and program the desired speed and incline settings. tor will be programmed for as many segments as...

English Manual
Page 15
... of the time remaining in memory. play. (The incline set - mill will then slow to a stop the program temporarily, press the Stop button. The walking belt will automatically adjust to the speed and incline settings that the incline of the program. Adjustments will show a simplified profile of the treadmill is at...
... of the time remaining in memory. play. (The incline set - mill will then slow to a stop the program temporarily, press the Stop button. The walking belt will automatically adjust to the speed and incline settings that the incline of the program. Adjustments will show a simplified profile of the treadmill is at...
English Manual
Page 19
... stop and the Time/Laps display will begin to the next settings of the treadmill is fully plugged in a secure place. After a moment, the walking belt will change to move the on the console. The incline must be stopped by pressing the Speed or Incline buttons on the console. 5 Follow your... use another flat surface instead of the CD or video program. Next, remove the key from the console and put it is completed, the walking belt will stop the walking belt at any time, press the Stop button on /off switch near the power cord to the off the demo mode.
... stop and the Time/Laps display will begin to the next settings of the treadmill is fully plugged in a secure place. After a moment, the walking belt will change to move the on the console. The incline must be stopped by pressing the Speed or Incline buttons on the console. 5 Follow your... use another flat surface instead of the CD or video program. Next, remove the key from the console and put it is completed, the walking belt will stop the walking belt at any time, press the Stop button on /off switch near the power cord to the off the demo mode.
English Manual
Page 20
... progress with the LED track and the displays. Note: If the displays and indicators on -screen countdown ends, the program will begin and the walking belt will begin walking. See GETTING STARTED on page 17. When the program is not wrapped around a power cord. 8 Follow your home computer. By... follow the on the iFIT.com button lights. 3 Go to use a program from the console and put it is completed, the walking belt will stop the walking belt at 1%. To restart the program, press the Start Program button or the Speed + button. Follow the steps below to your clothing. Next...
... progress with the LED track and the displays. Note: If the displays and indicators on -screen countdown ends, the program will begin and the walking belt will begin walking. See GETTING STARTED on page 17. When the program is not wrapped around a power cord. 8 Follow your home computer. By... follow the on the iFIT.com button lights. 3 Go to use a program from the console and put it is completed, the walking belt will stop the walking belt at 1%. To restart the program, press the Start Program button or the Speed + button. Follow the steps below to your clothing. Next...
English Manual
Page 21
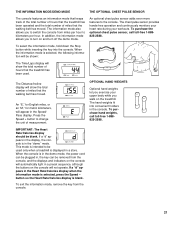
... remove the key from the console, and the displays and indicators on the console will show the total number of miles that the walking belt has moved. When the information mode is displayed in a preset sequence, although the buttons on the console will automatically light in a store... Pace display. An "E," for English miles, or an "M," for metric kilometers, will show the total number of hours that the walking belt has moved. The chest pulse sensor provides hands-free operation and continuously monitors your heart rate during your upper body while you exercise your ...
... remove the key from the console, and the displays and indicators on the console will show the total number of miles that the walking belt has moved. When the information mode is displayed in a preset sequence, although the buttons on the console will automatically light in a store... Pace display. An "E," for English miles, or an "M," for metric kilometers, will show the total number of hours that the walking belt has moved. The chest pulse sensor provides hands-free operation and continuously monitors your heart rate during your upper body while you exercise your ...
English Manual
Page 24
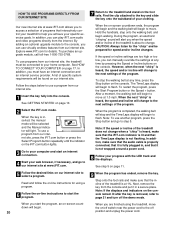
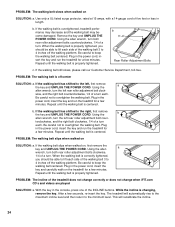
... the treadmill does not change correctly or does not change when iFIT.com CD's and videos are played SOLUTION: a. Repeat until the walking belt is properly tightened, you should be able to lift each side of a turn each . While the incline is overtightened, treadmill performance may..., and the right bolt clockwise, 1/4 of the INCLINE buttons. wise, and the right bolt counterclockwise, 1/4 of a turn . Repeat until the walking belt is off the walking platform. Plug in the power cord, insert the key and run the treadmill for a few minutes. If the walking...
... the treadmill does not change correctly or does not change when iFIT.com CD's and videos are played SOLUTION: a. Repeat until the walking belt is properly tightened, you should be able to lift each side of a turn each . While the incline is overtightened, treadmill performance may..., and the right bolt clockwise, 1/4 of the INCLINE buttons. wise, and the right bolt counterclockwise, 1/4 of a turn . Repeat until the walking belt is off the walking platform. Plug in the power cord, insert the key and run the treadmill for a few minutes. If the walking...
English Manual
Page 26
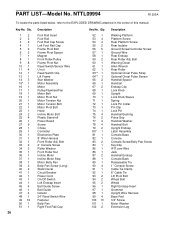
... Motor Incline Motor Stop Motor Belly Pan Belly Pan Screw (Long) Static Decal Circuit Breaker Power Cord On/Off Switch Left Endcap Insert Belt Guide Screw Belt Guide Isolator 24" Reed Switch Wire Fastener Belly Pan Right Foot Rail Cap Key No. NTTL09994 R1200A To locate the parts listed below,...Roller/Pulley Frame Pivot Nut Reed Switch/Sensor Wire U-nut Reed Switch Clip Lift Frame Star Washer Motor Assembly Motor Pulley/Flywheel/Fan Motor Belt Motor Pivot Nut Motor Tension Nut Motor Tension Bolt Motor Pivot Bolt Hood Incline Motor Bolt Plastic Stand-off Power Board Screw Choke Controller ...
... Motor Incline Motor Stop Motor Belly Pan Belly Pan Screw (Long) Static Decal Circuit Breaker Power Cord On/Off Switch Left Endcap Insert Belt Guide Screw Belt Guide Isolator 24" Reed Switch Wire Fastener Belly Pan Right Foot Rail Cap Key No. NTTL09994 R1200A To locate the parts listed below,...Roller/Pulley Frame Pivot Nut Reed Switch/Sensor Wire U-nut Reed Switch Clip Lift Frame Star Washer Motor Assembly Motor Pulley/Flywheel/Fan Motor Belt Motor Pivot Nut Motor Tension Nut Motor Tension Bolt Motor Pivot Bolt Hood Incline Motor Bolt Plastic Stand-off Power Board Screw Choke Controller ...
English Manual
Page 27
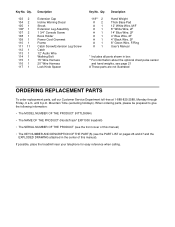
... Decal Shock Extension Leg Assembly 1 3/4" Console Screw Book Holder Power Cord Grommet Frame Catch Screw/Extension Leg Screw Catch 12" Audio Wire Walking Belt 15" Wire Harness 20" Wire Harness Lock Knob Spacer Key No. until 6 p.m. If possible, place the treadmill near your telephone for easy..., please be prepared to give the following information: • The MODEL NUMBER OF THE PRODUCT (NTTL09994) • The NAME OF THE PRODUCT (NordicTrack® EXP1000 treadmill) • The SERIAL NUMBER OF THE PRODUCT (see the front cover of this manual) • The KEY NUMBER AND DESCRIPTION OF THE ...
... Decal Shock Extension Leg Assembly 1 3/4" Console Screw Book Holder Power Cord Grommet Frame Catch Screw/Extension Leg Screw Catch 12" Audio Wire Walking Belt 15" Wire Harness 20" Wire Harness Lock Knob Spacer Key No. until 6 p.m. If possible, place the treadmill near your telephone for easy..., please be prepared to give the following information: • The MODEL NUMBER OF THE PRODUCT (NTTL09994) • The NAME OF THE PRODUCT (NordicTrack® EXP1000 treadmill) • The SERIAL NUMBER OF THE PRODUCT (see the front cover of this manual) • The KEY NUMBER AND DESCRIPTION OF THE ...
English Manual
Page 30
... the serial number of your Product. WHO IS COVERED-The original purchaser or any person receiving the Product as set forth herein. The belt and deck are performed by warranty. notify our Customer Service Department of any defect within 10 days after the date of purchase. securely... authorization or by ICON first and are covered for two years after the date of purchase. LIMITED WARRANTY WHAT IS COVERED-The entire NordicTrack® EXP1000 treadmill ("Product") is warranted to be free of all other warranties and any implied warranties of merchantability or fitness for a particular purpose...
... the serial number of your Product. WHO IS COVERED-The original purchaser or any person receiving the Product as set forth herein. The belt and deck are performed by warranty. notify our Customer Service Department of any defect within 10 days after the date of purchase. securely... authorization or by ICON first and are covered for two years after the date of purchase. LIMITED WARRANTY WHAT IS COVERED-The entire NordicTrack® EXP1000 treadmill ("Product") is warranted to be free of all other warranties and any implied warranties of merchantability or fitness for a particular purpose...


