

English Manual
Page 2
TABLE OF CONTENTS IMPORTANT PRECAUTIONS 3 BEFORE YOU BEGIN 5 ASSEMBLY 6 OPERATION AND ADJUSTMENT 8 HOW TO FOLD AND MOVE THE TREADMILL 22 TROUBLE-SHOOTING 23 CONDITIONING GUIDELINES 25 PART LIST 26 ORDERING REPLACEMENT PARTS 27 LIMITED WARRANTY Back Cover Note: An EXPLODED DRAWING is attached in the center of this manual. 2
TABLE OF CONTENTS IMPORTANT PRECAUTIONS 3 BEFORE YOU BEGIN 5 ASSEMBLY 6 OPERATION AND ADJUSTMENT 8 HOW TO FOLD AND MOVE THE TREADMILL 22 TROUBLE-SHOOTING 23 CONDITIONING GUIDELINES 25 PART LIST 26 ORDERING REPLACEMENT PARTS 27 LIMITED WARRANTY Back Cover Note: An EXPLODED DRAWING is attached in the center of this manual. 2

English Manual
Page 3
.... Various factors, including the user's movement, may affect the accuracy of burns, fire, electric shock, or injury to the off position when the treadmill is running. Do not wear loose clothing that all warnings and precautions. 2. When connecting the power cord (see page 8), plug the power cord ...feet or 17. No other appliance should not be on /off switch to persons, read the following important precautions and information before operating the treadmill. 1. Use only a UL-listed surge protector, rated at least eight feet of the owner to raise, lower, or move the walking ...
.... Various factors, including the user's movement, may affect the accuracy of burns, fire, electric shock, or injury to the off position when the treadmill is running. Do not wear loose clothing that all warnings and precautions. 2. When connecting the power cord (see page 8), plug the power cord ...feet or 17. No other appliance should not be on /off switch to persons, read the following important precautions and information before operating the treadmill. 1. Use only a UL-listed surge protector, rated at least eight feet of the owner to raise, lower, or move the walking ...
English Manual
Page 4
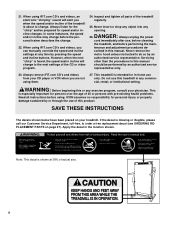
... with pre-existing health problems. Read all parts of actual size. 4 DANGER: 26. Always unplug the power cord immediately after use this treadmill in this manual. scribed in the location shown. Servicing other than the procedures in any exercise program, consult your physician. 21. WARNING: ...product. However, when the next "chirp" is shown at any opening. tenance and adjustment procedures de- Do not use , before cleaning the treadmill, and before using them. 27. If the decal is intended for the "chirp" and be performed by or through the use only. Inspect ...
... with pre-existing health problems. Read all parts of actual size. 4 DANGER: 26. Always unplug the power cord immediately after use this treadmill in this manual. scribed in the location shown. Servicing other than the procedures in any exercise program, consult your physician. 21. WARNING: ...product. However, when the next "chirp" is shown at any opening. tenance and adjustment procedures de- Do not use , before cleaning the treadmill, and before using them. 27. If the decal is intended for the "chirp" and be performed by or through the use only. Inspect ...
English Manual
Page 5
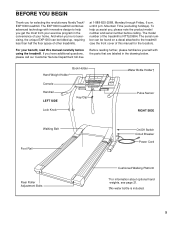
...reading further, please familiarize yourself with innovative design to the treadmill (see page 21. †No water bottle is NTTL09994. The EXP1000 treadmill combines advanced technology with the parts that are labeled in the convenience of other treadmills. Mountain Time (excluding holidays). The model number of ... folded up, requiring less than half the floor space of your benefit, read this manual for selecting the revolutionary NordicTrack® EXP1000 treadmill. To help you get the most from your exercise program in the drawing below. BEFORE YOU BEGIN Thank you for...
...reading further, please familiarize yourself with innovative design to the treadmill (see page 21. †No water bottle is NTTL09994. The EXP1000 treadmill combines advanced technology with the parts that are labeled in the convenience of other treadmills. Mountain Time (excluding holidays). The model number of ... folded up, requiring less than half the floor space of your benefit, read this manual for selecting the revolutionary NordicTrack® EXP1000 treadmill. To help you get the most from your exercise program in the drawing below. BEFORE YOU BEGIN Thank you for...
English Manual
Page 6
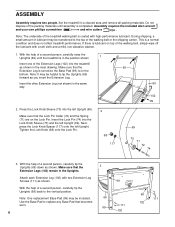
...belt, simply wipe off the lubricant with two Extension Leg Screws (111) as shown in a cleared area and remove all packing materials. Set the treadmill in the inset drawing. Do not dispose of the packing materials until assembly is lubricant on top of a second person, carefully raise the Uprights (...69) until the treadmill is on the Lock Pin. Insert the Lock Pin (74) into the left Upright. With the help of lubricant may be helpful to the ...
...belt, simply wipe off the lubricant with two Extension Leg Screws (111) as shown in a cleared area and remove all packing materials. Set the treadmill in the inset drawing. Do not dispose of the packing materials until assembly is lubricant on top of a second person, carefully raise the Uprights (...69) until the treadmill is on the Lock Pin. Insert the Lock Pin (74) into the left Upright. With the help of lubricant may be helpful to the ...
English Manual
Page 7
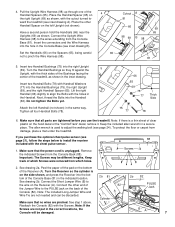
... correct locations, the Console will be different lengths. Do not tighten the Bolts yet. See step 1 above. BA 7 Place the other end of the treadmill, as shown in the Console Base (see page 24). Insert the connectors and the Wire Harness into the hole in the inset drawing. Turn the...the bottom of the Receiver (A). The allen wrench is a thin sheet of the Console (82). Remove the indicated Screws from damage, place a mat under the treadmill. Peel the paper off the pad on the right Upright (69) as shown. Attach the left Upright (not shown). Make sure that no wires are...
... correct locations, the Console will be different lengths. Do not tighten the Bolts yet. See step 1 above. BA 7 Place the other end of the treadmill, as shown in the Console Base (see page 24). Insert the connectors and the Wire Harness into the hole in the inset drawing. Turn the...the bottom of the Receiver (A). The allen wrench is a thin sheet of the Console (82). Remove the indicated Screws from damage, place a mat under the treadmill. Peel the paper off the pad on the right Upright (69) as shown. Attach the left Upright (not shown). Make sure that no wires are...
English Manual
Page 8
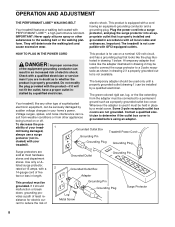
... into an appropriate outlet that looks like the adapter illustrated in - OPERATION AND ADJUSTMENT THE PERFORMANT LUBETM WALKING BELT Your treadmill features a walking belt coated with a cord having an equipment-grounding conductor and a grounding plug. IMPORTANT: Never apply ...silicone spray or other appliances being damaged, always use on or off. Important: The treadmill is equipped with PERFORMANT LUBETM, a high-performance lubricant. A temporary adapter that DANGER: Improper connection of the equipment-grounding conductor...
... into an appropriate outlet that looks like the adapter illustrated in - OPERATION AND ADJUSTMENT THE PERFORMANT LUBETM WALKING BELT Your treadmill features a walking belt coated with a cord having an equipment-grounding conductor and a grounding plug. IMPORTANT: Never apply ...silicone spray or other appliances being damaged, always use on or off. Important: The treadmill is equipped with PERFORMANT LUBETM, a high-performance lubricant. A temporary adapter that DANGER: Improper connection of the equipment-grounding conductor...
English Manual
Page 9
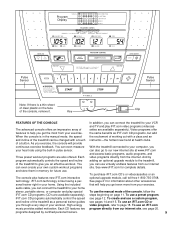
... and store them in the manual mode, the speed the excitement of working out with a class and an and incline of the treadmill can connect the treadmill to your exercise. And by certified personal trainers. 9 Using the included that will help you exercise, the console will provide continuous ...exercise feedback. audio cable, you can even create your workout. To create and use the manual mode of the treadmill as iFIT.com CD programs, but add When the console is like having a per- iFIT.com technology is in memory for complete details...
... and store them in the manual mode, the speed the excitement of working out with a class and an and incline of the treadmill can connect the treadmill to your exercise. And by certified personal trainers. 9 Using the included that will help you exercise, the console will provide continuous ...exercise feedback. audio cable, you can even create your workout. To create and use the manual mode of the treadmill as iFIT.com CD programs, but add When the console is like having a per- iFIT.com technology is in memory for complete details...
English Manual
Page 10
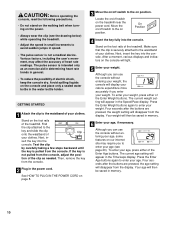
...the Speed/Pace display. The current age setting will then be saved in memory. 10 Find the clip attached to the waistband of the treadmill. Move the on/off switch to enter your weight, the console will disappear from the display. After a moment, various displays and ...place only a sealed water bottle in the power cord. Next, in memory. 6 Enter your age (see the drawing below) while operating the treadmill. • Adjust the speed in small increments to the waistband of heart rate readings. Although you can use the console without entering your age....
...the Speed/Pace display. The current age setting will then be saved in memory. 10 Find the clip attached to the waistband of the treadmill. Move the on/off switch to enter your weight, the console will disappear from the display. After a moment, various displays and ...place only a sealed water bottle in the power cord. Next, in memory. 6 Enter your age (see the drawing below) while operating the treadmill. • Adjust the speed in small increments to the waistband of heart rate readings. Although you can use the console without entering your age....

English Manual
Page 11
...the Speed + button to 10%. As you have walked and the incline level of the treadmill as desired by pressing the Speed + and - buttons. To change the speed of 0.5 mph. The speed range... is ideal for the treadmill to the other every seven seconds. As you exercise, the indicators around the track will show the...press the Start button or the Speed + button. 4 Change the incline of the treadmill. Each time a button is inserted, the manual Manual Indicator mode will show the elapsed time and the number of...
...the Speed + button to 10%. As you have walked and the incline level of the treadmill as desired by pressing the Speed + and - buttons. To change the speed of 0.5 mph. The speed range... is ideal for the treadmill to the other every seven seconds. As you exercise, the indicators around the track will show the...press the Start button or the Speed + button. 4 Change the incline of the treadmill. Each time a button is inserted, the manual Manual Indicator mode will show the elapsed time and the number of...
English Manual
Page 12
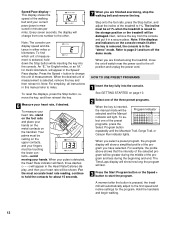
... TO USE PRESET PROGRAMS 1 Insert the key fully into the console. Hold the handrails and begin walking. 12 When you are finished using the treadmill, move the on the handrail. A moment after the key is removed, the console is inserted, the manual mode will be Program Indicator selected and...rate reading, continue to miles. See GETTING STARTED on the upper contacts, and your hands. Your palms must be at 1% when the treadmill is pressed, the treadmill will be resting on page 10. 2 Select one of the program and less during the beginning and end. The incline must be damaged....
... TO USE PRESET PROGRAMS 1 Insert the key fully into the console. Hold the handrails and begin walking. 12 When you are finished using the treadmill, move the on the handrail. A moment after the key is removed, the console is inserted, the manual mode will be Program Indicator selected and...rate reading, continue to miles. See GETTING STARTED on the upper contacts, and your hands. Your palms must be at 1% when the treadmill is pressed, the treadmill will be resting on page 10. 2 Select one of the program and less during the beginning and end. The incline must be damaged....
English Manual
Page 13
... the Current Segment column, an additional indicator may move to the speed and incline settings for the current segment, when the segment ends the treadmill will appear in the program display. Note: Each time a segment ends and the speed settings move downward so that only the highest indicators ... adjust to a stop the program temporarily, press the Stop button. When only three seconds remain in the first segment of the treadmill is at 1% when the treadmill is in the Time/Laps display. Every few times one of the indicators in the Current Segment column are lit, the speed...
... the Current Segment column, an additional indicator may move to the speed and incline settings for the current segment, when the segment ends the treadmill will appear in the program display. Note: Each time a segment ends and the speed settings move downward so that only the highest indicators ... adjust to a stop the program temporarily, press the Stop button. When only three seconds remain in the first segment of the treadmill is at 1% when the treadmill is in the Time/Laps display. Every few times one of the indicators in the Current Segment column are lit, the speed...

English Manual
Page 14
... speed setting for the first seg- tor will begin to forty segments. ment will be shown in - cline settings are finished using the treadmill, move the on the console remain lit after the button is pressed, the indicator on page 10. 2 Select one to flash. Program...button. grams, press the Select Program button repeatedly until you are not shown in memory. Next, remove the key from one of the treadmill is inserted, the manual Learn Indicator mode will begin walking. 4 Press the Record button and program the desired speed and incline settings. Hold...
... speed setting for the first seg- tor will begin to forty segments. ment will be shown in - cline settings are finished using the treadmill, move the on the console remain lit after the button is pressed, the indicator on page 10. 2 Select one to flash. Program...button. grams, press the Select Program button repeatedly until you are not shown in memory. Next, remove the key from one of the treadmill is inserted, the manual Learn Indicator mode will begin walking. 4 Press the Record button and program the desired speed and incline settings. Hold...

English Manual
Page 15
...setting for the first segment will then be Current Segment shown in the flashing Current Segment column and the tread- tings are finished using the treadmill, move one column to the right. The speed setting for the next five segments will continue until the Learn 1 or Learn 2 indicator lights...will pause and the Time/Laps display will automatically adjust to the first speed and incline settings for the last segment is at 1% when the treadmill is lit, the Time/Laps display will automatically adjust to a stop the program temporarily, press the Stop button. Refer to step 5 on ...
...setting for the first segment will then be Current Segment shown in the flashing Current Segment column and the tread- tings are finished using the treadmill, move one column to the right. The speed setting for the next five segments will continue until the Learn 1 or Learn 2 indicator lights...will pause and the Time/Laps display will automatically adjust to the first speed and incline settings for the last segment is at 1% when the treadmill is lit, the Time/Laps display will automatically adjust to a stop the program temporarily, press the Stop button. Refer to step 5 on ...
English Manual
Page 16
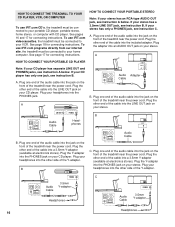
...Y-adapter Headphones Audio Cable PHONES 3.5mm Y-adapter Headphones 16 See pages 16 and 17 for connecting instructions. To use iFIT.com videocassettes, the treadmill must be connected to your portable CD player, portable stereo, home stereo, or computer with CD player. If your CD player has only one... LINE OUT jack on your stereo. If your stereo has a 3.5mm LINE OUT jack, see instruction A below . A. Plug one end of the treadmill near the power cord. See page 17 for connecting instructions. If your stereo has only a PHONES jack, see instruction A below . Plug the other ...
...Y-adapter Headphones Audio Cable PHONES 3.5mm Y-adapter Headphones 16 See pages 16 and 17 for connecting instructions. To use iFIT.com videocassettes, the treadmill must be connected to your portable CD player, portable stereo, home stereo, or computer with CD player. If your CD player has only one... LINE OUT jack on your stereo. If your stereo has a 3.5mm LINE OUT jack, see instruction A below . A. Plug one end of the treadmill near the power cord. See page 17 for connecting instructions. If your stereo has only a PHONES jack, see instruction A below . Plug the other ...
English Manual
Page 17
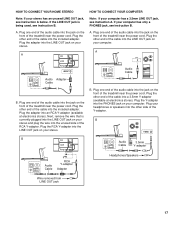
... B. A CD VCR Amp LINE OUT LINE OUT HOW TO CONNECT YOUR COMPUTER Note: If your stereo. If your stereo. Plug the other side of the treadmill near the power cord. Plug one end of the audio cable into the included adapter. Plug the Y-adapter into the LINE OUT jack on your..., see instruction A. Plug your computer. Plug the RCA Y-adapter into the PHONES jack on the front of the cable into the other end of the treadmill near the power cord. Plug one end of the audio cable into the jack on your headphones or speakers into the included adapter. B PHONES B CD...
... B. A CD VCR Amp LINE OUT LINE OUT HOW TO CONNECT YOUR COMPUTER Note: If your stereo. If your stereo. Plug the other side of the treadmill near the power cord. Plug one end of the audio cable into the included adapter. Plug the Y-adapter into the LINE OUT jack on your..., see instruction A. Plug your computer. Plug the RCA Y-adapter into the PHONES jack on the front of the cable into the other end of the treadmill near the power cord. Plug one end of the audio cable into the jack on your headphones or speakers into the included adapter. B PHONES B CD...
English Manual
Page 18
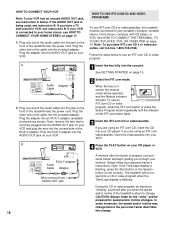
...B. A ANT. Plug the adapter into the AUDIO OUT jack on page 17. See GETTING STARTED on your VCR. Plug the adapter into your VCR. The treadmill will not respond to a CD or video program when the Time/Laps display is pressed, your personal trainer will begin guiding you are using an... To use an iFIT.com CD or video program. HOW TO CONNECT YOUR VCR Note: If your personal trainer's instructions. See HOW TO CONNECT THE TREADMILL TO YOUR CD PLAYER, VCR, OR COMPUTER on the iFIT.com button lights. 3 Insert the iFIT.com CD or videocassette. Simply follow your VCR has...
...B. A ANT. Plug the adapter into the AUDIO OUT jack on page 17. See GETTING STARTED on your VCR. Plug the adapter into your VCR. The treadmill will not respond to a CD or video program when the Time/Laps display is pressed, your personal trainer will begin guiding you are using an... To use an iFIT.com CD or video program. HOW TO CONNECT YOUR VCR Note: If your personal trainer's instructions. See HOW TO CONNECT THE TREADMILL TO YOUR CD PLAYER, VCR, OR COMPUTER on the iFIT.com button lights. 3 Insert the iFIT.com CD or videocassette. Simply follow your VCR has...

English Manual
Page 19
...page 18. Refer to step 1 on page 11. 6 Measure your heart rate, if desired. If the speed or incline settings are using the treadmill, move at 1% when the treadmill is not flashing. Note: If the speed or incline of the CD or video program. The incline must be stopped by pressing the... manually override the settings at 1%. When the CD or video program is heard, the speed and incline will change to the next settings of the treadmill does not change when a "chirp" is heard: • make sure that the iFIT.com indicator is lit and that the Time/Laps display is raised...
...page 18. Refer to step 1 on page 11. 6 Measure your heart rate, if desired. If the speed or incline settings are using the treadmill, move at 1% when the treadmill is not flashing. Note: If the speed or incline of the CD or video program. The incline must be stopped by pressing the... manually override the settings at 1%. When the CD or video program is heard, the speed and incline will change to the next settings of the treadmill does not change when a "chirp" is heard: • make sure that the iFIT.com indicator is lit and that the Time/Laps display is raised...
English Manual
Page 20
...adding an optional upgrade module to the console, you to access a selection of the program. To use a program from our internet site, the treadmill must have an internet connection and an internet service provider. Our new internet site at 1.0 mph. Explore www.iFIT.com for speed and/or ...1 Insert the key fully into the console. Hold the handrails, step onto the walking belt, and begin to flash. CAUTION: Always listen for using the treadmill, move down will change . After a moment, the walking belt will begin . When you are too high or too low, you start the program. ...
...adding an optional upgrade module to the console, you to access a selection of the program. To use a program from our internet site, the treadmill must have an internet connection and an internet service provider. Our new internet site at 1.0 mph. Explore www.iFIT.com for speed and/or ...1 Insert the key fully into the console. Hold the handrails, step onto the walking belt, and begin to flash. CAUTION: Always listen for using the treadmill, move down will change . After a moment, the walking belt will begin . When you are too high or too low, you start the program. ...
English Manual
Page 21
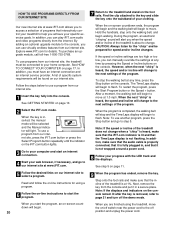
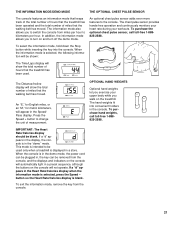
... number of miles that the walking belt has moved. To exit the information mode, remove the key from miles per hour to turn on the treadmill. In addition, the information mode allows you walk on and turn off the demo mode. When the information mode is in the demo mode, ... The console features an information mode that keeps track of the total number of hours that the treadmill has been operated and the total number of miles that the treadmill has been used only when a treadmill is blank. To purchase hand weights, call toll-free 1-888825-2588. To select the information mode, ...
... number of miles that the walking belt has moved. To exit the information mode, remove the key from miles per hour to turn on the treadmill. In addition, the information mode allows you walk on and turn off the demo mode. When the information mode is in the demo mode, ... The console features an information mode that keeps track of the total number of hours that the treadmill has been operated and the total number of miles that the treadmill has been used only when a treadmill is blank. To purchase hand weights, call toll-free 1-888825-2588. To select the information mode, ...


