

English Manual
Page 1
... Decal ACTIVATE YOUR WARRANTY To register your product and activate your warranty today, go to www.nordictrackservice.com/ registration. MT Sat. 8 a.m.–-12 p.m. USER’'S MANUAL CUSTOMER CARE For service at any time, go to www.nordictrackservice.com. Or call 1-800-TO-BE-FIT (1-800-862-3348) Mon.–-Fri. 6 a.m.–...;-6 p.m. Save this equipment. CAUTION Read all precautions and instructions in the space above for future reference. MT Please do not contact the store. www.nordictrack.com Model No. 831.24937.0 Serial No.
... Decal ACTIVATE YOUR WARRANTY To register your product and activate your warranty today, go to www.nordictrackservice.com/ registration. MT Sat. 8 a.m.–-12 p.m. USER’'S MANUAL CUSTOMER CARE For service at any time, go to www.nordictrackservice.com. Or call 1-800-TO-BE-FIT (1-800-862-3348) Mon.–-Fri. 6 a.m.–...;-6 p.m. Save this equipment. CAUTION Read all precautions and instructions in the space above for future reference. MT Please do not contact the store. www.nordictrack.com Model No. 831.24937.0 Serial No.
English Manual
Page 2
... 8 PART IDENTIFICATION CHART 9 ASSEMBLY 10 THE CHEST HEART RATE MONITOR 21 OPERATION AND ADJUSTMENT 22 HOW TO FOLD AND MOVE THE TREADMILL 40 TROUBLESHOOTING 41 EXERCISE GUIDELINES 44 PART LIST 45 EXPLODED DRAWING 47 ORDERING REPLACEMENT PARTS Back Cover LIMITED WARRANTY Back Cover WARNING DECAL ...PLACEMENT This drawing shows the locations of ICON IP, Inc. 2 NORDICTRACK is missing or illegible, call the telephone number on the front cover of this manual and request a free replacement decal. Note: The decals may not be shown at actual size....
... 8 PART IDENTIFICATION CHART 9 ASSEMBLY 10 THE CHEST HEART RATE MONITOR 21 OPERATION AND ADJUSTMENT 22 HOW TO FOLD AND MOVE THE TREADMILL 40 TROUBLESHOOTING 41 EXERCISE GUIDELINES 44 PART LIST 45 EXPLODED DRAWING 47 ORDERING REPLACEMENT PARTS Back Cover LIMITED WARRANTY Back Cover WARNING DECAL ...PLACEMENT This drawing shows the locations of ICON IP, Inc. 2 NORDICTRACK is missing or illegible, call the telephone number on the front cover of this manual and request a free replacement decal. Note: The decals may not be shown at actual size....
English Manual
Page 3
...beginning any exercise program, consult your local NORDICTRACK dealer, call the telephone number on page 22. The treadmill is intended for personal injury or property damage sus- To protect the floor or carpet from moisture and dust. The treadmill should be used or where oxygen is especially...or less. 10. This is being administered. 8. Do not place the treadmill on page 41 if the treadmill is damaged, the walking belt may result in this manual and all times. 9. Do not operate the treadmill where aerosol products are standing on page 24). 18. Never move the walking...
...beginning any exercise program, consult your local NORDICTRACK dealer, call the telephone number on page 22. The treadmill is intended for personal injury or property damage sus- To protect the floor or carpet from moisture and dust. The treadmill should be used or where oxygen is especially...or less. 10. This is being administered. 8. Do not place the treadmill on page 41 if the treadmill is damaged, the walking belt may result in this manual and all times. 9. Do not operate the treadmill where aerosol products are standing on page 24). 18. Never move the walking...
English Manual
Page 4
...grounding of antenna discharge unit, connection to move the treadmill until it can fall into such power lines or circuits. An outside antenna system, use , before performing the maintenance and adjustment procedures described in this manual. To reduce the risk of the television. There ...including the user’'s movement, may result in the vicinity of the treadmill by an authorized service representative. Do not change the incline of overhead power lines or other than the procedures in this manual should not be performed by an authorized ser- Never insert any opening ...
...grounding of antenna discharge unit, connection to move the treadmill until it can fall into such power lines or circuits. An outside antenna system, use , before performing the maintenance and adjustment procedures described in this manual. To reduce the risk of the television. There ...including the user’'s movement, may result in the vicinity of the treadmill by an authorized service representative. Do not change the incline of overhead power lines or other than the procedures in this manual should not be performed by an authorized ser- Never insert any opening ...
English Manual
Page 8
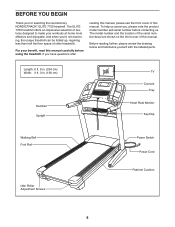
... Key/Clip Walking Belt Foot Rail Idler Roller Adjustment Screws Power Switch Power Cord Platform Cushion 8 The ELITE 7700 treadmill offers an impressive selection of this manual carefully before contacting us assist you for selecting the revolutionary NORDICTRACK® ELITE 7700 treadmill. Before reading further, please review the drawing below and familiarize yourself with the labeled parts. The...
... Key/Clip Walking Belt Foot Rail Idler Roller Adjustment Screws Power Switch Power Cord Platform Cushion 8 The ELITE 7700 treadmill offers an impressive selection of this manual carefully before contacting us assist you for selecting the revolutionary NORDICTRACK® ELITE 7700 treadmill. Before reading further, please review the drawing below and familiarize yourself with the labeled parts. The...
English Manual
Page 9
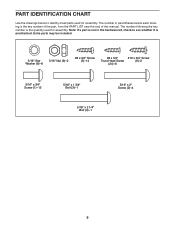
.... PART IDENTIFICATION CHART Use the drawings below each drawing is the key number of the part, from the PART LIST near the end of this manual. The number following the key number is the quantity used for assembly.
.... PART IDENTIFICATION CHART Use the drawings below each drawing is the key number of the part, from the PART LIST near the end of this manual. The number following the key number is the quantity used for assembly.

English Manual
Page 10
...requires two persons. •• Place all assembly steps. •• After shipping, there may be an oily substance on the exterior of the treadmill. Attach the right wheel assembly to the left wheel assembly (not shown) to the right Upright (84) with a soft cloth and a mild, non...power tools. 1. This is unplugged. 2 Identify the right wheel assembly (A). Start both Screws, and then tighten them. Do not dispose of this manual) and register your warranty •• saves you time if you ever need to contact Customer Care •• allows us to www.nordictrackservice....
...requires two persons. •• Place all assembly steps. •• After shipping, there may be an oily substance on the exterior of the treadmill. Attach the right wheel assembly to the left wheel assembly (not shown) to the right Upright (84) with a soft cloth and a mild, non...power tools. 1. This is unplugged. 2 Identify the right wheel assembly (A). Start both Screws, and then tighten them. Do not dispose of this manual) and register your warranty •• saves you time if you ever need to contact Customer Care •• allows us to www.nordictrackservice....

English Manual
Page 19
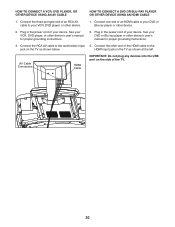
...before connecting the antenna. Push the 300 ohm to 75 ohm adapter onto the 75 ohm terminal on the treadmill frame near the power cord. 300 to the 75 ohm terminal on the treadmill frame near the power cord. 75 Ohm CATV Cable 75 Ohm Terminal 3. Connect the 75 ohm CATV ...75 Ohm CATV Cable 2. Connect the 75 ohm CATV cable to the 75 ohm terminal on the treadmill frame near the power cord. No CATV cable, antenna, or adapter; Inspect your external source user’'s manual for proper grounding instructions. 1. See your outdoor antenna and the lead-in the desired location. Plug...
...before connecting the antenna. Push the 300 ohm to 75 ohm adapter onto the 75 ohm terminal on the treadmill frame near the power cord. 300 to the 75 ohm terminal on the treadmill frame near the power cord. 75 Ohm CATV Cable 75 Ohm Terminal 3. Connect the 75 ohm CATV ...75 Ohm CATV Cable 2. Connect the 75 ohm CATV cable to the 75 ohm terminal on the treadmill frame near the power cord. No CATV cable, antenna, or adapter; Inspect your external source user’'s manual for proper grounding instructions. 1. See your outdoor antenna and the lead-in the desired location. Plug...
English Manual
Page 20
... TO CONNECT A DVD OR BLU-RAY PLAYER OR OTHER DEVICE USING AN HDMI CABLE 1. See your VCR, DVD player, or other device’'s user’'s manual for proper grounding instructions. 2. Plug in the power cord of your device. Plug in the power cord of your device. HDMI input jack on the... HDMI cable to your DVD or Blu-ray player or other device. 1. See your DVD or Blu-ray player or other device’'s user’'s manual for proper grounding instructions. 3. Connect the other end of an RCA AV cable to the audio/video input 3.
... TO CONNECT A DVD OR BLU-RAY PLAYER OR OTHER DEVICE USING AN HDMI CABLE 1. See your VCR, DVD player, or other device’'s user’'s manual for proper grounding instructions. 2. Plug in the power cord of your device. Plug in the power cord of your device. HDMI input jack on the... HDMI cable to your DVD or Blu-ray player or other device. 1. See your DVD or Blu-ray player or other device’'s user’'s manual for proper grounding instructions. 3. Connect the other end of an RCA AV cable to the audio/video input 3.

English Manual
Page 23
... offers an array of a button. When you use the manual mode, you can change the speed and incline of the treadmill with customizable Google Maps. In addition, you exercise, the console will display instant exercise feedback. Choose and download sets of onboard workouts. Download...CONSOLE DIAGRAM MAKE YOUR FITNESS GOALS A REALITY WITH IFIT.COM With your new iFit-compatible fitness equipment, you can use an array of the treadmill as it guides you through an effective exercise session. Upload your workout results to your favorite workout music or audio books with simulated workouts....
... offers an array of a button. When you use the manual mode, you can change the speed and incline of the treadmill with customizable Google Maps. In addition, you exercise, the console will display instant exercise feedback. Choose and download sets of onboard workouts. Download...CONSOLE DIAGRAM MAKE YOUR FITNESS GOALS A REALITY WITH IFIT.COM With your new iFit-compatible fitness equipment, you can use an array of the treadmill as it guides you through an effective exercise session. Upload your workout results to your favorite workout music or audio books with simulated workouts....
English Manual
Page 25
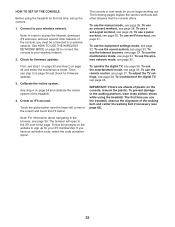
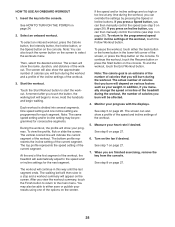
... to the iFit.com home page. To use the remote control, see page 42). To use the treadmill, observe the alignment of plastic on page 34 and calibrate the incline system of the screen and touch ...the iFit button. Calibrate the incline system. HOW TO SET UP THE CONSOLE Before using the treadmill. First, see step 3 on the website to a wireless network. The first time you have an activation code.... 2. Connect to access the Internet, download iFit workouts, and use the manual mode, see page 28. To troubleshoot the digital TV, see page 36.
... to the iFit.com home page. To use the remote control, see page 42). To use the treadmill, observe the alignment of plastic on page 34 and calibrate the incline system of the screen and touch ...the iFit button. Calibrate the incline system. HOW TO SET UP THE CONSOLE Before using the treadmill. First, see step 3 on the website to a wireless network. The first time you have an activation code.... 2. Connect to access the Internet, download iFit workouts, and use the manual mode, see page 28. To troubleshoot the digital TV, see page 36.
English Manual
Page 26
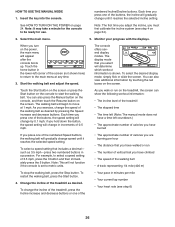
... can show the following workout information: •• The incline level of the treadmill •• The elapsed time •• The time left (Note: The manual mode does not have a time left corner of the treadmill as desired by touching the red boxes on the console to be ready for the... console to start the walking belt. You can also press the Manual button on the console, and then touch the...
... can show the following workout information: •• The incline level of the treadmill •• The elapsed time •• The time left (Note: The manual mode does not have a time left corner of the treadmill as desired by touching the red boxes on the console to be ready for the... console to start the walking belt. You can also press the Manual button on the console, and then touch the...
English Manual
Page 28
...be affected. 4. If you press an Incline button, you can also show your progress with the displays. In addition, if you manually change the speed or incline of the treadmill during the workout, you can also touch the runner button on page 24. 2. After you touch the button, the walking belt ... current segment. When you burn will indicate the current segment of the workout. 5. The top profile represents the speed setting of the workout, the treadmill will continue in the lower-left corner of the workout. 3. If the speed and/or incline settings are too high or too low at any...
...be affected. 4. If you press an Incline button, you can also show your progress with the displays. In addition, if you manually change the speed or incline of the treadmill during the workout, you can also touch the runner button on page 24. 2. After you touch the button, the walking belt ... current segment. When you burn will indicate the current segment of the workout. 5. The top profile represents the speed setting of the workout, the treadmill will continue in the lower-left corner of the workout. 3. If the speed and/or incline settings are too high or too low at any...

English Manual
Page 29
... of calories you are finished exercising, remove the key from the console. 4. See HOW TO TURN ON THE POWER on various factors such as the manual mode (see pages 26). When you will appear on the screen. 3.
... of calories you are finished exercising, remove the key from the console. 4. See HOW TO TURN ON THE POWER on various factors such as the manual mode (see pages 26). When you will appear on the screen. 3.

English Manual
Page 41
... a few seconds. b. Check the power switch located on . The console features a display demo mode, designed to turn on page 22. SYMPTOM: The displays of this manual. a 62 5 5 5 SYMPTOM: The power turns off the demo mode, hold down the Stop button for ve minutes, and then plug it . b. SYMPTOM: ...The console displays remain lit when you remove the key, the demo mode is turned on the treadmill frame near the power cord. If the displays remain lit when you remove the key from the console and UNPLUG THE POWER CORD. If further...
... a few seconds. b. Check the power switch located on . The console features a display demo mode, designed to turn on page 22. SYMPTOM: The displays of this manual. a 62 5 5 5 SYMPTOM: The power turns off the demo mode, hold down the Stop button for ve minutes, and then plug it . b. SYMPTOM: ...The console displays remain lit when you remove the key, the demo mode is turned on the treadmill frame near the power cord. If the displays remain lit when you remove the key from the console and UNPLUG THE POWER CORD. If further...

English Manual
Page 42
...a. SYMPTOM: The walking belt slows when walked on page 22. If you should be able to lift each edge of this manual. d. if the walking belt has shifted to keep the walking belt centered. Reattach the Motor Hood (not shown) with high-performance lubricant....150;-3 in . If the walking belt has shifted to the left idler roller screw counterclockwise 1/2 of a turn; Repeat until the walking belt is overtightened, treadmill performance may decrease and the walking belt may deteriorate the walking belt and cause excessive wear. careful to the right, turn the left , use the...
...a. SYMPTOM: The walking belt slows when walked on page 22. If you should be able to lift each edge of this manual. d. if the walking belt has shifted to keep the walking belt centered. Reattach the Motor Hood (not shown) with high-performance lubricant....150;-3 in . If the walking belt has shifted to the left idler roller screw counterclockwise 1/2 of a turn; Repeat until the walking belt is overtightened, treadmill performance may decrease and the walking belt may deteriorate the walking belt and cause excessive wear. careful to the right, turn the left , use the...

English Manual
Page 46
... Supply Stand-Off Power Supply Plate M4 x 12mm Screw TV Bracket Upper TV Bracket Cover TV TV Cover Lower TV Bracket Cover –- User’'s Manual Note: Specications are not illustrated. 46 For information about ordering replacement parts, see the back cover of this... manual. *These parts are subject to change without notice. Qty. 101 1 102 1 103 1 104 1 105 2 106 1 107 4 108 1 109 1 110 2 111 2 112 1 113 1 114 4 115 2 116 1 ...
... Supply Stand-Off Power Supply Plate M4 x 12mm Screw TV Bracket Upper TV Bracket Cover TV TV Cover Lower TV Bracket Cover –- User’'s Manual Note: Specications are not illustrated. 46 For information about ordering replacement parts, see the back cover of this... manual. *These parts are subject to change without notice. Qty. 101 1 102 1 103 1 104 1 105 2 106 1 107 4 108 1 109 1 110 2 111 2 112 1 113 1 114 4 115 2 116 1 ...

English Manual
Page 52
ORDERING REPLACEMENT PARTS To order replacement parts, please see the front cover of its authorized service centers. ICON’'s obligation under this manual. For in their scope and duration to the terms set forth above is under normal use and service conditions. ICON is limited to the customer. ... to provide the following information when contacting us: •• the model number and serial number of the product (see the front cover of this manual) •• the name of the product (see the PART LIST and the EXPLODED DRAWING near the end of purchase. Labor is in this...
ORDERING REPLACEMENT PARTS To order replacement parts, please see the front cover of its authorized service centers. ICON’'s obligation under this manual. For in their scope and duration to the terms set forth above is under normal use and service conditions. ICON is limited to the customer. ... to provide the following information when contacting us: •• the model number and serial number of the product (see the front cover of this manual) •• the name of the product (see the PART LIST and the EXPLODED DRAWING near the end of purchase. Labor is in this...


