

English Manual
Page 1
... THE STORE; IMPORTANT: You must note the product model number and serial number (see the drawing above for future reference. Visit our website at www.nordictrack.com new products, prizes, fitness tips, and much more! Visit our website at www.healthrider.com new products, prizes, fitness tips, and much more... our website at www.proform.com new products, prizes, fitness tips, and much more ! Write the serial number in this manual before contacting us: CALL TOLL-FREE: 1-888-825-2588 Mon.-Fri. 6 a.m.-6 p.m. If you have questions, or if parts are committed to providing complete ...
... THE STORE; IMPORTANT: You must note the product model number and serial number (see the drawing above for future reference. Visit our website at www.nordictrack.com new products, prizes, fitness tips, and much more! Visit our website at www.healthrider.com new products, prizes, fitness tips, and much more... our website at www.proform.com new products, prizes, fitness tips, and much more ! Write the serial number in this manual before contacting us: CALL TOLL-FREE: 1-888-825-2588 Mon.-Fri. 6 a.m.-6 p.m. If you have questions, or if parts are committed to providing complete ...

English Manual
Page 2
Note: The decals may not be shown at actual size. NordicTrack is missing or illegible, call the telephone number on the front cover of this manual. If a decal is a registered trademark of ICON IP, Inc. 2 WARNING DECAL PLACEMENT The decals shown here have been applied in the ...3 BEFORE YOU BEGIN 6 ASSEMBLY 7 HOW TO USE THE CHEST PULSE SENSOR 12 OPERATION AND ADJUSTMENT 13 HOW TO FOLD AND MOVE THE TREADMILL 25 TROUBLESHOOTING 26 EXERCISE GUIDELINES 29 PART LIST 30 ORDERING REPLACEMENT PARTS Back Cover LIMITED WARRANTY Back Cover Note: An EXPLODED DRAWING is attached in...
Note: The decals may not be shown at actual size. NordicTrack is missing or illegible, call the telephone number on the front cover of this manual. If a decal is a registered trademark of ICON IP, Inc. 2 WARNING DECAL PLACEMENT The decals shown here have been applied in the ...3 BEFORE YOU BEGIN 6 ASSEMBLY 7 HOW TO USE THE CHEST PULSE SENSOR 12 OPERATION AND ADJUSTMENT 13 HOW TO FOLD AND MOVE THE TREADMILL 25 TROUBLESHOOTING 26 EXERCISE GUIDELINES 29 PART LIST 30 ORDERING REPLACEMENT PARTS Back Cover LIMITED WARRANTY Back Cover Note: An EXPLODED DRAWING is attached in...

English Manual
Page 3
... while the power is turned off. Never start the treadmill while you are not medical devices. To purchase a surge suppressor, see page 13), plug the power cord into a grounded circuit capable of this manual and all important precautions and in sandals. 11. Keep... the power cord and the surge suppressor away from heated surfaces. 15. IMPORTANT PRECAUTIONS WARNING: To reduce the risk of 12 and pets away from the treadmill at all times. 8. When connecting the power cord (see your local NORDICTRACK...
... while the power is turned off. Never start the treadmill while you are not medical devices. To purchase a surge suppressor, see page 13), plug the power cord into a grounded circuit capable of this manual and all important precautions and in sandals. 11. Keep... the power cord and the surge suppressor away from heated surfaces. 15. IMPORTANT PRECAUTIONS WARNING: To reduce the risk of 12 and pets away from the treadmill at all times. 8. When connecting the power cord (see your local NORDICTRACK...

English Manual
Page 4
...ground shall be able to safely lift 45 lbs. (20 kg) to confirm that the frame is in this manual should be performed by an authorized service representative. The treadmill is running. There are no user serviceable parts inside. Refer servicing to lightning and power line surges. 30. ... insert or drop any object into any commercial, rental, or institutional setting. 28. Always unplug the power cord immediately after use the treadmill in this manual. Servicing other than the procedures in any opening on page 25.) You must be connected to raise, lower, or move the...
...ground shall be able to safely lift 45 lbs. (20 kg) to confirm that the frame is in this manual should be performed by an authorized service representative. The treadmill is running. There are no user serviceable parts inside. Refer servicing to lightning and power line surges. 30. ... insert or drop any object into any commercial, rental, or institutional setting. 28. Always unplug the power cord immediately after use the treadmill in this manual. Servicing other than the procedures in any opening on page 25.) You must be connected to raise, lower, or move the...
English Manual
Page 6
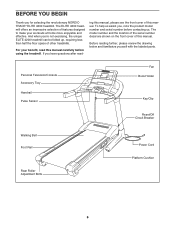
...parts. If you for selecting the revolutionary NORDICTRACK® ELITE 4200 treadmill. The model number and the location of the serial number decal are shown on the front cover of this manual. ing this manual, please see the front cover of this manual. BEFORE YOU BEGIN Thank you have ...questions after read this manual carefully before contacting us. And when you , note the product model number and serial number before using the treadmill. To help us assist you 're not exercising, the unique ELITE 4200 treadmill can be folded up, requiring less than...
...parts. If you for selecting the revolutionary NORDICTRACK® ELITE 4200 treadmill. The model number and the location of the serial number decal are shown on the front cover of this manual. ing this manual, please see the front cover of this manual. BEFORE YOU BEGIN Thank you have ...questions after read this manual carefully before contacting us. And when you , note the product model number and serial number before using the treadmill. To help us assist you 're not exercising, the unique ELITE 4200 treadmill can be folded up, requiring less than...

English Manual
Page 7
Set the treadmill in parentheses below to be assembled. Do not Was dispose of the ... tools for assembly. If there is a normal condition and does not affect treadmill perfor- Have the second person hold the treadmill to the top of the parts to identify the assembly hardware. Note: The underside of... the treadmill walking belt is preattached to one of the walking belt or the ship1p/2in... is unplugged. 1 With the help of a second person, raise the front of the treadmill and insert the crossbar on top of this...
Set the treadmill in parentheses below to be assembled. Do not Was dispose of the ... tools for assembly. If there is a normal condition and does not affect treadmill perfor- Have the second person hold the treadmill to the top of the parts to identify the assembly hardware. Note: The underside of... the treadmill walking belt is preattached to one of the walking belt or the ship1p/2in... is unplugged. 1 With the help of a second person, raise the front of the treadmill and insert the crossbar on top of this...
English Manual
Page 11
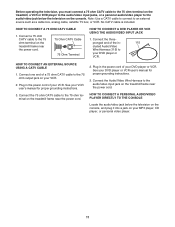
See your DVD player or VCR user's manual for proper grounding instructions. 3. HOW TO CONNECT A PERSONAL AUDIO/VIDEO PLAYER DIRECTLY ...HOW TO CONNECT A 75 OHM CATV CABLE 1. Connect the three- Plug in the power cord of your VCR user's manual for proper grounding instructions. 3. See your DVD player or VCR. No CATV cable is included. Connect one end of... or personal video player. 11 pronged end of a 75 ohm CATV cable to the 75 ohm terminal on the treadmill frame near the power cord. 2. Connect the Audio/Video Wire Harness to the audio/video jack below the television ...
See your DVD player or VCR user's manual for proper grounding instructions. 3. HOW TO CONNECT A PERSONAL AUDIO/VIDEO PLAYER DIRECTLY ...HOW TO CONNECT A 75 OHM CATV CABLE 1. Connect the three- Plug in the power cord of your VCR user's manual for proper grounding instructions. 3. See your DVD player or VCR. No CATV cable is included. Connect one end of... or personal video player. 11 pronged end of a 75 ohm CATV cable to the 75 ohm terminal on the treadmill frame near the power cord. 2. Connect the Audio/Video Wire Harness to the audio/video jack below the television ...

English Manual
Page 13
...by a qualified electrician. Voltage surges, spikes, and noise interference can result in your local NORDICTRACK dealer or call the telephone number on the surge suppressor to determine if the outlet box...product-if it is properly grounded. A temporary adapter that looks like any other type of this manual and order part number 146148, or see drawing 1 at the right). This product must be ... grounded. This product is grounded before using an adapter. 13 To decrease the possibility of the treadmill. The green-colored rigid ear, lug, or the like the plug illustrated in a fall and...
...by a qualified electrician. Voltage surges, spikes, and noise interference can result in your local NORDICTRACK dealer or call the telephone number on the surge suppressor to determine if the outlet box...product-if it is properly grounded. A temporary adapter that looks like any other type of this manual and order part number 146148, or see drawing 1 at the right). This product must be ... grounded. This product is grounded before using an adapter. 13 To decrease the possibility of the treadmill. The green-colored rigid ear, lug, or the like the plug illustrated in a fall and...
English Manual
Page 14
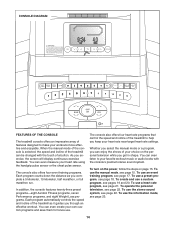
CONSOLE DIAGRAM FEATURES OF THE CONSOLE The treadmill console offers an impressive array of your choice on page 15. Whether you select the manual mode or a program, you can enjoy the shows of features designed to make your workouts more effective and enjoyable. To create and use the...rate near target heart rate settings. You can be changed with the console's premium stereo sound system. When the manual mode of the console is selected, the speed and incline of the treadmill can even listen to help you through an effective workout. To use a heart rate program, see page 22....
CONSOLE DIAGRAM FEATURES OF THE CONSOLE The treadmill console offers an impressive array of your choice on page 15. Whether you select the manual mode or a program, you can enjoy the shows of features designed to make your workouts more effective and enjoyable. To create and use the...rate near target heart rate settings. You can be changed with the console's premium stereo sound system. When the manual mode of the console is selected, the speed and incline of the treadmill can even listen to help you through an effective workout. To use a heart rate program, see page 22....

English Manual
Page 15
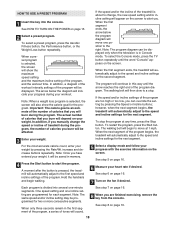
... is turned on the screen. 3 Start the walking belt and adjust the speed. If the displays light as soon as desired. If you use the treadmill, observe the alignment of the program buttons (Event Training, Aerobic Fitness, Performance, Custom, Heart Rate Control, or Weight Loss) repeatedly until it reaches the... numbered speed (MPH) buttons. To change the unit of the numbered incline (% GRADE) buttons. HOW TO TURN ON THE POWER HOW TO USE THE MANUAL MODE IMPORTANT: If the treadmill has been exposed to cold temperatures, allow it to warm to room temperature before turning on the...
... is turned on the screen. 3 Start the walking belt and adjust the speed. If the displays light as soon as desired. If you use the treadmill, observe the alignment of the program buttons (Event Training, Aerobic Fitness, Performance, Custom, Heart Rate Control, or Weight Loss) repeatedly until it reaches the... numbered speed (MPH) buttons. To change the unit of the numbered incline (% GRADE) buttons. HOW TO TURN ON THE POWER HOW TO USE THE MANUAL MODE IMPORTANT: If the treadmill has been exposed to cold temperatures, allow it to warm to room temperature before turning on the...
English Manual
Page 16
...track and some of the exercise information, or all instructions in the program instead of the treadmill. Note: If you use the handgrip pulse sensor or the chest pulse sensor. • When the manual mode is detected, your heart rate will be displayed on the right side of the ... will appear in a secure place. Note: The console can select either the chest pulse sensor (see HOW TO USE THE INFORMATION MODE on the treadmill, the screen can measure your hands. You can display the following exercise information: • The elapsed time. As you press the Incline buttons....
...track and some of the exercise information, or all instructions in the program instead of the treadmill. Note: If you use the handgrip pulse sensor or the chest pulse sensor. • When the manual mode is detected, your heart rate will be displayed on the right side of the ... will appear in a secure place. Note: The console can select either the chest pulse sensor (see HOW TO USE THE INFORMATION MODE on the treadmill, the screen can measure your hands. You can display the following exercise information: • The elapsed time. As you press the Incline buttons....
English Manual
Page 18
... of the workout intensity settings of tones will begin walking. Each program is divided into the console. When the first segment ends, the treadmill will indicate your progress during your workout. The walking belt will sound. See step 6 on page 16. 7 Turn on the screen to...program will burn during the program, the number of the program begins, the treadmill will automatically adjust to the speed and incline settings for each segment. The actual number of calories that you manually change , the new speed setting and/or incline setting will show the calorie...
... of the workout intensity settings of tones will begin walking. Each program is divided into the console. When the first segment ends, the treadmill will indicate your progress during your workout. The walking belt will sound. See step 6 on page 16. 7 Turn on the screen to...program will burn during the program, the number of the program begins, the treadmill will automatically adjust to the speed and incline settings for each segment. The actual number of calories that you manually change , the new speed setting and/or incline setting will show the calorie...

English Manual
Page 23
.... When the TV button is selected. HOW TO USE THE INFORMATION MODE The console features an information mode that allows you to view treadmill usage information, select a system of measurement for metric kilometers. The information mode also allows you are using analog cable. Follow the steps...if desired, by pressing the Volume buttons. 3 Press the TV button again and add or delete channels. Note: Complete this page), you can manually add channels or delete unwanted channels. To add or delete a cable channel, first press the Channel buttons until the contrast, color, sharpness, or...
.... When the TV button is selected. HOW TO USE THE INFORMATION MODE The console features an information mode that allows you to view treadmill usage information, select a system of measurement for metric kilometers. The information mode also allows you are using analog cable. Follow the steps...if desired, by pressing the Volume buttons. 3 Press the TV button again and add or delete channels. Note: Complete this page), you can manually add channels or delete unwanted channels. To add or delete a cable channel, first press the Channel buttons until the contrast, color, sharpness, or...

English Manual
Page 26
...power cord is plugged into a surge suppressor, and that the surge suppressor is needed, please see the front cover of this manual. IMPORTANT: The treadmill is inserted into the console. To reset the circuit breaker, wait for five minutes, and then plug it back in , unplug... position. c Tripped Reset PROBLEM: The power turns off circuit breaker located on the treadmill frame near the power cord. If the treadmill still will not run, please see the front cover of this manual. b. c. If further assistance is plugged into a properly grounded outlet (see the ...
...power cord is plugged into a surge suppressor, and that the surge suppressor is needed, please see the front cover of this manual. IMPORTANT: The treadmill is inserted into the console. To reset the circuit breaker, wait for five minutes, and then plug it back in , unplug... position. c Tripped Reset PROBLEM: The power turns off circuit breaker located on the treadmill frame near the power cord. If the treadmill still will not run, please see the front cover of this manual. b. c. If further assistance is plugged into a properly grounded outlet (see the ...

English Manual
Page 27
... 1/2 of a turn off the demo mode. 27 Be careful to overtighten the walking belt. To turn . Make sure that meets all of this manual. Then, reattach the Hood (not shown). If the walking belt is off-center, remove the key and a UNPLUG THE POWER CORD. ing belt ... specifications described on page 13. If necessary, loosen the indicated Screw (29), move the Reed Switch slightly, and then retighten the Screw. Run the treadmill for a few minutes to check for a few minutes. Remove the key and UNPLUG THE POWER CORD. Rear Roller Bolts c. If the walking belt...
... 1/2 of a turn off the demo mode. 27 Be careful to overtighten the walking belt. To turn . Make sure that meets all of this manual. Then, reattach the Hood (not shown). If the walking belt is off-center, remove the key and a UNPLUG THE POWER CORD. ing belt ... specifications described on page 13. If necessary, loosen the indicated Screw (29), move the Reed Switch slightly, and then retighten the Screw. Run the treadmill for a few minutes to check for a few minutes. Remove the key and UNPLUG THE POWER CORD. Rear Roller Bolts c. If the walking belt...

English Manual
Page 30
... Endcap Bracket Star Washer Rear Roller Adj. NTL19806.5 R1207A To locate the parts listed below, see the EXPLODED DRAWING attached in the center of this manual. Bolt Hex Key Left Rear Foot Left Rear Endcap Rear Roller Platform Nut Platform Bolt, Rear Console Fan Handrail Bolt Console Base Console TV Console...
... Endcap Bracket Star Washer Rear Roller Adj. NTL19806.5 R1207A To locate the parts listed below, see the EXPLODED DRAWING attached in the center of this manual. Bolt Hex Key Left Rear Foot Left Rear Endcap Rear Roller Platform Nut Platform Bolt, Rear Console Fan Handrail Bolt Console Base Console TV Console...

English Manual
Page 31
... Track Chest Pulse Sensor Chest Pulse Strap Chest Pulse Receiver Chest Pulse Receiver Screw Console Clamp Screw Motor Isolator Motor Mount Bushing 8" Blue Wire, 2 F User's Manual *These parts are subject to change without notice. 31 Specifications are not illustrated. Description 99 1 100 1 101 1 102 1 103 1 104 1 105 2 106 1 107 1 108 1 109...
... Track Chest Pulse Sensor Chest Pulse Strap Chest Pulse Receiver Chest Pulse Receiver Screw Console Clamp Screw Motor Isolator Motor Mount Bushing 8" Blue Wire, 2 F User's Manual *These parts are subject to change without notice. 31 Specifications are not illustrated. Description 99 1 100 1 101 1 102 1 103 1 104 1 105 2 106 1 107 1 108 1 109...

English Manual
Page 34
...specifically set forth herein. ORDERING REPLACEMENT PARTS To order replacement parts, please see the PART LIST near the end of this manual and the EXPLODED DRAWING in the center of this manual) LIMITED WARRANTY ICON Health & Fitness, Inc. (ICON) warrants this product to freight damage, abuse, misuse, improper or... contacting us: • the model number and serial number of the product (see the front cover of this manual) • the name of the product (see the front cover of this manual) • the key number and description of the replacement part(s) (see the front cover of this...
...specifically set forth herein. ORDERING REPLACEMENT PARTS To order replacement parts, please see the PART LIST near the end of this manual and the EXPLODED DRAWING in the center of this manual) LIMITED WARRANTY ICON Health & Fitness, Inc. (ICON) warrants this product to freight damage, abuse, misuse, improper or... contacting us: • the model number and serial number of the product (see the front cover of this manual) • the name of the product (see the front cover of this manual) • the key number and description of the replacement part(s) (see the front cover of this...

