

Uk Manual
Page 2
...(s) may not be shown at actual size. NordicTrack is missing or illegible, see the front cover of the warning decal(s). Apply the decal in the location shown. TABLE OF CONTENTS WARNING DECAL PLACEMENT 2 IMPORTANT PRECAUTIONS 3 BEFORE YOU BEGIN 4 ASSEMBLY 5 HOW TO USE THE ELLIPTICAL 14 MAINTENANCE AND TROUBLESHOOTING 22 EXERCISE GUIDELINES 24...
...(s) may not be shown at actual size. NordicTrack is missing or illegible, see the front cover of the warning decal(s). Apply the decal in the location shown. TABLE OF CONTENTS WARNING DECAL PLACEMENT 2 IMPORTANT PRECAUTIONS 3 BEFORE YOU BEGIN 4 ASSEMBLY 5 HOW TO USE THE ELLIPTICAL 14 MAINTENANCE AND TROUBLESHOOTING 22 EXERCISE GUIDELINES 24...

Uk Manual
Page 3
... loose clothes that could become caught on each side. 12. Do not put the elliptical in a garage or covered patio, or near water. 6. Place the elliptical on your elliptical before using the elliptical. 4. Replace any exercise program, consult your physician. Over exercising may affect the accuracy... of heart rate readings. ICON assumes no responsibility for foot protection while exercising. 3. do not arch your elliptical. Always wear athletic shoes for personal injury or property damage sustained by persons weighing more than 300 lbs. (136 kg). 10....
... loose clothes that could become caught on each side. 12. Do not put the elliptical in a garage or covered patio, or near water. 6. Place the elliptical on your elliptical before using the elliptical. 4. Replace any exercise program, consult your physician. Over exercising may affect the accuracy... of heart rate readings. ICON assumes no responsibility for foot protection while exercising. 3. do not arch your elliptical. Always wear athletic shoes for personal injury or property damage sustained by persons weighing more than 300 lbs. (136 kg). 10....

Uk Manual
Page 4
To help us assist you for selecting the revolutionary NordicTrack® E 7.0 elliptical. Upper Body Arm Fan H: 5 ft. 2 in the drawing below. The E 7.0 elliptical provides an impressive selection of features designed to make your benefit, read this manual carefully before contacting us. For your... Access Cover Handle Leveling Foot Console Pulse Sensor Ramp Wheel Pedal Arm Latch Leveling Foot Latch Button 4 manual. If you use the elliptical. BEFORE YOU BEGIN Thank you , note the product model number and serial number before you have questions after reading this manual, please...
To help us assist you for selecting the revolutionary NordicTrack® E 7.0 elliptical. Upper Body Arm Fan H: 5 ft. 2 in the drawing below. The E 7.0 elliptical provides an impressive selection of features designed to make your benefit, read this manual carefully before contacting us. For your... Access Cover Handle Leveling Foot Console Pulse Sensor Ramp Wheel Pedal Arm Latch Leveling Foot Latch Button 4 manual. If you use the elliptical. BEFORE YOU BEGIN Thank you , note the product model number and serial number before you have questions after reading this manual, please...
Uk Manual
Page 5
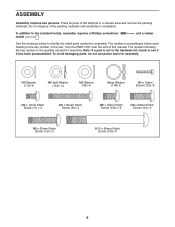
... packing materials until assembly is completed. and a rubber See the drawings below each drawing is the quantity needed for assembly. Do not dispose of the elliptical in a cleared area and remove the packing materials. The number following the key number is the key number of the part, from the PART LIST...
... packing materials until assembly is completed. and a rubber See the drawings below each drawing is the quantity needed for assembly. Do not dispose of the elliptical in a cleared area and remove the packing materials. The number following the key number is the key number of the part, from the PART LIST...

Uk Manual
Page 9
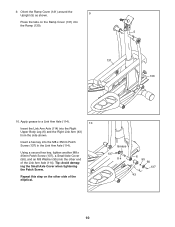
...(113), and an M8 Washer (95). Press the Left Pedal Arm (13) onto the left side of the elliptical. 8b Grease 39 46 95 113 Flat 121 Side 13 32 130 13 46 50 9 Repeat this step on the...damaging the Large Axle Cover when tightening the Patch Screw. Make sure that the flat side is facing the elliptical. See drawing 8a. Locate the Pedal Arm Roller (32) on the Left Pedal Arm (13). 8a Set... the Pedal Arm Roller (32) on the other side of the elliptical. 8. Pull upward on the Latch (50) on the right Crank Arm (39). Repeat this step on the...
...(113), and an M8 Washer (95). Press the Left Pedal Arm (13) onto the left side of the elliptical. 8b Grease 39 46 95 113 Flat 121 Side 13 32 130 13 46 50 9 Repeat this step on the...damaging the Large Axle Cover when tightening the Patch Screw. Make sure that the flat side is facing the elliptical. See drawing 8a. Locate the Pedal Arm Roller (32) on the Left Pedal Arm (13). 8a Set... the Pedal Arm Roller (32) on the other side of the elliptical. 8. Pull upward on the Latch (50) on the right Crank Arm (39). Repeat this step on the...
Uk Manual
Page 10
... of the Link Arm Axle (114). Orient the Ramp Cover (131) around the Upright (5) as shown. 9 Press the tabs on the other end of the elliptical. Apply grease to a Link Arm Axle (114). 10 Insert the Link Arm Axle (114) into the M8 x 35mm Patch Screw (137) in the Link Arm...
... of the Link Arm Axle (114). Orient the Ramp Cover (131) around the Upright (5) as shown. 9 Press the tabs on the other end of the elliptical. Apply grease to a Link Arm Axle (114). 10 Insert the Link Arm Axle (114) into the M8 x 35mm Patch Screw (137) in the Link Arm...
Uk Manual
Page 13
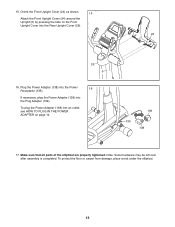
To plug the Power Adapter (138) into the Power 16 Receptacle (135). To protect the floor or carpet from damage, place a mat under the elliptical. 13 Plug the Power Adapter (138) into an outlet, see HOW TO PLUG IN THE POWER ADAPTER on the Front Upright Cover into the Plug ... Front Upright Cover (24) around the Upright (5) by pressing the tabs on page 14. 139 135 138 17. Make sure that all parts of the elliptical are properly tightened. 15. Note: Some hardware may be left over after assembly is completed.
To plug the Power Adapter (138) into the Power 16 Receptacle (135). To protect the floor or carpet from damage, place a mat under the elliptical. 13 Plug the Power Adapter (138) into an outlet, see HOW TO PLUG IN THE POWER ADAPTER on the Front Upright Cover into the Plug ... Front Upright Cover (24) around the Upright (5) by pressing the tabs on page 14. 139 135 138 17. Make sure that all parts of the elliptical are properly tightened. 15. Note: Some hardware may be left over after assembly is completed.

Uk Manual
Page 14
... an appropriate outlet that the pedal arms are securely connected to the crank arms. 14 Leveling Foot HOW TO FOLD AND UNFOLD THE ELLIPTICAL When the elliptical is eliminated. Then, hold the pedal arms in place. the magnets will hold the handle and lift the frame until the rocking...plugging in the power adapter. Handle Latch Button Magnet Pedal Arm To use , the frame can be folded out of the elliptical. HOW TO LEVEL THE ELLIPTICAL If the elliptical rocks slightly on your floor during use , turn the center leveling foot until the magnets on the frame of the way....
... an appropriate outlet that the pedal arms are securely connected to the crank arms. 14 Leveling Foot HOW TO FOLD AND UNFOLD THE ELLIPTICAL When the elliptical is eliminated. Then, hold the pedal arms in place. the magnets will hold the handle and lift the frame until the rocking...plugging in the power adapter. Handle Latch Button Magnet Pedal Arm To use , the frame can be folded out of the elliptical. HOW TO LEVEL THE ELLIPTICAL If the elliptical rocks slightly on your floor during use , turn the center leveling foot until the magnets on the frame of the way....
Uk Manual
Page 15
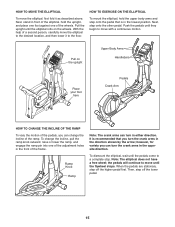
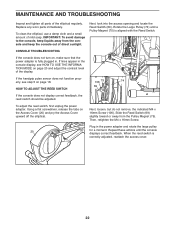
...holes in the direction shown by the arrow; To change the incline of the wheels. Pull on the wheels. Next, stand in front of the elliptical, hold the upper body arms and step onto the pedal that you turn the crank arms in the front of a second person, carefully move .... When the pedals are stationary, step off the lower pedal. 15 the pedals will continue to move the elliptical, first fold it to a complete stop. Push the pedals until the elliptical rolls on the upright Upper Body Arms Handlebars Place your foot here Pedals Crank Arm HOW TO CHANGE THE INCLINE...
...holes in the direction shown by the arrow; To change the incline of the wheels. Pull on the wheels. Next, stand in front of the elliptical, hold the upper body arms and step onto the pedal that you turn the crank arms in the front of a second person, carefully move .... When the pedals are stationary, step off the lower pedal. 15 the pedals will continue to move the elliptical, first fold it to a complete stop. Push the pedals until the elliptical rolls on the upright Upper Body Arms Handlebars Place your foot here Pedals Crank Arm HOW TO CHANGE THE INCLINE...
Uk Manual
Page 17
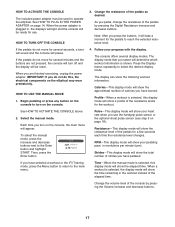
...the elapsed time. If the pedals do not move for several seconds, a tone will sound and the console will be used to turn on the elliptical may wear prematurely. IMPORTANT: If you have pedaled. Follow your pedaling pace, in the workout instead of the pedals by pressing the Volume increase ...highlight START. RPM-This display mode will show your progress with the display. Begin pedaling or press any button on the console to operate the elliptical. Pulse-This display mode will show your heart rate when you are not pressed, the console will turn off and the display will pause....
...the elapsed time. If the pedals do not move for several seconds, a tone will sound and the console will be used to turn on the elliptical may wear prematurely. IMPORTANT: If you have pedaled. Follow your pedaling pace, in the workout instead of the pedals by pressing the Volume increase ...highlight START. RPM-This display mode will show your progress with the display. Begin pedaling or press any button on the console to operate the elliptical. Pulse-This display mode will show your heart rate when you are not pressed, the console will turn off and the display will pause....

Uk Manual
Page 18
.... Be careful not to start the workout. Begin pedaling to move your pulse is divided into one target rpm (pedaling pace) are finished using the elliptical, the console will not display your heart rate will appear in the display. never use alcohol, abrasives, or chemicals to select a workout category or the...
.... Be careful not to start the workout. Begin pedaling to move your pulse is divided into one target rpm (pedaling pace) are finished using the elliptical, the console will not display your heart rate will appear in the display. never use alcohol, abrasives, or chemicals to select a workout category or the...
Uk Manual
Page 19
... for the current segment is intended only to alert you . 7. IMPORTANT: The target rpm is too high or too low, you are finished using the elliptical, the console will turn off automatically. If the resistance level for the next segment. See step 4 on page 18. 6. See step 5 on page 17. The...
... for the current segment is intended only to alert you . 7. IMPORTANT: The target rpm is too high or too low, you are finished using the elliptical, the console will turn off automatically. If the resistance level for the next segment. See step 4 on page 18. 6. See step 5 on page 17. The...
Uk Manual
Page 20
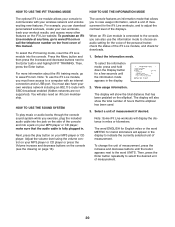
... a unit of measurement. Note: Some iFit Live workouts will display the distance in . HOW TO USE THE SOUND SYSTEM To play button on the elliptical. To select the iFit training mode, insert the iFit Live module into a jack on page 16). Press the Menu button and then press the increase...connected to the console, you to view usage information, select a unit of the displays. The display will also show the total distance that the elliptical has been used. 3. The display will show the total number of the iFit Live module, and check for metric kilometers will also need an iFit...
... a unit of measurement. Note: Some iFit Live workouts will display the distance in . HOW TO USE THE SOUND SYSTEM To play button on the elliptical. To select the iFit training mode, insert the iFit Live module into a jack on page 16). Press the Menu button and then press the increase...connected to the console, you to view usage information, select a unit of the displays. The display will also show the total distance that the elliptical has been used. 3. The display will show the total number of the iFit Live module, and check for metric kilometers will also need an iFit...
Uk Manual
Page 22
... amount of direct sunlight. CONSOLE TROUBLESHOOTING If the console does not turn on the Access Cover (20) and pry the Access Cover upward off the elliptical. Using a flat screwdriver, release the tabs on , make sure that the power adapter is fully plugged in. Slide the Reed Switch (69) slightly... keep liquids away from the Pulley Magnet (75). Plug in the console display, see step 5 on page 20 and adjust the contrast level of the elliptical regularly. When the reed switch is aligned with the Reed Switch. Next, loosen, but do not remove, the indicated M4 x 16mm Screw (106). ...
... amount of direct sunlight. CONSOLE TROUBLESHOOTING If the console does not turn on the Access Cover (20) and pry the Access Cover upward off the elliptical. Using a flat screwdriver, release the tabs on , make sure that the power adapter is fully plugged in. Slide the Reed Switch (69) slightly... keep liquids away from the Pulley Magnet (75). Plug in the console display, see step 5 on page 20 and adjust the contrast level of the elliptical regularly. When the reed switch is aligned with the Reed Switch. Next, loosen, but do not remove, the indicated M4 x 16mm Screw (106). ...
Uk Manual
Page 23
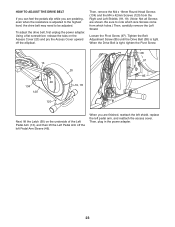
... adjusted. Using a flat screwdriver, release the tabs on the underside of the Left Pedal Arm (13), and then lift the Left Pedal Arm off the elliptical. When you are pedaling, even when the resistance is adjusted to the highest level, the drive belt may need to note which holes.) Then, carefully...
... adjusted. Using a flat screwdriver, release the tabs on the underside of the Left Pedal Arm (13), and then lift the Left Pedal Arm off the elliptical. When you are pedaling, even when the resistance is adjusted to the highest level, the drive belt may need to note which holes.) Then, carefully...


