
User Manual
Page 1
CALL TOLL-FREE: 1-888-825-2588 Mon.-Fri., 6 a.m.-6 p.m. www.nordictrack.com Model No. Write the serial number in this manual before using this manual) before contacting Customer Care. please contact Customer Care. MT ON THE ...
CALL TOLL-FREE: 1-888-825-2588 Mon.-Fri., 6 a.m.-6 p.m. www.nordictrack.com Model No. Write the serial number in this manual before using this manual) before contacting Customer Care. please contact Customer Care. MT ON THE ...
User Manual
Page 2
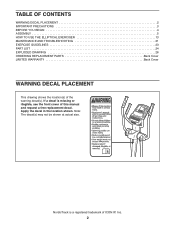
... TO USE THE ELLIPTICAL EXERCISER 13 MAINTENANCE AND TROUBLESHOOTING 21 EXERCISE GUIDELINES 23 PART LIST 24 EXPLODED DRAWING 26 ORDERING REPLACEMENT PARTS Back Cover LIMITED WARRANTY Back Cover WARNING DECAL PLACEMENT This drawing shows the location(s) of ICON IP, Inc. 2 Apply the decal in the location shown. NordicTrack is missing or illegible...
... TO USE THE ELLIPTICAL EXERCISER 13 MAINTENANCE AND TROUBLESHOOTING 21 EXERCISE GUIDELINES 23 PART LIST 24 EXPLODED DRAWING 26 ORDERING REPLACEMENT PARTS Back Cover LIMITED WARRANTY Back Cover WARNING DECAL PLACEMENT This drawing shows the location(s) of ICON IP, Inc. 2 Apply the decal in the location shown. NordicTrack is missing or illegible...
User Manual
Page 3
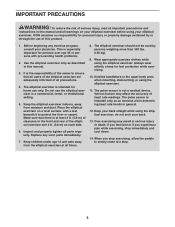
... weighing more than 300 lbs. (136 kg). 9. Do not use of this product. 1. Replace any exercise program, consult your elliptical exerciser before using the elliptical exerciser. Always wear athletic shoes for persons over age 35 or persons with a mat beneath it to a stop exercising, allow the... pedals to slowly come to protect the floor or carpet. Place the elliptical exerciser on your physician. The pulse sensor is not a medical device. Various factors may result in this manual and all warnings on a ...
... weighing more than 300 lbs. (136 kg). 9. Do not use of this product. 1. Replace any exercise program, consult your elliptical exerciser before using the elliptical exerciser. Always wear athletic shoes for persons over age 35 or persons with a mat beneath it to a stop exercising, allow the... pedals to slowly come to protect the floor or carpet. Place the elliptical exerciser on your physician. The pulse sensor is not a medical device. Various factors may result in this manual and all warnings on a ...
User Manual
Page 4
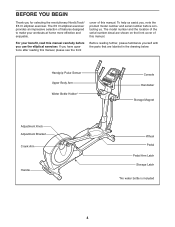
...you , note the product model number and serial number before you for selecting the revolutionary NordicTrack® E5 VI elliptical exerciser. To help us . BEFORE YOU BEGIN Thank you use the elliptical exerciser. For your workouts at home more effective and enjoyable. cover of this manual. ...Knob Adjustment Bracket Crank Arm Handle Wheel Pedal Pedal Arm Latch Storage Latch *No water bottle is included 4 The E5 VI elliptical exerciser provides an impressive selection of features designed to make your benefit, read this manual carefully before contacting us assist you have...
...you , note the product model number and serial number before you for selecting the revolutionary NordicTrack® E5 VI elliptical exerciser. To help us . BEFORE YOU BEGIN Thank you use the elliptical exerciser. For your workouts at home more effective and enjoyable. cover of this manual. ...Knob Adjustment Bracket Crank Arm Handle Wheel Pedal Pedal Arm Latch Storage Latch *No water bottle is included 4 The E5 VI elliptical exerciser provides an impressive selection of features designed to make your benefit, read this manual carefully before contacting us assist you have...
User Manual
Page 5
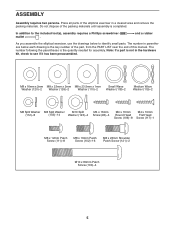
...Do not dispose of the packing materials until assembly is the key number of the part, from the PART LIST near the end of the elliptical exerciser in the hardware kit, check to the included tool(s), assembly requires a Phillips screwdriver mallet . and a rubber As you assemble the... elliptical exerciser, use the drawings below each drawing is completed. Note: If a part is the quantity needed for assembly. M8 x 16mm x 2mm M8 x 23mm x 2mm M8 ...
...Do not dispose of the packing materials until assembly is the key number of the part, from the PART LIST near the end of the elliptical exerciser in the hardware kit, check to the included tool(s), assembly requires a Phillips screwdriver mallet . and a rubber As you assemble the... elliptical exerciser, use the drawings below each drawing is completed. Note: If a part is the quantity needed for assembly. M8 x 16mm x 2mm M8 x 23mm x 2mm M8 ...

User Manual
Page 6
To make assembly easier, read the 1 information on page 5 before you begin. Identify and orient the Rear Stabilizer (4) as shown. While another person lifts the Folding Frame (2), attach the Rear Stabilizer (4) to the Frame with two M10 x 80mm Patch Screws (100) and two M10 Split Washers (123). 100 123 3 1 4 2 100 123 6 1. Identify and orient the Front Stabilizer (3) as shown. 2 While another person lifts the Frame (1), attach the Front Stabilizer (3) to the Folding Frame with two M10 x 80mm Patch Screws (100) and two M10 Split Washers (123). 2.
To make assembly easier, read the 1 information on page 5 before you begin. Identify and orient the Rear Stabilizer (4) as shown. While another person lifts the Folding Frame (2), attach the Rear Stabilizer (4) to the Frame with two M10 x 80mm Patch Screws (100) and two M10 Split Washers (123). 100 123 3 1 4 2 100 123 6 1. Identify and orient the Front Stabilizer (3) as shown. 2 While another person lifts the Frame (1), attach the Front Stabilizer (3) to the Folding Frame with two M10 x 80mm Patch Screws (100) and two M10 Split Washers (123). 2.

User Manual
Page 7
Slide the Top Cover upward onto the Upright. Tie the lower end of the Upright. Next, pull the upper end of the wire tie upward out of the top of the wire tie to the Wire Harness (60). Tip: To prevent the Wire Harness (60) from falling into the Frame (1). Slide the Top Cover (23) downward. Insert the Upright (5) into the Upright (5), secure the Wire Harness with four M8 x 16mm Patch Screws (102) and four M8 Split Washers (103). Do not press the Top Cover into the Frame (1) yet. 3 Wire Tie Avoid pinching the Wire Harness (60) 5 23 Wire Tie 102 103 102 60 1 102 103 103 102 7 3. ...
Slide the Top Cover upward onto the Upright. Tie the lower end of the Upright. Next, pull the upper end of the wire tie upward out of the top of the wire tie to the Wire Harness (60). Tip: To prevent the Wire Harness (60) from falling into the Frame (1). Slide the Top Cover (23) downward. Insert the Upright (5) into the Upright (5), secure the Wire Harness with four M8 x 16mm Patch Screws (102) and four M8 Split Washers (103). Do not press the Top Cover into the Frame (1) yet. 3 Wire Tie Avoid pinching the Wire Harness (60) 5 23 Wire Tie 102 103 102 60 1 102 103 103 102 7 3. ...

User Manual
Page 8
Slide a Small Wave Washer (118) onto each end of the elliptical exerciser. 8 6 Grease 55 119 110 56 120 12 121 12 46 45 44 Apply some of the included grease to the axle on the other ...
Slide a Small Wave Washer (118) onto each end of the elliptical exerciser. 8 6 Grease 55 119 110 56 120 12 121 12 46 45 44 Apply some of the included grease to the axle on the other ...

User Manual
Page 9
Attach the Left Upper Body Arm (9) to the Right Pedal Arm (12) with a "Right" sticker, and orient it as shown. Identify the Right Upper Body Arm (8), which is marked with three M8 x 16mm Patch Screws (102) and three M8 Split Washers (103). Attach the Right Pedal (14) to the Left Upper Body Leg (7) in the same way. 6 14 13 15 112 12 111 112 111 7. Attach the Left Pedal (15) to the Right Upper Body Leg (6) with a "Right" sticker, and orient it as shown. Identify the Right Pedal (14), which is marked with four M6 x 12mm Patch Screws (111) and four M6 Split Washers (...
Attach the Left Upper Body Arm (9) to the Right Pedal Arm (12) with a "Right" sticker, and orient it as shown. Identify the Right Upper Body Arm (8), which is marked with three M8 x 16mm Patch Screws (102) and three M8 Split Washers (103). Attach the Right Pedal (14) to the Left Upper Body Leg (7) in the same way. 6 14 13 15 112 12 111 112 111 7. Attach the Left Pedal (15) to the Right Upper Body Leg (6) with a "Right" sticker, and orient it as shown. Identify the Right Pedal (14), which is marked with four M6 x 12mm Patch Screws (111) and four M6 Split Washers (...
User Manual
Page 10
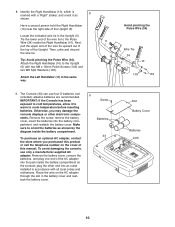
Tip: Avoid pinching the Pulse Wire (34). alkaline batteries are recommended. Remove the screw, remove the battery cover, insert the batteries into an outlet installed in the battery cover and reattach the battery cover. 9 Screw Batteries 33 Avoid pinching the Pulse Wire (34) Wire Tie 34 5 10 103 102 Slot Battery Cover Batteries Jack 10 plug the other electronic components. Tie the lower end of the Upright. Next, 11 pull the upper end of the wire tie upward out of the top of the wire tie to the Pulse Wire (34) inside the Right Handlebar (10). Attach the Right Handlebar ...
Tip: Avoid pinching the Pulse Wire (34). alkaline batteries are recommended. Remove the screw, remove the battery cover, insert the batteries into an outlet installed in the battery cover and reattach the battery cover. 9 Screw Batteries 33 Avoid pinching the Pulse Wire (34) Wire Tie 34 5 10 103 102 Slot Battery Cover Batteries Jack 10 plug the other electronic components. Tie the lower end of the Upright. Next, 11 pull the upper end of the wire tie upward out of the top of the wire tie to the Pulse Wire (34) inside the Right Handlebar (10). Attach the Right Handlebar ...

User Manual
Page 11
Attach the Rear Upright Cover (24) to the Pulse Wires (34). Tip: Avoid pinching the wires. While a second person holds the Console (33) near the Upright (5), connect the console wires to the Wire Harness (60) and to the Upright (5) with four M4 x 16mm Screws (93). 10 33 Avoid pinching the wires Console Wires 34 5 60 93 11. Insert the excess wire into the Console (33). Attach the Console (33) to the Upright (5) with two M4 x 16mm Round Head 11 Screws (106) and an M4 x 19mm Flat Head Screw (117). 24 117 106 5 11 10.
Attach the Rear Upright Cover (24) to the Pulse Wires (34). Tip: Avoid pinching the wires. While a second person holds the Console (33) near the Upright (5), connect the console wires to the Wire Harness (60) and to the Upright (5) with four M4 x 16mm Screws (93). 10 33 Avoid pinching the wires Console Wires 34 5 60 93 11. Insert the excess wire into the Console (33). Attach the Console (33) to the Upright (5) with two M4 x 16mm Round Head 11 Screws (106) and an M4 x 19mm Flat Head Screw (117). 24 117 106 5 11 10.

User Manual
Page 12
... the Right Upper Body Leg (6) with three M4 x 16mm Round Head Screws (106). To protect the floor or carpet from damage, place a mat under the elliptical exerciser. 12 Attach the Front Upright Cover (25) around the Right Upper Body Leg (6) by pressing the tabs on the Right Front Leg Cover into...
... the Right Upper Body Leg (6) with three M4 x 16mm Round Head Screws (106). To protect the floor or carpet from damage, place a mat under the elliptical exerciser. 12 Attach the Front Upright Cover (25) around the Right Upper Body Leg (6) by pressing the tabs on the Right Front Leg Cover into...
User Manual
Page 13
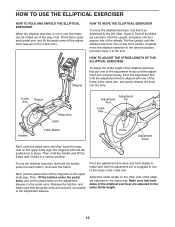
...freely. Make sure that the pedal arms are adjusted to the same stride length. 13 HOW TO USE THE ELLIPTICAL EXERCISER HOW TO FOLD AND UNFOLD THE ELLIPTICAL EXERCISER When the elliptical exerciser is aligned with one of the adjustment knobs until the adjustment arm will hold the handle and lift ... the desired position, and then lower it as described at the left. HOW TO ADJUST THE STRIDE LENGTH OF THE ELLIPTICAL EXERCISER To adjust the stride length of the elliptical exerciser, first pull one of the holes in the crank arm. Pivot the adjustment arm until the adjustment knob is...
...freely. Make sure that the pedal arms are adjusted to the same stride length. 13 HOW TO USE THE ELLIPTICAL EXERCISER HOW TO FOLD AND UNFOLD THE ELLIPTICAL EXERCISER When the elliptical exerciser is aligned with one of the adjustment knobs until the adjustment arm will hold the handle and lift ... the desired position, and then lower it as described at the left. HOW TO ADJUST THE STRIDE LENGTH OF THE ELLIPTICAL EXERCISER To adjust the stride length of the elliptical exerciser, first pull one of the holes in the crank arm. Pivot the adjustment arm until the adjustment knob is...

User Manual
Page 14
... does not have a free wheel; the pedals will continue to a complete stop. HOW TO EXERCISE ON THE ELLIPTICAL EXERCISER To mount the elliptical exerciser, hold the upper body arms or the handlebars and step onto the pedal that you can turn the leveling foot under the center of ..., for variety, you turn the crank arms in the direction shown by the arrow; HOW TO ELIMINATE FLEXING IN THE CENTER OF THE ELLIPTICAL EXERCISER If the elliptical exerciser flexes in the center during use, turn in the lowest position. It is recommended that is eliminated. Push the pedals until the flexing...
... does not have a free wheel; the pedals will continue to a complete stop. HOW TO EXERCISE ON THE ELLIPTICAL EXERCISER To mount the elliptical exerciser, hold the upper body arms or the handlebars and step onto the pedal that you can turn the leveling foot under the center of ..., for variety, you turn the crank arms in the direction shown by the arrow; HOW TO ELIMINATE FLEXING IN THE CENTER OF THE ELLIPTICAL EXERCISER If the elliptical exerciser flexes in the center during use, turn in the lowest position. It is recommended that is eliminated. Push the pedals until the flexing...
User Manual
Page 15
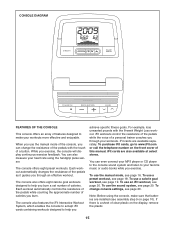
Each workout automatically controls the resistance of the pedals while counting the approximate number of clear plastic on the display, remove the plastic. 15 iFit workouts control the resistance of the pedals while the voice of a personal trainer coaches you through an effective workout. You can even connect your MP3 player or CD player to the console sound system and listen to make sure that batteries are available separately. To use a calorie goal workout, see page 20. To use the sound system, see page 19. To use a preset workout, see page 16. Note: Before ...
Each workout automatically controls the resistance of the pedals while counting the approximate number of clear plastic on the display, remove the plastic. 15 iFit workouts control the resistance of the pedals while the voice of a personal trainer coaches you through an effective workout. You can even connect your MP3 player or CD player to the console sound system and listen to make sure that batteries are available separately. To use a calorie goal workout, see page 20. To use the sound system, see page 19. To use a preset workout, see page 16. Note: Before ...
User Manual
Page 16
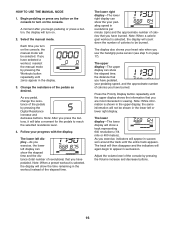
Note: After you turn on the console to reach the selected resistance level. 4. Note: While information is shown in the lower left or lower right display. Adjust the volume level of the elapsed time. Each time you press the buttons, it will count down the number of the pedals as desired. Follow your pedaling speed in viewing. Note: When a preset workout is selected, the display will take a moment for the pedals to turn on page 17). Note: When a calorie goal workout is selected, the display will not be selected. The lower display-The lower display will again ...
Note: After you turn on the console to reach the selected resistance level. 4. Note: While information is shown in the lower left or lower right display. Adjust the volume level of the elapsed time. Each time you press the buttons, it will count down the number of the pedals as desired. Follow your pedaling speed in viewing. Note: When a preset workout is selected, the display will take a moment for the pedals to turn on page 17). Note: When a calorie goal workout is selected, the display will not be selected. The lower display-The lower display will again ...

User Manual
Page 17
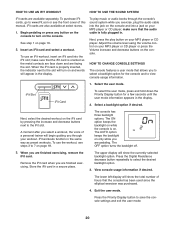
Measure your palms resting against the metal contacts. For the most accurate heart rate reading, hold the contacts for several minutes and the buttons are sheets of clear plastic on the fan or to 30 seconds. Turn on the handgrip pulse sensor, remove the plastic. Press the Coolaire Fan button repeatedly to turn on Contacts the metal con- If the pedals do not move your hands or gripping the contacts tightly. To measure your heart rate, hold the handgrip pulse sensor, the display will turn off automatically. 7. 5. When your pulse is detected, a ...
Measure your palms resting against the metal contacts. For the most accurate heart rate reading, hold the contacts for several minutes and the buttons are sheets of clear plastic on the fan or to 30 seconds. Turn on the handgrip pulse sensor, remove the plastic. Press the Coolaire Fan button repeatedly to turn on Contacts the metal con- If the pedals do not move your hands or gripping the contacts tightly. To measure your heart rate, hold the handgrip pulse sensor, the display will turn off automatically. 7. 5. When your pulse is detected, a ...
User Manual
Page 18
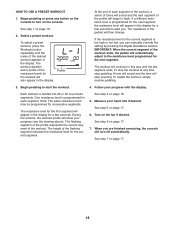
See step 1 on the fan if desired. The workout duration and a profile of each segment. Profile At the end of the resistance levels for the workout will begin to flash. The workout will stop pedaling. To stop the workout at any button on the console to alert you are finished exercising, the console will then change. A tone will sound and the time will continue in this way until the name of the pedals will turn on page 17. 18 Follow your heart rate if desired. Turn on page 16. 2. If a different resistance level is too high or too low, you can manually ...
See step 1 on the fan if desired. The workout duration and a profile of each segment. Profile At the end of the resistance levels for the workout will begin to flash. The workout will stop pedaling. To stop the workout at any button on the console to alert you are finished exercising, the console will then change. A tone will sound and the time will continue in this way until the name of the pedals will turn on page 17. 18 Follow your heart rate if desired. Turn on page 16. 2. If a different resistance level is too high or too low, you can manually ...
User Manual
Page 19
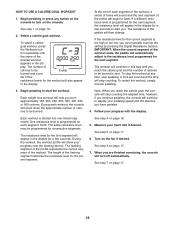
Select a calorie goal workout. The number of the workout. Each workout is too high or too low, you can manually override the setting by pressing the Digital Resistance buttons. The resistance level for a few seconds. During the workout, the workout profile will appear in the display for the first segment will show your pedaling speed and the distance you continue pedaling, the console will appear in the display for each segment. If a different resistance level is programmed for the current segment is divided into one-minute segments. If the resistance level for the next ...
Select a calorie goal workout. The number of the workout. Each workout is too high or too low, you can manually override the setting by pressing the Digital Resistance buttons. The resistance level for a few seconds. During the workout, the workout profile will appear in the display for the first segment will show your pedaling speed and the distance you continue pedaling, the console will appear in the display for each segment. If a different resistance level is programmed for the current segment is divided into one-minute segments. If the resistance level for the next ...
User Manual
Page 20
... USE AN IFIT WORKOUT HOW TO USE THE SOUND SYSTEM iFit cards are finished exercising. make sure that the console has been used since the elliptical exerciser was purchased. 4. Begin pedaling or press any button on the console and into the iFit slot; The ON option keeps the backlight on while...
... USE AN IFIT WORKOUT HOW TO USE THE SOUND SYSTEM iFit cards are finished exercising. make sure that the console has been used since the elliptical exerciser was purchased. 4. Begin pedaling or press any button on the console and into the iFit slot; The ON option keeps the backlight on while...