
User Manual
Page 2
... RATE MONITOR 15 OPERATION AND ADJUSTMENT 16 HOW TO FOLD AND MOVE THE TREADMILL 36 TROUBLESHOOTING 37 EXERCISE GUIDELINES 40 PART LIST 42 EXPLODED DRAWING 44 ORDERING REPLACEMENT PARTS Back Cover LIMITED WARRANTY Back Cover WARNING DECAL PLACEMENT This drawing shows the ...locations of this manual and request a free replacement decal. If a decal is a registered trademark of ICON IP, Inc. 2 Apply the decal in the location shown. Note: The decals may not be shown at actual size. NORDICTRACK...
... RATE MONITOR 15 OPERATION AND ADJUSTMENT 16 HOW TO FOLD AND MOVE THE TREADMILL 36 TROUBLESHOOTING 37 EXERCISE GUIDELINES 40 PART LIST 42 EXPLODED DRAWING 44 ORDERING REPLACEMENT PARTS Back Cover LIMITED WARRANTY Back Cover WARNING DECAL PLACEMENT This drawing shows the ...locations of this manual and request a free replacement decal. If a decal is a registered trademark of ICON IP, Inc. 2 Apply the decal in the location shown. Note: The decals may not be shown at actual size. NORDICTRACK...
User Manual
Page 4
...line surges. 31. The heart rate monitor is properly assembled. (See ASSEMBLY on page 10 and HOW TO FOLD AND MOVE THE TREADMILL on the treadmill. 28. Never insert any object into any opening on page 36.) You must be fatal. 33. Servicing other electric light or...temperatures below 23° F (-5° C) or above 140° F (60° C). Inspect and properly tighten all parts of the television. When folding or moving the treadmill, make sure that the storage latch is holding the frame securely in wire to grounding electrodes, and requirements for the location...
...line surges. 31. The heart rate monitor is properly assembled. (See ASSEMBLY on page 10 and HOW TO FOLD AND MOVE THE TREADMILL on the treadmill. 28. Never insert any object into any opening on page 36.) You must be fatal. 33. Servicing other electric light or...temperatures below 23° F (-5° C) or above 140° F (60° C). Inspect and properly tighten all parts of the television. When folding or moving the treadmill, make sure that the storage latch is holding the frame securely in wire to grounding electrodes, and requirements for the location...
User Manual
Page 8
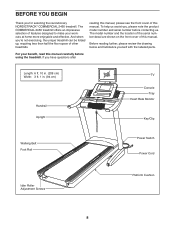
... home more enjoyable and effective. The COMMERCIAL 2450 treadmill offers an impressive selection of other treadmills. Before reading further, please review the drawing below and familiarize yourself with the labeled parts. The model number and the location of ...treadmill can be folded up, requiring less than half the oor space of features designed to make your benet, read this manual. reading this manual, please see the front cover of this manual carefully before contacting us assist you for selecting the revolutionary NORDICTRACK® COMMERCIAL 2450 treadmill...
... home more enjoyable and effective. The COMMERCIAL 2450 treadmill offers an impressive selection of other treadmills. Before reading further, please review the drawing below and familiarize yourself with the labeled parts. The model number and the location of ...treadmill can be folded up, requiring less than half the oor space of features designed to make your benet, read this manual. reading this manual, please see the front cover of this manual carefully before contacting us assist you for selecting the revolutionary NORDICTRACK® COMMERCIAL 2450 treadmill...
User Manual
Page 9
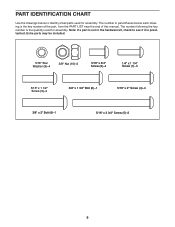
... CHART Use the drawings below each drawing is preattached. The number in the hardware kit, check to identify small parts used for assembly. Extra parts may be included. 5/16" Star Washer (9)–-4 3/8" Nut (10)–-2 5/16" x 3/4" Screw (2)–-4 1/4" x 1 1/4" Screw (7)–-4 5/16" x 1 1/2" Screw (3)–-4 3/8" x 1 3/4" Bolt (6)–-1 5/16" x 2" Screw (4)–-4 3/8" x 2" Bolt (8)–-1 5/...
... CHART Use the drawings below each drawing is preattached. The number in the hardware kit, check to identify small parts used for assembly. Extra parts may be included. 5/16" Star Washer (9)–-4 3/8" Nut (10)–-2 5/16" x 3/4" Screw (2)–-4 1/4" x 1 1/4" Screw (7)–-4 5/16" x 1 1/2" Screw (3)–-4 3/8" x 1 3/4" Bolt (6)–-1 5/16" x 2" Screw (4)–-4 3/8" x 2" Bolt (8)–-1 5/...
User Manual
Page 10
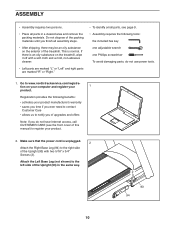
... computer and register your product. 2. Registration provides the following tools: the included hex key one adjustable wrench one Phillips screwdriver To avoid damaging parts, do not have Internet access, call CUSTOMER CARE (see page 9. •• Assembly requires the following benefits: •• activates ...product. This is unplugged. 2 Attach the Right Base Leg (94) to www.nordictrackservice.com/registra- Go to the right side of the treadmill. Do not dispose of the packing materials until you do not use power tools. 1. Make sure that the power cord is normal. tion...
... computer and register your product. 2. Registration provides the following tools: the included hex key one adjustable wrench one Phillips screwdriver To avoid damaging parts, do not have Internet access, call CUSTOMER CARE (see page 9. •• Assembly requires the following benefits: •• activates ...product. This is unplugged. 2 Attach the Right Base Leg (94) to www.nordictrackservice.com/registra- Go to the right side of the treadmill. Do not dispose of the packing materials until you do not use power tools. 1. Make sure that the power cord is normal. tion...
User Manual
Page 14
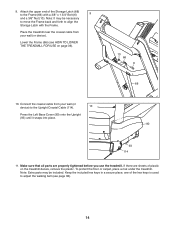
... of the hex keys is used to align the Storage Latch with a 3/8" x 1 3/4" Bolt (6) 9 and a 3/8" Nut (10). Place the treadmill near the coaxial cable from your wall (or device). Make sure that all parts are sheets of the Storage Latch (68) to the Upright Coaxial Cable (114). 10 Press the Left Base Cover...) with the Frame. 9. Note: It may be necessary to move the Frame back and forth to adjust the walking belt (see HOW TO LOWER THE TREADMILL FOR USE on the treadmill decals, remove the plastic. Note: Extra parts may be included.
... of the hex keys is used to align the Storage Latch with a 3/8" x 1 3/4" Bolt (6) 9 and a 3/8" Nut (10). Place the treadmill near the coaxial cable from your wall (or device). Make sure that all parts are sheets of the Storage Latch (68) to the Upright Coaxial Cable (114). 10 Press the Left Base Cover...) with the Frame. 9. Note: It may be necessary to move the Frame back and forth to adjust the walking belt (see HOW TO LOWER THE TREADMILL FOR USE on the treadmill decals, remove the plastic. Note: Extra parts may be included.

User Manual
Page 40
... your training zone. (During the first few months of regular exercise, you must exercise at the proper intensity is to make exercise a regular and enjoyable part of time. You can use stored fat calories for exercise. Various factors may complete up increases your body temperature, heart rate, and circulation in your...
... your training zone. (During the first few months of regular exercise, you must exercise at the proper intensity is to make exercise a regular and enjoyable part of time. You can use stored fat calories for exercise. Various factors may complete up increases your body temperature, heart rate, and circulation in your...

User Manual
Page 42
... Rubber Grommet Cushion Adjustment Bolt Cushion Disk Cushion Adjustment Bracket Cushion Stop Cushion Assembly Foot Rail Snap Warning Decal Idler Roller Platform Plate Model No. PART LIST Key No.
... Rubber Grommet Cushion Adjustment Bolt Cushion Disk Cushion Adjustment Bracket Cushion Stop Cushion Assembly Foot Rail Snap Warning Decal Idler Roller Platform Plate Model No. PART LIST Key No.

User Manual
Page 43
... TV Remote Control TV Bracket M4 x 12mm User’'s Manual Note: Specifications are not illustrated. 43 For information about ordering replacement parts, see the back cover of this manual. *These parts are subject to change without notice. Key No. Qty. 111 4 112 1 113 1 114 1 115 1 116 1 117 1 118 4 * –- Qty. 101 4 102...
... TV Remote Control TV Bracket M4 x 12mm User’'s Manual Note: Specifications are not illustrated. 43 For information about ordering replacement parts, see the back cover of this manual. *These parts are subject to change without notice. Key No. Qty. 111 4 112 1 113 1 114 1 115 1 116 1 117 1 118 4 * –- Qty. 101 4 102...

User Manual
Page 48
... of the product (see the front cover of this manual) •• the key number and description of the replacement part(s) (see the PART LIST and the EXPLODED DRAWING near the end of this manual) LIMITED WARRANTY IMPORTANT: To protect your fitness equipment with an ...). ICON’'s obligation under normal use or performance of incidental or consequential damages. If the product is authorized by ICON. If replacement parts are warranted for a minimal handling charge. Accordingly, the above is shipped to a service center, freight charges to repairing or replacing, at...
... of the product (see the front cover of this manual) •• the key number and description of the replacement part(s) (see the PART LIST and the EXPLODED DRAWING near the end of this manual) LIMITED WARRANTY IMPORTANT: To protect your fitness equipment with an ...). ICON’'s obligation under normal use or performance of incidental or consequential damages. If the product is authorized by ICON. If replacement parts are warranted for a minimal handling charge. Accordingly, the above is shipped to a service center, freight charges to repairing or replacing, at...


