

English Manual
Page 2
TABLE OF CONTENTS IMPORTANT PRECAUTIONS 3 BEFORE YOU BEGIN 5 ASSEMBLY 6 OPERATION AND ADJUSTMENT 10 HOW TO FOLD AND MOVE THE TREADMILL 24 TROUBLESHOOTING 26 CONDITIONING GUIDELINES 28 PART LIST 30 ORDERING REPLACEMENT PARTS 31 LIMITED WARRANTY Back Cover Note: An EXPLODED DRAWING is a registered trademark of this manual. NordicTrack is attached in the center of ICON IP, Inc. 2
TABLE OF CONTENTS IMPORTANT PRECAUTIONS 3 BEFORE YOU BEGIN 5 ASSEMBLY 6 OPERATION AND ADJUSTMENT 10 HOW TO FOLD AND MOVE THE TREADMILL 24 TROUBLESHOOTING 26 CONDITIONING GUIDELINES 28 PART LIST 30 ORDERING REPLACEMENT PARTS 31 LIMITED WARRANTY Back Cover Note: An EXPLODED DRAWING is a registered trademark of this manual. NordicTrack is attached in the center of ICON IP, Inc. 2
English Manual
Page 3
... is turned off. Adjust the speed in a fall and serious injury. 13. Wear appropriate exercise clothes when using the treadmill. 6. To purchase a surge suppressor, see your local NordicTrack dealer or call the tollfree telephone number on page 24.) You must be on a level surface, with bare feet, ...of the owner to raise, lower, or move the walking belt while the power is properly assembled. (See ASSEMBLY on page 6, and HOW TO FOLD AND MOVE THE TREADMILL on the front cover of the treadmill. To protect the floor or carpet from heated surfaces. 14. Do not put the...
... is turned off. Adjust the speed in a fall and serious injury. 13. Wear appropriate exercise clothes when using the treadmill. 6. To purchase a surge suppressor, see your local NordicTrack dealer or call the tollfree telephone number on page 24.) You must be on a level surface, with bare feet, ...of the owner to raise, lower, or move the walking belt while the power is properly assembled. (See ASSEMBLY on page 6, and HOW TO FOLD AND MOVE THE TREADMILL on the front cover of the treadmill. To protect the floor or carpet from heated surfaces. 14. Do not put the...

English Manual
Page 6
... the lubricant with high-performance lubricant. ASSEMBLY Assembly requires two persons. Note: The underside of the treadmill walking belt is lubricant on the lower end of the packing materials until assembly is a normal condition and does not affect treadmill performance. Make sure that the Base Extensions... are turned so the Base Pads (81) are beneath them. Assembly requires the included allen wrench and your own phillips screwdriver and wire cutters . Set the treadmill in a cleared area and remove all packing materials. Do not dispose of the Upright...
... the lubricant with high-performance lubricant. ASSEMBLY Assembly requires two persons. Note: The underside of the treadmill walking belt is lubricant on the lower end of the packing materials until assembly is a normal condition and does not affect treadmill performance. Make sure that the Base Extensions... are turned so the Base Pads (81) are beneath them. Assembly requires the included allen wrench and your own phillips screwdriver and wire cutters . Set the treadmill in a cleared area and remove all packing materials. Do not dispose of the Upright...

English Manual
Page 8
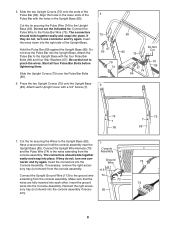
...place. Connect the Upright Wire Harness (73) and the Pulse Wire (74) to the wires extending from the console assembly. Make sure that the wires are fully inserted into the Console Assembly. Slide the two Upright Covers (75) onto the ends of the Pulse Bar with the holes in the lower ... Covers (75) onto the Upright Base (85). If they do not, turn one connector and try again. Insert the wires down into the console assembly if necessary. 7 Console Assembly Ground Wire 113 74 73 85 75 7 85 74 73 8 Slide the Upright Covers (75) over the Pulse Bar Bolts (66). 6. 5. Cut ...
...place. Connect the Upright Wire Harness (73) and the Pulse Wire (74) to the wires extending from the console assembly. Make sure that the wires are fully inserted into the Console Assembly. Slide the two Upright Covers (75) onto the ends of the Pulse Bar with the holes in the lower ... Covers (75) onto the Upright Base (85). If they do not, turn one connector and try again. Insert the wires down into the console assembly if necessary. 7 Console Assembly Ground Wire 113 74 73 85 75 7 85 74 73 8 Slide the Upright Covers (75) over the Pulse Bar Bolts (66). 6. 5. Cut ...
English Manual
Page 9
... 3/4" Screw (7) and the Access Door (95) from the Console Back (96). Make sure that the collar and the spring are pinched. use the treadmill. Press the Latch Insert (77) into the other wires included with a Star Washer (67) into the Latch Insert. Keep the included allen wrench in.... 3. Next, finger tighten a Short Console Bolt (112) with the chest pulse sensor. 1. Tighten the knob back onto the pin. 9 Knob 85 Console Assembly 77 Spring Collar Pin 10.Make sure that no wires are on the Access Door (95) with the 3/4" Screw (7). The allen wrench is shown). Use...
... 3/4" Screw (7) and the Access Door (95) from the Console Back (96). Make sure that the collar and the spring are pinched. use the treadmill. Press the Latch Insert (77) into the other wires included with a Star Washer (67) into the Latch Insert. Keep the included allen wrench in.... 3. Next, finger tighten a Short Console Bolt (112) with the chest pulse sensor. 1. Tighten the knob back onto the pin. 9 Knob 85 Console Assembly 77 Spring Collar Pin 10.Make sure that no wires are on the Access Door (95) with the 3/4" Screw (7). The allen wrench is shown). Use...
English Manual
Page 30
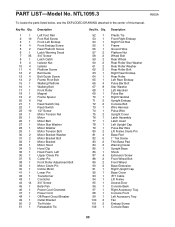
... Left Rear Endcap Pulse Bar Bolt Star Washer Left Handrail Pulse Bar Right Handrail Upright Endcap Console Bolt Wire Harness Pulse Wire Upright Cover Latch Assembly Latch Insert Left Upright Cap Pulse Bar Wire Lift Frame Clevis Pin Base Pad 1" Tek Screw Thin Base Pad Warning Decal Upright Base Shock Extension...
... Left Rear Endcap Pulse Bar Bolt Star Washer Left Handrail Pulse Bar Right Handrail Upright Endcap Console Bolt Wire Harness Pulse Wire Upright Cover Latch Assembly Latch Insert Left Upright Cap Pulse Bar Wire Lift Frame Clevis Pin Base Pad 1" Tek Screw Thin Base Pad Warning Decal Upright Base Shock Extension...

English Manual
Page 34
...ICON is warranted to be free of all other consequential damages of whatsoever nature. LIMITED WARRANTY WHAT IS COVERED-The entire NordicTrack® C2050 treadmill ("Product") is not responsible or liable for indirect, special or consequential damages arising out of or in connection with the... extend the terms of purchase. WHAT IS NOT COVERED-Any failures or damage caused by unauthorized service, misuse, accident, negligence, improper assembly or installation, alterations, modifications without charge, any person receiving the Product as specified in USA © 2005 ICON IP, Inc. ...
...ICON is warranted to be free of all other consequential damages of whatsoever nature. LIMITED WARRANTY WHAT IS COVERED-The entire NordicTrack® C2050 treadmill ("Product") is not responsible or liable for indirect, special or consequential damages arising out of or in connection with the... extend the terms of purchase. WHAT IS NOT COVERED-Any failures or damage caused by unauthorized service, misuse, accident, negligence, improper assembly or installation, alterations, modifications without charge, any person receiving the Product as specified in USA © 2005 ICON IP, Inc. ...

English Manual
Page 2
NordicTrack is attached in the center of ICON IP, Inc. 2 TABLE OF CONTENTS IMPORTANT PRECAUTIONS 3 BEFORE YOU BEGIN 5 ASSEMBLY 6 OPERATION AND ADJUSTMENT 10 HOW TO FOLD AND MOVE THE TREADMILL 24 TROUBLESHOOTING 26 CONDITIONING GUIDELINES 28 PART LIST 30 ORDERING REPLACEMENT PARTS 31 LIMITED WARRANTY Back Cover Note: An EXPLODED DRAWING is a registered trademark of this manual.
NordicTrack is attached in the center of ICON IP, Inc. 2 TABLE OF CONTENTS IMPORTANT PRECAUTIONS 3 BEFORE YOU BEGIN 5 ASSEMBLY 6 OPERATION AND ADJUSTMENT 10 HOW TO FOLD AND MOVE THE TREADMILL 24 TROUBLESHOOTING 26 CONDITIONING GUIDELINES 28 PART LIST 30 ORDERING REPLACEMENT PARTS 31 LIMITED WARRANTY Back Cover Note: An EXPLODED DRAWING is a registered trademark of this manual.
English Manual
Page 3
... leave the treadmill unattended while it is properly assembled. (See ASSEMBLY on page 6, and HOW TO FOLD AND MOVE THE TREADMILL on the treadmill at all of 12 and pets away from heated surfaces. 14. Never move the treadmill. 20. When connecting the power cord (see your local NordicTrack dealer or call... 1-888825-2588 and order part number 146148. 16. It is the responsibility of the owner to the control system of high speeds. Use the treadmill only as an exercise ...
... leave the treadmill unattended while it is properly assembled. (See ASSEMBLY on page 6, and HOW TO FOLD AND MOVE THE TREADMILL on the treadmill at all of 12 and pets away from heated surfaces. 14. Never move the treadmill. 20. When connecting the power cord (see your local NordicTrack dealer or call... 1-888825-2588 and order part number 146148. 16. It is the responsibility of the owner to the control system of high speeds. Use the treadmill only as an exercise ...

English Manual
Page 6
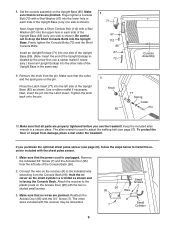
..., non-abrasive cleaner. Make sure that the Base Extension is a normal condition and does not affect treadmill performance. Set the treadmill in a cleared area and remove all packing materials. Assembly requires the included allen wrench and your own phillips screwdriver and wire cutters . For help of a second...the Base Extension. 1 55 Brackets 81 90 85 81 6 This is turned so the Base Pads (81) are beneath it. ASSEMBLY Assembly requires two persons. Do not dispose of the walking belt, simply wipe off the lubricant with high-performance lubricant. While the other ...
..., non-abrasive cleaner. Make sure that the Base Extension is a normal condition and does not affect treadmill performance. Set the treadmill in a cleared area and remove all packing materials. Assembly requires the included allen wrench and your own phillips screwdriver and wire cutters . For help of a second...the Base Extension. 1 55 Brackets 81 90 85 81 6 This is turned so the Base Pads (81) are beneath it. ASSEMBLY Assembly requires two persons. Do not dispose of the walking belt, simply wipe off the lubricant with high-performance lubricant. While the other ...
English Manual
Page 8
...the Pulse Bar into each Upright Cover with the four Pulse Bar Bolts (66) and four Star Washers (67). Have a second person hold the console assembly near the Upright Base (85). If they do not, turn one connector and try again. If necessary, remove the right accessory tray (not shown) ...from the console assembly. Make sure that the wires are fully inserted into the Upright Base. Be careful not to the Upright Base (85). Attach each other. Cut the...
...the Pulse Bar into each Upright Cover with the four Pulse Bar Bolts (66) and four Star Washers (67). Have a second person hold the console assembly near the Upright Base (85). If they do not, turn one connector and try again. If necessary, remove the right accessory tray (not shown) ...from the console assembly. Make sure that the wires are fully inserted into the Upright Base. Be careful not to the Upright Base (85). Attach each other. Cut the...

English Manual
Page 9
...follow the steps below to the indicated wire extending from damage, place a mat under the treadmill. Finger tighten a Console Bolt (72) with a Star Washer (67) into the upper hole in a secure place. use the treadmill. Use a rubber mallet if necessary. The allen wrench is oriented as shown. The other...pin into the left side of the Upright Endcap indicated by the arrow first; Tighten the knob back onto the pin. 9 Knob 85 Console Assembly 77 Spring Collar Pin 10.Make sure that no wires are pinched. 8. Make sure that all parts are on the receiver (A) to install...
...follow the steps below to the indicated wire extending from damage, place a mat under the treadmill. Finger tighten a Console Bolt (72) with a Star Washer (67) into the upper hole in a secure place. use the treadmill. Use a rubber mallet if necessary. The allen wrench is oriented as shown. The other...pin into the left side of the Upright Endcap indicated by the arrow first; Tighten the knob back onto the pin. 9 Knob 85 Console Assembly 77 Spring Collar Pin 10.Make sure that no wires are pinched. 8. Make sure that all parts are on the receiver (A) to install...

English Manual
Page 30
... Left Rear Endcap Pulse Bar Bolt Star Washer Left Handrail Pulse Bar Right Handrail Upright Endcap Console Bolt Wire Harness Pulse Wire Upright Cover Latch Assembly Latch Insert Left Upright Cap Pulse Bar Wire Lift Frame Clevis Pin Base Pad 1" Tek Screw Thin Base Pad Warning Decal Upright Base Shock Extension...
... Left Rear Endcap Pulse Bar Bolt Star Washer Left Handrail Pulse Bar Right Handrail Upright Endcap Console Bolt Wire Harness Pulse Wire Upright Cover Latch Assembly Latch Insert Left Upright Cap Pulse Bar Wire Lift Frame Clevis Pin Base Pad 1" Tek Screw Thin Base Pad Warning Decal Upright Base Shock Extension...
English Manual
Page 34
... not allow limitations on the outside of the carton and insure the product. LIMITED WARRANTY WHAT IS COVERED-The entire NordicTrack® C2050 treadmill ("Product") is warranted to be free of all other consequential damages of whatsoever nature. WHAT WE DO TO CORRECT COVERED... DEFECTS-We will replace the Product. WHAT IS NOT COVERED-Any failures or damage caused by unauthorized service, misuse, accident, negligence, improper assembly ...
... not allow limitations on the outside of the carton and insure the product. LIMITED WARRANTY WHAT IS COVERED-The entire NordicTrack® C2050 treadmill ("Product") is warranted to be free of all other consequential damages of whatsoever nature. WHAT WE DO TO CORRECT COVERED... DEFECTS-We will replace the Product. WHAT IS NOT COVERED-Any failures or damage caused by unauthorized service, misuse, accident, negligence, improper assembly ...


