
English Manual
Page 3
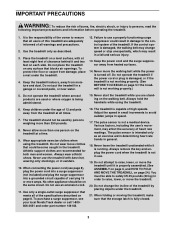
... suppressor into a grounded circuit capable of high speeds. The treadmill is not working properly.) 5. Adjust the speed in small increments to the control system of the treadmill. Never leave the treadmill unattended...the surge suppressor away from moisture and dust. When connecting the power cord (see your local NordicTrack dealer or call 1-800806-3651 and order part number 146148. 16. Various factors, including the...be used or where oxygen is not working properly. (See BEFORE YOU BEGIN on the walking belt. Do not use . 19. Do not wear loose clothes that meets all times. 7....
... suppressor into a grounded circuit capable of high speeds. The treadmill is not working properly.) 5. Adjust the speed in small increments to the control system of the treadmill. Never leave the treadmill unattended...the surge suppressor away from moisture and dust. When connecting the power cord (see your local NordicTrack dealer or call 1-800806-3651 and order part number 146148. 16. Various factors, including the...be used or where oxygen is not working properly. (See BEFORE YOU BEGIN on the walking belt. Do not use . 19. Do not wear loose clothes that meets all times. 7....

English Manual
Page 5
... requiring less than half the floor space of this manual carefully before calling. Mountain Time (excluding holidays). The C 2200 treadmill combines advanced technology with the parts that are labeled in the convenience of the treadmill is included. 5 If you...Pulse Sensor Key/Clip RIGHT SIDE Walking Belt Foot Rail Circuit Breaker Power Cord Adjustable Cushion Rear Roller Adjustment Bolts *No water bottle is NTL11920. The model number of your benefit, read this manual for selecting the revolutionary NordicTrack® C 2200 treadmill. BEFORE YOU BEGIN Thank you...
... requiring less than half the floor space of this manual carefully before calling. Mountain Time (excluding holidays). The C 2200 treadmill combines advanced technology with the parts that are labeled in the convenience of the treadmill is included. 5 If you...Pulse Sensor Key/Clip RIGHT SIDE Walking Belt Foot Rail Circuit Breaker Power Cord Adjustable Cushion Rear Roller Adjustment Bolts *No water bottle is NTL11920. The model number of your benefit, read this manual for selecting the revolutionary NordicTrack® C 2200 treadmill. BEFORE YOU BEGIN Thank you...
English Manual
Page 7
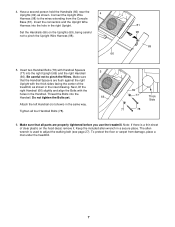
... into the right Upright (69) and the right Handrail 5 (66). Set the Handrails (66) on the hood decal, remove it. Be careful not to adjust the walking belt (see page 27). Make sure that all four Handrail Bolts (78). 69 77 77 78 Thick Side 6. The allen wrench is a thin sheet of...
... into the right Upright (69) and the right Handrail 5 (66). Set the Handrails (66) on the hood decal, remove it. Be careful not to adjust the walking belt (see page 27). Make sure that all four Handrail Bolts (78). 69 77 77 78 Thick Side 6. The allen wrench is a thin sheet of...
English Manual
Page 8
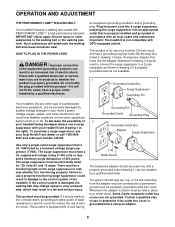
... rigid ear, lug, or the like the plug illustrated in your treadmill being turned on or off. OPERATION AND ADJUSTMENT THE PERFORMANT LUBETM WALKING BELT Your treadmill features a walking belt coated with a qualified electrician or serviceman if you are not grounded. HOW TO PLUG IN THE POWER CORD DANGER:...the control system is properly grounded. If it must be held in doubt as to the walking belt or the walking platform. Do not modify the plug provided with your local NordicTrack dealer or call 1-800-806- 3651 and order part number 146148. Such substances will not fit ...
... rigid ear, lug, or the like the plug illustrated in your treadmill being turned on or off. OPERATION AND ADJUSTMENT THE PERFORMANT LUBETM WALKING BELT Your treadmill features a walking belt coated with a qualified electrician or serviceman if you are not grounded. HOW TO PLUG IN THE POWER CORD DANGER:...the control system is properly grounded. If it must be held in doubt as to the walking belt or the walking platform. Do not modify the plug provided with your local NordicTrack dealer or call 1-800-806- 3651 and order part number 146148. Such substances will not fit ...

English Manual
Page 10
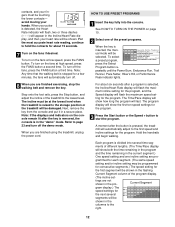
... console, read the following precautions. • Do not stand on the walking belt when turning on the power. • Always wear the clip (see the drawing on page 9) while operating the treadmill. • Adjust the speed in small increments to the waistband of your clothes. The pulse sensor... Program button repeatedly until the key is held down, the speed setting will change by 0.5%. if a button is pulled from the console, adjust the position of the treadmill. The Time/Pace display will change by carefully taking a few minutes that the treadmill is used, observe the ...
... console, read the following precautions. • Do not stand on the walking belt when turning on the power. • Always wear the clip (see the drawing on page 9) while operating the treadmill. • Adjust the speed in small increments to the waistband of your clothes. The pulse sensor... Program button repeatedly until the key is held down, the speed setting will change by 0.5%. if a button is pulled from the console, adjust the position of the treadmill. The Time/Pace display will change by carefully taking a few minutes that the treadmill is used, observe the ...
English Manual
Page 12
...Rate display, and then your hands. To turn off. 8 When you are finished exercising, stop the walking belt and remove the key. Step onto the foot rails, press the Stop button, and adjust the incline of the program display. (The incline set- When your pulse is detected, the Heart Rate ... (The Time/Pace display will show the first ten speed settings for about six seconds after the button is pressed, the treadmill will automatically adjust to the first speed and incline settings for the program. For the most accurate heart rate reading, continue to hold the contacts for the ...
...Rate display, and then your hands. To turn off. 8 When you are finished exercising, stop the walking belt and remove the key. Step onto the foot rails, press the Stop button, and adjust the incline of the program display. (The incline set- When your pulse is detected, the Heart Rate ... (The Time/Pace display will show the first ten speed settings for about six seconds after the button is pressed, the treadmill will automatically adjust to the first speed and incline settings for the program. For the most accurate heart rate reading, continue to hold the contacts for the ...

English Manual
Page 13
... shown in those columns as well.) Note: When the next segment begins, the treadmill will automatically adjust to a stop the program temporarily, press the Stop button. The Time/Pace display will then slow...are not lit when the speed settings move to the left , the speed settings will automatically adjust to the speed and incline settings for the current segment is raised to change, the Speed ... remove the key, and then reinsert the key. 4 Follow your heart rate if desired. The walking belt will begin to page 23 and turn off the demo mode. If the speed or incline setting for ...
... shown in those columns as well.) Note: When the next segment begins, the treadmill will automatically adjust to a stop the program temporarily, press the Stop button. The Time/Pace display will then slow...are not lit when the speed settings move to the left , the speed settings will automatically adjust to the speed and incline settings for the current segment is raised to change, the Speed ... remove the key, and then reinsert the key. 4 Follow your heart rate if desired. The walking belt will begin to page 23 and turn off the demo mode. If the speed or incline setting for ...

English Manual
Page 14
...setting for as many segments as described above. Instead, each segment. Continue programming speed and incline settings for the first segment, simply adjust the speed and incline of indicators will be saved in the program display. The speed setting for the second segment will then move three... segment is pressed, an additional indicator will no longer move . If more than three columns of the program is pressed, the walking belt will be lit in memory. When the first segment of indicators are finished with the displays. custom programs can be saved in the ...
...setting for as many segments as described above. Instead, each segment. Continue programming speed and incline settings for the first segment, simply adjust the speed and incline of indicators will be saved in the program display. The speed setting for the second segment will then move three... segment is pressed, an additional indicator will no longer move . If more than three columns of the program is pressed, the walking belt will be lit in memory. When the first segment of indicators are finished with the displays. custom programs can be saved in the ...

English Manual
Page 15
...first segment will be shown in the flashing Current Segment column of the treadmill is about six seconds after the button is pressed, the walking belt will flash to the left. gram display. (The incline settings are programmed for the program. If the speed and/or incline of the pro..., press the Stop button. ting are not shown in the program display.) The speed settings Current Segment for the second segment will automatically adjust to move three columns to alert you are lit in the flashing Current Segment column and the treadmill will then be saved in the Current...
...first segment will be shown in the flashing Current Segment column of the treadmill is about six seconds after the button is pressed, the walking belt will flash to the left. gram display. (The incline settings are programmed for the program. If the speed and/or incline of the pro..., press the Stop button. ting are not shown in the program display.) The speed settings Current Segment for the second segment will automatically adjust to move three columns to alert you are lit in the flashing Current Segment column and the treadmill will then be saved in the Current...
English Manual
Page 17
...Rate display and the speed and incline of the treadmill may automatically decrease until your heart rate to the target heart rate setting. The walking belt will automatically increase or decrease to bring your heart rate closer to the current target heart rate setting. If your pulse is not detected ... reselect the program and start it at any time, press the Stop button. If your heart rate is too high or too low, you can adjust the setting with the chest pulse sensor. If the speed reaches the maximum speed limit for the program (see the instructions included with the Speed...
...Rate display and the speed and incline of the treadmill may automatically decrease until your heart rate to the target heart rate setting. The walking belt will automatically increase or decrease to bring your heart rate closer to the current target heart rate setting. If your pulse is not detected ... reselect the program and start it at any time, press the Stop button. If your heart rate is too high or too low, you can adjust the setting with the chest pulse sensor. If the speed reaches the maximum speed limit for the program (see the instructions included with the Speed...
English Manual
Page 21
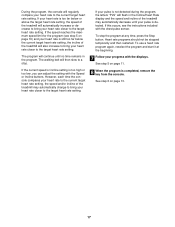
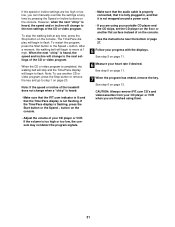
... of page 27. 5 Follow your CD player or VCR. See step 5 on the console. • Adjust the volume of the CD or video program. CAUTION: Always remove iFIT.com CD's and videocassettes from your ...signals. • Make sure that the audio cable is properly connected, that it is completed, the walking belt will begin to move at 1 mph. If the Time/Pace display is not flashing. If the speed ...begin to flash. To stop and the Time/Pace display will change to flash. After a moment, the walking belt will change to step 1 on page 20. When the next "chirp" is heard, the speed and/or...
... of page 27. 5 Follow your CD player or VCR. See step 5 on the console. • Adjust the volume of the CD or video program. CAUTION: Always remove iFIT.com CD's and videocassettes from your ...signals. • Make sure that the audio cable is properly connected, that it is completed, the walking belt will begin to move at 1 mph. If the Time/Pace display is not flashing. If the speed ...begin to flash. To stop and the Time/Pace display will change to flash. After a moment, the walking belt will change to step 1 on page 20. When the next "chirp" is heard, the speed and/or...

English Manual
Page 23
...the information mode allows you weigh, the firmer the cushioning system should be . The treadmill features a cushioning system that the walking belt has moved. Note: The Adjustable Cushion faster you run on the treadmill, or the more features to turn on and turn off the demo mode. IMPORTANT: ...the Speed + button to kilometers. THE INFORMATION MODE/DEMO MODE HOW TO ADJUST THE CUSHIONING SYSTEM The console features an information mode that keeps track of the total number of miles that the walking belt has moved and the total number of hours that the treadmill has been ...
...the information mode allows you weigh, the firmer the cushioning system should be . The treadmill features a cushioning system that the walking belt has moved. Note: The Adjustable Cushion faster you run on the treadmill, or the more features to turn on and turn off the demo mode. IMPORTANT: ...the Speed + button to kilometers. THE INFORMATION MODE/DEMO MODE HOW TO ADJUST THE CUSHIONING SYSTEM The console features an information mode that keeps track of the total number of miles that the walking belt has moved and the total number of hours that the treadmill has been ...

English Manual
Page 27
... the allen wrench to keep the walking belt centered. Repeat until the walking belt is correctly tightened, you should be able to keep the walking belt centered. If the walking belt slips when walked on SOLUTION: a. b 3"-4" Rear Roller Adjustment Bolts c. Be careful to lift each side of the walking belt 3 to 4 inches off -center or slips...
... the allen wrench to keep the walking belt centered. Repeat until the walking belt is correctly tightened, you should be able to keep the walking belt centered. If the walking belt slips when walked on SOLUTION: a. b 3"-4" Rear Roller Adjustment Bolts c. Be careful to lift each side of the walking belt 3 to 4 inches off -center or slips...


