
User Guide
Page 5
All rights reserved. 5 Installing the SIM card and the battery 28 Installation ...28 Charging the battery ...30 Switching the phone on and off 43 Using predictive text input ...43 Writing compound words...44 Using traditional text input ...45 General instructions on ... function ...46 List of menu functions ...48 5. Menu functions 56 Messages (Menu 1) ...56 Text and picture messages (SMS)...56 Copyright © 2003 Nokia. Basic functions 37 Making a call ...37 Answering or rejecting an incoming call 39 Functions available during a call ...40 Using the loudspeaker...40 Using the ...
All rights reserved. 5 Installing the SIM card and the battery 28 Installation ...28 Charging the battery ...30 Switching the phone on and off 43 Using predictive text input ...43 Writing compound words...44 Using traditional text input ...45 General instructions on ... function ...46 List of menu functions ...48 5. Menu functions 56 Messages (Menu 1) ...56 Text and picture messages (SMS)...56 Copyright © 2003 Nokia. Basic functions 37 Making a call ...37 Answering or rejecting an incoming call 39 Functions available during a call ...40 Using the loudspeaker...40 Using the ...

User Guide
Page 10
All rights reserved. 10 Bookmarks...140 Receiving a bookmark ...141 Service inbox ...141 Settings for the service inbox ...141 Emptying the cache memory ...142 Security features for fast local connections 146 Using your phone as a modem ...147 7. Battery information 148 Charging and discharging ...148 CARE AND MAINTENANCE 150 IMPORTANT SAFETY INFORMATION 151 Copyright © 2003 Nokia. PC connectivity 146 USB port for browser connections 142 Security module ...142 Certificates ...143 Go to (Menu 16) ...145 SIM services (Menu 17) ...145 6.
All rights reserved. 10 Bookmarks...140 Receiving a bookmark ...141 Service inbox ...141 Settings for the service inbox ...141 Emptying the cache memory ...142 Security features for fast local connections 146 Using your phone as a modem ...147 7. Battery information 148 Charging and discharging ...148 CARE AND MAINTENANCE 150 IMPORTANT SAFETY INFORMATION 151 Copyright © 2003 Nokia. PC connectivity 146 USB port for browser connections 142 Security module ...142 Certificates ...143 Go to (Menu 16) ...145 SIM services (Menu 17) ...145 6.

User Guide
Page 12
... press . Keep it dry. Press as many times as needed (e.g. Copyright © 2003 Nokia. ACCESSORIES AND BATTERIES Use only approved accessories and batteries. EMERGENCY CALLS Ensure the phone is not water-resistant. Enter the emergency number, then press . WATER-RESISTANCE Your phone is switched on and in the normal position. Give your location. BACKUP COPIES...
... press . Keep it dry. Press as many times as needed (e.g. Copyright © 2003 Nokia. ACCESSORIES AND BATTERIES Use only approved accessories and batteries. EMERGENCY CALLS Ensure the phone is not water-resistant. Enter the emergency number, then press . WATER-RESISTANCE Your phone is switched on and in the normal position. Give your location. BACKUP COPIES...

User Guide
Page 14
...for use of approved accessories, please check with this device. When you disconnect the power cord of any approval or warranty applying to the phone, and may invalidate any accessory, grasp and pull the plug, not the cord. ■ About accessories Check the model number of any... charger before use with power from ACP-12, LCH-9 and LCH-12. Warning: Use only batteries, chargers and accessories approved by the phone manufacturer for use when supplied with this particular phone model. For availability of any other types may be dangerous. Copyright © 2003...
...for use of approved accessories, please check with this device. When you disconnect the power cord of any approval or warranty applying to the phone, and may invalidate any accessory, grasp and pull the plug, not the cord. ■ About accessories Check the model number of any... charger before use with power from ACP-12, LCH-9 and LCH-12. Warning: Use only batteries, chargers and accessories approved by the phone manufacturer for use when supplied with this particular phone model. For availability of any other types may be dangerous. Copyright © 2003...

User Guide
Page 26
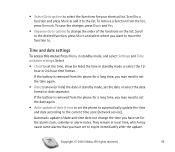
Shows the battery charge level. Shows the name of the cellular network at your current location. Guiding texts for use and you are using the phone in a UMTS network. 3. Copyright © 2003 Nokia. Shows the signal strength of the network in which the phone is being used, or the operator.... 26 ■ Standby mode and display indicators When the phone is ready for the three selection keys. The higher the bar, the stronger the signal. Putting on the wrist strap Thread the strap as shown in the battery. 4. The following indicators are described throughout this guide. 1....
Shows the battery charge level. Shows the name of the cellular network at your current location. Guiding texts for use and you are using the phone in a UMTS network. 3. Copyright © 2003 Nokia. Shows the signal strength of the network in which the phone is being used, or the operator.... 26 ■ Standby mode and display indicators When the phone is ready for the three selection keys. The higher the bar, the stronger the signal. Putting on the wrist strap Thread the strap as shown in the battery. 4. The following indicators are described throughout this guide. 1....

User Guide
Page 28
... first need to the top left, remove the right sleeve from the phone. 1. Copyright © 2003 Nokia. With the display facing downwards and the camera lens pointing to remove one of small children. • The SIM card and its contacts can easily ... card. • Before installing or removing the SIM card, always switch off the power and disconnect the phone from the charger and any other device. Getting started ■ Installing the SIM card and the battery • Keep all miniature SIM cards out of the reach of the two side covers ('sleeves') from...
... first need to the top left, remove the right sleeve from the phone. 1. Copyright © 2003 Nokia. With the display facing downwards and the camera lens pointing to remove one of small children. • The SIM card and its contacts can easily ... card. • Before installing or removing the SIM card, always switch off the power and disconnect the phone from the charger and any other device. Getting started ■ Installing the SIM card and the battery • Keep all miniature SIM cards out of the reach of the two side covers ('sleeves') from...
User Guide
Page 29
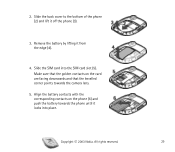
Make sure that the golden contacts on the phone (6) and push the battery towards the camera lens. 5. All rights reserved. 29 Slide the SIM card into place. 2. Slide the back cover to the bottom of the phone (2) and lift it from the edge (4). 4. Copyright © 2003 Nokia. Align the battery contacts with the corresponding contacts on the card are facing downwards and that the bevelled corner points towards the phone until it locks into the SIM card slot (5). Remove the battery by lifting it off the phone (3). 3.
Make sure that the golden contacts on the phone (6) and push the battery towards the camera lens. 5. All rights reserved. 29 Slide the SIM card into place. 2. Slide the back cover to the bottom of the phone (2) and lift it from the edge (4). 4. Copyright © 2003 Nokia. Align the battery contacts with the corresponding contacts on the card are facing downwards and that the bevelled corner points towards the phone until it locks into the SIM card slot (5). Remove the battery by lifting it off the phone (3). 3.

User Guide
Page 30
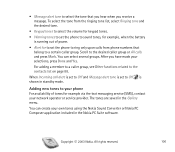
Place the back cover over the battery (7) and slide it towards the phone. See also Battery information on the display. The charging indicator bar starts scrolling on page 148. 1. Copyright © 2003 Nokia. 6. Replace the sleeve by pushing it gently into place (8). Connect the lead from the charger to an AC wall socket. Connect the...
Place the back cover over the battery (7) and slide it towards the phone. See also Battery information on the display. The charging indicator bar starts scrolling on page 148. 1. Copyright © 2003 Nokia. 6. Replace the sleeve by pushing it gently into place (8). Connect the lead from the charger to an AC wall socket. Connect the...

User Guide
Page 31
...need to be changed. Copyright © 2003 Nokia. If charging still fails, contact your network operator or service provider. Your phone does not support 5 Volt SIM cards and the card may cause interference or danger. • Charging the battery supplied with the phone takes about 1 hour 30 minutes when using ...code or security code, key in again and retry. If the text still appears on when wireless phone use is fully charged, the charging indicator bar stops scrolling. When the battery is prohibited or when it in the code and press OK. Disconnect the charger from the AC ...
...need to be changed. Copyright © 2003 Nokia. If charging still fails, contact your network operator or service provider. Your phone does not support 5 Volt SIM cards and the card may cause interference or danger. • Charging the battery supplied with the phone takes about 1 hour 30 minutes when using ...code or security code, key in again and retry. If the text still appears on when wireless phone use is fully charged, the charging indicator bar stops scrolling. When the battery is prohibited or when it in the code and press OK. Disconnect the charger from the AC ...
User Guide
Page 92
... time, which may cause some alarms that you want to move the function to. If the battery is removed from the phone for the alarm clock, calendar or alarm notes. Copyright © 2003 Nokia. Scroll to the desired function, press Move and select where you have set to expire immediately... after the update. If the battery is removed from the list, press Unmark. All rights reserved. 92 ...
... time, which may cause some alarms that you want to move the function to. If the battery is removed from the phone for the alarm clock, calendar or alarm notes. Copyright © 2003 Nokia. Scroll to the desired function, press Move and select where you have set to expire immediately... after the update. If the battery is removed from the list, press Unmark. All rights reserved. 92 ...

User Guide
Page 98
.... 98 If you select List, the menus are shown as a list. If there is no operator logo available in the phone, this function is not used for the signal strength and battery charge level. • Menu view to the image you select Grid, the menus are shown as a grid. Press Open and..., such as wallpaper. • If you delete an image from the Gallery menu while it is Copyright © 2003 Nokia. Scroll to set the time after which the phone displays the main menu. If you have previously used as the wallpaper until you change it. • Colour schemes to select the colour...
.... 98 If you select List, the menus are shown as a list. If there is no operator logo available in the phone, this function is not used for the signal strength and battery charge level. • Menu view to the image you select Grid, the menus are shown as a grid. Press Open and..., such as wallpaper. • If you delete an image from the Gallery menu while it is Copyright © 2003 Nokia. Scroll to set the time after which the phone displays the main menu. If you have previously used as the wallpaper until you change it. • Colour schemes to select the colour...
User Guide
Page 100
... and the desired tone. • Keypad tones to select the volume for keypad tones. • Warning tones to set the phone to sound tones, for example, when the battery is shown in standby mode. • Message alert tone to select the tone that belong to a certain caller group. To ...select the tone from phone numbers that you hear when you have made your own tones using the Nokia Sound Converter or Nokia PC Composer application included in...
... and the desired tone. • Keypad tones to select the volume for keypad tones. • Warning tones to set the phone to sound tones, for example, when the battery is shown in standby mode. • Message alert tone to select the tone that belong to a certain caller group. To ...select the tone from phone numbers that you hear when you have made your own tones using the Nokia Sound Converter or Nokia PC Composer application included in...
User Guide
Page 114
... switched off the phone or Yes to stop the alarm. To set a tone for the active profile in the Profiles menu, see page 90. and the current time on and starts sounding the alarm tone. Copyright © 2003 Nokia. To access this menu: Press Menu in standby mode and select Organiser and... danger. Press Stop to make and receive calls. To change the alarm time, select On. Note: Do not press Yes when wireless phone use is enough power in the battery. Alarm clock You can set an alarm, select Alarm time, key in the alarm time and press OK. If the alarm time...
... switched off the phone or Yes to stop the alarm. To set a tone for the active profile in the Profiles menu, see page 90. and the current time on and starts sounding the alarm tone. Copyright © 2003 Nokia. To access this menu: Press Menu in standby mode and select Organiser and... danger. Press Stop to make and receive calls. To change the alarm time, select On. Note: Do not press Yes when wireless phone use is enough power in the battery. Alarm clock You can set an alarm, select Alarm time, key in the alarm time and press OK. If the alarm time...

User Guide
Page 127
...the times or to continue the timing, press Options and select Reset or Start. Note: Using the stopwatch consumes the battery and the phone's operating time will be reduced. When the stopwatch is on, is shown in standby mode, and select Extras and ... in the background when performing other functions while the stopwatch is stopped, you want to use other operations with your phone. Be careful not to let it run in the background If you can press Save to save the lap or split...Stopwatch You can measure time and take a lap time or Stop to stop the timing. Copyright © 2003 Nokia.
...the times or to continue the timing, press Options and select Reset or Start. Note: Using the stopwatch consumes the battery and the phone's operating time will be reduced. When the stopwatch is on, is shown in standby mode, and select Extras and ... in the background when performing other functions while the stopwatch is stopped, you want to use other operations with your phone. Be careful not to let it run in the background If you can press Save to save the lap or split...Stopwatch You can measure time and take a lap time or Stop to stop the timing. Copyright © 2003 Nokia.

User Guide
Page 129
To ensure interoperability between Bluetooth devices, use Nokia approved accessories for the first time. 5. Check with the manufacturers of the display. 2. Note: Using Bluetooth consumes the battery and the phone's operating time will be restrictions on , the indicator is on using the device. ...other electronic devices. Setting up a Bluetooth connection 1. Copyright © 2003 Nokia. Profile (as a gateway), Headset Profile (as a gateway), Hands-Free Profile (as walls or other operations with your phone. When the Bluetooth feature is shown at the top of other Bluetooth devices...
To ensure interoperability between Bluetooth devices, use Nokia approved accessories for the first time. 5. Check with the manufacturers of the display. 2. Note: Using Bluetooth consumes the battery and the phone's operating time will be restrictions on , the indicator is on using the device. ...other electronic devices. Setting up a Bluetooth connection 1. Copyright © 2003 Nokia. Profile (as a gateway), Headset Profile (as a gateway), Hands-Free Profile (as walls or other operations with your phone. When the Bluetooth feature is shown at the top of other Bluetooth devices...

User Guide
Page 148
...not in your battery only with a hot or cold battery may Copyright © 2003 Nokia. If left unused a fully charged battery will reduce the capacity and lifetime of the + and - Use the battery only for example when you carry a spare battery in use any charger or battery which is ... but it is powered by the phone manufacturer and recharge your pocket or purse. Note that a new battery's full performance is damaged. Never use . All rights reserved. 148 7. Battery information ■ Charging and discharging Your phone is time to keep the battery between 15°C and 25°...
...not in your battery only with a hot or cold battery may Copyright © 2003 Nokia. If left unused a fully charged battery will reduce the capacity and lifetime of the + and - Use the battery only for example when you carry a spare battery in use any charger or battery which is ... but it is powered by the phone manufacturer and recharge your pocket or purse. Note that a new battery's full performance is damaged. Never use . All rights reserved. 148 7. Battery information ■ Charging and discharging Your phone is time to keep the battery between 15°C and 25°...

User Guide
Page 149
Copyright © 2003 Nokia. All rights reserved. 149 recycling). Batteries' performance is fully charged. temporarily not work, even when the battery is particularly limited in a fire! Dispose of batteries in temperatures well below freezing. Do not dispose of batteries according to local regulations (e.g. Do not dispose as household waste.
Copyright © 2003 Nokia. All rights reserved. 149 recycling). Batteries' performance is fully charged. temporarily not work, even when the battery is particularly limited in a fire! Dispose of batteries in temperatures well below freezing. Do not dispose of batteries according to local regulations (e.g. Do not dispose as household waste.

User Guide
Page 150
...The personnel there will corrode electronic circuits. • Do not use harsh chemicals, cleaning solvents, or strong detergents to open the phone. Copyright © 2003 Nokia. All rights reserved. 150 Paint can clog the moving parts can be treated with care. If any accessory. Rough handling can... nearest qualified service facility. Its moving parts and prevent proper operation. • Use a soft, clean and dry cloth to your phone, battery, charger or any of them is a product of superior design and craftsmanship and should be damaged. • Do not store the...
...The personnel there will corrode electronic circuits. • Do not use harsh chemicals, cleaning solvents, or strong detergents to open the phone. Copyright © 2003 Nokia. All rights reserved. 150 Paint can clog the moving parts can be treated with care. If any accessory. Rough handling can... nearest qualified service facility. Its moving parts and prevent proper operation. • Use a soft, clean and dry cloth to your phone, battery, charger or any of them is a product of superior design and craftsmanship and should be damaged. • Do not store the...


