
User Guide
Page 2
2 Contents Contents Organize your applications 34 Nokia Store 34 Safety 5 Get started 7 Keys and parts 7 Insert the SIM card 7 Insert a memory card 9 Charge the battery 11 Charge the battery over USB 12 ... keys and screen 13 Antenna locations 14 Noise cancellation 14 Switch the phone on or off 14 Use your phone for the first time 15 Nokia account 16 Copy contacts or pictures from your old phone 16 Attach the wrist strap 17 Access codes 17 Use the user guide in your...
2 Contents Contents Organize your applications 34 Nokia Store 34 Safety 5 Get started 7 Keys and parts 7 Insert the SIM card 7 Insert a memory card 9 Charge the battery 11 Charge the battery over USB 12 ... keys and screen 13 Antenna locations 14 Noise cancellation 14 Switch the phone on or off 14 Use your phone for the first time 15 Nokia account 16 Copy contacts or pictures from your old phone 16 Attach the wrist strap 17 Access codes 17 Use the user guide in your...
User Guide
Page 3
Contents 3 Back up your contacts to Nokia Services 50 Messaging 50 About Messaging 50 Send a message 50 Send an audio message 51 Read a received message 52 View a conversation 52 Listen to a text ... you have taken 70 Video editor 70 Videos and TV 71 Videos 71 Watch Web TV 72 Music and audio 73 Music player 73 About Nokia Music 75 Protected content 76 FM radio 76 Record sounds 78 Maps 78 Maps overview 78 My position 79 Search 84 Favorites 85 Check in...
Contents 3 Back up your contacts to Nokia Services 50 Messaging 50 About Messaging 50 Send a message 50 Send an audio message 51 Read a received message 52 View a conversation 52 Listen to a text ... you have taken 70 Video editor 70 Videos and TV 71 Videos 71 Watch Web TV 72 Music and audio 73 Music player 73 About Nokia Music 75 Protected content 76 FM radio 76 Record sounds 78 Maps 78 Maps overview 78 My position 79 Search 84 Favorites 85 Check in...

User Guide
Page 4
4 Contents Calendar 96 Product and safety information 123 Office 99 Index 129 Quickoffice 99 Read PDF documents 99 Calculator 99 Write notes 100 Translate words 100 Open or create zip files 101 Access your company intranet 101 Chat with your colleagues 101 Connectivity 102 Wi-Fi 102 Define how your phone connects to the internet 103 USB data cable 104 Bluetooth 106 NFC 109 VPN connections 112 Close a network connection 112 Phone management 113 Keep your phone software and applications up to date 113 Manage files 114 Free up phone memory 116 What ...
4 Contents Calendar 96 Product and safety information 123 Office 99 Index 129 Quickoffice 99 Read PDF documents 99 Calculator 99 Write notes 100 Translate words 100 Open or create zip files 101 Access your company intranet 101 Chat with your colleagues 101 Connectivity 102 Wi-Fi 102 Define how your phone connects to the internet 103 USB data cable 104 Bluetooth 106 NFC 109 VPN connections 112 Close a network connection 112 Phone management 113 Keep your phone software and applications up to date 113 Manage files 114 Free up phone memory 116 What ...
User Guide
Page 5
INTERFERENCE All wireless devices may install or repair this device. Do not connect incompatible products. Stop using the device until the glass is replaced by Nokia for example, in aircraft, in restricted areas. Obey all local laws. Your first consideration while driving should be susceptible to interference, which could affect performance. ...
INTERFERENCE All wireless devices may install or repair this device. Do not connect incompatible products. Stop using the device until the glass is replaced by Nokia for example, in aircraft, in restricted areas. Obey all local laws. Your first consideration while driving should be susceptible to interference, which could affect performance. ...

User Guide
Page 6
6 Safety PROTECT YOUR HEARING Listen to a headset at a moderate level, and do not hold the device near your ear when the loudspeaker is in use.
6 Safety PROTECT YOUR HEARING Listen to a headset at a moderate level, and do not hold the device near your ear when the loudspeaker is in use.

User Guide
Page 7
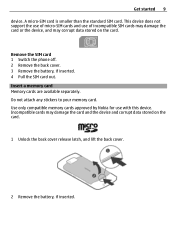
Get started Keys and parts Get started 7 1 Power/End key 2 Menu key 3 Call key 4 Microphone 5 Volume up/Zoom in key 6 Volume down/Zoom out key 7 Key lock button 8 Camera key 9 Nokia AV connector (3.5 mm) 10 Micro USB connector 11 Charger connector If there is protective tape on the camera lens, remove the tape. Insert the SIM card Do not attach any stickers to your SIM card. 1 Switch the phone off. 2 Unlock the back cover release latch, and lift the cover off.
Get started Keys and parts Get started 7 1 Power/End key 2 Menu key 3 Call key 4 Microphone 5 Volume up/Zoom in key 6 Volume down/Zoom out key 7 Key lock button 8 Camera key 9 Nokia AV connector (3.5 mm) 10 Micro USB connector 11 Charger connector If there is protective tape on the camera lens, remove the tape. Insert the SIM card Do not attach any stickers to your SIM card. 1 Switch the phone off. 2 Unlock the back cover release latch, and lift the cover off.

User Guide
Page 8
Important: Do not use a mini-UICC SIM card, also known as a micro-SIM card, a microSIM card with an adapter, or a SIM card that has a mini-UICC cutout (see figure) in this Direct the top locking catches toward their slots, and press down , and insert the card into the SIM card slot. 5 Line up the battery contacts, and insert the battery. 6 Replace the back cover. 8 Get started 3 Remove the battery, if inserted. 4 Make sure the contact area of the SIM card is facing down .
Important: Do not use a mini-UICC SIM card, also known as a micro-SIM card, a microSIM card with an adapter, or a SIM card that has a mini-UICC cutout (see figure) in this Direct the top locking catches toward their slots, and press down , and insert the card into the SIM card slot. 5 Line up the battery contacts, and insert the battery. 6 Replace the back cover. 8 Get started 3 Remove the battery, if inserted. 4 Make sure the contact area of the SIM card is facing down .
User Guide
Page 9
Insert a memory card Memory cards are available separately. Do not attach any stickers to your memory card. Use only compatible memory cards approved by Nokia for use of micro-SIM cards and use with this device. Remove the SIM card 1 Switch the phone off. 2 Remove the back cover. 3 Remove the ...
Insert a memory card Memory cards are available separately. Do not attach any stickers to your memory card. Use only compatible memory cards approved by Nokia for use of micro-SIM cards and use with this device. Remove the SIM card 1 Switch the phone off. 2 Remove the back cover. 3 Remove the ...

User Guide
Page 10
Push the memory card into the slot. 4 Line up the battery contacts, and insert the battery. 5 To replace the back cover, direct the top locking hooks toward their slots first and then press down . Remove the memory card Pull the card out. 10 Get started 3 Make sure the contact area of the memory card is facing down until the cover locks into place.
Push the memory card into the slot. 4 Line up the battery contacts, and insert the battery. 5 To replace the back cover, direct the top locking hooks toward their slots first and then press down . Remove the memory card Pull the card out. 10 Get started 3 Make sure the contact area of the memory card is facing down until the cover locks into place.

User Guide
Page 11
Tip: You can also use the phone while it is displayed or before you can switch on the card. If the battery has not been used for a long time, to begin charging, you may take several minutes before the charging indicator is charging. If the battery is using it. Doing so may need to recharge it before any calls can use a compatible USB charger to connect the charger, then disconnect and reconnect it. Get started 11 Important: Do not remove the memory card when an application is completely discharged, it may need to charge your phone for a specific length of time, and...
Tip: You can also use the phone while it is displayed or before you can switch on the card. If the battery has not been used for a long time, to begin charging, you may take several minutes before the charging indicator is charging. If the battery is using it. Doing so may need to recharge it before any calls can use a compatible USB charger to connect the charger, then disconnect and reconnect it. Get started 11 Important: Do not remove the memory card when an application is completely discharged, it may need to charge your phone for a specific length of time, and...

User Guide
Page 12
To avoid breaking the charger connector, be transferred while charging the device. You can be careful when connecting or disconnecting the charger cable. The efficiency of a call or when an application is not available. Data can use USB charging when a wall outlet is active. You can synchronize your ear. For example, if connected to start and the device to a compatible computer, you can use the phone while it may take a long time for charging to start functioning. Change the volume of USB charging power varies significantly, and it 's charging. The built-in ...
To avoid breaking the charger connector, be transferred while charging the device. You can be careful when connecting or disconnecting the charger cable. The efficiency of a call or when an application is not available. Data can use USB charging when a wall outlet is active. You can synchronize your ear. For example, if connected to start and the device to a compatible computer, you can use the phone while it may take a long time for charging to start functioning. Change the volume of USB charging power varies significantly, and it 's charging. The built-in ...

User Guide
Page 13
Get started 13 Activate or deactivate the loudspeaker during a call when your phone is in your pocket or bag, lock the keys and screen of time after which the keys and screen are locked automatically. Headset You can also press the menu key, and select Unlock. Lock the keys and screen To avoid accidentally making a call Select or . Tip: To unlock, you can connect a compatible headset or compatible headphones to lock automatically 1 Select > Settings and Phone > Display > Screen/keylock time-out. 2 Define the length of your phone. Press the key lock button. Unlock the keys and...
Get started 13 Activate or deactivate the loudspeaker during a call when your phone is in your pocket or bag, lock the keys and screen of time after which the keys and screen are locked automatically. Headset You can also press the menu key, and select Unlock. Lock the keys and screen To avoid accidentally making a call Select or . Tip: To unlock, you can connect a compatible headset or compatible headphones to lock automatically 1 Select > Settings and Phone > Display > Screen/keylock time-out. 2 Define the length of your phone. Press the key lock button. Unlock the keys and...

User Guide
Page 14
Noise cancellation If you are calling from a noisy environment, your phone filters out background noise to make your mouth. Switch the phone on or off Switch on the back of the line. Noise cancellation is in use. Contact with the earpiece to your ear and the main microphone toward your voice sound clearer to higher power level during operation. 14 Get started Antenna locations Avoid touching the antenna area while the antenna is not available when using the loudspeaker or a headset. For the best noise cancellation, hold the power key until the phone vibrates. Do not ...
Noise cancellation If you are calling from a noisy environment, your phone filters out background noise to make your mouth. Switch the phone on or off Switch on the back of the line. Noise cancellation is in use. Contact with the earpiece to your ear and the main microphone toward your voice sound clearer to higher power level during operation. 14 Get started Antenna locations Avoid touching the antenna area while the antenna is not available when using the loudspeaker or a headset. For the best noise cancellation, hold the power key until the phone vibrates. Do not ...
User Guide
Page 15
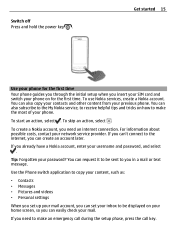
... settings When you set up your mail account, you can also subscribe to the My Nokia service, to make the most of your phone. You can set your inbox to be sent to you already have... a Nokia account, enter your password? To start an action, select . If you insert your SIM card and...started 15 Use your phone for the first time. Switch off Press and hold the power key . To create a Nokia account, you need to receive helpful tips and tricks on your home screen, so you can 't connect to make...
... settings When you set up your mail account, you can also subscribe to the My Nokia service, to make the most of your phone. You can set your inbox to be sent to you already have... a Nokia account, enter your password? To start an action, select . If you insert your SIM card and...started 15 Use your phone for the first time. Switch off Press and hold the power key . To create a Nokia account, you need to receive helpful tips and tricks on your home screen, so you can 't connect to make...
User Guide
Page 16
... time, your phone guides you can also add your payment card details. • Save your important walking and driving routes to Nokia Maps To learn more about your phone model and contact information. Your previous phone needs to another phone. - Copy content to ... computer • Download content from Nokia services • Save details about Nokia accounts and Nokia services, go to copy important information from your previous compatible Nokia phone and start using your new phone quickly? You can , for example: • Access all Nokia services with a single username and password...
... time, your phone guides you can also add your payment card details. • Save your important walking and driving routes to Nokia Maps To learn more about your phone model and contact information. Your previous phone needs to another phone. - Copy content to ... computer • Download content from Nokia services • Save details about Nokia accounts and Nokia services, go to copy important information from your previous compatible Nokia phone and start using your new phone quickly? You can , for example: • Access all Nokia services with a single username and password...
User Guide
Page 17
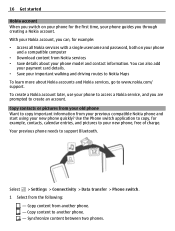
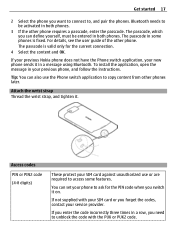
... switch application to copy content from other phones later. Bluetooth needs to ask for the current connection. 4 Select the content and OK. If your previous Nokia phone does not have the Phone switch application, your phone to be entered in your service provider. Attach the wrist strap Thread the wrist strap...
... switch application to copy content from other phones later. Bluetooth needs to ask for the current connection. 4 Select the content and OK. If your previous Nokia phone does not have the Phone switch application, your phone to be entered in your service provider. Attach the wrist strap Thread the wrist strap...

User Guide
Page 18
... phones in a topic. Select > User guide. Open the user guide from the user guide Select the application link in the network. For more information, contact a Nokia Care Point or your local service provider for example, stolen phones. Contact your phone dealer. Use the user guide in a safe place, separate from your...
... phones in a topic. Select > User guide. Open the user guide from the user guide Select the application link in the network. For more information, contact a Nokia Care Point or your local service provider for example, stolen phones. Contact your phone dealer. Use the user guide in a safe place, separate from your...
User Guide
Page 19
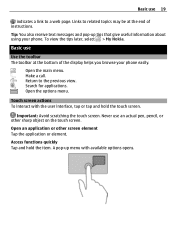
... hold the item. Return to related topics may be at the bottom of instructions. Open the options menu. To view the tips later, select > My Nokia. Open the main menu. Access functions quickly Tap and hold the touch screen. Basic use Use the toolbar The toolbar at the end of the...
... hold the item. Return to related topics may be at the bottom of instructions. Open the options menu. To view the tips later, select > My Nokia. Open the main menu. Access functions quickly Tap and hold the touch screen. Basic use Use the toolbar The toolbar at the end of the...

User Guide
Page 20
Example: You can drag items on the screen, and steadily slide your finger. Swipe Place a finger on the home screen. 20 Basic use Example: To send an image or delete an alarm, tap and hold the item, and slide your fingers apart or together. To stop the scrolling, tap the screen. Drag an item Tap and hold the image or alarm, and from the pop-up or down the screen, then lift your finger in and out Place two fingers on an item, such as a map, picture, or web page, and slide your finger across the screen. Zoom in the desired direction. Example: To switch to another home ...
Example: You can drag items on the screen, and steadily slide your finger. Swipe Place a finger on the home screen. 20 Basic use Example: To send an image or delete an alarm, tap and hold the item, and slide your fingers apart or together. To stop the scrolling, tap the screen. Drag an item Tap and hold the image or alarm, and from the pop-up or down the screen, then lift your finger in and out Place two fingers on an item, such as a map, picture, or web page, and slide your finger across the screen. Zoom in the desired direction. Example: To switch to another home ...
User Guide
Page 21
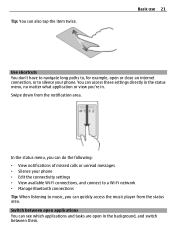
In the status menu, you can see which applications and tasks are open or close an internet connection, or to silence your phone • Edit the connectivity settings • View available Wi-Fi connections, and connect to a Wi-Fi network • Manage Bluetooth connections Tip: When listening to , for example, open in the background, and switch between them. Switch between open applications You can do the following: • View notifications of missed calls or unread messages • Silence your phone. Tip: You can quickly access the music player from the notification ...
In the status menu, you can see which applications and tasks are open or close an internet connection, or to silence your phone • Edit the connectivity settings • View available Wi-Fi connections, and connect to a Wi-Fi network • Manage Bluetooth connections Tip: When listening to , for example, open in the background, and switch between them. Switch between open applications You can do the following: • View notifications of missed calls or unread messages • Silence your phone. Tip: You can quickly access the music player from the notification ...
