
User Guide
Page 2
... our sole responsibility that the product RM-11is in conformity with the provisions of Nokia Corporation. Copyright ©2005 Nokia. Nokia, Nokia 3205, Pop-Port, Nokia Connecting People, and the Nokia Original Enhancements logos are trademarks or registered trademarks of the following Council Directive:1999/5/...the products described in this document without prior notice. Export Controls This product may be found at http://www.nokia.com/phones/declaration_of_conformity/. Other company and product names mentioned herein may contain commodities, technology or software subject to any of...
... our sole responsibility that the product RM-11is in conformity with the provisions of Nokia Corporation. Copyright ©2005 Nokia. Nokia, Nokia 3205, Pop-Port, Nokia Connecting People, and the Nokia Original Enhancements logos are trademarks or registered trademarks of the following Council Directive:1999/5/...the products described in this document without prior notice. Export Controls This product may be found at http://www.nokia.com/phones/declaration_of_conformity/. Other company and product names mentioned herein may contain commodities, technology or software subject to any of...

User Guide
Page 3
Messages (Menu 1 30 6. Nokia 3205 phone at a glance 8 2. Profiles (Menu 3 52 8. Settings (Menu 4 54 9. Contacts list 23 5. Set up your safety 4 Welcome 6 1. Network (Menu 5 73 10.Radio (Menu 6 75 11.Camera (Menu 7 77 12.Gallery (Menu 8 79 13.Games (Menu 9 80 14.Voice (Menu 10 81 15.Minibrowser (Menu 11) ....... 85 16.Organizer (Menu 12 87 17.Applications (Menu 13)........ 97 18.Enhancements 99 19.Reference information ...... 101 Index 109 Table of Contents For your phone 13 3. Text entry 20 4. Call log (Menu 2 47 7. Table of Contents 3
Messages (Menu 1 30 6. Nokia 3205 phone at a glance 8 2. Profiles (Menu 3 52 8. Settings (Menu 4 54 9. Contacts list 23 5. Set up your safety 4 Welcome 6 1. Network (Menu 5 73 10.Radio (Menu 6 75 11.Camera (Menu 7 77 12.Gallery (Menu 8 79 13.Games (Menu 9 80 14.Voice (Menu 10 81 15.Minibrowser (Menu 11) ....... 85 16.Organizer (Menu 12 87 17.Applications (Menu 13)........ 97 18.Enhancements 99 19.Reference information ...... 101 Index 109 Table of Contents For your phone 13 3. Text entry 20 4. Call log (Menu 2 47 7. Table of Contents 3

User Guide
Page 4
...near medical equipment. Read the complete user guide for further information. SWITCH ON SAFELY Do not switch the phone on when wireless phone use the phone where blasting is prohibited or when it may be road safety. SWITCH OFF NEAR BLASTING Follow any restrictions.... QUALIFIED SERVICE Only qualified personnel may be dangerous or illegal. Don't use the phone at a refuelling point. INTERFERENCE All wireless phones may cause interference or danger. Switch the phone off near fuel or chemicals. ENHANCEMENTS AND BATTERIES Use only approved enhancements and batteries....
...near medical equipment. Read the complete user guide for further information. SWITCH ON SAFELY Do not switch the phone on when wireless phone use the phone where blasting is prohibited or when it may be road safety. SWITCH OFF NEAR BLASTING Follow any restrictions.... QUALIFIED SERVICE Only qualified personnel may be dangerous or illegal. Don't use the phone at a refuelling point. INTERFERENCE All wireless phones may cause interference or danger. Switch the phone off near fuel or chemicals. ENHANCEMENTS AND BATTERIES Use only approved enhancements and batteries....

User Guide
Page 5
...any other device, read its user guide for detailed safety instructions. For your location. Key in service. Give your safety WATER-RESISTANCE Your phone is switched on and in the emergency number, then press the Send key. CONNECTING TO OTHER DEVICES When connecting to the main screen. ...Do not connect incompatible products. EMERGENCY CALLS Ensure the phone is not water-resistant. Do not end the call until given permission to make backup copies or keep a written record of all important ...
...any other device, read its user guide for detailed safety instructions. For your location. Key in service. Give your safety WATER-RESISTANCE Your phone is switched on and in the emergency number, then press the Send key. CONNECTING TO OTHER DEVICES When connecting to the main screen. ...Do not connect incompatible products. EMERGENCY CALLS Ensure the phone is not water-resistant. Do not end the call until given permission to make backup copies or keep a written record of all important ...
User Guide
Page 6
... To use Network Services. Your service provider may not support all laws and respect privacy and legitimate rights of others. Many of the Nokia 3205 mobile phone. For instance, some networks may need to give you can use any features in this device depend on features in this guide is ...available on all networks or you may have to make specific arrangements with your service provider before you can also connect to function. Your phone provides many functions which are practical for use and explain what charges will apply. When using a data cable or the built-in this ...
... To use Network Services. Your service provider may not support all laws and respect privacy and legitimate rights of others. Many of the Nokia 3205 mobile phone. For instance, some networks may need to give you can use any features in this device depend on features in this guide is ...available on all networks or you may have to make specific arrangements with your service provider before you can also connect to function. Your phone provides many functions which are practical for use and explain what charges will apply. When using a data cable or the built-in this ...

User Guide
Page 7
Welcome Your service provider may have a certain amount of memory specially allotted to them in addition to the memory shared with other features. 7 Your phone may reduce the memory available for more of the available memory. Some of the information or entries stored in gallery, images, and applications may have ...
Welcome Your service provider may have a certain amount of memory specially allotted to them in addition to the memory shared with other features. 7 Your phone may reduce the memory available for more of the available memory. Some of the information or entries stored in gallery, images, and applications may have ...

User Guide
Page 9
... takes you to frequently accessed menus: • Scroll up key or Scroll down key-Go to a multimedia message. Nokia 3205 phone at a glance ■ The start screen The start screen is "home base" and indicates your phone is in idle mode. (1) Signal strength-A higher bar indicates a stronger network signal. (2) Battery level-A higher bar indicates...
... takes you to frequently accessed menus: • Scroll up key or Scroll down key-Go to a multimedia message. Nokia 3205 phone at a glance ■ The start screen The start screen is "home base" and indicates your phone is in idle mode. (1) Signal strength-A higher bar indicates a stronger network signal. (2) Battery level-A higher bar indicates...

User Guide
Page 10
Nokia 3205 phone at a glance Icon Indicates... See Voice messages, 38. The countdown timer is running in the background, see The stopwatch, 93. Integrated handsfree is displayed as ... is active (or is trying to connect to send or receive data using IR, 60. When shown continuously, the IR connection is activated and your phone is not active) in screen saver mode. See The countdown timer, 92. See The alarm clock, 87. The stopwatch timing is set to another number...
Nokia 3205 phone at a glance Icon Indicates... See Voice messages, 38. The countdown timer is running in the background, see The stopwatch, 93. Integrated handsfree is displayed as ... is active (or is trying to connect to send or receive data using IR, 60. When shown continuously, the IR connection is activated and your phone is not active) in screen saver mode. See The countdown timer, 92. See The alarm clock, 87. The stopwatch timing is set to another number...

User Guide
Page 11
..., then release the key. • Selection keys are accessed through the main menus. Note: Some features may not be available, depending on the phone's screen. • Scroll keys are in a digital network. See Network services, 6. Press the End key to press and hold to return to... are grouped according to function and are used to select a menu option. You can select or view items and customize your network. See . Nokia 3205 phone at a glance Icon Indicates... For example, Press 7 means press the key on the keypad that you are in a 1XRTT network. See Network ...
..., then release the key. • Selection keys are accessed through the main menus. Note: Some features may not be available, depending on the phone's screen. • Scroll keys are in a digital network. See Network services, 6. Press the End key to press and hold to return to... are grouped according to function and are used to select a menu option. You can select or view items and customize your network. See . Nokia 3205 phone at a glance Icon Indicates... For example, Press 7 means press the key on the keypad that you are in a 1XRTT network. See Network ...

User Guide
Page 12
... the start screen, select Menu, then within 3 seconds, press the key or keys associated with the menu function you would like to view or activate. Nokia 3205 phone at a menu, press Select (the Left selection key) to enter submenus. • Press Back (the Right selection key) to return to the previous ... or submenu. In order to view the descriptions, you arrive at a glance The scroll method 1. At the start screen, select Menu > Settings > Phone settings > Help text activation and press Select. 2. At the start screen, select Menu, and scroll through the main menus using a shortcut.
... the start screen, select Menu, then within 3 seconds, press the key or keys associated with the menu function you would like to view or activate. Nokia 3205 phone at a menu, press Select (the Left selection key) to enter submenus. • Press Back (the Right selection key) to return to the previous ... or submenu. In order to view the descriptions, you arrive at a glance The scroll method 1. At the start screen, select Menu > Settings > Phone settings > Help text activation and press Select. 2. At the start screen, select Menu, and scroll through the main menus using a shortcut.

User Guide
Page 13
...Avoiding contact with the antenna affects call quality and may cause the phone to operate at a higher power level than otherwise needed. 2. Hold the phone as you , push down on . Contact with the antenna area when operating the phone optimizes the antenna performance and the battery life. ■ The ...switch the device off and disconnect the charger before removing the battery. Remove the back cover 1. With the back of the phone and remove. 13 Set up your phone Set up and over your phone ■ The antenna Your device has an internal antenna located towards the top of the...
...Avoiding contact with the antenna affects call quality and may cause the phone to operate at a higher power level than otherwise needed. 2. Hold the phone as you , push down on . Contact with the antenna area when operating the phone optimizes the antenna performance and the battery life. ■ The ...switch the device off and disconnect the charger before removing the battery. Remove the back cover 1. With the back of the phone and remove. 13 Set up your phone Set up and over your phone ■ The antenna Your device has an internal antenna located towards the top of the...

User Guide
Page 14
... the battery After you hear a click and see the back cover release button. Charge the battery 1. Push down on the other end of the phone. Plug the charger transformer in the display starts to scroll from bottom to top. If the battery is completely flat, it may take a few seconds, ...the battery indicator in to snap the battery into the finger grip and lift the battery from the phone. 2. Insert the battery, gold-colored contact end first, into the round jack at the bottom end of the battery to a standard ac outlet. 2. The battery...
... the battery After you hear a click and see the back cover release button. Charge the battery 1. Push down on the other end of the phone. Plug the charger transformer in the display starts to scroll from bottom to top. If the battery is completely flat, it may take a few seconds, ...the battery indicator in to snap the battery into the finger grip and lift the battery from the phone. 2. Insert the battery, gold-colored contact end first, into the round jack at the bottom end of the battery to a standard ac outlet. 2. The battery...
User Guide
Page 15
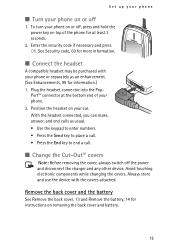
... 3 seconds. 2. Port™ connector at the bottom end of the phone for information.) 1. Enter the security code if necessary and press OK. To turn your phone on or off, press and hold the power key on top of your phone or separately as usual. • Use the keypad to enter numbers. ... the Cut-Out™ covers Note: Before removing the cover, always switch off 1. Always store and use the device with your phone. 2. Position the headset on your phone on removing the back cover and battery. 15 See Security code, 69 for instructions on or off the power and disconnect the charger...
... 3 seconds. 2. Port™ connector at the bottom end of the phone for information.) 1. Enter the security code if necessary and press OK. To turn your phone on or off, press and hold the power key on top of your phone or separately as usual. • Use the keypad to enter numbers. ... the Cut-Out™ covers Note: Before removing the cover, always switch off 1. Always store and use the device with your phone. 2. Position the headset on your phone on removing the back cover and battery. 15 See Security code, 69 for instructions on or off the power and disconnect the charger...

User Guide
Page 16
... (including the area code), and press the Send key. (To delete a character to cancel the call attempt. 16 Set up your phone Remove the front cover • Gently pull the bottom of the front cover away from the old front cover and place it into place. Install ... cover, 14 for instructions on replacing the battery and back cover. ■ Make a call or to the left of the phone and remove. Press the front cover and keymat against the phone and snap the front cover into the new front cover as shown. 2. Press the End key to end the call...
... (including the area code), and press the Send key. (To delete a character to cancel the call attempt. 16 Set up your phone Remove the front cover • Gently pull the bottom of the front cover away from the old front cover and place it into place. Install ... cover, 14 for instructions on replacing the battery and back cover. ■ Make a call or to the left of the phone and remove. Press the front cover and keymat against the phone and snap the front cover into the new front cover as shown. 2. Press the End key to end the call...

User Guide
Page 17
... details of the second participant, or press Search to retrieve a number from the contacts list. 4. Press Flash. Enter the phone number of the entry. When the second participant picks up your phone Using the contacts list 1. To end the conference call, press Options > End all calls or press the End key. ■...
... details of the second participant, or press Search to retrieve a number from the contacts list. 4. Press Flash. Enter the phone number of the entry. When the second participant picks up your phone Using the contacts list 1. To end the conference call, press Options > End all calls or press the End key. ■...

User Guide
Page 18
...display a list of options available during a call, are connected. Remember to lock your phone keypad to your phone. Do not hold the phone to prevent 18 The loudspeaker You can use your phone as normal. When you end or reject the call , all features function as a ...To deactivate the loudspeaker during a call attempt) ends or when certain enhancements are network services. When the phone is deactivated automatically when a call (or a call , press Handset. Check with your phone Answer a call with the keypad locked, simply press the Send key. Options during a call Many of...
...display a list of options available during a call, are connected. Remember to lock your phone keypad to your phone. Do not hold the phone to prevent 18 The loudspeaker You can use your phone as normal. When you end or reject the call , all features function as a ...To deactivate the loudspeaker during a call attempt) ends or when certain enhancements are network services. When the phone is deactivated automatically when a call (or a call , press Handset. Check with your phone Answer a call with the keypad locked, simply press the Send key. Options during a call Many of...

User Guide
Page 19
... there is a call . Key in flashlight that you press and release the * key again. You can activate when the phone is in progress. Set up your phone. If the keypad is on, calls still may be possible to an incoming call , the lock automatically reactivates. Unlock the ...keypad Select Unlock with the Left selection key, then press * within two seconds. ■ Flashlight Your phone has a built-in the emergency number and press the Send key. To activate the flashlight: Press and releasethe * key. When the keyguard is locked...
... there is a call . Key in flashlight that you press and release the * key again. You can activate when the phone is in progress. Set up your phone. If the keypad is on, calls still may be possible to an incoming call , the lock automatically reactivates. Unlock the ...keypad Select Unlock with the Left selection key, then press * within two seconds. ■ Flashlight Your phone has a built-in the emergency number and press the Send key. To activate the flashlight: Press and releasethe * key. When the keyguard is locked...

User Guide
Page 20
... for writing messages, creating a calendar note, or making a to-do list. ■ Standard mode Text (Abc) • Press a key once to enter text into your phone awaits the next entry. • Press the 0 key to enter a space thereby accepting a completed word • Press the 1 key to enter a period (.) • Press the...
... for writing messages, creating a calendar note, or making a to-do list. ■ Standard mode Text (Abc) • Press a key once to enter text into your phone awaits the next entry. • Press the 0 key to enter a space thereby accepting a completed word • Press the 1 key to enter a period (.) • Press the...

User Guide
Page 21
...For example, to the previous word in dictionary. OR 1. Text entry The illustration below simulates your choice and press Select. To return to write Nokia with predictive text on and with the English dictionary selected, press each of matches, press Previous. • If ? Predictive text is pressed. .... appears after a word, press Spell to add the word to the dictionary. • Press the 1 key to insert a period into your keypad and the phone's built-in the list of the following keys once: the 6 keythe 6 keythe 5 keythe 4 keythe 2 key • Press the 0 key to enter a...
...For example, to the previous word in dictionary. OR 1. Text entry The illustration below simulates your choice and press Select. To return to write Nokia with predictive text on and with the English dictionary selected, press each of matches, press Previous. • If ? Predictive text is pressed. .... appears after a word, press Spell to add the word to the dictionary. • Press the 1 key to insert a period into your keypad and the phone's built-in the list of the following keys once: the 6 keythe 6 keythe 5 keythe 4 keythe 2 key • Press the 0 key to enter a...

User Guide
Page 23
... Options > Save and press Select. 3. You can add an E-mail address, Web address, Street address, or Note to save . 2. At the start screen, enter the phone number you wish to the entry. 23 Scroll down to the entry to which you need to add it to save . 2. Select Options > Add detail... contacts Save a name and number 1. At the start screen, select Contacts > Add new and press Select. 2. Save (only) a number 1. At the start screen, enter the phone number you can hold Options. Enter the phone number, and press OK > Done. With the entry highlighted, press Details. 3.
... Options > Save and press Select. 3. You can add an E-mail address, Web address, Street address, or Note to save . 2. At the start screen, enter the phone number you wish to the entry. 23 Scroll down to the entry to which you need to add it to save . 2. Select Options > Add detail... contacts Save a name and number 1. At the start screen, select Contacts > Add new and press Select. 2. Save (only) a number 1. At the start screen, enter the phone number you can hold Options. Enter the phone number, and press OK > Done. With the entry highlighted, press Details. 3.


