User Guide
Page 2
... Council Directive: 1999/5/EC. Includes RSA BSAFE cryptographic or security protocol software from http://www.nokia.com/phones/declaration_of_conformity/. DECLARATION OF CONFORMITY We, NOKIA CORPORATION declare under our sole responsibility that the product RH-30 is a sound mark of Nokia Corporation. Reproduction, transfer, distribution or storage of part or all of the contents in...
... Council Directive: 1999/5/EC. Includes RSA BSAFE cryptographic or security protocol software from http://www.nokia.com/phones/declaration_of_conformity/. DECLARATION OF CONFORMITY We, NOKIA CORPORATION declare under our sole responsibility that the product RH-30 is a sound mark of Nokia Corporation. Reproduction, transfer, distribution or storage of part or all of the contents in...

User Guide
Page 3
...limited to, the implied warranties of merchantability and fitness for any loss of data or income or any time without prior notice. Nokia reserves the right to you. Except as is". Please check with the Nokia dealer nearest to revise this document are provided "as required by applicable law, no circumstances shall... Nokia be responsible for a particular purpose, are made in relation to the accuracy, reliability or contents of particular products may vary by region. The contents ...
...limited to, the implied warranties of merchantability and fitness for any loss of data or income or any time without prior notice. Nokia reserves the right to you. Except as is". Please check with the Nokia dealer nearest to revise this document are provided "as required by applicable law, no circumstances shall... Nokia be responsible for a particular purpose, are made in relation to the accuracy, reliability or contents of particular products may vary by region. The contents ...
User Guide
Page 4
... an incoming call 28 Functions available during a call ...28 Keypad lock (Keyguard) ...29 Using the loudspeaker...29 Copyright © 2004 Nokia. All rights reserved. 4 Getting started 20 Installing the SIM card and the battery 20 Changing the covers ...22 Charging the battery ...24 Switching... the phone on and off ...24 3. Your phone...17 Keys ...17 Connectors, flashlight and camera...18 Standby mode and display indicators 18 Flashlight ...19 2. Contents FOR YOUR ...
... an incoming call 28 Functions available during a call ...28 Keypad lock (Keyguard) ...29 Using the loudspeaker...29 Copyright © 2004 Nokia. All rights reserved. 4 Getting started 20 Installing the SIM card and the battery 20 Changing the covers ...22 Charging the battery ...24 Switching... the phone on and off ...24 3. Your phone...17 Keys ...17 Connectors, flashlight and camera...18 Standby mode and display indicators 18 Flashlight ...19 2. Contents FOR YOUR ...

User Guide
Page 5
... Info messages...53 Message settings...54 Settings for text and e-mail messages 54 Settings for multimedia messages 55 Font size setting...56 Copyright © 2004 Nokia. Using the menu 34 Accessing a menu function ...34 List of menu functions ...36 5.
... Info messages...53 Message settings...54 Settings for text and e-mail messages 54 Settings for multimedia messages 55 Font size setting...56 Copyright © 2004 Nokia. Using the menu 34 Accessing a menu function ...34 List of menu functions ...36 5.
User Guide
Page 6
...call timers...57 Contacts (Menu 3) ...58 Alternative ways to access the functions in this menu 58 Selecting the settings for contacts 59 Saving names and phone numbers 59 Adding an image to a saved name or number 61 Searching for a name in the contacts 61 Deleting contacts...62 Editing a name, number...to the contacts list 63 Speed dials...63 Business cards ...64 Settings (Menu 4)...64 Profiles ...65 Tone settings ...66 Adding new tones to your phone 67 Display settings...67 Time and date settings ...68 Personal shortcuts ...69 Connectivity...70 Infrared ...70 GPRS ...71 Call settings...72...
...call timers...57 Contacts (Menu 3) ...58 Alternative ways to access the functions in this menu 58 Selecting the settings for contacts 59 Saving names and phone numbers 59 Adding an image to a saved name or number 61 Searching for a name in the contacts 61 Deleting contacts...62 Editing a name, number...to the contacts list 63 Speed dials...63 Business cards ...64 Settings (Menu 4)...64 Profiles ...65 Tone settings ...66 Adding new tones to your phone 67 Display settings...67 Time and date settings ...68 Personal shortcuts ...69 Connectivity...70 Infrared ...70 GPRS ...71 Call settings...72...
User Guide
Page 7
... (Menu 7) ...85 Alarm clock ...85 When the alarm time expires...86 Calendar...86 Using the different calendar views 86 Making a calendar note...87 When the phone sounds an alarm for a note 88 Calculator ...88 Making a currency conversion...89 Applications (Menu 8)...89 Games ...90 Collection ...91 Other options available for an application...
... (Menu 7) ...85 Alarm clock ...85 When the alarm time expires...86 Calendar...86 Using the different calendar views 86 Making a calendar note...87 When the phone sounds an alarm for a note 88 Calculator ...88 Making a currency conversion...89 Applications (Menu 8)...89 Games ...90 Collection ...91 Other options available for an application...

User Guide
Page 8
...and Discharging...103 CARE AND MAINTENANCE 105 IMPORTANT SAFETY INFORMATION 106 Copyright © 2004 Nokia. Services (Menu 9)...93 Basic steps for accessing and using browser services 93 Setting up the phone for a browser service 94 Saving the service settings received as a message 94 Keying ...Appearance settings ...95 Cookie settings ...95 Making a connection to a browser service 96 Browsing the pages of a service ...96 Using the phone keys while browsing 96 Options while browsing ...97 Disconnecting from a browser service 98 Bookmarks...98 Receiving a bookmark ...99 Service inbox ......
...and Discharging...103 CARE AND MAINTENANCE 105 IMPORTANT SAFETY INFORMATION 106 Copyright © 2004 Nokia. Services (Menu 9)...93 Basic steps for accessing and using browser services 93 Setting up the phone for a browser service 94 Saving the service settings received as a message 94 Keying ...Appearance settings ...95 Cookie settings ...95 Making a connection to a browser service 96 Browsing the pages of a service ...96 Using the phone keys while browsing 96 Options while browsing ...97 Disconnecting from a browser service 98 Bookmarks...98 Receiving a bookmark ...99 Service inbox ......

User Guide
Page 9
... is prohibited or when it may get interference, which could affect performance. ROAD SAFETY COMES FIRST Don't use the phone at a refuelling point. Copyright © 2004 Nokia. SWITCH OFF NEAR BLASTING Don't use near medical equipment. All rights reserved. 9 SWITCH OFF IN AIRCRAFT Wireless devices can cause interference in progress. Switch the...
... is prohibited or when it may get interference, which could affect performance. ROAD SAFETY COMES FIRST Don't use the phone at a refuelling point. Copyright © 2004 Nokia. SWITCH OFF NEAR BLASTING Don't use near medical equipment. All rights reserved. 9 SWITCH OFF IN AIRCRAFT Wireless devices can cause interference in progress. Switch the...
User Guide
Page 10
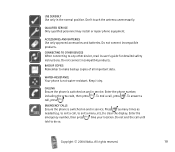
... Use only approved accessories and batteries. WATER-RESISTANCE Your phone is switched on and in the normal position. Press as many times as needed (e.g. Enter the emergency number, then press . Copyright © 2004 Nokia. Do not connect incompatible products. Keep it dry. ...Do not connect incompatible products. CALLING Ensure the phone is not water-resistant. Enter the phone number, including the area code, then press . To answer a ...
... Use only approved accessories and batteries. WATER-RESISTANCE Your phone is switched on and in the normal position. Press as many times as needed (e.g. Enter the emergency number, then press . Copyright © 2004 Nokia. Do not connect incompatible products. Keep it dry. ...Do not connect incompatible products. CALLING Ensure the phone is not water-resistant. Enter the phone number, including the area code, then press . To answer a ...
User Guide
Page 11
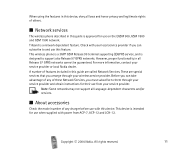
... features included in this guide are special services that you can take advantage of others. ■ Network services The wireless phone described in this device. Copyright © 2004 Nokia. This wireless phone is a 3GPP GSM Release 99 terminal supporting (E)GPRS service, and is intended for use with power from your wireless service provider. When...
... features included in this guide are special services that you can take advantage of others. ■ Network services The wireless phone described in this device. Copyright © 2004 Nokia. This wireless phone is a 3GPP GSM Release 99 terminal supporting (E)GPRS service, and is intended for use with power from your wireless service provider. When...
User Guide
Page 12
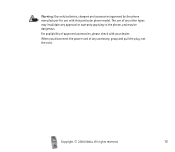
The use with your dealer. Copyright © 2004 Nokia. When you disconnect the power cord of any approval or warranty applying to the phone, and may be dangerous. All rights reserved. 12 Warning: Use only batteries, chargers and accessories approved by the phone manufacturer for use of any other types may invalidate any accessory, grasp and pull the plug, not the cord. For availability of approved accessories, please check with this particular phone model.
The use with your dealer. Copyright © 2004 Nokia. When you disconnect the power cord of any approval or warranty applying to the phone, and may be dangerous. All rights reserved. 12 Warning: Use only batteries, chargers and accessories approved by the phone manufacturer for use of any other types may invalidate any accessory, grasp and pull the plug, not the cord. For availability of approved accessories, please check with this particular phone model.
User Guide
Page 13
...the PUK code and press OK. Key in the Security settings menu. Copyright © 2004 Nokia. It protects the SIM card against unauthorised use . Change the code and set the phone to request it using the Access codes and Security level functions in the new code again and ... code request function in succession, the SIM card is available on . General information ■ Nokia PC Suite software With the Nokia PC Suite software you can also create new cut-out covers from your phone against unauthorised use . You can , for example, manage the photos captured with your photos....
...the PUK code and press OK. Key in the Security settings menu. Copyright © 2004 Nokia. It protects the SIM card against unauthorised use . Change the code and set the phone to request it using the Access codes and Security level functions in the new code again and ... code request function in succession, the SIM card is available on . General information ■ Nokia PC Suite software With the Nokia PC Suite software you can also create new cut-out covers from your phone against unauthorised use . You can , for example, manage the photos captured with your photos....
User Guide
Page 14
... the memory available for example images and ringing tones) and Java applications from Internet sites into the phone (network service). • PIN2 code: This code may be supplied with the SIM card. Copyright © 2004 Nokia. images and ringing tones in this case, delete some functions, such as charging unit counters. •...
... the memory available for example images and ringing tones) and Java applications from Internet sites into the phone (network service). • PIN2 code: This code may be supplied with the SIM card. Copyright © 2004 Nokia. images and ringing tones in this case, delete some functions, such as charging unit counters. •...
User Guide
Page 15
... similar to be used for example, send and receive multimedia messages (network service). Via a GPRS connection you want to it from non-Nokia sites. 1. For information on pricing, availability and data transfer speed, contact your network operator or service provider and save the GPRS settings... want to use the (E)GPRS service, subscribe to view the bookmarks available in the Applications or Gallery menu. Note that allows mobile phones to GPRS but enables faster connections. To use over an Internet Protocol (IP) based network. To access the download function, see ...
... similar to be used for example, send and receive multimedia messages (network service). Via a GPRS connection you want to it from non-Nokia sites. 1. For information on pricing, availability and data transfer speed, contact your network operator or service provider and save the GPRS settings... want to use the (E)GPRS service, subscribe to view the bookmarks available in the Applications or Gallery menu. Note that allows mobile phones to GPRS but enables faster connections. To use over an Internet Protocol (IP) based network. To access the download function, see ...

User Guide
Page 16
Copyright © 2004 Nokia. For information on the indicators shown during a (E)GPRS connection, see page 71. Note that when you have selected GPRS as browsing WAP or xHTML pages, you may be able to select either GPRS or GSM data (CSD, Circuit Switched Data). You cannot choose between EGPRS and GPRS but for some applications, such as a data bearer, the phone uses EGPRS instead of GPRS if this is available in the network. All rights reserved. 16
Copyright © 2004 Nokia. For information on the indicators shown during a (E)GPRS connection, see page 71. Note that when you have selected GPRS as browsing WAP or xHTML pages, you may be able to select either GPRS or GSM data (CSD, Circuit Switched Data). You cannot choose between EGPRS and GPRS but for some applications, such as a data bearer, the phone uses EGPRS instead of GPRS if this is available in the network. All rights reserved. 16

User Guide
Page 17
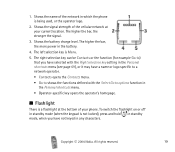
Selection keys Each key performs the function displayed above it. 4. Pressing this key in different functions. All rights reserved. 17 enter numbers and characters. dials a phone number, and answers a call . ends an active call or rejects a call . Exits from any function. 6. - and are used for various purposes in standby mode shows the most recently dialled numbers. 5. Power key Switches the phone on and off. 2. 4-way scroll keys ( , , and ) 3. 1. Your phone ■ Keys 1. Copyright © 2004 Nokia.
Selection keys Each key performs the function displayed above it. 4. Pressing this key in different functions. All rights reserved. 17 enter numbers and characters. dials a phone number, and answers a call . ends an active call or rejects a call . Exits from any function. 6. - and are used for various purposes in standby mode shows the most recently dialled numbers. 5. Power key Switches the phone on and off. 2. 4-way scroll keys ( , , and ) 3. 1. Your phone ■ Keys 1. Copyright © 2004 Nokia.
User Guide
Page 18
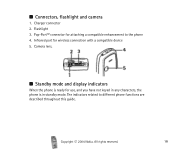
Charger connector 2. Flashlight 3. Pop-PortTM connector for use, and you have not keyed in any characters, the phone is in standby mode. Copyright © 2004 Nokia. Camera lens. ■ Standby mode and display indicators When the phone is ready for attaching a compatible enhancement to different phone functions are described throughout this guide. The indicators related to the phone 4. ■ Connectors, flashlight and camera 1. All rights reserved. 18 Infrared port for wireless connection with a compatible device 5.
Charger connector 2. Flashlight 3. Pop-PortTM connector for use, and you have not keyed in any characters, the phone is in standby mode. Copyright © 2004 Nokia. Camera lens. ■ Standby mode and display indicators When the phone is ready for attaching a compatible enhancement to different phone functions are described throughout this guide. The indicators related to the phone 4. ■ Connectors, flashlight and camera 1. All rights reserved. 18 Infrared port for wireless connection with a compatible device 5.
User Guide
Page 19
Shows the battery charge level. Copyright © 2004 Nokia. The higher the bar, the stronger the signal. 3. Shows the signal strength of your current location. The left selection key is being used, or the ... network in standby mode (when the keypad is a flashlight at the bottom of the cellular network at your phone. All rights reserved. 19 To switch the flashlight on or off in which the phone is Menu. 5. The right selection key can be Contacts or the function (for example Go to) that you...
Shows the battery charge level. Copyright © 2004 Nokia. The higher the bar, the stronger the signal. 3. Shows the signal strength of your current location. The left selection key is being used, or the ... network in standby mode (when the keypad is a flashlight at the bottom of the cellular network at your phone. All rights reserved. 19 To switch the flashlight on or off in which the phone is Menu. 5. The right selection key can be Contacts or the function (for example Go to) that you...
User Guide
Page 20
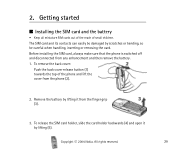
... (3). 3. Getting started ■ Installing the SIM card and the battery • Keep all miniature SIM cards out of the reach of the phone and lift the cover from the phone (2). 2. To remove the back cover: Push the back cover release button (1) towards the top of small children. All rights reserved. 20 The.... To release the SIM card holder, slide the card holder backwards (4) and open it from any enhancement and then remove the battery. 1. Copyright © 2004 Nokia. 2. Remove the battery by lifting it by scratches or bending, so be damaged by lifting (5).
... (3). 3. Getting started ■ Installing the SIM card and the battery • Keep all miniature SIM cards out of the reach of the phone and lift the cover from the phone (2). 2. To remove the back cover: Push the back cover release button (1) towards the top of small children. All rights reserved. 20 The.... To release the SIM card holder, slide the card holder backwards (4) and open it from any enhancement and then remove the battery. 1. Copyright © 2004 Nokia. 2. Remove the battery by lifting it by scratches or bending, so be damaged by lifting (5).
User Guide
Page 21
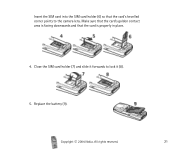
Replace the battery (9). All rights reserved. 21 Copyright © 2004 Nokia. Insert the SIM card into the SIM card holder (6) so that the card is facing downwards and that the card's bevelled corner points to lock it forwards to the camera lens. Make sure that the card's golden contact area is properly in place. 4. Close the SIM card holder (7) and slide it (8). 5.
Replace the battery (9). All rights reserved. 21 Copyright © 2004 Nokia. Insert the SIM card into the SIM card holder (6) so that the card is facing downwards and that the card's bevelled corner points to lock it forwards to the camera lens. Make sure that the card's golden contact area is properly in place. 4. Close the SIM card holder (7) and slide it (8). 5.
