User Guide
Page 4
Getting started 20 Installing the SIM card and the battery 20 Changing the covers ...22 Charging the battery ...24 Switching the phone on and off ...24 3. Basic functions 26 Making a call ...26 Answering or rejecting an incoming call 28 Functions available during ...29 Using the loudspeaker...29 Copyright © 2004 Nokia. All rights reserved. 4 Contents FOR YOUR SAFETY 9 General information 13 Nokia PC Suite software...13 Access codes ...13 Shared memory ...14 Downloading content and applications 14 (E)GPRS ...15 1. Your phone...17 Keys ...17 Connectors, flashlight and camera...18...
Getting started 20 Installing the SIM card and the battery 20 Changing the covers ...22 Charging the battery ...24 Switching the phone on and off ...24 3. Basic functions 26 Making a call ...26 Answering or rejecting an incoming call 28 Functions available during ...29 Using the loudspeaker...29 Copyright © 2004 Nokia. All rights reserved. 4 Contents FOR YOUR SAFETY 9 General information 13 Nokia PC Suite software...13 Access codes ...13 Shared memory ...14 Downloading content and applications 14 (E)GPRS ...15 1. Your phone...17 Keys ...17 Connectors, flashlight and camera...18...
User Guide
Page 13
...incorrect PIN code three times in succession, the SIM card is 12345. General information ■ Nokia PC Suite software With the Nokia PC Suite software you can also create new cut-out covers from your phone. • PIN code: The PIN (Personal Identification Number) code may be supplied with ...the phone's camera and create new ringing tones and wallpapers. You can , for example, manage ...
...incorrect PIN code three times in succession, the SIM card is 12345. General information ■ Nokia PC Suite software With the Nokia PC Suite software you can also create new cut-out covers from your phone. • PIN code: The PIN (Personal Identification Number) code may be supplied with ...the phone's camera and create new ringing tones and wallpapers. You can , for example, manage ...
User Guide
Page 20
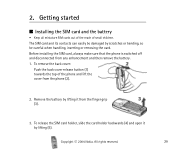
... lifting (5). To release the SIM card holder, slide the card holder backwards (4) and open it from the finger grip (3). 3. Copyright © 2004 Nokia. All rights reserved. 20 Getting started ■ Installing the SIM card and the battery • Keep all miniature SIM cards out of the reach of... the phone and lift the cover from any enhancement and then remove the battery. 1. The SIM card and its contacts can easily be careful when handling, inserting or ...
... lifting (5). To release the SIM card holder, slide the card holder backwards (4) and open it from the finger grip (3). 3. Copyright © 2004 Nokia. All rights reserved. 20 Getting started ■ Installing the SIM card and the battery • Keep all miniature SIM cards out of the reach of... the phone and lift the cover from any enhancement and then remove the battery. 1. The SIM card and its contacts can easily be careful when handling, inserting or ...
User Guide
Page 22
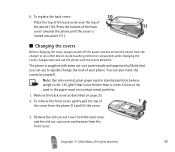
... can also make the covers by Nokia that is supplied with the covers attached. Remove the old cut-out cover from the back cover and the old cut -out covers made and approved by yourself. Copyright © 2004 Nokia. 6. To replace the back cover: Place the top of the back cover over the top of your phone. You can use...
... can also make the covers by Nokia that is supplied with the covers attached. Remove the old cut-out cover from the back cover and the old cut -out covers made and approved by yourself. Copyright © 2004 Nokia. 6. To replace the back cover: Place the top of the back cover over the top of your phone. You can use...

User Guide
Page 23
Place the keymat on the front cover (2). 5. Place the new cut-out cover on the cut-out cover (3). Copyright © 2004 Nokia. Make sure that the keymat is properly in the middle and at the bottom of the phone towards the cover until it locks into the back cover by sliding the cut -out cover into place (5). 7. To replace the front cover, align the bottom of the phone with the bottom of the cover (4) and press the top of the back cover (6). Place the cut -out cover under the two guides in place. 6. 4. All rights reserved. 23
Place the keymat on the front cover (2). 5. Place the new cut-out cover on the cut-out cover (3). Copyright © 2004 Nokia. Make sure that the keymat is properly in the middle and at the bottom of the phone towards the cover until it locks into the back cover by sliding the cut -out cover into place (5). 7. To replace the front cover, align the bottom of the phone with the bottom of the cover (4) and press the top of the back cover (6). Place the cut -out cover under the two guides in place. 6. 4. All rights reserved. 23
User Guide
Page 24
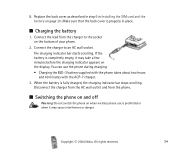
...display. You can use is completely empty, it may take a few minutes before the charging indicator appears on the bottom of your phone. 2. Copyright © 2004 Nokia. All rights reserved. 24 Disconnect the charger from the AC wall outlet and from the charger to an AC wall socket. 8. ... the SIM card and the battery on when wireless phone use the phone during charging. • Charging the BLD-3 battery supplied with the phone takes about two hours and 40 minutes with the ACP-7 charger. 3. Make sure that the back cover is fully charged, the charging indicator bar stops scrolling...
...display. You can use is completely empty, it may take a few minutes before the charging indicator appears on the bottom of your phone. 2. Copyright © 2004 Nokia. All rights reserved. 24 Disconnect the charger from the AC wall outlet and from the charger to an AC wall socket. 8. ... the SIM card and the battery on when wireless phone use the phone during charging. • Charging the BLD-3 battery supplied with the phone takes about two hours and 40 minutes with the ACP-7 charger. 3. Make sure that the back cover is fully charged, the charging indicator bar stops scrolling...


