User Guide
Page 4
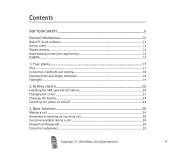
... General information 13 Nokia PC Suite software...13 Access codes ...13 Shared memory ...14 Downloading content and applications 14 (E)GPRS ...15 1. Getting started 20 Installing the SIM card and the battery 20 Changing the covers ...22 Charging the battery ...24 Switching the phone on and off ......24 3. All rights reserved. 4 Your phone...17 Keys ...17 Connectors, flashlight and camera...18 Standby mode and display indicators 18 ...
... General information 13 Nokia PC Suite software...13 Access codes ...13 Shared memory ...14 Downloading content and applications 14 (E)GPRS ...15 1. Getting started 20 Installing the SIM card and the battery 20 Changing the covers ...22 Charging the battery ...24 Switching the phone on and off ......24 3. All rights reserved. 4 Your phone...17 Keys ...17 Connectors, flashlight and camera...18 Standby mode and display indicators 18 ...
User Guide
Page 13
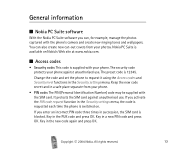
... With the Nokia PC Suite software you can also create new cut-out covers from your photos. You can , for example, manage the photos captured with the SIM card. The preset code is supplied with your phone against unauthorised use . Key in a safe place separate from your phone. •...code request function in succession, the SIM card is switched on Nokia's Web site at www.nokia.com. ■ Access codes • Security code: This code is 12345. Copyright © 2004 Nokia. The security code protects your phone. If you enter an incorrect PIN code three times in the...
... With the Nokia PC Suite software you can also create new cut-out covers from your photos. You can , for example, manage the photos captured with the SIM card. The preset code is supplied with your phone against unauthorised use . Key in a safe place separate from your phone. •...code request function in succession, the SIM card is switched on Nokia's Web site at www.nokia.com. ■ Access codes • Security code: This code is 12345. Copyright © 2004 Nokia. The security code protects your phone. If you enter an incorrect PIN code three times in the...
User Guide
Page 20
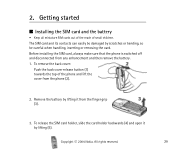
...backwards (4) and open it from any enhancement and then remove the battery. 1. Before installing the SIM card, always make sure that the phone is switched off and disconnected from the finger grip (3). 3. Remove the battery by lifting it by scratches or bending, so be damaged by... lifting (5). Copyright © 2004 Nokia. All rights reserved. 20 To remove the back cover: Push the back cover release button (1) towards the top of small children. Getting started ■ Installing the SIM card and the battery...
...backwards (4) and open it from any enhancement and then remove the battery. 1. Before installing the SIM card, always make sure that the phone is switched off and disconnected from the finger grip (3). 3. Remove the battery by lifting it by scratches or bending, so be damaged by... lifting (5). Copyright © 2004 Nokia. All rights reserved. 20 To remove the back cover: Push the back cover release button (1) towards the top of small children. Getting started ■ Installing the SIM card and the battery...
User Guide
Page 22
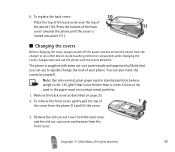
... look of the cover from the front cover. Copyright © 2004 Nokia. 6. To replace the back cover: Place the top of the back cover over the top of the back cover towards the phone until the cover is supplied with the covers attached. Remove the old cut-out cover from the back cover and the old cut -out covers made and approved...
... look of the cover from the front cover. Copyright © 2004 Nokia. 6. To replace the back cover: Place the top of the back cover over the top of the back cover towards the phone until the cover is supplied with the covers attached. Remove the old cut-out cover from the back cover and the old cut -out covers made and approved...

User Guide
Page 23
To replace the front cover, align the bottom of the phone with the bottom of the cover (4) and press the top of the back cover (6). Place the new cut -out cover (3). Make sure that the keymat is properly in the middle and at the bottom of the phone towards the cover until it locks into the back cover by sliding the cut -out cover into place (5). 7. Place the keymat on the cut -out cover on the front cover (2). 5. All rights reserved. 23 4. Copyright © 2004 Nokia. Place the cut -out cover under the two guides in place. 6.
To replace the front cover, align the bottom of the phone with the bottom of the cover (4) and press the top of the back cover (6). Place the new cut -out cover (3). Make sure that the keymat is properly in the middle and at the bottom of the phone towards the cover until it locks into the back cover by sliding the cut -out cover into place (5). 7. Place the keymat on the cut -out cover on the front cover (2). 5. All rights reserved. 23 4. Copyright © 2004 Nokia. Place the cut -out cover under the two guides in place. 6.
User Guide
Page 24
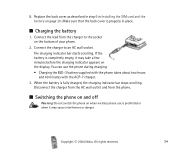
...phone. ■ Switching the phone on and off Warning: Do not switch the phone on the bottom of your phone...when wireless phone use the phone during charging. • Charging the BLD-3 battery supplied with the phone takes ...about two hours and 40 minutes with the ACP-7 charger. 3. All rights reserved. 24 Disconnect the charger from the AC wall outlet and from the charger to an AC wall socket. The charging indicator bar starts scrolling. Make sure that the back cover... is prohibited or when it may cause interference or danger. 8. Replace the back cover as ...
...phone. ■ Switching the phone on and off Warning: Do not switch the phone on the bottom of your phone...when wireless phone use the phone during charging. • Charging the BLD-3 battery supplied with the phone takes ...about two hours and 40 minutes with the ACP-7 charger. 3. All rights reserved. 24 Disconnect the charger from the AC wall outlet and from the charger to an AC wall socket. The charging indicator bar starts scrolling. Make sure that the back cover... is prohibited or when it may cause interference or danger. 8. Replace the back cover as ...


