
User Guide
Page 4
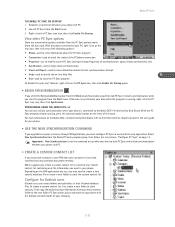
... contacts using Phone Editor 26 Tour the Messages window 27 Send and manage SMS messages 28 Edit Settings 29 Launch other PC suite applications 29 11 Wireless modem setup 30 Select Nokia Modem Option 30 Perform hardware installation for IR 31 IR and Windows XP (Home and Professional 32 IR and Windows 2000 Professional operating system 33 Learn about Nokia Modem Option Control Panel 34 12 Configure your data...
... contacts using Phone Editor 26 Tour the Messages window 27 Send and manage SMS messages 28 Edit Settings 29 Launch other PC suite applications 29 11 Wireless modem setup 30 Select Nokia Modem Option 30 Perform hardware installation for IR 31 IR and Windows XP (Home and Professional 32 IR and Windows 2000 Professional operating system 33 Learn about Nokia Modem Option Control Panel 34 12 Configure your data...
User Guide
Page 5
... make digital data calls using your Nokia phone as a wireless modem: • You must be connected to your PC or handheld device using Adobe Acrobat reader during installation of compatible phones and connection methods, see "Wireless modem setup" on page 30). Digital data calls are not available when outside of the digital network. • Your phone must subscribe to digital data services with the following information: • Installation instructions for Nokia PC Suite 5.1 • Instructions for using Nokia...
... make digital data calls using your Nokia phone as a wireless modem: • You must be connected to your PC or handheld device using Adobe Acrobat reader during installation of compatible phones and connection methods, see "Wireless modem setup" on page 30). Digital data calls are not available when outside of the digital network. • Your phone must subscribe to digital data services with the following information: • Installation instructions for Nokia PC Suite 5.1 • Instructions for using Nokia...
User Guide
Page 7
... copy data between two Nokia phones, to your PC, and erase data from your phone. • Nokia Image Converter converts and optimize graphics for use in the data cable sales package prior to confirm the default installation location. [ 3 ] The actual name and model number of your Nokia phone should appear on connecting your phone and compatible PC using Windows Explorer or My Computer. • Nokia Phone Editor allows you downloaded the application in this guide...
... copy data between two Nokia phones, to your PC, and erase data from your phone. • Nokia Image Converter converts and optimize graphics for use in the data cable sales package prior to confirm the default installation location. [ 3 ] The actual name and model number of your Nokia phone should appear on connecting your phone and compatible PC using Windows Explorer or My Computer. • Nokia Phone Editor allows you downloaded the application in this guide...

User Guide
Page 12
... and destination phones, stop the IR connection between source phone and PC. The compatible data types are copying phone data and want Content Copier to use . 4 Click Next to begin copying the data to your phone. By doing so, you want to copy to close Content Copier. Copy data from the source phone When you select Copy data from a phone to a PC, Content Copier transfers all compatible data types (contacts list, calendar, to-do, caller groups...
... and destination phones, stop the IR connection between source phone and PC. The compatible data types are copying phone data and want Content Copier to use . 4 Click Next to begin copying the data to your phone. By doing so, you want to copy to close Content Copier. Copy data from the source phone When you select Copy data from a phone to a PC, Content Copier transfers all compatible data types (contacts list, calendar, to-do, caller groups...
User Guide
Page 16
... MMS message. Note that SP MIDI files and GM files use the same file extension (.mid). However, to do this case, played by one voice brings the cumulative polyphony of the first three channels to four. In effect, you transfer the SP MIDI file to your work more information on these features, refer to the phone user guide. 1 From the Save dialog, click the Update to phone button. 2 Make...
... MMS message. Note that SP MIDI files and GM files use the same file extension (.mid). However, to do this case, played by one voice brings the cumulative polyphony of the first three channels to four. In effect, you transfer the SP MIDI file to your work more information on these features, refer to the phone user guide. 1 From the Save dialog, click the Update to phone button. 2 Make...
User Guide
Page 19
... PC Sync program To disable the auto start features, right-click on the PIM application you use to modify current PC Sync settings (change PIM applications, you to check the status of the PC/phone connection • Properties-use , you want in their Outlook database files. Nokia PC Sync TO ENABLE PC SYNC ON STARTUP 1 Establish a connection between your phone and PC. • CREATE A CUSTOM CONTACT LIST If you start the program from the Start menu...
... PC Sync program To disable the auto start features, right-click on the PIM application you use to modify current PC Sync settings (change PIM applications, you to check the status of the PC/phone connection • Properties-use , you want in their Outlook database files. Nokia PC Sync TO ENABLE PC SYNC ON STARTUP 1 Establish a connection between your phone and PC. • CREATE A CUSTOM CONTACT LIST If you start the program from the Start menu...
User Guide
Page 29
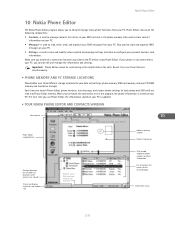
...phone is updated. • TOUR NOKIA PHONE EDITOR AND CONTACTS WINDOW New contact Phone Editor navigation bar Send message Send business card Editing tools (cut, copy, paste, delete) 10 Indicates primary number Contact card viewer Contacts directory (list of contacts list entries for your data and settings: phone memory, SIM card memory, and your SIM card and in both phone and SIM card) are stored) Status bar displays help texts and toolbar tips Memory status (SIM card and contacts list memory) Click to add additional phone numbers or other information List of folders or locations...
...phone is updated. • TOUR NOKIA PHONE EDITOR AND CONTACTS WINDOW New contact Phone Editor navigation bar Send message Send business card Editing tools (cut, copy, paste, delete) 10 Indicates primary number Contact card viewer Contacts directory (list of contacts list entries for your data and settings: phone memory, SIM card memory, and your SIM card and in both phone and SIM card) are stored) Status bar displays help texts and toolbar tips Memory status (SIM card and contacts list memory) Click to add additional phone numbers or other information List of folders or locations...
User Guide
Page 30
... save your phone user guide. [ 26 ] Click OK only when you want to return to save the data. 4 Repeat steps 1-3 to add additional data. 5 Click OK only when you want to add from the list. For more information on the toolbar, or select New Contact from SIM card to phone memory): 1 Click the contact you want to change a contact storage location (for example, from the shortcut menu. 2 Enter the name of the shortcut menu options available. Add...
... save your phone user guide. [ 26 ] Click OK only when you want to return to save the data. 4 Repeat steps 1-3 to add additional data. 5 Click OK only when you want to add from the list. For more information on the toolbar, or select New Contact from SIM card to phone memory): 1 Click the contact you want to change a contact storage location (for example, from the shortcut menu. 2 Enter the name of the shortcut menu options available. Add...

User Guide
Page 31
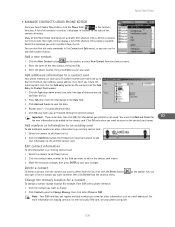
... Enter. 4 Add members to change the caller group assignment. You can use Phone Editor to New, then click Contact Group. Contact groups are stored in the Contact Groups folder. 1 Click the + next to the PC folder, then click the Contact Groups folder. 2 Click Contact, point to send SMS messages (see "Copy and move contacts Your PC hard drive offers you substantially more storage space for names and numbers than your phone user guide...
... Enter. 4 Add members to change the caller group assignment. You can use Phone Editor to New, then click Contact Group. Contact groups are stored in the Contact Groups folder. 1 Click the + next to the PC folder, then click the Contact Groups folder. 2 Click Contact, point to send SMS messages (see "Copy and move contacts Your PC hard drive offers you substantially more storage space for names and numbers than your phone user guide...
User Guide
Page 32
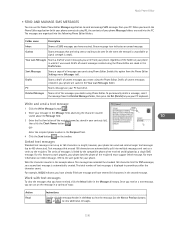
... SMS messages you write from the Deleted Messages folder, then press the Del (Delete) key on the toolbar. PC Stores messages on your PC hard drive. Text messages that you create using Phone Editor. This message has exceeded the standard 160 character limit for your message in the Message field, observing the character counter visible above . Enter the recipient phone number in the Recipient field. 4 Click the Send button on your contacts list...
... SMS messages you write from the Deleted Messages folder, then press the Del (Delete) key on the toolbar. PC Stores messages on your PC hard drive. Text messages that you create using Phone Editor. This message has exceeded the standard 160 character limit for your message in the Message field, observing the character counter visible above . Enter the recipient phone number in the Recipient field. 4 Click the Send button on your contacts list...

User Guide
Page 33
... The Phone Editor navigation bar contains buttons that recipient contact information is used to launch the other program (for example, word processing programs). 10 While reading a message, select the Save As command from the Message menu. • EDIT SETTINGS You can be used to launch PC Sync or Content Copier. [ 29 ] Enter the recipient name or number, then click the Send button. Verify that can use the Settings application to view and edit...
... The Phone Editor navigation bar contains buttons that recipient contact information is used to launch the other program (for example, word processing programs). 10 While reading a message, select the Save As command from the Message menu. • EDIT SETTINGS You can be used to launch PC Sync or Content Copier. [ 29 ] Enter the recipient name or number, then click the Send button. Verify that can use the Settings application to view and edit...

User Guide
Page 34
Wireless modem setup 11 Wireless modem setup Your phone can function as GSM data). The installation software attempts to detect your service provider for more details. The Nokia PC Suite software installation begins. Check with your phone connected using IR, see "IR and Windows 2000 Professional operating system" on page 33 for important information on your phone connected to a corporate network, the Internet, or check e-mail wherever you wish to complete the installation process and...
Wireless modem setup 11 Wireless modem setup Your phone can function as GSM data). The installation software attempts to detect your service provider for more details. The Nokia PC Suite software installation begins. Check with your phone connected using IR, see "IR and Windows 2000 Professional operating system" on page 33 for important information on your phone connected to a corporate network, the Internet, or check e-mail wherever you wish to complete the installation process and...
User Guide
Page 37
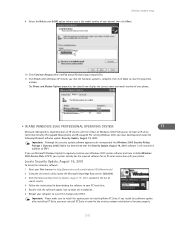
... services with your phone. Locate Security Update, August 19, 2001 To locate the necessary software: 1 Point your Web browser to: http://www.microsoft.com/windows2000/downloads/ 2 Using the site search utility, locate the Microsoft Knowledge Base article: Q252795. 3 Click the link to access Security Update, August 19, 2001, located in order for the wireless modem installation to function properly. [ 33 ] Important: Please make an IR serial connection between IR-equipped Nokia phones...
... services with your phone. Locate Security Update, August 19, 2001 To locate the necessary software: 1 Point your Web browser to: http://www.microsoft.com/windows2000/downloads/ 2 Using the site search utility, locate the Microsoft Knowledge Base article: Q252795. 3 Click the link to access Security Update, August 19, 2001, located in order for the wireless modem installation to function properly. [ 33 ] Important: Please make an IR serial connection between IR-equipped Nokia phones...
User Guide
Page 39
... Before making or receiving digital data or fax calls: • You must subscribe to digital data and fax services with your service provider. • Your phone must be powered up, and you permission to access the corporate network through the Internet, creating a secure connection between your phone (as a wireless modem) and your phone as a wireless GPRS or EDGE modem. You may consider creating a separate set of data you transfer GPRS data services work much...
... Before making or receiving digital data or fax calls: • You must subscribe to digital data and fax services with your service provider. • Your phone must be powered up, and you permission to access the corporate network through the Internet, creating a secure connection between your phone (as a wireless modem) and your phone as a wireless GPRS or EDGE modem. You may consider creating a separate set of data you transfer GPRS data services work much...

User Guide
Page 40
... Start screen, press Menu 12-2-2-1 (Connectivity > GPRS > GPRS modem settings > Active access point), then press Select. 2 Press Select again to view the list of your wireless service provider is a factor. • You are times when it may not be advantageous or appropriate to access the Internet using Nokia Modem Option. GPRS/EDGE You may have to search for the local dial-up to transfer and time or speed is your Internet access...
... Start screen, press Menu 12-2-2-1 (Connectivity > GPRS > GPRS modem settings > Active access point), then press Select. 2 Press Select again to view the list of your wireless service provider is a factor. • You are times when it may not be advantageous or appropriate to access the Internet using Nokia Modem Option. GPRS/EDGE You may have to search for the local dial-up to transfer and time or speed is your Internet access...
User Guide
Page 42
Configure your data and fax software 5 Click the Set up my connection manually option, then click Next. 6 Click the Connect using a dial-up modem option, then click Next. 7 Select only your Nokia phone as the active modem, then click Next. 8 Type a name for your new connection (for example, Internet-GPRS), then click Next. 9 Enter the GPRS network access code, *99# , then click Next. 10 Enter the username and/or password as the...
Configure your data and fax software 5 Click the Set up my connection manually option, then click Next. 6 Click the Connect using a dial-up modem option, then click Next. 7 Select only your Nokia phone as the active modem, then click Next. 8 Type a name for your new connection (for example, Internet-GPRS), then click Next. 9 Enter the GPRS network access code, *99# , then click Next. 10 Enter the username and/or password as the...

User Guide
Page 43
... configurations you use your Nokia phone as a domain name or IP addresses for example, Internet-Nokia phone). 2 Enter your user name and password, then click Connect. 3 Observe the notifications on your new Dial-up Networking feature to connect to your Internet service provider, or to make a remote connection to your corporate network (including corporate e-mail server using CSD. Contact your service provider for more information on configuring your network connection, consult your Internet service provider or your company help desk should...
... configurations you use your Nokia phone as a domain name or IP addresses for example, Internet-Nokia phone). 2 Enter your user name and password, then click Connect. 3 Observe the notifications on your new Dial-up Networking feature to connect to your Internet service provider, or to make a remote connection to your corporate network (including corporate e-mail server using CSD. Contact your service provider for more information on configuring your network connection, consult your Internet service provider or your company help desk should...

User Guide
Page 47
... GPRS network access code, *99# , in the list of Connection options, and is now complete. CONNECT TO THE NETWORK 1 Establish a connection between your PalmOS device, you need to create a dial-up network service configuration to connect you need to modify your existing Windows RAS configuration to use with your phone and handheld device, then tap Connect. 2 Tap the Applications menu, then launch the desired application (Web browser, e-mail, etc.). Create a CSD data connection Once your Nokia phone as a wireless...
... GPRS network access code, *99# , in the list of Connection options, and is now complete. CONNECT TO THE NETWORK 1 Establish a connection between your PalmOS device, you need to create a dial-up network service configuration to connect you need to modify your existing Windows RAS configuration to use with your phone and handheld device, then tap Connect. 2 Tap the Applications menu, then launch the desired application (Web browser, e-mail, etc.). Create a CSD data connection Once your Nokia phone as a wireless...

User Guide
Page 53
... file transfer using Nokia Phone Browser 24 folders Nokia Phone Browser 23 G General Packet Radio Service (GPRS) 35 GPRS dial-up connection for PalmOS 43 make a data call (PocketPC OS) 45 mPoocdkeemtPCseOtuSpc(oPnofcigkeutrPaCtioOnS)424,4 44 when to use 36 GPRS (General Packet Radio Service) 35 GPRS data access point 36 AOL settings 38 configure your phone 36 Dial-up Networking 37 I Ignore contact deletions 14 Infrared 2 Installation change language of installation 5 PC Suite 3 uninstall PC Suite 5 Internet access wireless service provider 35 Introduction 1 IR Windows 2000 update...
... file transfer using Nokia Phone Browser 24 folders Nokia Phone Browser 23 G General Packet Radio Service (GPRS) 35 GPRS dial-up connection for PalmOS 43 make a data call (PocketPC OS) 45 mPoocdkeemtPCseOtuSpc(oPnofcigkeutrPaCtioOnS)424,4 44 when to use 36 GPRS (General Packet Radio Service) 35 GPRS data access point 36 AOL settings 38 configure your phone 36 Dial-up Networking 37 I Ignore contact deletions 14 Infrared 2 Installation change language of installation 5 PC Suite 3 uninstall PC Suite 5 Internet access wireless service provider 35 Introduction 1 IR Windows 2000 update...

User Guide
Page 54
... Send SMS message 28 Send/manage SMS messages 28 Settings edit 29 GPRS data 36 SMS messages copying/moving 29 delete 29 read 28 reply/forward 29 save as text file 29 storing on PC 29 Source phone 8 SP-MIDI 10 Standard Midi File (SMF) 10 Standard MIDI files (about) 10 subset of contacts list 15 Synchronization conflicts 13 System requirements 1 T Target phone 8 Time-out 2 transfer MIDI to phone 12 Types of data applications 40 U Using PocketPC modem connection 45 Using...
... Send SMS message 28 Send/manage SMS messages 28 Settings edit 29 GPRS data 36 SMS messages copying/moving 29 delete 29 read 28 reply/forward 29 save as text file 29 storing on PC 29 Source phone 8 SP-MIDI 10 Standard Midi File (SMF) 10 Standard MIDI files (about) 10 subset of contacts list 15 Synchronization conflicts 13 System requirements 1 T Target phone 8 Time-out 2 transfer MIDI to phone 12 Types of data applications 40 U Using PocketPC modem connection 45 Using...


