Instruction Manual
Page 2
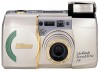
...Nikon ED (Extra-low Dispersion) lens with low chromatic aberration (popularly used as lenses for Nikon single-lens reflex cameras), as well as requirements and restrictions. : Indicates notes and cautions you feel confident using the camera. 2 Getting Started Your Nikon camera features: • Compact, light-weight construction with the date.... : Indicates supplementary descriptions. : Indicates pages for purchasing the Nikon Lite Touch Zoom 140ED / Lite Touch Zoom 140ED QD camera. Please remove it before use, and keep it handy until you are requested to the viewfinder eyepiece.
...Nikon ED (Extra-low Dispersion) lens with low chromatic aberration (popularly used as lenses for Nikon single-lens reflex cameras), as well as requirements and restrictions. : Indicates notes and cautions you feel confident using the camera. 2 Getting Started Your Nikon camera features: • Compact, light-weight construction with the date.... : Indicates supplementary descriptions. : Indicates pages for purchasing the Nikon Lite Touch Zoom 140ED / Lite Touch Zoom 140ED QD camera. Please remove it before use, and keep it handy until you are requested to the viewfinder eyepiece.

Instruction Manual
Page 3
Adjust the length using the lug on the strap. Put your head through this camera.) Strap Optional accessories • Camera case CS-L23 (Remote control unit can be stored in the pocket inside.) • Remote control unit ML-L3 ( p. 39) Attaching the strap E Attach the strap as shown in the illustration. Getting Started 3 Accessories (The following item is supplied with this loop.
Adjust the length using the lug on the strap. Put your head through this camera.) Strap Optional accessories • Camera case CS-L23 (Remote control unit can be stored in the pocket inside.) • Remote control unit ML-L3 ( p. 39) Attaching the strap E Attach the strap as shown in the illustration. Getting Started 3 Accessories (The following item is supplied with this loop.

Instruction Manual
Page 4
Table of Contents To take a picture right away 6 Camera parts 8-10 Body 8-9 LCD panel 10 Indications in the viewfinder 11 1 Preparations Installing a battery 12 Turning the camera on 13 Checking the battery power 13 Loading the film 14 2 Basic Operations Imprinting the date/time on pictures (Lite Touch Zoom 140ED QD only 16 Adjusting diopter 17 Holding the camera properly 18 Operating the Shutter Release button 19 Selecting Regular or Panorama mode (Lite Touch Zoom 140ED QD only 20 Zooming 21 Shooting 22 Rewinding the film 24 Removing the film 25 4 Getting Started
Table of Contents To take a picture right away 6 Camera parts 8-10 Body 8-9 LCD panel 10 Indications in the viewfinder 11 1 Preparations Installing a battery 12 Turning the camera on 13 Checking the battery power 13 Loading the film 14 2 Basic Operations Imprinting the date/time on pictures (Lite Touch Zoom 140ED QD only 16 Adjusting diopter 17 Holding the camera properly 18 Operating the Shutter Release button 19 Selecting Regular or Panorama mode (Lite Touch Zoom 140ED QD only 20 Zooming 21 Shooting 22 Rewinding the film 24 Removing the film 25 4 Getting Started

Instruction Manual
Page 5
... through a window _____ 38 Using the self-timer 38 Using the remote control (optional 39 Replacing the remote control battery 40 4 Additional Information Correcting the date and time (Lite Touch Zoom 140ED QD only 41 Troubleshooting 42 Camera care tips 44 Specifications 46 For safe handling of the...
... through a window _____ 38 Using the self-timer 38 Using the remote control (optional 39 Replacing the remote control battery 40 4 Additional Information Correcting the date and time (Lite Touch Zoom 140ED QD only 41 Troubleshooting 42 Camera care tips 44 Specifications 46 For safe handling of the...

Instruction Manual
Page 6
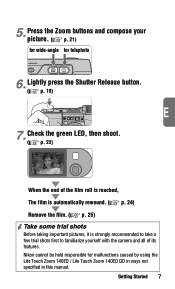
To take a picture right away Quick operation guide If you wish to use this camera immediately, proceed as follows: For details see the pages indicated for reference. 1. Select the Regular or Panorama mode (Lite Touch Zoom 140ED QD only). ( p. 20) Regular mode Panorama mode or 6 Getting Started Load film. ( pp. 14, 15) 4. Insert a battery. ( p. 12) 2. Turn the camera on. ( p. 13) 3.
To take a picture right away Quick operation guide If you wish to use this camera immediately, proceed as follows: For details see the pages indicated for reference. 1. Select the Regular or Panorama mode (Lite Touch Zoom 140ED QD only). ( p. 20) Regular mode Panorama mode or 6 Getting Started Load film. ( pp. 14, 15) 4. Insert a battery. ( p. 12) 2. Turn the camera on. ( p. 13) 3.
Instruction Manual
Page 7
Lightly press the Shutter Release button. ( p. 19) E 7. Getting Started 7 Nikon cannot be held responsible for telephoto 6. Check the green LED, then shoot. ( p. 23) When the end of the film roll is reached, The film is ... Before taking important pictures, it is strongly recommended to take a few trial shots first to familiarize yourself with the camera and all of its features. Press the Zoom buttons and compose your picture. ( p. 21) for wide-angle for malfunctions caused by using the Lite Touch Zoom 140ED / Lite Touch Zoom 140ED QD in ways not specified in this manual. 5.
Lightly press the Shutter Release button. ( p. 19) E 7. Getting Started 7 Nikon cannot be held responsible for telephoto 6. Check the green LED, then shoot. ( p. 23) When the end of the film roll is reached, The film is ... Before taking important pictures, it is strongly recommended to take a few trial shots first to familiarize yourself with the camera and all of its features. Press the Zoom buttons and compose your picture. ( p. 21) for wide-angle for malfunctions caused by using the Lite Touch Zoom 140ED / Lite Touch Zoom 140ED QD in ways not specified in this manual. 5.
Instruction Manual
Page 8
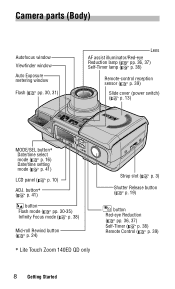
...pp. 30-35) Infinity Focus mode ( p. 38) Mid-roll Rewind button ( p. 24) * Lite Touch Zoom 140ED QD only Strap slot ( p. 3) Shutter Release button ( p. 19) button Red-eye Reduction ( pp. 36, 37) Self-Timer ( p. 38) Remote Control ( p. 39) 8 Getting Started Camera parts (Body) Autofocus window Viewfinder window Auto Exposure metering window Flash ( pp. 30, 31... Reduction lamp ( pp. 36, 37) Self-Timer lamp ( p. 38) Remote-control reception sensor ( p. 39) Slide cover (power switch) ( p. 13) MODE/SEL button* Date/time select mode ( p. 16) Date/time setting mode ( p. 41) LCD panel ( p. 10) ADJ.
...pp. 30-35) Infinity Focus mode ( p. 38) Mid-roll Rewind button ( p. 24) * Lite Touch Zoom 140ED QD only Strap slot ( p. 3) Shutter Release button ( p. 19) button Red-eye Reduction ( pp. 36, 37) Self-Timer ( p. 38) Remote Control ( p. 39) 8 Getting Started Camera parts (Body) Autofocus window Viewfinder window Auto Exposure metering window Flash ( pp. 30, 31... Reduction lamp ( pp. 36, 37) Self-Timer lamp ( p. 38) Remote-control reception sensor ( p. 39) Slide cover (power switch) ( p. 13) MODE/SEL button* Date/time select mode ( p. 16) Date/time setting mode ( p. 41) LCD panel ( p. 10) ADJ.

Instruction Manual
Page 9
Green LED ( pp. 11, 23) Orange LED ( pp. 11, 31) Viewfinder eyepiece ( p. 11) Diopter adjustment dial ( p. 17) Panorama switch* ( p. 20) Zoom buttons ( p. 21) Film cartridge confirmation window E Camera back lock release lever ( p. 14) Battery chamber lid ( p. 12) Tripod socket ( pp. 33, 35, 38, 39) Getting Started 9
Green LED ( pp. 11, 23) Orange LED ( pp. 11, 31) Viewfinder eyepiece ( p. 11) Diopter adjustment dial ( p. 17) Panorama switch* ( p. 20) Zoom buttons ( p. 21) Film cartridge confirmation window E Camera back lock release lever ( p. 14) Battery chamber lid ( p. 12) Tripod socket ( pp. 33, 35, 38, 39) Getting Started 9
Instruction Manual
Page 10
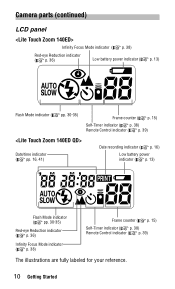
Camera parts (continued) LCD panel Infinity Focus Mode indicator ( p. 38) Red-eye Reduction indicator ( p. 36) Low battery power indicator ( p. 13) Flash Mode indicator ( pp. 30-35) Frame counter ( p. 15) Self-Timer indicator ( p. 38) Remote Control indicator ( p. 39) Date/time indicator ( pp. 16, 41) Date recording indicator ( p. 16) Low battery power indicator ( p. 13) Flash Mode...
Camera parts (continued) LCD panel Infinity Focus Mode indicator ( p. 38) Red-eye Reduction indicator ( p. 36) Low battery power indicator ( p. 13) Flash Mode indicator ( pp. 30-35) Frame counter ( p. 15) Self-Timer indicator ( p. 38) Remote Control indicator ( p. 39) Date/time indicator ( pp. 16, 41) Date recording indicator ( p. 16) Low battery power indicator ( p. 13) Flash Mode...

Instruction Manual
Page 11
... ready to fire. Getting Started 11 In close -up shooting at a distance less than approx. 0.74m. Indications in the viewfinder 1 Regular viewfinder 3 4 3 2 Panorama viewfinder (Lite Touch Zoom 140ED QD only) E 2 4 1Parallax compensation marks ( p. 29) For close -up flash unit, the LED blinks rapidly as a warning if the subject is closer than 1m. 2Autofocus frame...
... ready to fire. Getting Started 11 In close -up shooting at a distance less than approx. 0.74m. Indications in the viewfinder 1 Regular viewfinder 3 4 3 2 Panorama viewfinder (Lite Touch Zoom 140ED QD only) E 2 4 1Parallax compensation marks ( p. 29) For close -up flash unit, the LED blinks rapidly as a warning if the subject is closer than 1m. 2Autofocus frame...
Instruction Manual
Page 12
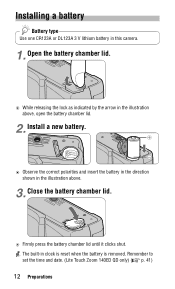
... built-in the illustration above , open the battery chamber lid. 2. Remember to set the time and date. (Lite Touch Zoom 140ED QD only) ( p. 41) 12 Preparations Install a new battery. While releasing the lock as indicated by the arrow in this camera. 1. Installing a battery Battery type Use one CR123A or DL123A 3 V lithium battery in the illustration above...
... built-in the illustration above , open the battery chamber lid. 2. Remember to set the time and date. (Lite Touch Zoom 140ED QD only) ( p. 41) 12 Preparations Install a new battery. While releasing the lock as indicated by the arrow in this camera. 1. Installing a battery Battery type Use one CR123A or DL123A 3 V lithium battery in the illustration above...

Instruction Manual
Page 13
... sure that the Low Battery Power indicator ( ) is completely retracted, slowly close the cover. Turning the camera on , the built-in the direction of the arrow, the camera is sufficient. E When the lens is not appeared on the LCD panel do not appear, the battery ...is recommended to carry spare batteries with a new one. If " " is blinking, or all the indicators on the LCD panel. Replace it clicks. It is exhausted. Lite Touch Zoom 140ED Lite Touch Zoom 140ED QD If...
... sure that the Low Battery Power indicator ( ) is completely retracted, slowly close the cover. Turning the camera on , the built-in the direction of the arrow, the camera is sufficient. E When the lens is not appeared on the LCD panel do not appear, the battery ...is recommended to carry spare batteries with a new one. If " " is blinking, or all the indicators on the LCD panel. Replace it clicks. It is exhausted. Lite Touch Zoom 140ED Lite Touch Zoom 140ED QD If...

Instruction Manual
Page 14
...14 Preparations For DX-coded film, film speed is recommended to use ISO400 film, which provides good results in flash photography, and reasonable protection against camera shake. 1. Film speeds valid for automatic setting are ISO50, 100, 200, 400, 800, 1600, and 3200. Film recommended It is automatically ... set . When loading/unloading film, be sure not to ISO100. Slide the camera back lock release lever (1), and open the camera back cover into direct sunlight. Loading the film Tips on DX-coded 35mm film Number of frames DX mark DX code Film speed Film cartridge Use DX-...
...14 Preparations For DX-coded film, film speed is recommended to use ISO400 film, which provides good results in flash photography, and reasonable protection against camera shake. 1. Film speeds valid for automatic setting are ISO50, 100, 200, 400, 800, 1600, and 3200. Film recommended It is automatically ... set . When loading/unloading film, be sure not to ISO100. Slide the camera back lock release lever (1), and open the camera back cover into direct sunlight. Loading the film Tips on DX-coded 35mm film Number of frames DX mark DX code Film speed Film cartridge Use DX-...
Instruction Manual
Page 15
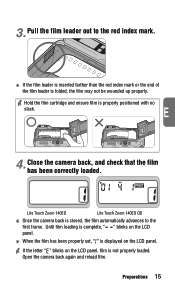
... displayed on the LCD panel, film is not properly loaded. Pull the film leader out to the first frame. Open the camera back again and reload film. E 4. Lite Touch Zoom 140ED Lite Touch Zoom 140ED QD Once the camera back is folded, the film may not be wounded up properly. If the letter " " blinks on the LCD panel. Until...
... displayed on the LCD panel, film is not properly loaded. Pull the film leader out to the first frame. Open the camera back again and reload film. E 4. Lite Touch Zoom 140ED Lite Touch Zoom 140ED QD Once the camera back is folded, the film may not be wounded up properly. If the letter " " blinks on the LCD panel. Until...
Instruction Manual
Page 16
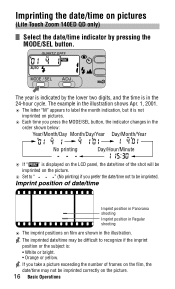
... be imprinted correctly on the picture. Each time you take a picture exceeding the number of date/time Imprint position in Panorama shooting Imprint position in Regular shooting The imprint positions on pictures (Lite Touch Zoom 140ED QD only) Select the date/time indicator by the lower two digits, and the time is in the order shown...
... be imprinted correctly on the picture. Each time you take a picture exceeding the number of date/time Imprint position in Panorama shooting Imprint position in Regular shooting The imprint positions on pictures (Lite Touch Zoom 140ED QD only) Select the date/time indicator by the lower two digits, and the time is in the order shown...

Instruction Manual
Page 17
otherwise, the eyepiece may be damaged. If the image in cold or warm, humid environments. a lens cloth). Caution: E As you look into the viewfinder and operate the diopter adjustment dial, make sure not to injure your finger or fingernail during adjustment. Basic Operations 17 If the antifog viewfinder eyepiece is unclear, turn and adjust the diopter adjustment lever. About the Antifog Viewfinder A specially treated plastic surface prevents the eyepiece from fogging when shooting in the viewfinder is smeared, gently wipe it with your eye with a dry, soft cloth (e.g. ...
otherwise, the eyepiece may be damaged. If the image in cold or warm, humid environments. a lens cloth). Caution: E As you look into the viewfinder and operate the diopter adjustment dial, make sure not to injure your finger or fingernail during adjustment. Basic Operations 17 If the antifog viewfinder eyepiece is unclear, turn and adjust the diopter adjustment lever. About the Antifog Viewfinder A specially treated plastic surface prevents the eyepiece from fogging when shooting in the viewfinder is smeared, gently wipe it with your eye with a dry, soft cloth (e.g. ...

Instruction Manual
Page 18
When holding the camera vertically, make sure that the flash is in the popped-up position. 18 Basic Operations Be careful not to press down on the flash unit when it is on top as shown. Holding the camera properly Hold the camera firmly. Do not block the lens, autofocus window, or flash with your body and hold the camera with both hands. Prop your elbows against your fingers or hair, or the strap.
When holding the camera vertically, make sure that the flash is in the popped-up position. 18 Basic Operations Be careful not to press down on the flash unit when it is on top as shown. Holding the camera properly Hold the camera firmly. Do not block the lens, autofocus window, or flash with your body and hold the camera with both hands. Prop your elbows against your fingers or hair, or the strap.

Instruction Manual
Page 19
... is backlit. Lightly press the button and confirm the green LED lights up . Pressing the Shutter Release button abruptly in one stroke may result in camera shake. Operating the Shutter Release button 1.
... is backlit. Lightly press the button and confirm the green LED lights up . Pressing the Shutter Release button abruptly in one stroke may result in camera shake. Operating the Shutter Release button 1.
Instruction Manual
Page 20
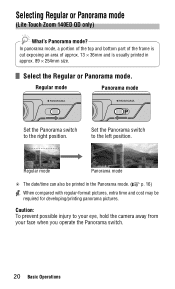
Set the Panorama switch to your eye, hold the camera away from your face when you operate the Panorama switch. 20 Basic Operations Caution: To prevent possible injury to the left position. In panorama mode, a ... required for developing/printing panorama pictures. Regular mode Panorama mode Set the Panorama switch to the right position. Regular mode Panorama mode The date/time can also be printed in approx. 89 × 254mm size. Selecting Regular or Panorama mode (Lite Touch Zoom 140ED QD only) What's Panorama mode? Select the Regular or Panorama mode.
Set the Panorama switch to your eye, hold the camera away from your face when you operate the Panorama switch. 20 Basic Operations Caution: To prevent possible injury to the left position. In panorama mode, a ... required for developing/printing panorama pictures. Regular mode Panorama mode Set the Panorama switch to the right position. Regular mode Panorama mode The date/time can also be printed in approx. 89 × 254mm size. Selecting Regular or Panorama mode (Lite Touch Zoom 140ED QD only) What's Panorama mode? Select the Regular or Panorama mode.

Instruction Manual
Page 21
for wide-angle for telephoto Press the zoom button for telephoto (140mm) photography or the zoom button for more than 2 minutes, the lens E automatically retracts to compose the picture. Example of a telephoto photograph Example of a wide-angle photograph Basic Operations 21 When the camera is obtained. Zooming Press the Zoom button to the (wide-angle) position. Remove your finger from the button when the desired image size is not operated for wide-angle (38mm) photography.
for wide-angle for telephoto Press the zoom button for telephoto (140mm) photography or the zoom button for more than 2 minutes, the lens E automatically retracts to compose the picture. Example of a telephoto photograph Example of a wide-angle photograph Basic Operations 21 When the camera is obtained. Zooming Press the Zoom button to the (wide-angle) position. Remove your finger from the button when the desired image size is not operated for wide-angle (38mm) photography.