
Instruction Manual
Page 2
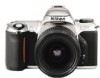
.... • Crisp, precise film advance and shutter release assure superb 2.5frame-per-second continuous shooting. • The Nikon N65/N65QD is sure to take better pictures-just press the shutter release button. • 3D Matrix Metering can handle it 2 Main features of your life. Get to know your N65/ N65QD camera, and be a pro to...
.... • Crisp, precise film advance and shutter release assure superb 2.5frame-per-second continuous shooting. • The Nikon N65/N65QD is sure to take better pictures-just press the shutter release button. • 3D Matrix Metering can handle it 2 Main features of your life. Get to know your N65/ N65QD camera, and be a pro to...
Instruction Manual
Page 4
Hold Camera and Focus 30-31 4. Install Batteries and Check Battery Power 16-17 2. Load Film 20-21 4. Set Exposure Mode to AF 26-27 2. Set Date and Time (N65QD only 22-23 About Shutter Release Button 24 BASIC OPERATION 25-...
Hold Camera and Focus 30-31 4. Install Batteries and Check Battery Power 16-17 2. Load Film 20-21 4. Set Exposure Mode to AF 26-27 2. Set Date and Time (N65QD only 22-23 About Shutter Release Button 24 BASIC OPERATION 25-...

Instruction Manual
Page 5
...Priority Auto 54-55 Aperture-Priority Auto 56-57 Manual ...58-60 Exposure Compensation 61 Auto Exposure Bracketing 62-63 Multiple Exposure 64-65 Film Rewind ...66 Diopter AdjustmenWiewfinder Accessories 67 Depth-of-Field Preview 68 Remote Control Operation (optional 69-72 Available Mode Combinations 73 About Depth... Flash Sync Mode Combinations 86 MISCELLANEOUS 87-113 Lens Compatibility 88-90 Usable Optional Speedlights 91-93 Optional Accessories 94-95 Camera Care 96-97 Notes on Batteries 98 Troubleshooting 99-101 Glossary...102- 105 Specifications 106-11 0 Index ...112- 113 5
...Priority Auto 54-55 Aperture-Priority Auto 56-57 Manual ...58-60 Exposure Compensation 61 Auto Exposure Bracketing 62-63 Multiple Exposure 64-65 Film Rewind ...66 Diopter AdjustmenWiewfinder Accessories 67 Depth-of-Field Preview 68 Remote Control Operation (optional 69-72 Available Mode Combinations 73 About Depth... Flash Sync Mode Combinations 86 MISCELLANEOUS 87-113 Lens Compatibility 88-90 Usable Optional Speedlights 91-93 Optional Accessories 94-95 Camera Care 96-97 Notes on Batteries 98 Troubleshooting 99-101 Glossary...102- 105 Specifications 106-11 0 Index ...112- 113 5

Instruction Manual
Page 6
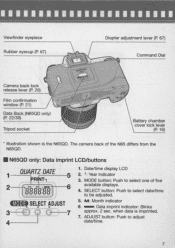
... (P. 66) Accessory shoe (P. 77) Depth -of-field preview button (P. 68) Remote control sensor (P. 69) Shutter release button (P. 17/24) Camera strap eyelet Aperture (P. 59)/ Exposure Compensation button (P. 61)/ Film rewind button (P. 66) LCD panel (P. 8) Self-timer (P. 40)/ AF-Assist Illuminator (P. 48)/ Red-Eye Reduction lamp (P.79) 6 Multiple Exposure (P. 64)! Focus mode selector...
... (P. 66) Accessory shoe (P. 77) Depth -of-field preview button (P. 68) Remote control sensor (P. 69) Shutter release button (P. 17/24) Camera strap eyelet Aperture (P. 59)/ Exposure Compensation button (P. 61)/ Film rewind button (P. 66) LCD panel (P. 8) Self-timer (P. 40)/ AF-Assist Illuminator (P. 48)/ Red-Eye Reduction lamp (P.79) 6 Multiple Exposure (P. 64)! Focus mode selector...
Instruction Manual
Page 7
... approx. 2 sec. ADJUST button : Push to be adjusted . 5. The camera back of five available displays. 4. SELECT button : Push to select date/time to adjust date/time. 7 ~ Viewfinder eyepiece Rubber eyecup (P. 67) Diopter adjustment lever (P. 67) Command Dial Camera back lock release lever (P. 20) Film confirmation window (P. 21) Data Back (N65QD only) (P. 22/39...
... approx. 2 sec. ADJUST button : Push to be adjusted . 5. The camera back of five available displays. 4. SELECT button : Push to select date/time to adjust date/time. 7 ~ Viewfinder eyepiece Rubber eyecup (P. 67) Diopter adjustment lever (P. 67) Command Dial Camera back lock release lever (P. 20) Film confirmation window (P. 21) Data Back (N65QD only) (P. 22/39...

Instruction Manual
Page 12
.. ", ,, ' - 1 Open the battery chamber and install batteries while the camera's power is off (page 16). 2 Attach the lens and turn the power switch on (page 18). • With CPU Nikkor lens other than G-type, set the lens aperture to its minimum and lock. 3 Open the camera back and install the film (page 20). .4 Set the focus mode selector to AF (autofocus) (page 26). 12
.. ", ,, ' - 1 Open the battery chamber and install batteries while the camera's power is off (page 16). 2 Attach the lens and turn the power switch on (page 18). • With CPU Nikkor lens other than G-type, set the lens aperture to its minimum and lock. 3 Open the camera back and install the film (page 20). .4 Set the focus mode selector to AF (autofocus) (page 26). 12

Instruction Manual
Page 13
5 Set the exposure mode dial to rewind automatically when it reaches the end of the roll (page 33). ~ 0 __J @ B --- @ ~ AUTO EH3 (36] 13 appears without blinking and slowly depress the shutter release button (page 32). 8 Film starts to 8 (AUTO mode) (page 28). 6 Hold the camera properly, compose frame and focus by lightly pressing the shutter release button (page 30). 7 Confirm focus indicator.
5 Set the exposure mode dial to rewind automatically when it reaches the end of the roll (page 33). ~ 0 __J @ B --- @ ~ AUTO EH3 (36] 13 appears without blinking and slowly depress the shutter release button (page 32). 8 Film starts to 8 (AUTO mode) (page 28). 6 Hold the camera properly, compose frame and focus by lightly pressing the shutter release button (page 30). 7 Confirm focus indicator.

Instruction Manual
Page 15
PREPARATION This section introduces the various operations necessary before you start shooting. • Install batteries and check battery power • Mount lens • Load film • Set date and time (N65QD only) • About shutter release button r I --'" ~~""": . ~ Or ~, ~ ~ ~ ~ • .... \ P ...". .. pr:. " .' ;.1') ~... .. • . . _ ,,~ ... • . , -. ~ . '~'I 00 .... ...
PREPARATION This section introduces the various operations necessary before you start shooting. • Install batteries and check battery power • Mount lens • Load film • Set date and time (N65QD only) • About shutter release button r I --'" ~~""": . ~ Or ~, ~ ~ ~ ~ • .... \ P ...". .. pr:. " .' ;.1') ~... .. • . . _ ,,~ ... • . , -. ~ . '~'I 00 .... ...
Instruction Manual
Page 16
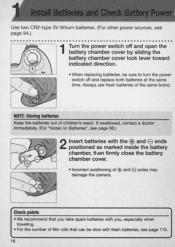
... with fresh batteries, see page 98.) 2 e Insert batteries with you, especially when traveling. • For the number of EEl and poles may damage the camera. Check points • We recommend that you take spare batteries with the EB and ends positioned as marked inside the battery chamber, then firmly close... the battery chamber cover. e • Incorrect positioning of film rolls that can be sure to turn the power switch off and replace both batteries at the same time. -- --
... with fresh batteries, see page 98.) 2 e Insert batteries with you, especially when traveling. • For the number of EEl and poles may damage the camera. Check points • We recommend that you take spare batteries with the EB and ends positioned as marked inside the battery chamber, then firmly close... the battery chamber cover. e • Incorrect positioning of film rolls that can be sure to turn the power switch off and replace both batteries at the same time. -- --

Instruction Manual
Page 20
... with no slack. Closing the camera back after loading film automatically advances the film to red index mark. • Do not insert the film leader beyond the red index mark . • Hold the film cartridge and ensure film is properly positioned with your finger or the film leader. 20 With DX-coded film, film speed will be loaded smoothly...
... with no slack. Closing the camera back after loading film automatically advances the film to red index mark. • Do not insert the film leader beyond the red index mark . • Hold the film cartridge and ensure film is properly positioned with your finger or the film leader. 20 With DX-coded film, film speed will be loaded smoothly...

Instruction Manual
Page 21
... first frame. :~S FS.6 B ---rn AUTO E::3 ( • When : appears on the film roll and film speed through the film confirmation window. • Infrared films cannot be used for the detection of available exposures on the LCD panel, the film has advanced to ISO 100 with this camera since an infrared sensor is set to the first frame...
... first frame. :~S FS.6 B ---rn AUTO E::3 ( • When : appears on the film roll and film speed through the film confirmation window. • Infrared films cannot be used for the detection of available exposures on the LCD panel, the film has advanced to ISO 100 with this camera since an infrared sensor is set to the first frame...

Instruction Manual
Page 24
...). • Lightly pressing the shutter release button activates the indications in picture blur. Make sure to the next frame. NOTE: Camera shake Pressing the shutter release button abruptly can result in the LCD panel and viewfinder (for the exposure meter.) Lightly Fully pressing ...depressing Fully depress the shutter release button. • Fully depressing the shutter release button releases shutter and film automatically advances to press the shutter release button slowly. 24 from removal of finger) . (See page 17 for approx. 5 sec....
...). • Lightly pressing the shutter release button activates the indications in picture blur. Make sure to the next frame. NOTE: Camera shake Pressing the shutter release button abruptly can result in the LCD panel and viewfinder (for the exposure meter.) Lightly Fully pressing ...depressing Fully depress the shutter release button. • Fully depressing the shutter release button releases shutter and film automatically advances to press the shutter release button slowly. 24 from removal of finger) . (See page 17 for approx. 5 sec....

Instruction Manual
Page 31
.... 31 Therefore, the actual exposed frame is somewhat I larger than the image you to guide autofocus. See page 76 for details on the film frame. Built-in Speedlight When the subject is dark or backlit (except in focus. -, e1/- e appears: Subject is automatically activated to... see more clearly through the viewfinder. • To take a picture of a negative film are partially cropped by most labs. blinks: Unable to focus using / 1' autofocus. • With dark subjects, the camera's AF-Assist Illuminator (page 48) is in Wi or .!~ - ) and the shutter release button...
.... 31 Therefore, the actual exposed frame is somewhat I larger than the image you to guide autofocus. See page 76 for details on the film frame. Built-in Speedlight When the subject is dark or backlit (except in focus. -, e1/- e appears: Subject is automatically activated to... see more clearly through the viewfinder. • To take a picture of a negative film are partially cropped by most labs. blinks: Unable to focus using / 1' autofocus. • With dark subjects, the camera's AF-Assist Illuminator (page 48) is in Wi or .!~ - ) and the shutter release button...

Instruction Manual
Page 32
...(in-focus indicator) appears in the viewfinder, then slowly, fully depress the shutter release button _With a moving subject, Continuous Servo AF (page 44) activates and camera continuously focuses on the subject 1 Confirm indications in Speedlight automatically pops up and starts charging (pages 34, 76) _ 2 Confirm that focus indicator. appears and slowly...the viewfinder while lightly pressing the shutter release button. • When the subject is dark or backlit and shutter release button is released , the film automatically advances to the next frame and the next shot can be taken_ 32
...(in-focus indicator) appears in the viewfinder, then slowly, fully depress the shutter release button _With a moving subject, Continuous Servo AF (page 44) activates and camera continuously focuses on the subject 1 Confirm indications in Speedlight automatically pops up and starts charging (pages 34, 76) _ 2 Confirm that focus indicator. appears and slowly...the viewfinder while lightly pressing the shutter release button. • When the subject is dark or backlit and shutter release button is released , the film automatically advances to the next frame and the next shot can be taken_ 32

Instruction Manual
Page 33
...off.) i Make sure the film is completely rewound (E is !i :is complete. • Pictures taken on frames beyond the indicated number of the exposures for the film roll may be discarded in the LCD panel), open the camera back away from sunlight and remove the film cartridge by tilting it to rewind... automatically when film reaches the end of the roll. • The frame counter ...
...off.) i Make sure the film is completely rewound (E is !i :is complete. • Pictures taken on frames beyond the indicated number of the exposures for the film roll may be discarded in the LCD panel), open the camera back away from sunlight and remove the film cartridge by tilting it to rewind... automatically when film reaches the end of the roll. • The frame counter ...

Instruction Manual
Page 38
... suitable for subjects with an evening or night background. In Sports Continuous mode, Continuous Servo AF (page 44) is recommended. • To avoid camera shake, use a tripod. • To cancel flash , set the flash sync mode to freeze action . rl!: Night Scene mode Use this ... release button is fully depressed. • 80mm to 300mm telephoto lenses are recommended . • Use of ISO 400 or faster film speed is automatically activated and the camera continues to avoid camera shake. • Continuous shooting is not possible when the built-in Speedlight is in up position .
... suitable for subjects with an evening or night background. In Sports Continuous mode, Continuous Servo AF (page 44) is recommended. • To avoid camera shake, use a tripod. • To cancel flash , set the flash sync mode to freeze action . rl!: Night Scene mode Use this ... release button is fully depressed. • 80mm to 300mm telephoto lenses are recommended . • Use of ISO 400 or faster film speed is automatically activated and the camera continues to avoid camera shake. • Continuous shooting is not possible when the built-in Speedlight is in up position .

Instruction Manual
Page 39
immediately after the shutter is released (when film is loaded). You can imprint the following date information on your picture: Year/Month/Day, Day/Hour/Minute, Month/DaylYear or Day/MonthlYear. .S.e.e.p.a.g.e.2.2.t.o.s.e.t .da.t.e.a.n.d.t.im.e 1 ... and fully depress the shutter release button to take a picture with the imprinted date/time. • Data imprint indicator - It may be imprinted on the film. Compatible film speeds for approx. Imprinted date/time The illustration at right indicates the position of the imprinted date/time on the picture.
immediately after the shutter is released (when film is loaded). You can imprint the following date information on your picture: Year/Month/Day, Day/Hour/Minute, Month/DaylYear or Day/MonthlYear. .S.e.e.p.a.g.e.2.2.t.o.s.e.t .da.t.e.a.n.d.t.im.e 1 ... and fully depress the shutter release button to take a picture with the imprinted date/time. • Data imprint indicator - It may be imprinted on the film. Compatible film speeds for approx. Imprinted date/time The illustration at right indicates the position of the imprinted date/time on the picture.

Instruction Manual
Page 42
...circle in the correct exposure. With Center-Weighted Metering, most of shutter speed and aperture for subject brightness and film sensitivity results in the viewfinder. With the N65/ N65QO, Matrix Metering is automatically selected when the exposure mode is controlled by the six-segment Matrix sensor....metering systems: Matrix Metering (page 28) and Center-Weighted Metering (page 58). Using 0 - or G-type Nikkor lenses, the N65/ N65QO camera performs 3D Matrix Metering by adding distance information to other than Manual and Center-Weighted Metering is not uniform. In general, brightness...
...circle in the correct exposure. With Center-Weighted Metering, most of shutter speed and aperture for subject brightness and film sensitivity results in the viewfinder. With the N65/ N65QO, Matrix Metering is automatically selected when the exposure mode is controlled by the six-segment Matrix sensor....metering systems: Matrix Metering (page 28) and Center-Weighted Metering (page 58). Using 0 - or G-type Nikkor lenses, the N65/ N65QO camera performs 3D Matrix Metering by adding distance information to other than Manual and Center-Weighted Metering is not uniform. In general, brightness...

Instruction Manual
Page 43
view • Remote control nn~'!rJ:ltinn DETAILED OPERATION This section features detailed descriptions of camera functions and advanced operations. • Focus mode • Focus area • AF-Assist Illuminator • Focus lock • Shooting in each exposure mode • Exposure Compensation • Auto Exposure Bracketing • Multiple Exposure • Film rewind • Diopter adjustmen iewfinder accessories • Depth-of-field pr;
view • Remote control nn~'!rJ:ltinn DETAILED OPERATION This section features detailed descriptions of camera functions and advanced operations. • Focus mode • Focus area • AF-Assist Illuminator • Focus lock • Shooting in each exposure mode • Exposure Compensation • Auto Exposure Bracketing • Multiple Exposure • Film rewind • Diopter adjustmen iewfinder accessories • Depth-of-field pr;

Instruction Manual
Page 62
...). ,.,' ... For example, this is useful in selecting one shot out of several shots with bracketed exposures after processing the film, when the subject has pronounced contrast in shooting with color slide film and where the latitude of the proper exposure is minimal. 1 e Rotate the Command Dial while pressing the Auto Exposure Bracketing...
...). ,.,' ... For example, this is useful in selecting one shot out of several shots with bracketed exposures after processing the film, when the subject has pronounced contrast in shooting with color slide film and where the latitude of the proper exposure is minimal. 1 e Rotate the Command Dial while pressing the Auto Exposure Bracketing...


