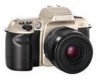

Instruction Manual
Page 2
Nomenclature AF-Assist Iliuminator/ Self-timer/ Red-Eye Reduction lamp PP . 59 Focus mode selector P. 20 Lens release button P. 17 Built-in P. 28 shoe ~ Eyepiece cap DK-5 (page 56) 2 Shutter release button P. 15 Flash sync mode button P. 60 Aperture button P. 43 Exposure compensation button P. 50 LCD P. 4
Nomenclature AF-Assist Iliuminator/ Self-timer/ Red-Eye Reduction lamp PP . 59 Focus mode selector P. 20 Lens release button P. 17 Built-in P. 28 shoe ~ Eyepiece cap DK-5 (page 56) 2 Shutter release button P. 15 Flash sync mode button P. 60 Aperture button P. 43 Exposure compensation button P. 50 LCD P. 4
Instruction Manual
Page 8
Please read this manual thoroughly and carefully to get the most out of each function, from lens to the detailed explanation of your Nikon N60/N60QD. Install Batteries and Check Battery Power 14-15 2. Set Focus Mode Selector to 8 22-23 6. Set Exposure Mode Dial to AF ...Release Shutter ...........26-27 8. "Flash Photography" introduces flash photography using the N60/N60QD's builtin Speedlight and optional Speedlight in the dark, as well as the steps in basic steps for easy picture-taking even for SLR camera beginners. Using Built-In Speedlight 28-29 About Focus and Exposure 30 8 ...
Please read this manual thoroughly and carefully to get the most out of each function, from lens to the detailed explanation of your Nikon N60/N60QD. Install Batteries and Check Battery Power 14-15 2. Set Focus Mode Selector to 8 22-23 6. Set Exposure Mode Dial to AF ...Release Shutter ...........26-27 8. "Flash Photography" introduces flash photography using the N60/N60QD's builtin Speedlight and optional Speedlight in the dark, as well as the steps in basic steps for easy picture-taking even for SLR camera beginners. Using Built-In Speedlight 28-29 About Focus and Exposure 30 8 ...

Instruction Manual
Page 9
---=...c:- _. DETAILED OPERATION 31-64 Lens Compatibility 32-33 Film 34-35 Focus Mode 36-37 Focus Lock 38 Shooting in Each Exposure Mode 39-44 Vari-Program 45-47 Exposure ...-63 Built-in Speed light and Matrix Balanced Fill-Flash 58 Flash shooting distance range 58 Flash sync mode features 59 USing built-in Speedlight 60-61 Usable lenses with built-in Speedlight 61 Usable Optional Speedlights 62-63 Available Mode Combinations 64 MISCELLANEOUS 65-77 Optional Accessories 66...
---=...c:- _. DETAILED OPERATION 31-64 Lens Compatibility 32-33 Film 34-35 Focus Mode 36-37 Focus Lock 38 Shooting in Each Exposure Mode 39-44 Vari-Program 45-47 Exposure ...-63 Built-in Speed light and Matrix Balanced Fill-Flash 58 Flash shooting distance range 58 Flash sync mode features 59 USing built-in Speedlight 60-61 Usable lenses with built-in Speedlight 61 Usable Optional Speedlights 62-63 Available Mode Combinations 64 MISCELLANEOUS 65-77 Optional Accessories 66...
Instruction Manual
Page 10
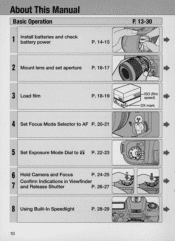
About This Manual [ Basic Operation 1 Install batteries and check battery power P. 14-15 P. 13-30 • 2 Mount lens and set aperture P.16-17 • 3 Load film P.18-19 • 4 Set Focus Mode Selector to AF P.20-21 • 5 Set Exposure Mode Dial to 8 P. 22-23 • 6 Hold Camera and Focus ~ ~ P. 24-25 7 Confirm Indications in Viewfinder and Release Shutter P.26-27 • 8 Using Built-In Speedlight P.28-29 • 10
About This Manual [ Basic Operation 1 Install batteries and check battery power P. 14-15 P. 13-30 • 2 Mount lens and set aperture P.16-17 • 3 Load film P.18-19 • 4 Set Focus Mode Selector to AF P.20-21 • 5 Set Exposure Mode Dial to 8 P. 22-23 • 6 Hold Camera and Focus ~ ~ P. 24-25 7 Confirm Indications in Viewfinder and Release Shutter P.26-27 • 8 Using Built-In Speedlight P.28-29 • 10
Instruction Manual
Page 11
...-in Speedlight and Matrix Balanced Fill-Flash (P. 58)/ Flash shooting distance range (P. 58)/Flash sync mode features (P. 59)/ Using built-in Speedlight (P. 60-61)/Usable lenses with built-in Each Exposure Mode (P. 39-44)-8: General Purpose (P. 39)/ P: Auto-Multi (P. 40)/S: Shutter-Priority Auto (P. 41...)-Matrix/30 Matrix (P. 48)/Center-Weighted (P. 48); Detailed Operation Notes on Batteries (P. 69) P. 31-64,69 Lens Compatibility Chart (P. 32-33)-CPU Nikkor lens (P. 32-33)/ Non-CPU lens (P. 32-33) Film (P. 34)-Confirming an automatically set film speed (P. 34)/ Mid-roll rewind (P. 34)/ ln...
...-in Speedlight and Matrix Balanced Fill-Flash (P. 58)/ Flash shooting distance range (P. 58)/Flash sync mode features (P. 59)/ Using built-in Speedlight (P. 60-61)/Usable lenses with built-in Each Exposure Mode (P. 39-44)-8: General Purpose (P. 39)/ P: Auto-Multi (P. 40)/S: Shutter-Priority Auto (P. 41...)-Matrix/30 Matrix (P. 48)/Center-Weighted (P. 48); Detailed Operation Notes on Batteries (P. 69) P. 31-64,69 Lens Compatibility Chart (P. 32-33)-CPU Nikkor lens (P. 32-33)/ Non-CPU lens (P. 32-33) Film (P. 34)-Confirming an automatically set film speed (P. 34)/ Mid-roll rewind (P. 34)/ ln...

Instruction Manual
Page 13
Settings are as follows : Attached lens Focus mode Exposure mode Exposure metering Built-in Speedlight D-type AF Nikkor Autofocus 8' (General-Purpose Progam) 3D Matrix Metering* Normal sync* * Automatically set when exposure mode is set to 8'. 13 BASIC OPERATION This section guides you through basic operations with the camera set to ~ mode.
Settings are as follows : Attached lens Focus mode Exposure mode Exposure metering Built-in Speedlight D-type AF Nikkor Autofocus 8' (General-Purpose Progam) 3D Matrix Metering* Normal sync* * Automatically set when exposure mode is set to 8'. 13 BASIC OPERATION This section guides you through basic operations with the camera set to ~ mode.
Instruction Manual
Page 16
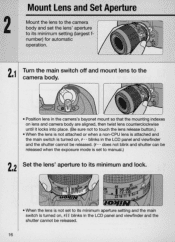
... fnumber) for automatic operation . 2.1 Turn the main switch off and mount lens to the camera body. • Position lens in the camera's bayonet mount so that the mounting indexes on lens and camera body are aligned, then twist lens counterclockwise until it locks into place. (Be sure not to its minimum and... lock. • When the lens is not set to manual.) 2•2 Set the lens' aperture to its minimum aperture setting...
... fnumber) for automatic operation . 2.1 Turn the main switch off and mount lens to the camera body. • Position lens in the camera's bayonet mount so that the mounting indexes on lens and camera body are aligned, then twist lens counterclockwise until it locks into place. (Be sure not to its minimum and... lock. • When the lens is not set to manual.) 2•2 Set the lens' aperture to its minimum aperture setting...
Instruction Manual
Page 17
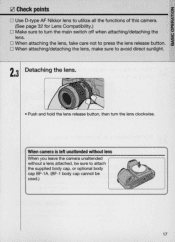
... main switch off when attaching/detaching the o o ! lens. D When attaching/detaching the lens, make sure to press the lens release button. When camera is left unattended without lens Wh en you leave the camera unattended without a lens attached , be sure to utilize all the functions of this camera. ~ (See page 32 for Lens Compatibility.) W Q. ____IZ_l _C_h_ec_k__p_O_in_ts 0Z D Use D-type...
... main switch off when attaching/detaching the o o ! lens. D When attaching/detaching the lens, make sure to press the lens release button. When camera is left unattended without lens Wh en you leave the camera unattended without a lens attached , be sure to utilize all the functions of this camera. ~ (See page 32 for Lens Compatibility.) W Q. ____IZ_l _C_h_ec_k__p_O_in_ts 0Z D Use D-type...

Instruction Manual
Page 21
... the same color clothing as a wall or other background. IZI Check points o z ~ o Do not attempt to AF. o With the focus mode set to rotate the lens' focus ring manually with the subject located at AF, the shutter cannot be released when the 0 subject is out of focus.
... the same color clothing as a wall or other background. IZI Check points o z ~ o Do not attempt to AF. o With the focus mode set to rotate the lens' focus ring manually with the subject located at AF, the shutter cannot be released when the 0 subject is out of focus.

Instruction Manual
Page 24
... image you should set the shutter speed faster than '1/focallength of your lens' sec. (Example: when using a 50mm lens, set the shutter speed faster than 1/50 sec.) Use of this camera is crucial when taking photographs. Camera shake and shutter speed Preventing camera shake is approximately 90% of a negative film are partially cropped by most...
... image you should set the shutter speed faster than '1/focallength of your lens' sec. (Example: when using a 50mm lens, set the shutter speed faster than 1/50 sec.) Use of this camera is crucial when taking photographs. Camera shake and shutter speed Preventing camera shake is approximately 90% of a negative film are partially cropped by most...

Instruction Manual
Page 29
... subjects (within O.5m to 3m or 1.6 to 9.8 ft.), the camera's AFAssist Illuminator (page 36) is introduced in the viewfinder approx. 3 sec. !Zl Check points o z o The built-in Speedlight offers an angle of coverage of 28mm lens with a person or animal, and Slow Sync flash , which reduces ...the "red-eye" effect with a a~: guide number of 15/49 (IS01 00, m/ft.). ~ o Using a CPU lens enables to perform Matrix Balanced Fill-Flash shooting. (For details, see page 61.) 8.2 Confirm ~ in viewfinder, then compose, focus and take the picture. •...
... subjects (within O.5m to 3m or 1.6 to 9.8 ft.), the camera's AFAssist Illuminator (page 36) is introduced in the viewfinder approx. 3 sec. !Zl Check points o z o The built-in Speedlight offers an angle of coverage of 28mm lens with a person or animal, and Slow Sync flash , which reduces ...the "red-eye" effect with a a~: guide number of 15/49 (IS01 00, m/ft.). ~ o Using a CPU lens enables to perform Matrix Balanced Fill-Flash shooting. (For details, see page 61.) 8.2 Confirm ~ in viewfinder, then compose, focus and take the picture. •...
Instruction Manual
Page 30
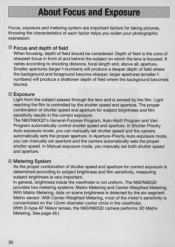
...a shallower depth of sharpest focus in the viewfinder. (With D-type AF Nikkor lenses, the N60/N60QD camera performs 3D Matrix Metering. Exposure Light from the subject passes through the lens and is very important. About Focus and Ex osure Focus, exposure and metering system are important... (smaller fnumbers) will produce a deeper depth of each factor helps you manually set shutter speed and the camera automatically sets the proper aperture. The N60/N60QD provides two metering systems: Matrix Metering and Center-Weighted Metering. In general , brightness inside the viewfinder is...
...a shallower depth of sharpest focus in the viewfinder. (With D-type AF Nikkor lenses, the N60/N60QD camera performs 3D Matrix Metering. Exposure Light from the subject passes through the lens and is very important. About Focus and Ex osure Focus, exposure and metering system are important... (smaller fnumbers) will produce a deeper depth of each factor helps you manually set shutter speed and the camera automatically sets the proper aperture. The N60/N60QD provides two metering systems: Matrix Metering and Center-Weighted Metering. In general , brightness inside the viewfinder is...

Instruction Manual
Page 31
DETAILED OPERATION This section features detailed descriptions of all camera functions - including lens, film, focus, exposure and others. 31
DETAILED OPERATION This section features detailed descriptions of all camera functions - including lens, film, focus, exposure and others. 31

Instruction Manual
Page 32
... aperture using the aperture button and Command Dial. CAUTION: Nikkor lenses that cannot be attached to the N60/N60QD The following Nikkor lenses cannot be attached to the N60/ N60QD (camera body or lens may be damaged): • AF Teleconverter TC-16A • Non-AI lenses • 400mm f/4... .S and 600mm f/ S.6 with this camera. Use a CPU lens (except IX-Nikkor) with Focusing Unit AU-1 • Fisheye 6mm f/ S.6 and ...
... aperture using the aperture button and Command Dial. CAUTION: Nikkor lenses that cannot be attached to the N60/N60QD The following Nikkor lenses cannot be attached to the N60/ N60QD (camera body or lens may be damaged): • AF Teleconverter TC-16A • Non-AI lenses • 400mm f/4... .S and 600mm f/ S.6 with this camera. Use a CPU lens (except IX-Nikkor) with Focusing Unit AU-1 • Fisheye 6mm f/ S.6 and ...

Instruction Manual
Page 33
Types of CPU lenses and other usable lenses ~ Focus mode Exposure mode Metering system Manual with Any mode Matrix Lens Autofocus electronic Manual other than rangefinder M M 3D 6segment 6segment CenterWeighted*' D-type AF Nikkor 0 t.. "'"·0 "'" AF-I Nikkor - Z Non-D-type AF Nikkor =c.>. (except AF Nikkor 0 c..> for F3AF) AI -P Nikkor - AI-S or AI type Nikkor, Series-E, - AI-modified Nikkor Medical-Nikkor 120mm f/4 - AF-S, AF-I Teleconverter - AI-S or AI type '-i' Teleconverters - t.. 0 Reflex-Nikkor - ""z''"" PC Nikkor - =c.>.
Types of CPU lenses and other usable lenses ~ Focus mode Exposure mode Metering system Manual with Any mode Matrix Lens Autofocus electronic Manual other than rangefinder M M 3D 6segment 6segment CenterWeighted*' D-type AF Nikkor 0 t.. "'"·0 "'" AF-I Nikkor - Z Non-D-type AF Nikkor =c.>. (except AF Nikkor 0 c..> for F3AF) AI -P Nikkor - AI-S or AI type Nikkor, Series-E, - AI-modified Nikkor Medical-Nikkor 120mm f/4 - AF-S, AF-I Teleconverter - AI-S or AI type '-i' Teleconverters - t.. 0 Reflex-Nikkor - ""z''"" PC Nikkor - =c.>.
Instruction Manual
Page 36
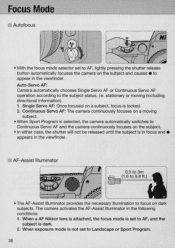
... either case, the shutter will not be released until the subject is locked. 2. Continuous Servo AF: The camera continuously focuses on a moving (including directional information). 1. When a AF Nikkor lens is attached, the focus mode is set to AF, and the subject is not set to AF, lightly ...pressing the shutter release button automatically focuses the camera on dark subjects. When exposure mode is dark. 2. Focus Mode ...
... either case, the shutter will not be released until the subject is locked. 2. Continuous Servo AF: The camera continuously focuses on a moving (including directional information). 1. When a AF Nikkor lens is attached, the focus mode is set to AF, and the subject is not set to AF, lightly ...pressing the shutter release button automatically focuses the camera on dark subjects. When exposure mode is dark. 2. Focus Mode ...

Instruction Manual
Page 37
...Manual focus • Set the focus mode selector to indicate the focus status in the viewfinder. Look through the viewfinder and rotate the lens focusing ring until the image appears sharp on the Speedlight unit emits light. Wait for " Usable Optional Speedlights". It is 0.5 to 3m... (1 .6 to protect the firing tube. Electronic Rangefinder Light ly pressing the shutter release button and rotating the lens focusing ring activates the Electronic Rangefinder to M . The Electronic Rangefinder works with a focal length of the AF-Assist Illuminator, it may not...
...Manual focus • Set the focus mode selector to indicate the focus status in the viewfinder. Look through the viewfinder and rotate the lens focusing ring until the image appears sharp on the Speedlight unit emits light. Wait for " Usable Optional Speedlights". It is 0.5 to 3m... (1 .6 to protect the firing tube. Electronic Rangefinder Light ly pressing the shutter release button and rotating the lens focusing ring activates the Electronic Rangefinder to M . The Electronic Rangefinder works with a focal length of the AF-Assist Illuminator, it may not...

Instruction Manual
Page 44
...183; - .....Over +1.5EV + ·0·- 3 Confirm focus indicator. Not available with the @ button and the Command Dial. However, the camera's meter will tum off). Continuous exposure is possible for shooting nighttime scenes or stars. Note that continuous exposure time is useful for approx. 15 hours... with a fresh set with Long Time Exposure. Use lens' aperture ring . Camera shake can be disabled. Under -0.5EV to close the shutter. appears in the viewfinder indicates the difference between the selected...
...183; - .....Over +1.5EV + ·0·- 3 Confirm focus indicator. Not available with the @ button and the Command Dial. However, the camera's meter will tum off). Continuous exposure is possible for shooting nighttime scenes or stars. Note that continuous exposure time is useful for approx. 15 hours... with a fresh set with Long Time Exposure. Use lens' aperture ring . Camera shake can be disabled. Under -0.5EV to close the shutter. appears in the viewfinder indicates the difference between the selected...

Instruction Manual
Page 55
... the function. 55 CI 2 Compose picture, focus and fully depress the shutter release button . • When the self-timer is pressed , duration of camera's meter changes to 30 sec. ~ Press the shutter release button within 30 sec. When Red-Eye Reduction (page 59) is released . The self-timer... can be released (i.e. Use a tripod or place the camera on a stable surface before or during self-timer operation), press button again, turn the main switch off or perform Two-Button Reset (page 57). mode. of the lens when setting the self-timer in the photograph. before the shutter releases...
... the function. 55 CI 2 Compose picture, focus and fully depress the shutter release button . • When the self-timer is pressed , duration of camera's meter changes to 30 sec. ~ Press the shutter release button within 30 sec. When Red-Eye Reduction (page 59) is released . The self-timer... can be released (i.e. Use a tripod or place the camera on a stable surface before or during self-timer operation), press button again, turn the main switch off or perform Two-Button Reset (page 57). mode. of the lens when setting the self-timer in the photograph. before the shutter releases...

Instruction Manual
Page 56
.... • Using the eyepiece cap or optional eyepiece correction lens • Tei attach an eyepiece cap or optional eyepiece correction lens, remove the rubber eyecup and slide down the eyepiece cap or eyepiece correction lens. Nine optional eyepiece correction lenses provide viewfinder diopter of the finder... diopter is -1.5 DP. To reattach the rubber eyecup, make sure the" Nikon DK- 10 JAPAN" stamp is located next to the viewfinder,...
.... • Using the eyepiece cap or optional eyepiece correction lens • Tei attach an eyepiece cap or optional eyepiece correction lens, remove the rubber eyecup and slide down the eyepiece cap or eyepiece correction lens. Nine optional eyepiece correction lenses provide viewfinder diopter of the finder... diopter is -1.5 DP. To reattach the rubber eyecup, make sure the" Nikon DK- 10 JAPAN" stamp is located next to the viewfinder,...