
Instruction Manual
Page 6
... until you feel confident using the camera. Be sure to read this manual : Indicates items to be checked, such as requirements and restrictions. : Indicates notes and cautions you are requested to follow. : Indicates supplementary descriptions. : Indicates pages for purchasing the Nikon Lite Touch Zoom 100W/Lite Touch Zoom 100W QUARTZ DATE (QD) camera. Thank you for reference. 6 Getting Started...
... until you feel confident using the camera. Be sure to read this manual : Indicates items to be checked, such as requirements and restrictions. : Indicates notes and cautions you are requested to follow. : Indicates supplementary descriptions. : Indicates pages for purchasing the Nikon Lite Touch Zoom 100W/Lite Touch Zoom 100W QUARTZ DATE (QD) camera. Thank you for reference. 6 Getting Started...

Instruction Manual
Page 7
...(Quick operation guide) --- 8 Camera parts 10 Body 10 LCD panel 12 Viewfinder 13 Installing a battery 14 Turning the camera on 15 Checking the battery power 15 Loading the film 16 Imprinting the date/time on pictures (Lite Touch Zoom 100W QD only 18 Holding the camera properly 19 En Operating the shutter... release button 19 Shooting 20 Zooming 22 Rewinding the film 23 Removing the film 23 When the main subject is ...
...(Quick operation guide) --- 8 Camera parts 10 Body 10 LCD panel 12 Viewfinder 13 Installing a battery 14 Turning the camera on 15 Checking the battery power 15 Loading the film 16 Imprinting the date/time on pictures (Lite Touch Zoom 100W QD only 18 Holding the camera properly 19 En Operating the shutter... release button 19 Shooting 20 Zooming 22 Rewinding the film 23 Removing the film 23 When the main subject is ...

Instruction Manual
Page 10
Camera parts Body Red-eye Reduction lamp ( pp. 32, 33) Self-timer lamp ( p. 36) Auto Exposure metering window Viewfinder window Flash ( pp. 26, 27) Lens Remote-.../SEL button* Date/time select mode ( p. 18) Date/time setting mode ( p. 39) ADJ button* ( p. 39) button Flash mode ( pp. 26-31) Infinity Focus mode ( p. 35) * Lite Touch Zoom 100W QD only 10 Getting Started Battery chamber cover ( p. 14) Strap eyelet ( p. 11) Shutter release button ( p. 19) Mid-roll rewind button ( p. 23) button Red-eye...
Camera parts Body Red-eye Reduction lamp ( pp. 32, 33) Self-timer lamp ( p. 36) Auto Exposure metering window Viewfinder window Flash ( pp. 26, 27) Lens Remote-.../SEL button* Date/time select mode ( p. 18) Date/time setting mode ( p. 39) ADJ button* ( p. 39) button Flash mode ( pp. 26-31) Infinity Focus mode ( p. 35) * Lite Touch Zoom 100W QD only 10 Getting Started Battery chamber cover ( p. 14) Strap eyelet ( p. 11) Shutter release button ( p. 19) Mid-roll rewind button ( p. 23) button Red-eye...

Instruction Manual
Page 12
Camera parts (continued) LCD panel Battery power indicator ( p. 15) Red-eye Reduction indicator ( p. 33) Infinity Focus Mode indicator ( p. 35) Flash Mode indicator ( pp. 26-31) Self-timer indicator ( p. 36) Frame counter ( p. 17) Remote Control indicator ( p. 37) Battery power indicator ( p. 15) Infinity Focus Mode indicator ( p. 35) Self-timer indicator ( p. 36) Red-eye Reduction indicator ( p. 33) Frame counter ( p. 17) Flash Mode indicator ( pp. 26-31) Date/time indicator ( pp. 18, 39) The illustrations are fully labeled for your reference. 12 Getting Started
Camera parts (continued) LCD panel Battery power indicator ( p. 15) Red-eye Reduction indicator ( p. 33) Infinity Focus Mode indicator ( p. 35) Flash Mode indicator ( pp. 26-31) Self-timer indicator ( p. 36) Frame counter ( p. 17) Remote Control indicator ( p. 37) Battery power indicator ( p. 15) Infinity Focus Mode indicator ( p. 35) Self-timer indicator ( p. 36) Red-eye Reduction indicator ( p. 33) Frame counter ( p. 17) Flash Mode indicator ( pp. 26-31) Date/time indicator ( pp. 18, 39) The illustrations are fully labeled for your reference. 12 Getting Started

Instruction Manual
Page 14
Check the time and date. (Lite Touch Zoom 100W QD only) ( p. 39) 14 Preparations While releasing the lock as marked inside the battery chamber. 3 Close the battery chamber cover until it clicks. Insert ... type Use one CR123A or DL123A type 3V lithium battery in clock may be reset automatically when the battery is removed. The built-in this camera. ends positioned as indicated by the arrow in the left illustration, open the battery chamber cover. 2 Install a new battery. Battery chamber cover 1 Open the battery...
Check the time and date. (Lite Touch Zoom 100W QD only) ( p. 39) 14 Preparations While releasing the lock as marked inside the battery chamber. 3 Close the battery chamber cover until it clicks. Insert ... type Use one CR123A or DL123A type 3V lithium battery in clock may be reset automatically when the battery is removed. The built-in this camera. ends positioned as indicated by the arrow in the left illustration, open the battery chamber cover. 2 Install a new battery. Battery chamber cover 1 Open the battery...

Instruction Manual
Page 15
... batteries with a new one ready. (no indicators) Replace the battery with you open the slide cover in the direction of the arrow, the camera is nearing exhaustion. Lite Touch Zoom 100W Lite Touch Zoom 100W QD showing blinking The battery power is showing on the LCD panel. Have a fresh one . The rewinding can only be released. When...
... batteries with a new one ready. (no indicators) Replace the battery with you open the slide cover in the direction of the arrow, the camera is nearing exhaustion. Lite Touch Zoom 100W Lite Touch Zoom 100W QD showing blinking The battery power is showing on the LCD panel. Have a fresh one . The rewinding can only be released. When...

Instruction Manual
Page 17
Lite Touch Zoom 100W Lite Touch Zoom 100W QD 4 Close the camera back, and check that " " appears on DX-coded 35mm film Number of frames DX mark DX code ISO (film speed) Film cartridge With DX-coded film, film speed is set to ISO 100. En ...Tips on the film counter. With a non-DX-coded film, the film speed is not properly loaded. If " " blinks on the LCD panel. Once the camera...
Lite Touch Zoom 100W Lite Touch Zoom 100W QD 4 Close the camera back, and check that " " appears on DX-coded 35mm film Number of frames DX mark DX code ISO (film speed) Film cartridge With DX-coded film, film speed is set to ISO 100. En ...Tips on the film counter. With a non-DX-coded film, the film speed is not properly loaded. If " " blinks on the LCD panel. Once the camera...

Instruction Manual
Page 18
... imprinted correctly on the picture. 18 Preparations Each time you take a picture exceeding the number of date/time Imprint position The imprint positions on pictures (Lite Touch Zoom 100W QD only) Select the date/time indicator by 24hour clock. If you press the MODE/SEL button, the indicator changes as white or reddish...
... imprinted correctly on the picture. 18 Preparations Each time you take a picture exceeding the number of date/time Imprint position The imprint positions on pictures (Lite Touch Zoom 100W QD only) Select the date/time indicator by 24hour clock. If you press the MODE/SEL button, the indicator changes as white or reddish...

Instruction Manual
Page 23
... not open the camera back until " " starts lighting and the rewinding motor stops. Once rewinding starts, there is no need to rewind automatically when film reaches the end of a dead battery, it is rewound and " " is completely rewound. En Press the mid-roll rewind ( ) button using a ball-point pen. Lite Touch Zoom 100W QD...
... not open the camera back until " " starts lighting and the rewinding motor stops. Once rewinding starts, there is no need to rewind automatically when film reaches the end of a dead battery, it is rewound and " " is completely rewound. En Press the mid-roll rewind ( ) button using a ball-point pen. Lite Touch Zoom 100W QD...

Instruction Manual
Page 26
... ( p. 35) For shooting a distant scene or landscape more sharply. Flash fires whenever photo is poor. Flash photography Selecting flash mode Lite Touch Zoom 100W Select flash mode by pressing the No indicator button. Lite Touch Zoom 100W QD You can select any of five flash modes by pressing the button. Flash Cancel ( p. 29) Flash will not...
... ( p. 35) For shooting a distant scene or landscape more sharply. Flash fires whenever photo is poor. Flash photography Selecting flash mode Lite Touch Zoom 100W Select flash mode by pressing the No indicator button. Lite Touch Zoom 100W QD You can select any of five flash modes by pressing the button. Flash Cancel ( p. 29) Flash will not...
Instruction Manual
Page 28
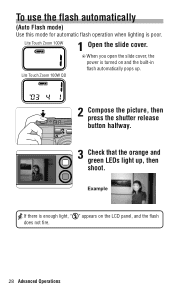
Zo 3 Check that the orange and green LEDs light up . 2 Compose the picture, then press the shutter release button halfway. Lite Touch Zoom 100W 1 Open the slide cover. To use the flash automatically (Auto Flash mode) Use this mode for automatic flash operation when lighting is turned on the LCD panel, and the flash does not fire. 28 Advanced Operations Lite Touch Zoom 100W QD When you open the slide cover, the power is poor. Example If there is enough light, " " appears on and the built-in flash automatically pops up , then shoot.
Zo 3 Check that the orange and green LEDs light up . 2 Compose the picture, then press the shutter release button halfway. Lite Touch Zoom 100W 1 Open the slide cover. To use the flash automatically (Auto Flash mode) Use this mode for automatic flash operation when lighting is turned on the LCD panel, and the flash does not fire. 28 Advanced Operations Lite Touch Zoom 100W QD When you open the slide cover, the power is poor. Example If there is enough light, " " appears on and the built-in flash automatically pops up , then shoot.

Instruction Manual
Page 29
To cancel flash operation (Flash Cancel mode) Use this mode in places, where use of a flash is prohibited, or to achieve a natural lighting effect at dusk or for the Flash Cancel mode Since slow shutter speeds are usually selected in this mode, use a tripod to prevent camera shake. Lite Touch Zoom 100W 1 Press the button until " " appears on the LCD panel. Lite Touch Zoom 100W QD En 2 Compose the picture, then press the shutter release button halfway. Zo 3 Check that the green LED lights up, then shoot. Example Advanced Operations 29 Use a tripod for night scenes.
To cancel flash operation (Flash Cancel mode) Use this mode in places, where use of a flash is prohibited, or to achieve a natural lighting effect at dusk or for the Flash Cancel mode Since slow shutter speeds are usually selected in this mode, use a tripod to prevent camera shake. Lite Touch Zoom 100W 1 Press the button until " " appears on the LCD panel. Lite Touch Zoom 100W QD En 2 Compose the picture, then press the shutter release button halfway. Zo 3 Check that the green LED lights up, then shoot. Example Advanced Operations 29 Use a tripod for night scenes.

Instruction Manual
Page 30
Zo 3 Check that the orange and green LEDs light up, then shoot. Example 30 Advanced Operations Lite Touch Zoom 100W 1 Press the button until " " appears on the LCD panel. Lite Touch Zoom 100W QD 2 Compose the picture, then press the shutter release button halfway. To use the flash always (Anytime Flash mode) Use this mode to intentionally fire the flash regardless of light conditions.
Zo 3 Check that the orange and green LEDs light up, then shoot. Example 30 Advanced Operations Lite Touch Zoom 100W 1 Press the button until " " appears on the LCD panel. Lite Touch Zoom 100W QD 2 Compose the picture, then press the shutter release button halfway. To use the flash always (Anytime Flash mode) Use this mode to intentionally fire the flash regardless of light conditions.

Instruction Manual
Page 31
Lite Touch Zoom 100W QD En 2 Compose the picture, then press the shutter release button halfway. Flash fires whenever photo is taken. Use a tripod for the Night Portrait (... usually selected in a night view (Night Portrait mode) Use this mode, use a tripod to capture both subject and background at night or under dim light. Lite Touch Zoom 100W 1 Press the button until " " appears on the LCD panel. Zo 3 Check that the orange and green LEDs light up, then shoot. Example Advanced Operations...
Lite Touch Zoom 100W QD En 2 Compose the picture, then press the shutter release button halfway. Flash fires whenever photo is taken. Use a tripod for the Night Portrait (... usually selected in a night view (Night Portrait mode) Use this mode, use a tripod to capture both subject and background at night or under dim light. Lite Touch Zoom 100W 1 Press the button until " " appears on the LCD panel. Zo 3 Check that the orange and green LEDs light up, then shoot. Example Advanced Operations...

Instruction Manual
Page 32
Remote Control mode (Lite Touch Zoom 100W QD only) ( p. 37) For remote control operation. Lite Touch Zoom 100W Select the mode by pressing button, for the red-eye reduction or self-timer/remote control. Note that Red-eye Reduction is automatically set ...when the flash is used . p. 33) (100W QD only) Self-Timer mode ( p. 36) For self-timer operation. button Select the mode by pressing the button. Lite Touch Zoom 100W QD Each time you press the No indicator button, the indicator changes as follows: (100W QD only) Indicator No indicator Explanation Red-eye Reduction...
Remote Control mode (Lite Touch Zoom 100W QD only) ( p. 37) For remote control operation. Lite Touch Zoom 100W Select the mode by pressing button, for the red-eye reduction or self-timer/remote control. Note that Red-eye Reduction is automatically set ...when the flash is used . p. 33) (100W QD only) Self-Timer mode ( p. 36) For self-timer operation. button Select the mode by pressing the button. Lite Touch Zoom 100W QD Each time you press the No indicator button, the indicator changes as follows: (100W QD only) Indicator No indicator Explanation Red-eye Reduction...

Instruction Manual
Page 33
before the flash fires. Lite Touch Zoom 100W Press the button until the shutter is released. The Red-eye Reduction mode is your top priority. Advanced Operations 33 Be careful not to move the camera or let the subject move until 1 " " appears on the LCD En panel. a This mode is not recommended in shooting situations...) In flash photographs, the subject's eyes may sometimes appear bright red. About Red-eye Reduction mode a The Red-eye Reduction lamp lights up , then shoot. Lite Touch Zoom 100W QD 2 Compose the picture, then press the shutter release button halfway.
before the flash fires. Lite Touch Zoom 100W Press the button until the shutter is released. The Red-eye Reduction mode is your top priority. Advanced Operations 33 Be careful not to move the camera or let the subject move until 1 " " appears on the LCD En panel. a This mode is not recommended in shooting situations...) In flash photographs, the subject's eyes may sometimes appear bright red. About Red-eye Reduction mode a The Red-eye Reduction lamp lights up , then shoot. Lite Touch Zoom 100W QD 2 Compose the picture, then press the shutter release button halfway.

Instruction Manual
Page 35
Flash is automatically canceled in this mode. Shooting a distant view or landscape through a window (Infinity Focus mode) Use Infinity Focus mode to shoot a distant view more sharply, or a landscape through a window. Zo 3 Check that the green LED lights up, then shoot. Advanced Operations 35 Lite Touch Zoom 100W 1 Press the button until " " appears on the LCD panel. Lite Touch Zoom 100W QD En Compose the picture, then 2 press the shutter release button halfway.
Flash is automatically canceled in this mode. Shooting a distant view or landscape through a window (Infinity Focus mode) Use Infinity Focus mode to shoot a distant view more sharply, or a landscape through a window. Zo 3 Check that the green LED lights up, then shoot. Advanced Operations 35 Lite Touch Zoom 100W 1 Press the button until " " appears on the LCD panel. Lite Touch Zoom 100W QD En Compose the picture, then 2 press the shutter release button halfway.

Instruction Manual
Page 36
...release button halfway. Using the self-timer Use the self-timer when you want to be in the picture. 1 Use a tripod or place the camera on the LCD panel. 3 Compose the picture, and press the shutter release button. After the shot, self-timer mode is closed. 36 Advanced... if the camera is not operated for 2 seconds before the shutter is released. When the shutter release button is pressed all the way down, the selftimer lamp blinks for approx. 8 seconds, then lights up for more than approx. 3 minutes or when the slide cover is canceled. Lite Touch Zoom 100W Lite Touch Zoom 100W QD...
...release button halfway. Using the self-timer Use the self-timer when you want to be in the picture. 1 Use a tripod or place the camera on the LCD panel. 3 Compose the picture, and press the shutter release button. After the shot, self-timer mode is closed. 36 Advanced... if the camera is not operated for 2 seconds before the shutter is released. When the shutter release button is pressed all the way down, the selftimer lamp blinks for approx. 8 seconds, then lights up for more than approx. 3 minutes or when the slide cover is canceled. Lite Touch Zoom 100W Lite Touch Zoom 100W QD...

Instruction Manual
Page 37
... in the remote control is closed. 2 Compose the picture, aim the remote control at the camera, and press the transmission button on the remote control. Lite Touch Zoom 100W QD 1 Press the button until " " appears on a stable flat surface. The life of the remote ...control is exhausted, the shutter may not be performed when the camera has extreme backlighting. Remote control operation cannot be released ...
... in the remote control is closed. 2 Compose the picture, aim the remote control at the camera, and press the transmission button on the remote control. Lite Touch Zoom 100W QD 1 Press the button until " " appears on a stable flat surface. The life of the remote ...control is exhausted, the shutter may not be performed when the camera has extreme backlighting. Remote control operation cannot be released ...

Instruction Manual
Page 39
..., "Hour" indicator blinks first. When the camera is on the LCD panel. Each time you press the ADJ button, the number advances by one. If the Year/Month/Day or Day/Hour/ Minute are all the digits. Additional Information 39 Correcting the date and time (Lite Touch Zoom 100W QD only) MODE/SEL button... is replaced a" " may be displayed on , the data will be immediately registered if the slide cover is closed, or the Mid-roll Rewind button or a Zoom button is pressed while the setting is in correction mode turns into Year/Month/Day, and then "Year" indicator blinks first. aThe date/time is...
..., "Hour" indicator blinks first. When the camera is on the LCD panel. Each time you press the ADJ button, the number advances by one. If the Year/Month/Day or Day/Hour/ Minute are all the digits. Additional Information 39 Correcting the date and time (Lite Touch Zoom 100W QD only) MODE/SEL button... is replaced a" " may be displayed on , the data will be immediately registered if the slide cover is closed, or the Mid-roll Rewind button or a Zoom button is pressed while the setting is in correction mode turns into Year/Month/Day, and then "Year" indicator blinks first. aThe date/time is...

