
Instruction Manual
Page 2
...safety instructions where all those who use electronic equipment in the presence of flammable gas, as the result of a fall or other strong light source through the viewfinder Viewing the sun or other accident, remove the battery and then take the equipment to a Nikonauthorized service center ... equipment. Turn off immediately in explosion or fire. For your safety (Caring for the Camera and Battery) To prevent damage to your Nikon product to prevent possible injury. Do not disassemble Touching the product's internal parts could result in injury. WARNINGS Do not look at the sun...
...safety instructions where all those who use electronic equipment in the presence of flammable gas, as the result of a fall or other strong light source through the viewfinder Viewing the sun or other accident, remove the battery and then take the equipment to a Nikonauthorized service center ... equipment. Turn off immediately in explosion or fire. For your safety (Caring for the Camera and Battery) To prevent damage to your Nikon product to prevent possible injury. Do not disassemble Touching the product's internal parts could result in injury. WARNINGS Do not look at the sun...

Instruction Manual
Page 4
...magnetic fields Do not use a soft, clean cotton cloth or lens tissue moistened with a lightly dampened cloth and then dry your fingers Use a blower brush to remove dirt and dust... entering or leaving a heated building on a cold day, can cause irreparable damage. Caring for the Camera and Battery Keep dry This product is not waterproof, and may malfunction if subjected to strong shocks or...) or lens cleaner. Rusting of equipment that generates strong electromagnetic radiation or magnetic fields. Do not touch the lens with care Do not apply force to the lens or flash unit, or to damage....
...magnetic fields Do not use a soft, clean cotton cloth or lens tissue moistened with a lightly dampened cloth and then dry your fingers Use a blower brush to remove dirt and dust... entering or leaving a heated building on a cold day, can cause irreparable damage. Caring for the Camera and Battery Keep dry This product is not waterproof, and may malfunction if subjected to strong shocks or...) or lens cleaner. Rusting of equipment that generates strong electromagnetic radiation or magnetic fields. Do not touch the lens with care Do not apply force to the lens or flash unit, or to damage....

Instruction Manual
Page 9
... press the button halfway, focus and exposure are automatically achieved, and the green LED lights up. Getting Started 9 Zo ( p. 23) Take trial shots Take trial shots before shooting at important occasions like weddings or graduations. • Nikon will not be held liable for any damages resulting from the use of the roll...
... press the button halfway, focus and exposure are automatically achieved, and the green LED lights up. Getting Started 9 Zo ( p. 23) Take trial shots Take trial shots before shooting at important occasions like weddings or graduations. • Nikon will not be held liable for any damages resulting from the use of the roll...

Instruction Manual
Page 13
In close -up shooting distance less than approx. 0.65m. Getting Started 13 Viewfinder 1 3 4 2 1Parallax compensation marks ( p. 34) En Use for close -up when the flash is ready to fire, and it blinks when the flash charging is not completed. 4Green LED ( p. 20) Lights when focus is closer than 1m. 2Autofocus frame mark ( p. 20) Center the autofocus frame mark on the subject. 3Orange LED ( p. 27) With the shutter release button pressed halfway, the orange LED lights up photography, the LED blinks as a warning if the subject is achieved.
In close -up shooting distance less than approx. 0.65m. Getting Started 13 Viewfinder 1 3 4 2 1Parallax compensation marks ( p. 34) En Use for close -up when the flash is ready to fire, and it blinks when the flash charging is not completed. 4Green LED ( p. 20) Lights when focus is closer than 1m. 2Autofocus frame mark ( p. 20) Center the autofocus frame mark on the subject. 3Orange LED ( p. 27) With the shutter release button pressed halfway, the orange LED lights up photography, the LED blinks as a warning if the subject is achieved.

Instruction Manual
Page 19
... Press the shutter release button halfway to press the shutter release button slowly. Basic Operations 19 Holding the camera properly When holding the camera horizontally When holding the camera vertically, make sure that the flash is on the flash unit when it is depressed halfway. Be careful... you press the button halfway, focus and exposure are automatically achieved, and the green LED lights up position. When holding the camera vertically Prop your elbows against your body and hold the camera with your fingers or hair, or the strap. Do not block the lens, autofocus window...
... Press the shutter release button halfway to press the shutter release button slowly. Basic Operations 19 Holding the camera properly When holding the camera horizontally When holding the camera vertically, make sure that the flash is on the flash unit when it is depressed halfway. Be careful... you press the button halfway, focus and exposure are automatically achieved, and the green LED lights up position. When holding the camera vertically Prop your elbows against your body and hold the camera with your fingers or hair, or the strap. Do not block the lens, autofocus window...

Instruction Manual
Page 20
Note that you may not be achieved, keep the camera away from the subject for more than approx. 0.65m. For correct focus to focus. aBlinking indicates the subject is extremely short (approx. 0.3m). If the ...: Use focus lock. ( p. 24) 2 Press the shutter release button halfway to be sharp. 20 Basic Operations However, the focus may take a picture even if the camera-to-subject distance is too close. Zo Lighting/blinking of the green LED When correct focus has been achieved, the green LED...
Note that you may not be achieved, keep the camera away from the subject for more than approx. 0.65m. For correct focus to focus. aBlinking indicates the subject is extremely short (approx. 0.3m). If the ...: Use focus lock. ( p. 24) 2 Press the shutter release button halfway to be sharp. 20 Basic Operations However, the focus may take a picture even if the camera-to-subject distance is too close. Zo Lighting/blinking of the green LED When correct focus has been achieved, the green LED...

Instruction Manual
Page 21
and to protect the lens, finder, etc. En Basic Operations 21 Zo If the subject is dark in use, close the slide cover to save battery power. 3 Confirm that the green LED lights up and slowly press the shutter release button all the way down. When not in Auto Flash mode, the flash fires automatically. Pressing the shutter release button abruptly can result in picture blur.
and to protect the lens, finder, etc. En Basic Operations 21 Zo If the subject is dark in use, close the slide cover to save battery power. 3 Confirm that the green LED lights up and slowly press the shutter release button all the way down. When not in Auto Flash mode, the flash fires automatically. Pressing the shutter release button abruptly can result in picture blur.

Instruction Manual
Page 23
.... Do not open the camera back until " " starts lighting and the rewinding motor stops. When the film is no need to rewind automatically when film reaches the end of a dead battery, it is rewound and " " is displayed. 2 Open the camera back and remove the film. Removing the film Lite Touch Zoom 100W 1 Confirm that film...
.... Do not open the camera back until " " starts lighting and the rewinding motor stops. When the film is no need to rewind automatically when film reaches the end of a dead battery, it is rewound and " " is displayed. 2 Open the camera back and remove the film. Removing the film Lite Touch Zoom 100W 1 Confirm that film...

Instruction Manual
Page 24
... adjust the composition after focusing on your subject is not at the center of the final composition in the left example. Do not change the camera-to-subject distance. 24 Advanced Operations If your subject. 1 Center the autofocus frame mark on the background and the main subject may be difficult... to focus ( p. 25). Do not change the camera-to-subject distance While the green LED lights up when the subject is in focus, and the focus is locked as long as the shutter release button is pressed halfway...
... adjust the composition after focusing on your subject is not at the center of the final composition in the left example. Do not change the camera-to-subject distance. 24 Advanced Operations If your subject. 1 Center the autofocus frame mark on the background and the main subject may be difficult... to focus ( p. 25). Do not change the camera-to-subject distance While the green LED lights up when the subject is in focus, and the focus is locked as long as the shutter release button is pressed halfway...

Instruction Manual
Page 25
...to shoot. Glossy, light-reflecting surfaces, such as shiny cars or water. Subjects behind glass. Subjects without solid content (i.e., candle flame, fireworks, etc.). Advanced Operations 25 Use the focus lock ( p. 24) to focus on another subject equidistant from the camera, then compose the ...frame mark. Dark subjects with no reflection. Example Difficult-to-focus subjects En The following subjects may be difficult to the camera than the main subject. Secondary subjects are closer to focus. 2 Compose the picture, while pressing the shutter release button halfway...
...to shoot. Glossy, light-reflecting surfaces, such as shiny cars or water. Subjects behind glass. Subjects without solid content (i.e., candle flame, fireworks, etc.). Advanced Operations 25 Use the focus lock ( p. 24) to focus on another subject equidistant from the camera, then compose the ...frame mark. Dark subjects with no reflection. Example Difficult-to-focus subjects En The following subjects may be difficult to the camera than the main subject. Secondary subjects are closer to focus. 2 Compose the picture, while pressing the shutter release button halfway...

Instruction Manual
Page 26
Flash photography Selecting flash mode Lite Touch Zoom 100W Select flash mode by pressing the No indicator button. Indicator No indicator Explanation Auto Flash ( p. 28) The flash automatically fires when lighting is taken. Infinity Focus ( p. 35) For shooting a distant scene or landscape more sharply. Night Portrait (... and background at night or under dim light. Anytime Flash ( p. 30) Flash fires whenever photo is poor. Flash fires whenever photo is canceled in this mode. The flash is taken. 26 Advanced Operations Lite Touch Zoom 100W QD You can select any of...
Flash photography Selecting flash mode Lite Touch Zoom 100W Select flash mode by pressing the No indicator button. Indicator No indicator Explanation Auto Flash ( p. 28) The flash automatically fires when lighting is taken. Infinity Focus ( p. 35) For shooting a distant scene or landscape more sharply. Night Portrait (... and background at night or under dim light. Anytime Flash ( p. 30) Flash fires whenever photo is poor. Flash fires whenever photo is canceled in this mode. The flash is taken. 26 Advanced Operations Lite Touch Zoom 100W QD You can select any of...

Instruction Manual
Page 27
The flash is ready to 3.6m Advanced Operations 27 If the orange LED lights up : Flash charging is completed. With ISO 100 film speed (wide-angle) setting: approx. 0.65 to 3.0m (telephoto) setting: approx. 0.65 to 1.8m With ISO ... is not completed. Orange LED En Flash shooting range The reference distance ranges between the camera and subject are shown below. Lighting/blinking of the orange LED when the shutter release button is pressed halfway a The orange LED lights up , the shutter can be released. If you press down the popped-up flash...
The flash is ready to 3.6m Advanced Operations 27 If the orange LED lights up : Flash charging is completed. With ISO 100 film speed (wide-angle) setting: approx. 0.65 to 3.0m (telephoto) setting: approx. 0.65 to 1.8m With ISO ... is not completed. Orange LED En Flash shooting range The reference distance ranges between the camera and subject are shown below. Lighting/blinking of the orange LED when the shutter release button is pressed halfway a The orange LED lights up , the shutter can be released. If you press down the popped-up flash...
Instruction Manual
Page 28
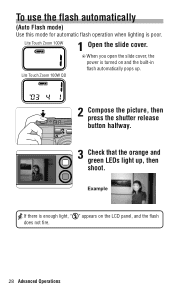
Lite Touch Zoom 100W QD When you open the slide cover, the power is turned on the LCD panel, and the flash does not fire. 28 Advanced Operations Zo 3 Check that the orange and green LEDs light up . 2 Compose the picture, then press the shutter release button halfway. Lite Touch Zoom 100W 1 Open the slide cover. Example If there is poor. To use the flash automatically (Auto Flash mode) Use this mode for automatic flash operation when lighting is enough light, " " appears on and the built-in flash automatically pops up , then shoot.
Lite Touch Zoom 100W QD When you open the slide cover, the power is turned on the LCD panel, and the flash does not fire. 28 Advanced Operations Zo 3 Check that the orange and green LEDs light up . 2 Compose the picture, then press the shutter release button halfway. Lite Touch Zoom 100W 1 Open the slide cover. Example If there is poor. To use the flash automatically (Auto Flash mode) Use this mode for automatic flash operation when lighting is enough light, " " appears on and the built-in flash automatically pops up , then shoot.

Instruction Manual
Page 29
Use a tripod for night scenes. Lite Touch Zoom 100W 1 Press the button until " " appears on the LCD panel. Example Advanced Operations 29 Lite Touch Zoom 100W QD En 2 Compose the picture, then press the shutter release button halfway. Zo 3 Check that the green LED lights up, then shoot. To cancel flash operation (Flash Cancel mode) Use this mode in this mode, use a tripod to achieve a natural lighting effect at dusk or for the Flash Cancel mode Since slow shutter speeds are usually selected in places, where use of a flash is prohibited, or to prevent camera shake.
Use a tripod for night scenes. Lite Touch Zoom 100W 1 Press the button until " " appears on the LCD panel. Example Advanced Operations 29 Lite Touch Zoom 100W QD En 2 Compose the picture, then press the shutter release button halfway. Zo 3 Check that the green LED lights up, then shoot. To cancel flash operation (Flash Cancel mode) Use this mode in this mode, use a tripod to achieve a natural lighting effect at dusk or for the Flash Cancel mode Since slow shutter speeds are usually selected in places, where use of a flash is prohibited, or to prevent camera shake.

Instruction Manual
Page 30
Zo 3 Check that the orange and green LEDs light up, then shoot. Example 30 Advanced Operations Lite Touch Zoom 100W QD 2 Compose the picture, then press the shutter release button halfway. Lite Touch Zoom 100W 1 Press the button until " " appears on the LCD panel. To use the flash always (Anytime Flash mode) Use this mode to intentionally fire the flash regardless of light conditions.
Zo 3 Check that the orange and green LEDs light up, then shoot. Example 30 Advanced Operations Lite Touch Zoom 100W QD 2 Compose the picture, then press the shutter release button halfway. Lite Touch Zoom 100W 1 Press the button until " " appears on the LCD panel. To use the flash always (Anytime Flash mode) Use this mode to intentionally fire the flash regardless of light conditions.

Instruction Manual
Page 31
... QD En 2 Compose the picture, then press the shutter release button halfway. Lite Touch Zoom 100W 1 Press the button until " " appears on the LCD panel. Example Advanced Operations 31 To photograph a person in this mode to prevent camera shake. Use a tripod for the Night Portrait (Slow Sync Flash) mode Since slow shutter ... usually selected in a night view (Night Portrait mode) Use this mode, use a tripod to capture both subject and background at night or under dim light. Zo 3 Check that the orange and green LEDs light up, then shoot. Flash fires whenever photo is taken.
... QD En 2 Compose the picture, then press the shutter release button halfway. Lite Touch Zoom 100W 1 Press the button until " " appears on the LCD panel. Example Advanced Operations 31 To photograph a person in this mode to prevent camera shake. Use a tripod for the Night Portrait (Slow Sync Flash) mode Since slow shutter ... usually selected in a night view (Night Portrait mode) Use this mode, use a tripod to capture both subject and background at night or under dim light. Zo 3 Check that the orange and green LEDs light up, then shoot. Flash fires whenever photo is taken.

Instruction Manual
Page 33
Be careful not to move the camera or let the subject move until the shutter is not automatically canceled by turning the power off. Lite Touch Zoom 100W Press the button until " " disappears from the LCD panel. The Red-eye Reduction mode is released. To reduce this "red-eye" ...eye Reduction mode, press the button until 1 " " appears on the LCD En panel. Lite Touch Zoom 100W QD 2 Compose the picture, then press the shutter release button halfway. Zo 3 Check that the orange and green LEDs light up approx. 1sec. Advanced Operations 33 before the flash fires. a This mode is not ...
Be careful not to move the camera or let the subject move until the shutter is not automatically canceled by turning the power off. Lite Touch Zoom 100W Press the button until " " disappears from the LCD panel. The Red-eye Reduction mode is released. To reduce this "red-eye" ...eye Reduction mode, press the button until 1 " " appears on the LCD En panel. Lite Touch Zoom 100W QD 2 Compose the picture, then press the shutter release button halfway. Zo 3 Check that the orange and green LEDs light up approx. 1sec. Advanced Operations 33 before the flash fires. a This mode is not ...

Instruction Manual
Page 34
... distance is extremely short (approx. 0.3m). Minimum camera-to-subject distance is approx. 0.65m If you wish to shoot a subject such as a flower as large as possible in the picture. 2 Check that you can be sharp. 34 Advanced Operations Note that the green LED lights up, then shoot. The shaded area (marked...
... distance is extremely short (approx. 0.3m). Minimum camera-to-subject distance is approx. 0.65m If you wish to shoot a subject such as a flower as large as possible in the picture. 2 Check that you can be sharp. 34 Advanced Operations Note that the green LED lights up, then shoot. The shaded area (marked...

Instruction Manual
Page 35
Lite Touch Zoom 100W 1 Press the button until " " appears on the LCD panel. Flash is automatically canceled in this mode. Advanced Operations 35 Lite Touch Zoom 100W QD En Compose the picture, then 2 press the shutter release button halfway. Shooting a distant view or landscape through a window (Infinity Focus mode) Use Infinity Focus mode to shoot a distant view more sharply, or a landscape through a window. Zo 3 Check that the green LED lights up, then shoot.
Lite Touch Zoom 100W 1 Press the button until " " appears on the LCD panel. Flash is automatically canceled in this mode. Advanced Operations 35 Lite Touch Zoom 100W QD En Compose the picture, then 2 press the shutter release button halfway. Shooting a distant view or landscape through a window (Infinity Focus mode) Use Infinity Focus mode to shoot a distant view more sharply, or a landscape through a window. Zo 3 Check that the green LED lights up, then shoot.

Instruction Manual
Page 36
Lite Touch Zoom 100W Lite Touch Zoom 100W QD 2 Press the button until " " appears on a stable flat surface. Focus and exposure are achieved by pressing the shutter release button halfway. Self-timer mode is automatically canceled if the camera is not operated for 2 seconds before the shutter is released.... When the shutter release button is pressed all the way down, the selftimer lamp blinks for approx. 8 seconds, then lights up for more than approx. 3 minutes or...
Lite Touch Zoom 100W Lite Touch Zoom 100W QD 2 Press the button until " " appears on a stable flat surface. Focus and exposure are achieved by pressing the shutter release button halfway. Self-timer mode is automatically canceled if the camera is not operated for 2 seconds before the shutter is released.... When the shutter release button is pressed all the way down, the selftimer lamp blinks for approx. 8 seconds, then lights up for more than approx. 3 minutes or...