D90 User's Manual
Page 6
... 242 240 247 243 iv Picture Controls How do I get quick access to repair or inspect my camera? Recent settings What do with this "question and answer" index. Exposure What do I clean the camera or lens? Clean Image Sensor See page 43 50 108 119 173 203 Frequently-Asked Questions Question Key phrase...
... 242 240 247 243 iv Picture Controls How do I get quick access to repair or inspect my camera? Recent settings What do with this "question and answer" index. Exposure What do I clean the camera or lens? Clean Image Sensor See page 43 50 108 119 173 203 Frequently-Asked Questions Question Key phrase...

D90 User's Manual
Page 9
Can I overlay two photos to create JPEG copies of a fisheye lens? Small picture Can I protect photos from accidental deletion? Image overlay Can I create the effect of NEF (RAW) photographs? Distortion control Can I use the camera to make a single image? Photo info How do I print photographs? ...Can I order professional prints? Filter effects How do I create a copy with the originals? Quick retouch Can I print the date on the camera? Straighten How do I reduce distortion? Side-by-side comparison See page 48, 128 129 49, 140, 162 162 138 139 141, 143...
Can I overlay two photos to create JPEG copies of a fisheye lens? Small picture Can I protect photos from accidental deletion? Image overlay Can I create the effect of NEF (RAW) photographs? Distortion control Can I use the camera to make a single image? Photo info How do I print photographs? ...Can I order professional prints? Filter effects How do I create a copy with the originals? Quick retouch Can I print the date on the camera? Straighten How do I reduce distortion? Side-by-side comparison See page 48, 128 129 49, 140, 162 162 138 139 141, 143...
D90 User's Manual
Page 10
... The BM-10 Monitor Cover 17 The DK-21 Viewfinder Eyepiece Cup 17 Camera Menus...18 Using Camera Menus ...19 Help ...21 First Steps ...22 Charge the Battery ...22 Insert the Battery ...23 Attach a Lens...25 Basic Setup...27 Inserting Memory Cards...29 Adjust Viewfinder Focus ...32 Basic... Photography and Playback 33 "Point-and-Shoot" Photography (i and j Modes 34 Step 1: Turn the Camera On 34 Step 2: Choose Shooting and Focus Modes 36 Step ...
... The BM-10 Monitor Cover 17 The DK-21 Viewfinder Eyepiece Cup 17 Camera Menus...18 Using Camera Menus ...19 Help ...21 First Steps ...22 Charge the Battery ...22 Insert the Battery ...23 Attach a Lens...25 Basic Setup...27 Inserting Memory Cards...29 Adjust Viewfinder Focus ...32 Basic... Photography and Playback 33 "Point-and-Shoot" Photography (i and j Modes 34 Step 1: Turn the Camera On 34 Step 2: Choose Shooting and Focus Modes 36 Step ...
D90 User's Manual
Page 21
XIntroduction X This chapter covers information you will need to know before using the camera, including the names of camera parts, how to use the camera menus, and how to Know the Camera 3 The Camera Body...3 The Mode Dial ...6 The Control Panel...7 The Viewfinder ...9 The Shooting Information Display 10 The ...17 The BM-10 Monitor Cover...17 The DK-21 Viewfinder Eyepiece Cup 17 Camera Menus ...18 Using Camera Menus...19 Help...21 First Steps...22 Charge the Battery ...22 Insert the Battery ...23 Attach a Lens ...25 Basic Setup ...27 Inserting Memory Cards...29 Adjust Viewfinder Focus...32 1...
XIntroduction X This chapter covers information you will need to know before using the camera, including the names of camera parts, how to use the camera menus, and how to Know the Camera 3 The Camera Body...3 The Mode Dial ...6 The Control Panel...7 The Viewfinder ...9 The Shooting Information Display 10 The ...17 The BM-10 Monitor Cover...17 The DK-21 Viewfinder Eyepiece Cup 17 Camera Menus ...18 Using Camera Menus...19 Help...21 First Steps...22 Charge the Battery ...22 Insert the Battery ...23 Attach a Lens ...25 Basic Setup ...27 Inserting Memory Cards...29 Adjust Viewfinder Focus...32 1...
D90 User's Manual
Page 22
... once every one to two years, and that it be inspected by Nikon specifically for your Nikon digital camera are particularly recommended if the camera is used with your purchase of a Nikon single-lens reflex (SLR) digital camera. Nikon recommends that fees apply to five years (note that the camera be serviced once every three to these services). Overview Thank you for...
... once every one to two years, and that it be inspected by Nikon specifically for your Nikon digital camera are particularly recommended if the camera is used with your purchase of a Nikon single-lens reflex (SLR) digital camera. Nikon recommends that fees apply to five years (note that the camera be serviced once every three to these services). Overview Thank you for...
D90 User's Manual
Page 23
... 6 1 7 8 2 9 10 11 3 12 19 4 13 5 14 20 15 21 22 16 17 23 18 24 25 1 Mode dial 6 2 Eyelet for camera strap 17 3 Focal plane mark (E 60 4 Accessory shoe (for optional flash unit 233 5 Accessory shoe cover 233 6 Power switch 34 7 Shutter-release button 38 8 E (exposure ... 82 18 Speaker 19 Body cap 240 20 CPU contacts 21 Mounting index 25 22 Lens mount 60 23 Tripod socket 24 Battery-chamber cover 23 25 Battery-chamber cover latch 23 3 Getting to Know the Camera Take a few moments to it helpful to bookmark this section and refer to familiarize yourself...
... 6 1 7 8 2 9 10 11 3 12 19 4 13 5 14 20 15 21 22 16 17 23 18 24 25 1 Mode dial 6 2 Eyelet for camera strap 17 3 Focal plane mark (E 60 4 Accessory shoe (for optional flash unit 233 5 Accessory shoe cover 233 6 Power switch 34 7 Shutter-release button 38 8 E (exposure ... 82 18 Speaker 19 Body cap 240 20 CPU contacts 21 Mounting index 25 22 Lens mount 60 23 Tripod socket 24 Battery-chamber cover 23 25 Battery-chamber cover latch 23 3 Getting to Know the Camera Take a few moments to it helpful to bookmark this section and refer to familiarize yourself...
D90 User's Manual
Page 24
The Camera Body (Continued) 1 X 2 3 4 10 5 11 6 12 13 7 14 8 9 1 Built-in flash 70 9 Mirror 43, 246 2 M (flash mode) button 70 10 DC-IN connector for optional EH-5a or Y (flash compensation) button 91 EH-5 AC adapter 239 3 Microphone 50, 170 11 USB connector 4 Infrared receiver 69 Connecting to a computer 149 5 D (bracketing) button 92 Connecting to a printer 151 6 Connector cover 146, 147, 149, 151 12 HDMI mini-pin connector 147 7 Lens release button 26 13 Video connector 146 8 Focus-mode selector 54, 59 14 Accessory terminal 241 4
The Camera Body (Continued) 1 X 2 3 4 10 5 11 6 12 13 7 14 8 9 1 Built-in flash 70 9 Mirror 43, 246 2 M (flash mode) button 70 10 DC-IN connector for optional EH-5a or Y (flash compensation) button 91 EH-5 AC adapter 239 3 Microphone 50, 170 11 USB connector 4 Infrared receiver 69 Connecting to a computer 149 5 D (bracketing) button 92 Connecting to a printer 151 6 Connector cover 146, 147, 149, 151 12 HDMI mini-pin connector 147 7 Lens release button 26 13 Video connector 146 8 Focus-mode selector 54, 59 14 Accessory terminal 241 4

D90 User's Manual
Page 45
... After confirming that the camera is off, remove the rear lens cap from entering the camera when the lens is used in the camera's bayonet mount. Being careful not to prevent dust from the lens and remove the camera body cap. Attach a Lens Care should be taken to press the lens-release button, rotate the lens counter-clockwise until it...
... After confirming that the camera is off, remove the rear lens cap from entering the camera when the lens is used in the camera's bayonet mount. Being careful not to prevent dust from the lens and remove the camera body cap. Attach a Lens Care should be taken to press the lens-release button, rotate the lens counter-clockwise until it...
D90 User's Manual
Page 46
...viewfinder and simplifying the process of CPU lenses equipped with the user and shooting conditions). Turn vibration reduction off by reattaching the lens and turning the camera on a tripod, but leave it much easier to vertical shake), making it on the image in the viewfinder may rattle when... shaken. See the lens manual for example, vibration reduction will be corrected by sliding the VR switch to motion that is not part of 105mm (Nikon ...
...viewfinder and simplifying the process of CPU lenses equipped with the user and shooting conditions). Turn vibration reduction off by reattaching the lens and turning the camera on a tripod, but leave it much easier to vertical shake), making it on the image in the viewfinder may rattle when... shaken. See the lens manual for example, vibration reduction will be corrected by sliding the VR switch to motion that is not part of 105mm (Nikon ...

D90 User's Manual
Page 52
... in focus before X framing pictures in the viewfinder. 1 Remove the lens cap and turn the camera Power switch on. 2 Focus the viewfinder. Rotate the diopter control until the viewfinder display and focus point are in your fingers or fingernails in sharp ...
... in focus before X framing pictures in the viewfinder. 1 Remove the lens cap and turn the camera Power switch on. 2 Focus the viewfinder. Rotate the diopter control until the viewfinder display and focus point are in your fingers or fingernails in sharp ...

D90 User's Manual
Page 53
...n Close Up ...42 m Sports ...42 o Night Portrait...42 Framing Pictures in auto and scene s modes. It assumes that default camera settings are selected when a non-CPU lens is attached, the shutter release will be disabled. 33 sBasic Photography and Playback This chapter outlines the basics of taking and viewing...the Monitor (Live View 43 Basic Playback...48 Deleting Unwanted Photographs 49 Recording and Viewing Movies (Live View 50 A Use a CPU Lens Auto and scene modes are only available with CPU lenses. for information on restoring default settings, see page 258. If these modes are used...
...n Close Up ...42 m Sports ...42 o Night Portrait...42 Framing Pictures in auto and scene s modes. It assumes that default camera settings are selected when a non-CPU lens is attached, the shutter release will be disabled. 33 sBasic Photography and Playback This chapter outlines the basics of taking and viewing...the Monitor (Live View 43 Basic Playback...48 Deleting Unwanted Photographs 49 Recording and Viewing Movies (Live View 50 A Use a CPU Lens Auto and scene modes are only available with CPU lenses. for information on restoring default settings, see page 258. If these modes are used...

D90 User's Manual
Page 54
Remove the lens cap and turn the camera on . K J - Ready fully-charged spare battery or prepare to charge battery. ...and viewfinder displays will fire automatically if the subject is not displayed; Battery partially discharged. Note: When camera is powered by the camera in response to shooting conditions, and s in which the flash will light. instead, a 9 icon ...Photography (i and j Modes) This section describes how to take photographs with the flash off while leaving the camera in control of settings are controlled by optional EH-5a or EH-5 AC adapter, battery level is poorly...
Remove the lens cap and turn the camera on . K J - Ready fully-charged spare battery or prepare to charge battery. ...and viewfinder displays will fire automatically if the subject is not displayed; Battery partially discharged. Note: When camera is powered by the camera in response to shooting conditions, and s in which the flash will light. instead, a 9 icon ...Photography (i and j Modes) This section describes how to take photographs with the flash off while leaving the camera in control of settings are controlled by optional EH-5a or EH-5 AC adapter, battery level is poorly...

D90 User's Manual
Page 57
... focus points. In j mode, shutter speeds slow when lighting is recommended. Focus point A Using a Zoom Lens Use the zoom ring to zoom out). use of the other to zoom in Zoom ring Zoom out 37...viewfinder with your upper body stable. For information on the lens focal length scale index to keep your left. Step 4: Frame the Photograph 1 Ready the camera. Keep your elbows propped lightly against your torso for support ... photographs in your right hand and cradle the camera body or lens with the main subject in live view mode, see page 43. 2 Frame the photograph.
... focus points. In j mode, shutter speeds slow when lighting is recommended. Focus point A Using a Zoom Lens Use the zoom ring to zoom out). use of the other to zoom in Zoom ring Zoom out 37...viewfinder with your upper body stable. For information on the lens focal length scale index to keep your left. Step 4: Frame the Photograph 1 Ready the camera. Keep your elbows propped lightly against your torso for support ... photographs in your right hand and cradle the camera body or lens with the main subject in live view mode, see page 43. 2 Frame the photograph.
D90 User's Manual
Page 60
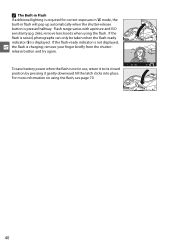
... can only be taken when the flash-ready indicator (M) is not in flash will pop up automatically when the shutter-release button is charging; remove lens hoods when using the flash, see page 70. 40 Flash range varies with aperture and ISO sensitivity (pg. 266); remove your finger briefly from the...
... can only be taken when the flash-ready indicator (M) is not in flash will pop up automatically when the shutter-release button is charging; remove lens hoods when using the flash, see page 70. 40 Flash range varies with aperture and ISO sensitivity (pg. 266); remove your finger briefly from the...

D90 User's Manual
Page 61
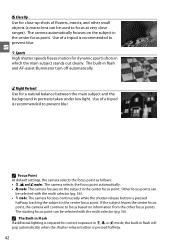
... the composition a sense of depth. n Close up For close up shots of six "scene" modes. If the subject is far from the background or a telephoto lens is poor. 41 Mode Description s k Portrait For portraits. The builtin flash and AF-assist illuminator turn off automatically. k Portrait Use for vivid landscape shots in...
... the composition a sense of depth. n Close up For close up shots of six "scene" modes. If the subject is far from the background or a telephoto lens is poor. 41 Mode Description s k Portrait For portraits. The builtin flash and AF-assist illuminator turn off automatically. k Portrait Use for vivid landscape shots in...
D90 User's Manual
Page 62
... focuses on information from the other small objects (a macro lens can be selected with the multi selector (pg. 56). • m mode: The camera focuses continuously while the shutter-release button is pressed halfway, tracking the subject in portraits taken under low light. The built-...in the center focus point. Use of a tripod is recommended to prevent blur. If the subject leaves the center focus point, the camera will pop automatically when the shutter-release button is pressed halfway. 42 Use of flowers, insects, and other focus points. o Night Portrait Use ...
... focuses on information from the other small objects (a macro lens can be selected with the multi selector (pg. 56). • m mode: The camera focuses continuously while the shutter-release button is pressed halfway, tracking the subject in portraits taken under low light. The built-...in the center focus point. Use of a tripod is recommended to prevent blur. If the subject leaves the center focus point, the camera will pop automatically when the shutter-release button is pressed halfway. 42 Use of flowers, insects, and other focus points. o Night Portrait Use ...

D90 User's Manual
Page 63
The subject will no longer be displayed in the camera monitor. The mirror will be raised and the view through the lens will end in the viewfinder. Displayed if shooting will be visible in 30 s or less. 46 e "No movie" icon Indicates that metering can not be ...
The subject will no longer be displayed in the camera monitor. The mirror will be raised and the view through the lens will end in the viewfinder. Displayed if shooting will be visible in 30 s or less. 46 e "No movie" icon Indicates that metering can not be ...
D90 User's Manual
Page 64
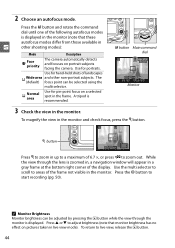
Use for hand-held shots of landscapes 9 Wide area (default) and other shooting modes): Mode Description 8 Face priority The camera automatically detects and focuses on portrait subjects facing the camera. The focus point can be selected using the multi selector. ! X button Exit Press X to zoom in s other non-portrait ... visible in the frame. A Monitor Brightness Monitor brightness can be adjusted by pressing the K button while the view through the lens is displayed in the monitor (note that monitor brightness has no effect on a selected spot in the monitor.
Use for hand-held shots of landscapes 9 Wide area (default) and other shooting modes): Mode Description 8 Face priority The camera automatically detects and focuses on portrait subjects facing the camera. The focus point can be selected using the multi selector. ! X button Exit Press X to zoom in s other non-portrait ... visible in the frame. A Monitor Brightness Monitor brightness can be adjusted by pressing the K button while the view through the lens is displayed in the monitor (note that monitor brightness has no effect on a selected spot in the monitor.

D90 User's Manual
Page 66
... shooting will appear in the monitor under fluorescent, mercury vapor, or sodium lamps or if the camera is selected. The camera will turn off. Live view shooting ends automatically if the lens is complete, the photograph will not appear in the final picture, banding or distortion may also ..., resulting in image noise and unusual colors (the camera may be locked by pressing the AE-L/AF-L button (pg. 88) or (in damage to an hour. At high ambient temperatures, this precaution could result in P, S, A, and M modes) altered using the lens focusing ring. 6 s Take the picture. When ...
... shooting will appear in the monitor under fluorescent, mercury vapor, or sodium lamps or if the camera is selected. The camera will turn off. Live view shooting ends automatically if the lens is complete, the photograph will not appear in the final picture, banding or distortion may also ..., resulting in image noise and unusual colors (the camera may be locked by pressing the AE-L/AF-L button (pg. 88) or (in damage to an hour. At high ambient temperatures, this precaution could result in P, S, A, and M modes) altered using the lens focusing ring. 6 s Take the picture. When ...

D90 User's Manual
Page 67
... the focus point contains areas of the frame. Use an AF-S lens. A The Shooting Information Display To hide or display indicators in the monitor in live view mode, press the R button. The camera will display the view through the lens as shown at right. If a flashing double red border is displayed..., the camera is unable to focus until a face is detected or the shutter-release button is facing ...
... the focus point contains areas of the frame. Use an AF-S lens. A The Shooting Information Display To hide or display indicators in the monitor in live view mode, press the R button. The camera will display the view through the lens as shown at right. If a flashing double red border is displayed..., the camera is unable to focus until a face is detected or the shutter-release button is facing ...


