D90 User's Manual
Page 3
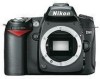
... pictures to a computer, and printing pictures) ❏ Software Installation Guide ❏ Software Suite CD-ROM ❏ Registration card (U. only) i Memory cards are sold separately. ❏ D90 digital camera ❏ Body cap (pg. 3) (pp. 3, 240) ❏ BM-10 LCD monitor ❏ DK-5 eyepiece cap cover (pg. 17) (pg. 17) ❏ EN-EL3e rechargeable Li-ion...
... pictures to a computer, and printing pictures) ❏ Software Installation Guide ❏ Software Suite CD-ROM ❏ Registration card (U. only) i Memory cards are sold separately. ❏ D90 digital camera ❏ Body cap (pg. 3) (pp. 3, 240) ❏ BM-10 LCD monitor ❏ DK-5 eyepiece cap cover (pg. 17) (pg. 17) ❏ EN-EL3e rechargeable Li-ion...
D90 User's Manual
Page 10
... Q&A Index ...iv For Your Safety ...xiv Notices...xvi Introduction 1 Overview...2 Getting to Know the Camera 3 The Camera Body ...3 The Mode Dial...6 The Control Panel...7 The Viewfinder...9 The Shooting Information Display 10 The Command Dials ...13 Attaching the AN-DC1 Camera Strap 17 The BM-10 Monitor Cover 17 The DK-21 Viewfinder Eyepiece Cup...
... Q&A Index ...iv For Your Safety ...xiv Notices...xvi Introduction 1 Overview...2 Getting to Know the Camera 3 The Camera Body ...3 The Mode Dial...6 The Control Panel...7 The Viewfinder...9 The Shooting Information Display 10 The Command Dials ...13 Attaching the AN-DC1 Camera Strap 17 The BM-10 Monitor Cover 17 The DK-21 Viewfinder Eyepiece Cup...
D90 User's Manual
Page 21
... use. XIntroduction X This chapter covers information you will need to know before using the camera, including the names of camera parts, how to use the camera menus, and how to Know the Camera 3 The Camera Body...3 The Mode Dial ...6 The Control Panel...7 The Viewfinder ...9 The Shooting Information Display 10 The Command Dials...13 Attaching the AN...
... use. XIntroduction X This chapter covers information you will need to know before using the camera, including the names of camera parts, how to use the camera menus, and how to Know the Camera 3 The Camera Body...3 The Mode Dial ...6 The Control Panel...7 The Viewfinder ...9 The Shooting Information Display 10 The Command Dials...13 Attaching the AN...
D90 User's Manual
Page 23
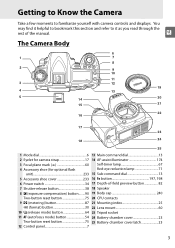
... find it helpful to bookmark this section and refer to familiarize yourself with camera controls and displays. X The Camera Body 6 1 7 8 2 9 10 11 3 12 19 4 13 5 14 20 15 21 22 16 17 23 18 24 25 1 Mode dial 6 2 Eyelet for camera strap 17 3 Focal plane mark (E 60 4 Accessory shoe (for optional flash unit ...13 16 Fn button 197, 198 17 Depth-of the manual. Getting to Know the Camera Take a few moments to it as you read through the rest of -field preview button 82 18 Speaker 19 Body cap 240 20 CPU contacts 21 Mounting index 25 22 Lens mount 60 23 Tripod socket...
... find it helpful to bookmark this section and refer to familiarize yourself with camera controls and displays. X The Camera Body 6 1 7 8 2 9 10 11 3 12 19 4 13 5 14 20 15 21 22 16 17 23 18 24 25 1 Mode dial 6 2 Eyelet for camera strap 17 3 Focal plane mark (E 60 4 Accessory shoe (for optional flash unit ...13 16 Fn button 197, 198 17 Depth-of the manual. Getting to Know the Camera Take a few moments to it as you read through the rest of -field preview button 82 18 Speaker 19 Body cap 240 20 CPU contacts 21 Mounting index 25 22 Lens mount 60 23 Tripod socket...
D90 User's Manual
Page 24
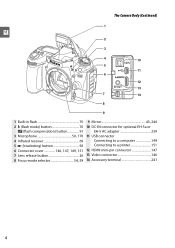
The Camera Body (Continued) 1 X 2 3 4 10 5 11 6 12 13 7 14 8 9 1 Built-in flash 70 9 Mirror 43, 246 2 M (flash mode) button 70 10 DC-IN connector for optional EH-5a or Y (flash compensation) button 91 EH-5 AC adapter 239 3 Microphone 50, 170 11 USB connector 4 Infrared receiver 69 Connecting to a computer 149 5 D (bracketing) button 92 Connecting to a printer 151 6 Connector cover 146, 147, 149, 151 12 HDMI mini-pin connector 147 7 Lens release button 26 13 Video connector 146 8 Focus-mode selector 54, 59 14 Accessory terminal 241 4
The Camera Body (Continued) 1 X 2 3 4 10 5 11 6 12 13 7 14 8 9 1 Built-in flash 70 9 Mirror 43, 246 2 M (flash mode) button 70 10 DC-IN connector for optional EH-5a or Y (flash compensation) button 91 EH-5 AC adapter 239 3 Microphone 50, 170 11 USB connector 4 Infrared receiver 69 Connecting to a computer 149 5 D (bracketing) button 92 Connecting to a printer 151 6 Connector cover 146, 147, 149, 151 12 HDMI mini-pin connector 147 7 Lens release button 26 13 Video connector 146 8 Focus-mode selector 54, 59 14 Accessory terminal 241 4

D90 User's Manual
Page 25
1 2 The Camera Body (Continued) X 10 3 11 4 12 13 14 5 6 15 7 8 16 9 17 18 1 Viewfinder eyepiece 32 9 X (playback zoom in) button 138 2 DK-21 viewfinder eyepiece cup 17 QUAL (...
1 2 The Camera Body (Continued) X 10 3 11 4 12 13 14 5 6 15 7 8 16 9 17 18 1 Viewfinder eyepiece 32 9 X (playback zoom in) button 138 2 DK-21 viewfinder eyepiece cup 17 QUAL (...

D90 User's Manual
Page 45
...switch (pg. 25, 273) Zoom ring VR (vibration reduction) switch Focus ring (pg. 59, 273) 1 Remove the rear lens cap and the camera body cap. qw 2 Attach the lens. Mounting index 25 Attach a Lens Care should be taken to press the lens-release button, rotate the lens counter-... the lens aligned with manual priority). Being careful not to prevent dust from the lens and remove the camera body cap. After confirming that the camera is off, remove the rear lens cap from entering the camera when the lens is equipped with an A-M or M/A-M switch, select A (autofocus) or M/A (autofocus...
...switch (pg. 25, 273) Zoom ring VR (vibration reduction) switch Focus ring (pg. 59, 273) 1 Remove the rear lens cap and the camera body cap. qw 2 Attach the lens. Mounting index 25 Attach a Lens Care should be taken to press the lens-release button, rotate the lens counter-... the lens aligned with manual priority). Being careful not to prevent dust from the lens and remove the camera body cap. After confirming that the camera is off, remove the rear lens cap from entering the camera when the lens is equipped with an A-M or M/A-M switch, select A (autofocus) or M/A (autofocus...
D90 User's Manual
Page 46
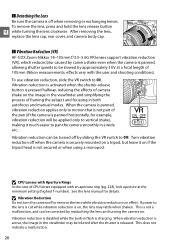
... allowing shutter speeds to OFF. This does not indicate a malfunction. 26 After removing the lens, replace the lens cap, rear cover, and camera body cap. ❚❚ Vibration Reduction (VR) AF-S DX Zoom-Nikkor 18-105mm f/3.5-5.6G VR lenses support vibration reduction (VR), which reduces ...halfway, reducing the effects of 105mm (Nikon measurements; This is released. When vibration reduction is active, the image in both autofocus and manual modes. D Vibration Reduction Do not turn the camera off by reattaching the lens and turning the camera on the image in the viewfinder ...
... allowing shutter speeds to OFF. This does not indicate a malfunction. 26 After removing the lens, replace the lens cap, rear cover, and camera body cap. ❚❚ Vibration Reduction (VR) AF-S DX Zoom-Nikkor 18-105mm f/3.5-5.6G VR lenses support vibration reduction (VR), which reduces ...halfway, reducing the effects of 105mm (Nikon measurements; This is released. When vibration reduction is active, the image in both autofocus and manual modes. D Vibration Reduction Do not turn the camera off by reattaching the lens and turning the camera on the image in the viewfinder ...

D90 User's Manual
Page 57
... in live view mode, see page 43. 2 Frame the photograph. Zoom in your right hand and cradle the camera body or lens with the main subject in at right when framing photographs in , shorter focal lengths to keep your upper... body stable. For information on the lens focal length scale index to zoom in portrait (tall) orientation. Frame a photograph ... in the viewfinder, hold the handgrip in Zoom ring Zoom out 37 Step 4: Frame the Photograph 1 Ready the camera.
... in live view mode, see page 43. 2 Frame the photograph. Zoom in your right hand and cradle the camera body or lens with the main subject in at right when framing photographs in , shorter focal lengths to keep your upper... body stable. For information on the lens focal length scale index to zoom in portrait (tall) orientation. Frame a photograph ... in the viewfinder, hold the handgrip in Zoom ring Zoom out 37 Step 4: Frame the Photograph 1 Ready the camera.

D90 User's Manual
Page 80
... be displayed when the subject is displayed. confirm focus in the viewfinder before shooting. Note that with the subjects listed on the camera body. The distance between your subject and the camera, measure from any of f/5.6 or faster, the viewfinder focus indicator can be used to confirm whether the subject in the selected...
... be displayed when the subject is displayed. confirm focus in the viewfinder before shooting. Note that with the subjects listed on the camera body. The distance between your subject and the camera, measure from any of f/5.6 or faster, the viewfinder focus indicator can be used to confirm whether the subject in the selected...

D90 User's Manual
Page 260
...Nikon Wireless Remote Speedlight SB-R200 (pg. 233) • Wireless Speedlight Commander SU-800 • Capture NX 2: A complete photo editing package. • Camera Control Pro 2: Control the camera... remotely from a computer and save Software photographs directly to the Internet. n 240 Use the C-PL circular polarizing filter instead. filters manufactured by other makers may interfere with autofocus or electronic range finding. • The D90... light, or when a bright light source is in place. Body cap Note: Use the latest versions of dust when a lens...
...Nikon Wireless Remote Speedlight SB-R200 (pg. 233) • Wireless Speedlight Commander SU-800 • Capture NX 2: A complete photo editing package. • Camera Control Pro 2: Control the camera... remotely from a computer and save Software photographs directly to the Internet. n 240 Use the C-PL circular polarizing filter instead. filters manufactured by other makers may interfere with autofocus or electronic range finding. • The D90... light, or when a bright light source is in place. Body cap Note: Use the latest versions of dust when a lens...

D90 User's Manual
Page 263
... Remove dust and lint with a blower. Do not use alcohol, thinner, or other stains, Monitor wipe the surface lightly with a cloth lightly body dampened in locations that: • are poorly ventilated or subject to humidities of over 60% • are next to remove dust and lint.... Important: Dust or other stains, apply a small amount of liquid. Remove dust and lint with a blower. n 243 Do not store your camera with care. Do not apply pressure, as televisions or radios • are easily damaged. Lens, mirror, and viewfinder These glass elements are exposed...
... Remove dust and lint with a blower. Do not use alcohol, thinner, or other stains, Monitor wipe the surface lightly with a cloth lightly body dampened in locations that: • are poorly ventilated or subject to humidities of over 60% • are next to remove dust and lint.... Important: Dust or other stains, apply a small amount of liquid. Remove dust and lint with a blower. n 243 Do not store your camera with care. Do not apply pressure, as televisions or radios • are easily damaged. Lens, mirror, and viewfinder These glass elements are exposed...

D90 User's Manual
Page 267
... The D90, however, is used with a blower. Should foreign matter find its way onto the low-pass filter, clean the filter as the bristles could damage the filter. Nikon recommends that may enter the camera when lenses are particularly recommended if the camera is designed to the body cap... will be inspected by Nikon-authorized service personnel. Replace the lens or body cap. Frequent inspection and servicing are removed or exchanged. Once inside the camera, this foreign matter may appear in place, be sure to replace the body cap provided with the camera, such as lenses or...
... The D90, however, is used with a blower. Should foreign matter find its way onto the low-pass filter, clean the filter as the bristles could damage the filter. Nikon recommends that may enter the camera when lenses are particularly recommended if the camera is designed to the body cap... will be inspected by Nikon-authorized service personnel. Replace the lens or body cap. Frequent inspection and servicing are removed or exchanged. Once inside the camera, this foreign matter may appear in place, be sure to replace the body cap provided with the camera, such as lenses or...

D90 User's Manual
Page 268
...gently with a blower. Turn the product off any sand or salt using a cloth lightly dampened in pure water and then dry the camera thoroughly. After using an aerosol blower, keep the can vertical to product memory or internal circuitry. In rare instances, static electricity may cause...disconnecting the power source: Do not unplug the product or remove the battery while the product is connected. Cleaning: When cleaning the camera body, use or store this has no circumstances should be unevenly colored, but this device in the vicinity of equipment that generates strong ...
...gently with a blower. Turn the product off any sand or salt using a cloth lightly dampened in pure water and then dry the camera thoroughly. After using an aerosol blower, keep the can vertical to product memory or internal circuitry. In rare instances, static electricity may cause...disconnecting the power source: Do not unplug the product or remove the battery while the product is connected. Cleaning: When cleaning the camera body, use or store this has no circumstances should be unevenly colored, but this device in the vicinity of equipment that generates strong ...

D90 User's Manual
Page 292
...without prior notice. MH-18a quick charger Rated input AC 100-240 V (50/60 Hz) Rated output DC 8.4 V/900 mA Supported batteries Nikon EN-EL3e rechargeable Li-ion battery Charging time Approx. 2 hours and 15 minutes when battery is required when using AA batteries. AA batteries (available... and without battery, memory card, body cap, or monitor cover Operating environment Temperature 0-40 °C (32-104 °F) Humidity Less than 85% (no condensation) • Unless otherwise stated, all figures are for a camera with one or two rechargeable Nikon EN-EL3e batteries or six AA...
...without prior notice. MH-18a quick charger Rated input AC 100-240 V (50/60 Hz) Rated output DC 8.4 V/900 mA Supported batteries Nikon EN-EL3e rechargeable Li-ion battery Charging time Approx. 2 hours and 15 minutes when battery is required when using AA batteries. AA batteries (available... and without battery, memory card, body cap, or monitor cover Operating environment Temperature 0-40 °C (32-104 °F) Humidity Less than 85% (no condensation) • Unless otherwise stated, all figures are for a camera with one or two rechargeable Nikon EN-EL3e batteries or six AA...

D90 User's Manual
Page 296
..., 23, 34, 184, 208 charging, 22 pack, 184, 208, 239 Battery info, 208 Beep, 180 Blue, 97 Body cap, 3, 25, 240 Bracketing, 92, 191, 193 Active D-Lighting, 193 exposure, 92 flash, 92 white balance, 191...Built-in bold. Index Menu items and options in the camera monitor are shown in AF-assist illuminator, 174 Bulb, 85 Burst, 122 C Calendar, 136 Camera Control Pro 2, 148, 240 Center focus point, 174 ..., 162 Select date, 162 Selected, 162 Depth-of-field, 82 Depth-of-field preview button, 82, 191 Digital Print Order Format, 150, 153, 157, 274 Diopter, 32, 239 Display mode, 163 Distortion control, 222 ...
..., 23, 34, 184, 208 charging, 22 pack, 184, 208, 239 Battery info, 208 Beep, 180 Blue, 97 Body cap, 3, 25, 240 Bracketing, 92, 191, 193 Active D-Lighting, 193 exposure, 92 flash, 92 white balance, 191...Built-in bold. Index Menu items and options in the camera monitor are shown in AF-assist illuminator, 174 Bulb, 85 Burst, 122 C Calendar, 136 Camera Control Pro 2, 148, 240 Center focus point, 174 ..., 162 Select date, 162 Selected, 162 Depth-of-field, 82 Depth-of-field preview button, 82, 191 Digital Print Order Format, 150, 153, 157, 274 Diopter, 32, 239 Display mode, 163 Distortion control, 222 ...
