
Users Manual - English for customers in the Americas
Page 47
... select an item, 1 or 3 to shooting mode. 23 if daylight saving time is set to the current date and time (note that the camera uses a 24-hour clock). 8 Set date format. Press the shutter-release button halfway to exit to change. Press 1 or 3 to choose the order in the local time zone, press... the clock is in effect in which the year, month, and day will be displayed and press J. 9 Exit to highlight On and press J. 7 Set the date and time. Select Date format and press 2.
... select an item, 1 or 3 to shooting mode. 23 if daylight saving time is set to the current date and time (note that the camera uses a 24-hour clock). 8 Set date format. Press the shutter-release button halfway to exit to change. Press 1 or 3 to choose the order in the local time zone, press... the clock is in effect in which the year, month, and day will be displayed and press J. 9 Exit to highlight On and press J. 7 Set the date and time. Select Date format and press 2.

Users Manual - English for customers in the Americas
Page 230
...connector and AC adapter. If the & icon flashes in the information display, the clock has been reset and the date and time recorded with any new photographs will power the clock for about three months. Two days of the lettering ...off automatically if no operations are performed for about 10 seconds. Set the clock to the correct time and date using the Time zone and date > Date and time option in the information display, see A > Custom Setting c4 (Monitor off delay, 0 264...clear shooting or flash information from the monitor, press the R button or press the shutter-release button halfway.
...connector and AC adapter. If the & icon flashes in the information display, the clock has been reset and the date and time recorded with any new photographs will power the clock for about three months. Two days of the lettering ...off automatically if no operations are performed for about 10 seconds. Set the clock to the correct time and date using the Time zone and date > Date and time option in the information display, see A > Custom Setting c4 (Monitor off delay, 0 264...clear shooting or flash information from the monitor, press the R button or press the shutter-release button halfway.

Users Manual - English for customers in the Americas
Page 397
.............264 Synchronized release 264 T Ten-pin remote terminal..2, 221, 297 Text entry 273 Thumbnail 223 TIFF (RGB 88, 92 Tilting monitor 10 Time 23, 271 Time zone 22, 271 Time zone and date 22, 271 Time-lapse movie 259 Timer 116 Toning (Set Picture Control) .........179 Touch controls 12, 226, 274 Touch...-point AF 100, 103 Single-servo AF 41, 98, 260 Size 74, 91, 278 Skylight 279 Slide show 249 Slot 93, 224, 256 Slot empty release lock 276 Slot selection 93, 224 Slow sync 192 Slow-motion movie 69, 70 Slow-motion playback 76 Smart device 222, 249, 275 Smoothing 184...
.............264 Synchronized release 264 T Ten-pin remote terminal..2, 221, 297 Text entry 273 Thumbnail 223 TIFF (RGB 88, 92 Tilting monitor 10 Time 23, 271 Time zone 22, 271 Time zone and date 22, 271 Time-lapse movie 259 Timer 116 Toning (Set Picture Control) .........179 Touch controls 12, 226, 274 Touch...-point AF 100, 103 Single-servo AF 41, 98, 260 Size 74, 91, 278 Skylight 279 Slide show 249 Slot 93, 224, 256 Slot empty release lock 276 Slot selection 93, 224 Slow sync 192 Slow-motion movie 69, 70 Slow-motion playback 76 Smart device 222, 249, 275 Smoothing 184...

Users Manual - English for customers in Asia and Africa
Page 47
Press the shutter-release button halfway to exit to change. Daylight saving time is off . Select Date format and press 2. Select Daylight saving time and press 2. Press 4 or 2 to select an item, 1 or 3 to shooting mode. 23 if daylight saving time is set to the current date and time (note that the camera ...the clock is in effect in which the year, month, and day will be displayed and press J. 9 Exit to highlight On and press J. 7 Set the date and time. 6 Turn daylight saving time on or off by default; Press 1 or 3 to choose the order in the local time zone, press 1 to ...
Press the shutter-release button halfway to exit to change. Daylight saving time is off . Select Date format and press 2. Select Daylight saving time and press 2. Press 4 or 2 to select an item, 1 or 3 to shooting mode. 23 if daylight saving time is set to the current date and time (note that the camera ...the clock is in effect in which the year, month, and day will be displayed and press J. 9 Exit to highlight On and press J. 7 Set the date and time. 6 Turn daylight saving time on or off by default; Press 1 or 3 to choose the order in the local time zone, press 1 to ...

Users Manual - English for customers in Asia and Africa
Page 230
... installed or the camera is powered by an optional power connector and AC adapter. Set the clock to the correct time and date using the Time zone and date > Date and time option in the information display, see A > Custom Setting c4 (Monitor off automatically if no operations are performed for...clear shooting or flash information from the monitor, press the R button or press the shutter-release button halfway. If the & icon flashes in the information display, the clock has been reset and the date and time recorded with any new photographs will power the clock for about three months. Two...
... installed or the camera is powered by an optional power connector and AC adapter. Set the clock to the correct time and date using the Time zone and date > Date and time option in the information display, see A > Custom Setting c4 (Monitor off automatically if no operations are performed for...clear shooting or flash information from the monitor, press the R button or press the shutter-release button halfway. If the & icon flashes in the information display, the clock has been reset and the date and time recorded with any new photographs will power the clock for about three months. Two...

Users Manual - English for customers in Asia and Africa
Page 397
.............264 Synchronized release 264 T Ten-pin remote terminal..2, 221, 297 Text entry 273 Thumbnail 223 TIFF (RGB 88, 92 Tilting monitor 10 Time 23, 271 Time zone 22, 271 Time zone and date 22, 271 Time-lapse movie 259 Timer 116 Toning (Set Picture Control) .........179 Touch controls 12, 226, 274 Touch...-point AF 100, 103 Single-servo AF 41, 98, 260 Size 74, 91, 278 Skylight 279 Slide show 249 Slot 93, 224, 256 Slot empty release lock 276 Slot selection 93, 224 Slow sync 192 Slow-motion movie 69, 70 Slow-motion playback 76 Smart device 222, 249, 275 Smoothing 184...
.............264 Synchronized release 264 T Ten-pin remote terminal..2, 221, 297 Text entry 273 Thumbnail 223 TIFF (RGB 88, 92 Tilting monitor 10 Time 23, 271 Time zone 22, 271 Time zone and date 22, 271 Time-lapse movie 259 Timer 116 Toning (Set Picture Control) .........179 Touch controls 12, 226, 274 Touch...-point AF 100, 103 Single-servo AF 41, 98, 260 Size 74, 91, 278 Skylight 279 Slide show 249 Slot 93, 224, 256 Slot empty release lock 276 Slot selection 93, 224 Slow sync 192 Slow-motion movie 69, 70 Slow-motion playback 76 Smart device 222, 249, 275 Smoothing 184...

Users Manual - English for customers in Europe
Page 47
... default; Press 1 or 3 to choose the order in the local time zone, press 1 to the current date and time (note that the camera uses a 24-hour clock). 8 Set date format. Press the shutter-release button halfway to exit to change. Press 4 or 2 to select an item, 1 or 3 to shooting ...mode. 23 Select Date format and press 2. Select Date and time and press 2. Select Daylight saving time and press 2. ...
... default; Press 1 or 3 to choose the order in the local time zone, press 1 to the current date and time (note that the camera uses a 24-hour clock). 8 Set date format. Press the shutter-release button halfway to exit to change. Press 4 or 2 to select an item, 1 or 3 to shooting ...mode. 23 Select Date format and press 2. Select Date and time and press 2. Select Daylight saving time and press 2. ...

Users Manual - English for customers in Europe
Page 230
...clock for about three months. A Turning the Monitor Off To clear shooting or flash information from the monitor, press the R button or press the shutter-release button halfway. If the & icon flashes in the information display, see A > Custom Setting c4 (Monitor off automatically, see B > Information display (0... will turn off automatically if no operations are performed for about 10 seconds. Set the clock to the correct time and date using the Time zone and date > Date and time option in the setup menu (0 271). A The & Indicator The camera clock is powered by an independent,...
...clock for about three months. A Turning the Monitor Off To clear shooting or flash information from the monitor, press the R button or press the shutter-release button halfway. If the & icon flashes in the information display, see A > Custom Setting c4 (Monitor off automatically, see B > Information display (0... will turn off automatically if no operations are performed for about 10 seconds. Set the clock to the correct time and date using the Time zone and date > Date and time option in the setup menu (0 271). A The & Indicator The camera clock is powered by an independent,...

Users Manual - English for customers in Europe
Page 397
.............264 Synchronized release 264 T Ten-pin remote terminal..2, 221, 297 Text entry 273 Thumbnail 223 TIFF (RGB 88, 92 Tilting monitor 10 Time 23, 271 Time zone 22, 271 Time zone and date 22, 271 Time-lapse movie 259 Timer 116 Toning (Set Picture Control) .........179 Touch controls 12, 226, 274 Touch...-point AF 100, 103 Single-servo AF 41, 98, 260 Size 74, 91, 278 Skylight 279 Slide show 249 Slot 93, 224, 256 Slot empty release lock 276 Slot selection 93, 224 Slow sync 192 Slow-motion movie 69, 70 Slow-motion playback 76 Smart device 222, 249, 275 Smoothing 184...
.............264 Synchronized release 264 T Ten-pin remote terminal..2, 221, 297 Text entry 273 Thumbnail 223 TIFF (RGB 88, 92 Tilting monitor 10 Time 23, 271 Time zone 22, 271 Time zone and date 22, 271 Time-lapse movie 259 Timer 116 Toning (Set Picture Control) .........179 Touch controls 12, 226, 274 Touch...-point AF 100, 103 Single-servo AF 41, 98, 260 Size 74, 91, 278 Skylight 279 Slide show 249 Slot 93, 224, 256 Slot empty release lock 276 Slot selection 93, 224 Slow sync 192 Slow-motion movie 69, 70 Slow-motion playback 76 Smart device 222, 249, 275 Smoothing 184...

Menu Guide - English
Page 6
...: Release Button to Use Dial 147 f7: Reverse Indicators 148 f8: Live View Button Options 148 f9: D Switch 148 f10: Assign MB-D18 Buttons 149 g: Movie 152 g1: Custom Control Assignment 152 g2: Highlight Brightness 156 B The Setup Menu: Camera Setup 157 Format Memory Card 158 Language 158 Time Zone and Date...
...: Release Button to Use Dial 147 f7: Reverse Indicators 148 f8: Live View Button Options 148 f9: D Switch 148 f10: Assign MB-D18 Buttons 149 g: Movie 152 g1: Custom Control Assignment 152 g2: Highlight Brightness 156 B The Setup Menu: Camera Setup 157 Format Memory Card 158 Language 158 Time Zone and Date...

Menu Guide - English
Page 17
... (0 152) Preview button Preview button + y Fn1 button Fn1 button + y Fn2 button Sub-selector center Sub-selector center + y Shutter-release button g2 Highlight brightness (0 156) ❚❚ Setup Menu Defaults Option Time zone and date (0 159) Sync with smart device Daylight saving time Monitor brightness (0 160) Menus/playback Live view Monitor color balance...
... (0 152) Preview button Preview button + y Fn1 button Fn1 button + y Fn2 button Sub-selector center Sub-selector center + y Shutter-release button g2 Highlight brightness (0 156) ❚❚ Setup Menu Defaults Option Time zone and date (0 159) Sync with smart device Daylight saving time Monitor brightness (0 160) Menus/playback Live view Monitor color balance...

Menu Guide - English
Page 70
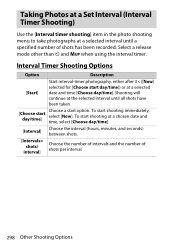
...and the number of shots has been recorded. Interval Timer Shooting G button ➜ C photo shooting menu Take photographs at a chosen date and time, select Choose day/time. Option Description Start interval timer shooting, either after 3 s (Now selected for Choose start shooting... been taken. To start option. Shooting will continue at a selected Start date and time (Choose day/time). Interval Choose the interval (hours, minutes, and seconds) between shots. Select a release mode other than M (note that exposure smoothing only takes effect in exposure...
...and the number of shots has been recorded. Interval Timer Shooting G button ➜ C photo shooting menu Take photographs at a chosen date and time, select Choose day/time. Option Description Start interval timer shooting, either after 3 s (Now selected for Choose start shooting... been taken. To start option. Shooting will continue at a selected Start date and time (Choose day/time). Interval Choose the interval (hours, minutes, and seconds) between shots. Select a release mode other than M (note that exposure smoothing only takes effect in exposure...

Menu Guide - English
Page 157
...A See Also For menu defaults, see "Setup Menu Defaults" (0 17). Menu Guide 157 G button Option Format memory card Language Time zone and date Monitor brightness Monitor color balance Virtual horizon Information display AF fine-tune Non-CPU lens data Clean image sensor Lock mirror up for cleaning * Image ... Eye-Fi upload 185 169 Conformity marking 186 170 MB-D18 battery type 187 173 Battery order 188 175 Battery info 189 176 Slot empty release lock 190 177 Save/load settings 191 178 Reset all settings 193 178 Firmware version 193 179 * Not available when battery is low. B The ...
...A See Also For menu defaults, see "Setup Menu Defaults" (0 17). Menu Guide 157 G button Option Format memory card Language Time zone and date Monitor brightness Monitor color balance Virtual horizon Information display AF fine-tune Non-CPU lens data Clean image sensor Lock mirror up for cleaning * Image ... Eye-Fi upload 185 169 Conformity marking 186 170 MB-D18 battery type 187 173 Battery order 188 175 Battery info 189 176 Slot empty release lock 190 177 Save/load settings 191 178 Reset all settings 193 178 Firmware version 193 179 * Not available when battery is low. B The ...

Menu Guide - English
Page 187
... HR6 Ni-MH AA batteries. A Using AA Batteries The capacity of AA batteries drops sharply at warmer temperatures. Menu Guide 187 due to their expiry date. Low battery. Change batteries. Select when using FR6 lithium AA batteries. Some AA batteries cannot be used if no alternative is used ; The camera shows.... d d (flashes) Description Batteries fully charged. Option s LR6 (AA alkaline) t HR6 (AA Ni-MH) u FR6 (AA lithium) Description Select when using LR6 alkaline AA batteries. Shutter release disabled.
... HR6 Ni-MH AA batteries. A Using AA Batteries The capacity of AA batteries drops sharply at warmer temperatures. Menu Guide 187 due to their expiry date. Low battery. Change batteries. Select when using FR6 lithium AA batteries. Some AA batteries cannot be used if no alternative is used ; The camera shows.... d d (flashes) Description Batteries fully charged. Option s LR6 (AA alkaline) t HR6 (AA Ni-MH) u FR6 (AA lithium) Description Select when using LR6 alkaline AA batteries. Shutter release disabled.

Menu Guide - English
Page 193
...G button ➜ B setup menu Reset all settings except Language and Time zone and date to camera. Note that Save/load settings is only available when a memory card is .... Menu Option Wireless remote (WR) options Setup Assign remote (WR) Fn button Eye-Fi upload Slot empty release lock All My Menu items My Menu/ Recent Settings All recent settings Choose tab Settings saved using the Save/load... "NCSETUP" and ending with two characters that you save settings using the D850 can be able to load settings if the file name is only available if the card contains saved settings.
...G button ➜ B setup menu Reset all settings except Language and Time zone and date to camera. Note that Save/load settings is only available when a memory card is .... Menu Option Wireless remote (WR) options Setup Assign remote (WR) Fn button Eye-Fi upload Slot empty release lock All My Menu items My Menu/ Recent Settings All recent settings Choose tab Settings saved using the Save/load... "NCSETUP" and ending with two characters that you save settings using the D850 can be able to load settings if the file name is only available if the card contains saved settings.
Users Manual
Page 12
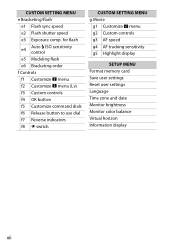
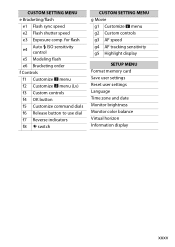
... e5 Modeling flash e6 Bracketing order f Controls f1 Customize i menu f2 Customize i menu (Lv) f3 Custom controls f4 OK button f5 Customize command dials f6 Release button to use dial f7 Reverse indicators f8 D switch CUSTOM SETTING MENU g Movie g1 Customize i menu g2 Custom controls g3 AF speed g4 AF tracking... sensitivity g5 Highlight display SETUP MENU Format memory card Save user settings Reset user settings Language Time zone and date Monitor brightness Monitor color balance Virtual horizon Information display xii
... e5 Modeling flash e6 Bracketing order f Controls f1 Customize i menu f2 Customize i menu (Lv) f3 Custom controls f4 OK button f5 Customize command dials f6 Release button to use dial f7 Reverse indicators f8 D switch CUSTOM SETTING MENU g Movie g1 Customize i menu g2 Custom controls g3 AF speed g4 AF tracking... sensitivity g5 Highlight display SETUP MENU Format memory card Save user settings Reset user settings Language Time zone and date Monitor brightness Monitor color balance Virtual horizon Information display xii
Reference Manual
Page 35
...e6 Bracketing order f Controls f1 Customize i menu f2 Customize i menu (Lv) f3 Custom controls f4 OK button f5 Customize command dials f6 Release button to use dial f7 Reverse indicators f8 D switch CUSTOM SETTING MENU g Movie g1 Customize i menu g2 Custom controls g3 AF speed g4... AF tracking sensitivity g5 Highlight display SETUP MENU Format memory card Save user settings Reset user settings Language Time zone and date Monitor brightness Monitor color balance Virtual horizon Information display xxxv CUSTOM SETTING MENU e Bracketing/flash e1 Flash sync speed e2 Flash ...
...e6 Bracketing order f Controls f1 Customize i menu f2 Customize i menu (Lv) f3 Custom controls f4 OK button f5 Customize command dials f6 Release button to use dial f7 Reverse indicators f8 D switch CUSTOM SETTING MENU g Movie g1 Customize i menu g2 Custom controls g3 AF speed g4... AF tracking sensitivity g5 Highlight display SETUP MENU Format memory card Save user settings Reset user settings Language Time zone and date Monitor brightness Monitor color balance Virtual horizon Information display xxxv CUSTOM SETTING MENU e Bracketing/flash e1 Flash sync speed e2 Flash ...
Reference Manual
Page 344
... number of shots per interval. 298 Other Shooting Options To start shooting at a selected date and time [Choose day/time]. Select a release mode other than E and MUP when using the interval timer. To start day/time]) or at a chosen date and time, select [Choose day/time]. [Interval] Choose the interval (hours, minutes, and...
... number of shots per interval. 298 Other Shooting Options To start shooting at a selected date and time [Choose day/time]. Select a release mode other than E and MUP when using the interval timer. To start day/time]) or at a chosen date and time, select [Choose day/time]. [Interval] Choose the interval (hours, minutes, and...
Reference Manual
Page 752
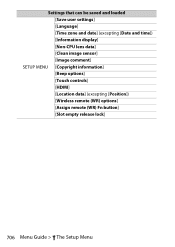
Settings that can be saved and loaded [Save user settings] [Language] [Time zone and date] (excepting [Date and time]) [Information display] [Non-CPU lens data] [Clean image sensor] [Image comment] SETUP MENU [Copyright information] [Beep options] [Touch controls] [HDMI] [Location data] (excepting [Position]) [Wireless remote (WR) options] [Assign remote (WR) Fn button] [Slot empty release lock] 706 Menu Guide > B The Setup Menu
Settings that can be saved and loaded [Save user settings] [Language] [Time zone and date] (excepting [Date and time]) [Information display] [Non-CPU lens data] [Clean image sensor] [Image comment] SETUP MENU [Copyright information] [Beep options] [Touch controls] [HDMI] [Location data] (excepting [Position]) [Wireless remote (WR) options] [Assign remote (WR) Fn button] [Slot empty release lock] 706 Menu Guide > B The Setup Menu
Reference Manual
Page 938
...correction 728 Red-eye reduction 102, 465 Release button to use dial............641 Release mode 73, 178 Release mode dial 73 Release mode dial lock release .. 73 Remote flash photography.........477 Remote ...Predictive focus tracking 141 Preset manual (White balance).89, 197, 209 Press the shutter-release button all settings 708 Reset custom settings 590 Reset movie shooting menu .....572 Reset ...S Quick crop 362, 377 Quick retouch 727 Quick sharp 247 Quiet continuous shutter-release .. 74, 180 Quiet shutter-release 74, 180 892 Index S (small 97, 137 Saturation 247 Save original (...
...correction 728 Red-eye reduction 102, 465 Release button to use dial............641 Release mode 73, 178 Release mode dial 73 Release mode dial lock release .. 73 Remote flash photography.........477 Remote ...Predictive focus tracking 141 Preset manual (White balance).89, 197, 209 Press the shutter-release button all settings 708 Reset custom settings 590 Reset movie shooting menu .....572 Reset ...S Quick crop 362, 377 Quick retouch 727 Quick sharp 247 Quiet continuous shutter-release .. 74, 180 Quiet shutter-release 74, 180 892 Index S (small 97, 137 Saturation 247 Save original (...

