
Reference Manual
Page 6
... The Information Display...5 The Command Dial ...7 The Viewfinder...10 Camera Menus...11 Using Camera Menus ...12 First Steps ...14 Charge the Battery ...14 Insert the Battery ...15 Attach a Lens...17 Basic Setup...19 Insert a Memory Card...21 Format the Memory Card ...22 Adjust Viewfinder Focus ...23 Basic... Photography 25 Battery Level and Card Capacity 25 "Point-and-Shoot" Photography (i and j Modes 26 Creative Photography (Scene Modes 30 The Mode Dial...30 k ...
... The Information Display...5 The Command Dial ...7 The Viewfinder...10 Camera Menus...11 Using Camera Menus ...12 First Steps ...14 Charge the Battery ...14 Insert the Battery ...15 Attach a Lens...17 Basic Setup...19 Insert a Memory Card...21 Format the Memory Card ...22 Adjust Viewfinder Focus ...23 Basic... Photography 25 Battery Level and Card Capacity 25 "Point-and-Shoot" Photography (i and j Modes 26 Creative Photography (Scene Modes 30 The Mode Dial...30 k ...

Reference Manual
Page 11
... Notes 197 Compatible Lenses...197 Compatible CPU Lenses ...197 Compatible Non-CPU Lenses 199 Optional Flash Units (Speedlights 202 The Nikon Creative Lighting System (CLS 203 Other Accessories ...206 Approved Memory Cards 207 Attaching a Power Connector and AC Adapter 208 Caring... for the Camera...209 Storage...209 Cleaning ...209 The Low-Pass Filter...210 Caring for the Camera and Battery: Cautions 214 Available Settings ...216 Memory Card Capacity ...218 Exposure Program (Mode P 219 Troubleshooting ...220 Display ...220 Shooting (All Modes) ...
... Notes 197 Compatible Lenses...197 Compatible CPU Lenses ...197 Compatible Non-CPU Lenses 199 Optional Flash Units (Speedlights 202 The Nikon Creative Lighting System (CLS 203 Other Accessories ...206 Approved Memory Cards 207 Attaching a Power Connector and AC Adapter 208 Caring... for the Camera...209 Storage...209 Cleaning ...209 The Low-Pass Filter...210 Caring for the Camera and Battery: Cautions 214 Available Settings ...216 Memory Card Capacity ...218 Exposure Program (Mode P 219 Troubleshooting ...220 Display ...220 Shooting (All Modes) ...

Reference Manual
Page 12
...in the presence of flammable gas, as the result of a fall or other accident, remove the battery and/or AC adapter and then take the equipment to a Nikon-authorized service center for inspection. Particular care should be observed when photographing infants, when the flash ...safety instructions where all warnings before using this equipment. After removing the battery, take the product to observe this could cause temporary visual impairment. A Keep out of reach of children Failure to a Nikon-authorized service center for inspection. Should the product break open as this...
...in the presence of flammable gas, as the result of a fall or other accident, remove the battery and/or AC adapter and then take the equipment to a Nikon-authorized service center for inspection. Particular care should be observed when photographing infants, when the flash ...safety instructions where all warnings before using this equipment. After removing the battery, take the product to observe this could cause temporary visual impairment. A Keep out of reach of children Failure to a Nikon-authorized service center for inspection. Should the product break open as this...
Reference Manual
Page 13
...8226; Do not expose the battery to flame or to observe this precaution could result in this precaution could result in electric shock. • Do not use immediately should be hot immediately after use only the cables provided or sold by Nikon for use in this precaution could... cause hearing loss or damage the equipment. A Use appropriate cables When connecting cables to maintain compliance with product regulations. Observe the following precautions when handling batteries for the purpose to the input and...
...8226; Do not expose the battery to flame or to observe this precaution could result in this precaution could result in electric shock. • Do not use immediately should be hot immediately after use only the cables provided or sold by Nikon for use in this precaution could... cause hearing loss or damage the equipment. A Use appropriate cables When connecting cables to maintain compliance with product regulations. Observe the following precautions when handling batteries for the purpose to the input and...

Reference Manual
Page 14
... any errors or omissions to the attention of the Nikon representative in your area (address provided separately). This symbol indicates that this product. • While every effort has been made to ensure that the battery is to be collected separately. Notice for separate collection... at any time and without Nikon's prior written permission. • Nikon reserves the right to change the specifications of the hardware and software described...
... any errors or omissions to the attention of the Nikon representative in your area (address provided separately). This symbol indicates that this product. • While every effort has been made to ensure that the battery is to be collected separately. Notice for separate collection... at any time and without Nikon's prior written permission. • Nikon reserves the right to change the specifications of the hardware and software described...

Reference Manual
Page 15
...may expose you to lead, a chemical known to • Increase the separation between the the State of California to provide D5100 reasonable protection against harmful CAUTIONS interference in the State of the proper configuration for Customers in a residential installation. Tel.: 631-547...that any radio frequency energy and, if not installed changes or modifications made to communications. Nikon Inc., 1300 Walt Whitman Road, Melville, New York 11747-3064, U.S.A. The Battery Charger IMPORTANT SAFETY INSTRUCTIONS-SAVE THESE INSTRUCTIONS DANGER-TO REDUCE THE RISK OF FIRE OR ...
...may expose you to lead, a chemical known to • Increase the separation between the the State of California to provide D5100 reasonable protection against harmful CAUTIONS interference in the State of the proper configuration for Customers in a residential installation. Tel.: 631-547...that any radio frequency energy and, if not installed changes or modifications made to communications. Nikon Inc., 1300 Walt Whitman Road, Melville, New York 11747-3064, U.S.A. The Battery Charger IMPORTANT SAFETY INSTRUCTIONS-SAVE THESE INSTRUCTIONS DANGER-TO REDUCE THE RISK OF FIRE OR ...

Reference Manual
Page 17
...test shot to ensure that the camera is inspected or serviced. Only Nikon brand electronic accessories (including chargers, batteries, AC adapters, and flash accessories) certified by the original retailer or a Nikon-authorized service representative once every one to two years, and that it ... (such as lenses or optional flash units, should be available from product malfunction. Additional information may result from the Nikon representative in the batteries overheating, igniting, rupturing, or leaking. See the following sites: • For users in the U.S.A.: http://www.nikonusa...
...test shot to ensure that the camera is inspected or serviced. Only Nikon brand electronic accessories (including chargers, batteries, AC adapters, and flash accessories) certified by the original retailer or a Nikon-authorized service representative once every one to two years, and that it ... (such as lenses or optional flash units, should be available from product malfunction. Additional information may result from the Nikon representative in the batteries overheating, igniting, rupturing, or leaking. See the following sites: • For users in the U.S.A.: http://www.nikonusa...

Reference Manual
Page 20
...) button Deleting pictures during playback 133 18 Power connector cover for optional power connector 208 19 Battery-chamber cover latch 15 20 Battery-chamber cover........ 15 21 W (thumbnail/playback zoom out) button 129 Q (help) button 11 22 Battery latch 15 A The Power Switch Rotate the power switch as shown to turn the camera...
...) button Deleting pictures during playback 133 18 Power connector cover for optional power connector 208 19 Battery-chamber cover latch 15 20 Battery-chamber cover........ 15 21 W (thumbnail/playback zoom out) button 129 Q (help) button 11 22 Battery latch 15 A The Power Switch Rotate the power switch as shown to turn the camera...

Reference Manual
Page 23
... units ... 205 8 Print date indicator 163 9 Auto ISO sensitivity indicator 155 10 Multiple exposure indicator 79 11 HDR indicator 76 12 "Beep" indicator 161 13 Battery indicator 25 14 GPS connection indicator...174 15 Eye-Fi connection indicator 175 16 Help icon 11, 224 17 ADL bracketing amount ..... 90 18 Exposure...
... units ... 205 8 Print date indicator 163 9 Auto ISO sensitivity indicator 155 10 Multiple exposure indicator 79 11 HDR indicator 76 12 "Beep" indicator 161 13 Battery indicator 25 14 GPS connection indicator...174 15 Eye-Fi connection indicator 175 16 Help icon 11, 224 17 ADL bracketing amount ..... 90 18 Exposure...
Reference Manual
Page 28
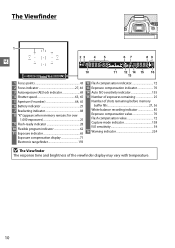
... 12 14 15 16 13 1 Focus points 43 2 Focus indicator 27, 46 3 Autoexposure (AE) lock indicator 69 4 Shutter speed 63, 65 5 Aperture (f-number 64, 65 6 Battery indicator 25 7 Bracketing indicator 88 8 "K" (appears when memory remains for over 1,000 exposures 25 9 Flash-ready indicator 28 10 Flexible program indicator 62 11 Exposure...
... 12 14 15 16 13 1 Focus points 43 2 Focus indicator 27, 46 3 Autoexposure (AE) lock indicator 69 4 Shutter speed 63, 65 5 Aperture (f-number 64, 65 6 Battery indicator 25 7 Bracketing indicator 88 8 "K" (appears when memory remains for over 1,000 exposures 25 9 Flash-ready indicator 28 10 Flexible program indicator 62 11 Exposure...
Reference Manual
Page 32
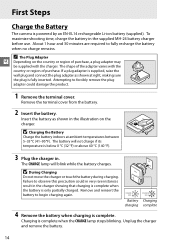
...To maximize shooting time, charge the battery in . Battery Charging charging complete 4 Remove the battery when charging is complete when the CHARGE lamp stops blinking. Remove the terminal cover from the battery. 2 Insert the battery. D Charging the Battery Charge the battery indoors at right, making sure the...176;F) or above 60 °C (140 °F). 3 Plug the charger in the supplied MH-24 battery charger before use. Remove and reinsert the battery to fully recharge the battery when no charge remains. Charging is complete. The shape of purchase. If a plug adapter is fully ...
...To maximize shooting time, charge the battery in . Battery Charging charging complete 4 Remove the battery when charging is complete when the CHARGE lamp stops blinking. Remove the terminal cover from the battery. 2 Insert the battery. D Charging the Battery Charge the battery indoors at right, making sure the...176;F) or above 60 °C (140 °F). 3 Plug the charger in the supplied MH-24 battery charger before use. Remove and reinsert the battery to fully recharge the battery when no charge remains. Charging is complete. The shape of purchase. If a plug adapter is fully ...
Reference Manual
Page 33
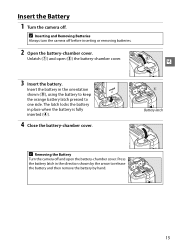
... camera off and open (w) the battery-chamber cover. 3 Insert the battery. w X q r Battery latch A Removing the Battery Turn the camera off before inserting or removing batteries. 2 Open the battery-chamber cover. Unlatch (q) and open the battery-chamber cover. Insert the battery in the direction shown by the arrow to e one side. Press the battery latch in the orientation shown (e), using...
... camera off and open (w) the battery-chamber cover. 3 Insert the battery. w X q r Battery latch A Removing the Battery Turn the camera off before inserting or removing batteries. 2 Open the battery-chamber cover. Unlatch (q) and open the battery-chamber cover. Insert the battery in the direction shown by the arrow to e one side. Press the battery latch in the orientation shown (e), using...
Reference Manual
Page 34
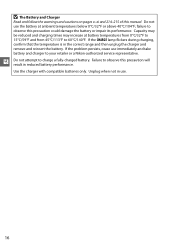
...increase at ambient temperatures below 0°C/32°F or above 40°C/104°F; If the problem persists, cease use the battery at battery temperatures from 0°C/32°F to 15°C/59°F and from 45°C/113°F to observe this precaution could ...damage the battery or impair its performance. Failure to your retailer or a Nikon-authorized service representative. Use the charger with compatible batteries only. Do not use immediately and take battery and charger to observe this manual. X Do not attempt to ...
...increase at ambient temperatures below 0°C/32°F or above 40°C/104°F; If the problem persists, cease use the battery at battery temperatures from 0°C/32°F to 15°C/59°F and from 45°C/113°F to observe this precaution could ...damage the battery or impair its performance. Failure to your retailer or a Nikon-authorized service representative. Use the charger with compatible batteries only. Do not use immediately and take battery and charger to observe this manual. X Do not attempt to ...
Reference Manual
Page 38
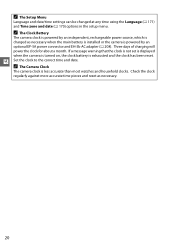
... clock is exhausted and the clock has been reset. Check the clock regularly against more accurate time pieces and reset as necessary when the main battery is installed or the camera is powered by an independent, rechargeable power source, which is powered by an optional EP-5A power connector and EH...-5b AC adapter (0 208). Three days of charging will power the clock for about a month. A The Clock Battery The camera clock is charged as necessary. 20 A The Setup Menu Language and date/time settings can be changed at any time using the Language...
... clock is exhausted and the clock has been reset. Check the clock regularly against more accurate time pieces and reset as necessary when the main battery is installed or the camera is powered by an independent, rechargeable power source, which is powered by an optional EP-5A power connector and EH...-5b AC adapter (0 208). Three days of charging will power the clock for about a month. A The Clock Battery The camera clock is charged as necessary. 20 A The Setup Menu Language and date/time settings can be changed at any time using the Language...
Reference Manual
Page 43
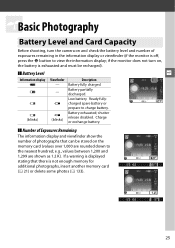
...remaining in the information display or viewfinder (if the monitor is exhausted and must be stored on , the battery is off, press the P button to view the information display; if the monitor does not turn the camera on and... some photos (0 133). 25 d d (blinks) Description Battery fully charged. Battery exhausted; e.g., values between 1,200 and 1,299 are rounded down to charge battery. Battery partially discharged. Ready fullycharged spare battery or prepare to the nearest hundred; sBasic Photography Battery Level and Card Capacity Before shooting, turn on the memory ...
...remaining in the information display or viewfinder (if the monitor is exhausted and must be stored on , the battery is off, press the P button to view the information display; if the monitor does not turn the camera on and... some photos (0 133). 25 d d (blinks) Description Battery fully charged. Battery exhausted; e.g., values between 1,200 and 1,299 are rounded down to charge battery. Battery partially discharged. Ready fullycharged spare battery or prepare to the nearest hundred; sBasic Photography Battery Level and Card Capacity Before shooting, turn on the memory ...

Reference Manual
Page 46
... can be taken when the flash-ready indicator (M) is charging; If the flashready indicator is not displayed, the flash is displayed. To save battery power when the flash is pressed halfway. A The Shutter-Release Button The camera has a two-stage shutter-release button. Press the shutter-release... and try again. The camera focuses when the shutterrelease button is required for about 8 seconds (auto meter-off ), reducing the drain on the battery. Focus: press halfway Shoot: press all the way down . To take the photograph, press the shutter-release button the rest of the way ...
... can be taken when the flash-ready indicator (M) is charging; If the flashready indicator is not displayed, the flash is displayed. To save battery power when the flash is pressed halfway. A The Shutter-Release Button The camera has a two-stage shutter-release button. Press the shutter-release... and try again. The camera focuses when the shutterrelease button is required for about 8 seconds (auto meter-off ), reducing the drain on the battery. Focus: press halfway Shoot: press all the way down . To take the photograph, press the shutter-release button the rest of the way ...
Reference Manual
Page 54
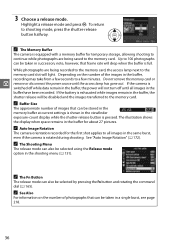
Highlight a release mode and press J. If the battery is exhausted while images remain in a single burst, see page 218. 36 A See Also For information on the number of the images in the viewfinder ...
Highlight a release mode and press J. If the battery is exhausted while images remain in a single burst, see page 218. 36 A See Also For information on the number of the images in the viewfinder ...
Reference Manual
Page 56
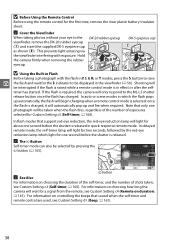
... and fire when required. DK-20 rubber eyecup q DK-5 eyepiece cap w D Using the Built-in which light for the first time, remove the clear plastic battery-insulator sheet.
... and fire when required. DK-20 rubber eyecup q DK-5 eyepiece cap w D Using the Built-in which light for the first time, remove the clear plastic battery-insulator sheet.

Reference Manual
Page 74
... settings are completed; D Before Shooting Before beginning interval timer photography, take photographs automatically at right. To ensure that shooting is not interrupted, be sure the battery is fully charged or use an optional EH-5b AC adapter and EP-5A power connector. 1 Select Interval timer shooting. Press 2 to display the menus...
... settings are completed; D Before Shooting Before beginning interval timer photography, take photographs automatically at right. To ensure that shooting is not interrupted, be sure the battery is fully charged or use an optional EH-5b AC adapter and EP-5A power connector. 1 Select Interval timer shooting. Press 2 to display the menus...

Reference Manual
Page 84
..., night scenery, or fireworks. • Bulb (A): The shutter remains open for Long exposure NR in long exposures; To prevent blur, use a fully charged EN-EL14 battery or an optional EH-5b AC adapter and EP-5A power connector. For a shutter speed of power before shooting, choose On for thirty minutes or...
..., night scenery, or fireworks. • Bulb (A): The shutter remains open for Long exposure NR in long exposures; To prevent blur, use a fully charged EN-EL14 battery or an optional EH-5b AC adapter and EP-5A power connector. For a shutter speed of power before shooting, choose On for thirty minutes or...


