
D3 User's Manual
Page 3
... (this guide) ❏ Quick Guide ❏ Software Installation Guide ❏ Software Suite CD-ROM ❏ Registration card (U. S. Memory cards are sold separately. ❏ D3 digital camera (pg. 3) ❏ BF-1A body cap (pp. 4, 387) ❏ BS-2 accessory shoe cover (pg. 3) ❏ EN-EL4a rechargeable Li-ion battery with terminal cover (pp. 32, 34) ❏...
... (this guide) ❏ Quick Guide ❏ Software Installation Guide ❏ Software Suite CD-ROM ❏ Registration card (U. S. Memory cards are sold separately. ❏ D3 digital camera (pg. 3) ❏ BF-1A body cap (pp. 4, 387) ❏ BS-2 accessory shoe cover (pg. 3) ❏ EN-EL4a rechargeable Li-ion battery with terminal cover (pp. 32, 34) ❏...

D3 User's Manual
Page 12
Table of Contents Q&A Index iv For Your Safety xviii Notices...xxi Introduction 1 Overview...2 Getting to Know the Camera 3 Camera Body 3 The Top Control Panel 8 The Rear Control Panel 10 The Viewfinder Display 12 The Shooting Information Display 14 The Command Dials 16 Quick Start Guide 23 Tutorial 25 Camera Menus 26 Using Camera Menus 28 Help ...31 First Steps 32 Charge the Battery 32 Insert the Battery 34 Attach a Lens 37 Basic Setup 39 Insert a Memory Card 42 Adjust Viewfinder Focus 47 Basic Photography and Playback 48 x
Table of Contents Q&A Index iv For Your Safety xviii Notices...xxi Introduction 1 Overview...2 Getting to Know the Camera 3 Camera Body 3 The Top Control Panel 8 The Rear Control Panel 10 The Viewfinder Display 12 The Shooting Information Display 14 The Command Dials 16 Quick Start Guide 23 Tutorial 25 Camera Menus 26 Using Camera Menus 28 Help ...31 First Steps 32 Charge the Battery 32 Insert the Battery 34 Attach a Lens 37 Basic Setup 39 Insert a Memory Card 42 Adjust Viewfinder Focus 47 Basic Photography and Playback 48 x

D3 User's Manual
Page 27
XIntroduction X This chapter covers information you will need to Know the Camera pg. 3 Camera Body pg. 3 The Top Control Panel pg. 8 The Rear Control Panel pg. 10 The Viewfinder Display pg. 12 The Shooting Information Display pg. 14 The Command Dials pg. 16 Quick Start Guide pg. 23 1 Overview pg. 2 Getting to know before using the camera, including the names of camera parts.
XIntroduction X This chapter covers information you will need to Know the Camera pg. 3 Camera Body pg. 3 The Top Control Panel pg. 8 The Rear Control Panel pg. 10 The Viewfinder Display pg. 12 The Shooting Information Display pg. 14 The Command Dials pg. 16 Quick Start Guide pg. 23 1 Overview pg. 2 Getting to know before using the camera, including the names of camera parts.

D3 User's Manual
Page 29
Camera Body 1 D (bracketing) 11 Shutter-release button ...... 55, 56 button 135, 139, 327 12 E (exposure compensation) 2 Release mode dial button 132 lock release 87 13 Eyelet for camera strap 5 3 Release mode dial 87 14 I (exposure mode) 4 Eyelet for camera strap 5 button 117 5 M (flash mode) button 199 Q (format) button 45 6...) 9 Metering selector 18 Accessory shoe cover lock button 115 22, 204, 400 10 Power switch 48 3 Getting to Know the Camera Take a few moments to it as you read through the rest of the manual. You may find it helpful to bookmark this section...
Camera Body 1 D (bracketing) 11 Shutter-release button ...... 55, 56 button 135, 139, 327 12 E (exposure compensation) 2 Release mode dial button 132 lock release 87 13 Eyelet for camera strap 5 3 Release mode dial 87 14 I (exposure mode) 4 Eyelet for camera strap 5 button 117 5 M (flash mode) button 199 Q (format) button 45 6...) 9 Metering selector 18 Accessory shoe cover lock button 115 22, 204, 400 10 Power switch 48 3 Getting to Know the Camera Take a few moments to it as you read through the rest of the manual. You may find it helpful to bookmark this section...

D3 User's Manual
Page 30
Camera Body (Continued) X 1 Mirror 90, 105, 395 2 Self-timer lamp 104 3 Flash sync terminal cover...... 204 4 Ten-pin remote terminal cover 223, 388 5 Flash sync terminal 204 6 Ten-pin remote terminal 223, 388 7 USB connector cover .....258, 264 8 Lens release button 38 9 Connector cover 274, 276 10 USB connector 258, 264 11 DC-IN connector for optional AC adapter EH-6......383 12 Audio/video (A/V) connector 274 13 HDMI connector 276 14 Focus-mode selector.......... 74, 83 15 Battery-cover latch 34 16 Battery-chamber cover 34 17 Meter coupling lever 429 18 Body cap 387 4
Camera Body (Continued) X 1 Mirror 90, 105, 395 2 Self-timer lamp 104 3 Flash sync terminal cover...... 204 4 Ten-pin remote terminal cover 223, 388 5 Flash sync terminal 204 6 Ten-pin remote terminal 223, 388 7 USB connector cover .....258, 264 8 Lens release button 38 9 Connector cover 274, 276 10 USB connector 258, 264 11 DC-IN connector for optional AC adapter EH-6......383 12 Audio/video (A/V) connector 274 13 HDMI connector 276 14 Focus-mode selector.......... 74, 83 15 Battery-cover latch 34 16 Battery-chamber cover 34 17 Meter coupling lever 429 18 Body cap 387 4

D3 User's Manual
Page 31
X 1 Depth-of-field preview 6 Vertical shooting shutter- button 117, 337 release button lock 54 2 Sub-command dial 16 7 CPU contacts 3 Fn button 64, 202, 331 8 Mounting index 37 4 Sub-command dial for 9 Lens mount 84 vertical shooting 16 10 Tripod socket 5 Shutter-release button for vertical shooting 54 ❚❚ Attaching the Camera Strap Attach the camera strap securely to the two eyelets on the camera body as shown below. 5
X 1 Depth-of-field preview 6 Vertical shooting shutter- button 117, 337 release button lock 54 2 Sub-command dial 16 7 CPU contacts 3 Fn button 64, 202, 331 8 Mounting index 37 4 Sub-command dial for 9 Lens mount 84 vertical shooting 16 10 Tripod socket 5 Shutter-release button for vertical shooting 54 ❚❚ Attaching the Camera Strap Attach the camera strap securely to the two eyelets on the camera body as shown below. 5

D3 User's Manual
Page 32
Camera Body (Continued) X 1 Viewfinder eyepiece 47 2 Eyepiece shutter lever 47 3 O (delete) button 58, 245 Q (format) button 45 4 K (playback) button ....... 57, 228 5 Monitor 57, 90, 228 6 G (menu) button.......... ...
Camera Body (Continued) X 1 Viewfinder eyepiece 47 2 Eyepiece shutter lever 47 3 O (delete) button 58, 245 Q (format) button 45 4 K (playback) button ....... 57, 228 5 Monitor 57, 90, 228 6 G (menu) button.......... ...

D3 User's Manual
Page 63
... priority). 37 Mounting index If the lens is removed. 1 Remove the rear lens cap and the camera body cap. After confirming that the camera is off, remove the rear lens s cap from entering the camera when the lens is equipped with an A-M or M/A-M switch, select A (autofocus) or M/ A... (autofocus with the mounting mark on the camera body, position the lens in the camera's bayonet mount. Being careful not to prevent dust from the lens and remove the camera body cap. 2 Attach the lens. Attach a Lens Care should be taken to press the lensrelease ...
... priority). 37 Mounting index If the lens is removed. 1 Remove the rear lens cap and the camera body cap. After confirming that the camera is off, remove the rear lens s cap from entering the camera when the lens is equipped with an A-M or M/A-M switch, select A (autofocus) or M/ A... (autofocus with the mounting mark on the camera body, position the lens in the camera's bayonet mount. Being careful not to prevent dust from the lens and remove the camera body cap. 2 Attach the lens. Attach a Lens Care should be taken to press the lensrelease ...

D3 User's Manual
Page 64
... image area is automatically selected when a DX lens is off when removing or exchanging lenses. ❚❚ Detaching the Lens Be sure the camera is attached. After removing the lens, replace the lens caps and camera body cap. A Lens An AF Nikkor 85 mm f/1.4D lens is used in this manual for details.
... image area is automatically selected when a DX lens is off when removing or exchanging lenses. ❚❚ Detaching the Lens Be sure the camera is attached. After removing the lens, replace the lens caps and camera body cap. A Lens An AF Nikkor 85 mm f/1.4D lens is used in this manual for details.

D3 User's Manual
Page 80
Ready the Camera When framing photographs in the viewfinder, hold the camera as shown at right. Keep your elbows propped s lightly against your torso for vertical shooting (pg. 5) and hold the handgrip in your right hand and cradle the camera body or lens with your left. For information on framing photographs in portrait (tall) orientation, unlock the shutter-release button for support and place one foot half a pace ahead of the other to keep you upper body stable. When framing photographs in the monitor, see page 90. 54
Ready the Camera When framing photographs in the viewfinder, hold the camera as shown at right. Keep your elbows propped s lightly against your torso for vertical shooting (pg. 5) and hold the handgrip in your right hand and cradle the camera body or lens with your left. For information on framing photographs in portrait (tall) orientation, unlock the shutter-release button for support and place one foot half a pace ahead of the other to keep you upper body stable. When framing photographs in the monitor, see page 90. 54

D3 User's Manual
Page 110
...Focal plane mark 84 The Electronic Rangefinder If the lens has a maximum aperture of the 51 focus points). The distance between your subject and the camera, measure from any of f/5.6 or faster, the viewfinder focus indicator can be used to confirm whether the subject in focus (the focus point ... in-focus indicator may sometimes be displayed when the subject is 46.5 mm (1.83 in focus; Note that with the subjects listed on the camera body. After positioning the subject in the selected focus point, press the shutter-release button halfway and N rotate the lens focusing ring until the in...
...Focal plane mark 84 The Electronic Rangefinder If the lens has a maximum aperture of the 51 focus points). The distance between your subject and the camera, measure from any of f/5.6 or faster, the viewfinder focus indicator can be used to confirm whether the subject in focus (the focus point ... in-focus indicator may sometimes be displayed when the subject is 46.5 mm (1.83 in focus; Note that with the subjects listed on the camera body. After positioning the subject in the selected focus point, press the shutter-release button halfway and N rotate the lens focusing ring until the in...

D3 User's Manual
Page 405
...using lens aperture ring and determine exposure before determining exposure and taking photograph. • PF-4 Reprocopy Outfit requires PA-4 Camera Holder. Use spot or center-weighted metering if desired results are specified using [Non-CPU lens data] (pg. 220...), aperture value will be displayed in viewfinder and top control panel. 14 Can be required depending on camera orientation. 20 Use preset aperture. PB-6D may be used only if lens focal length and maximum aperture are ... viewfinder is in viewfinder and top control panel. 17 Exposure determined by camera body.
...using lens aperture ring and determine exposure before determining exposure and taking photograph. • PF-4 Reprocopy Outfit requires PA-4 Camera Holder. Use spot or center-weighted metering if desired results are specified using [Non-CPU lens data] (pg. 220...), aperture value will be displayed in viewfinder and top control panel. 14 Can be required depending on camera orientation. 20 Use preset aperture. PB-6D may be used only if lens focal length and maximum aperture are ... viewfinder is in viewfinder and top control panel. 17 Exposure determined by camera body.

D3 User's Manual
Page 413
... • Capture NX: A complete photo editing package. • Camera Control Pro 2: Control the camera remotely from a computer and save photographs directly to the Internet. • Body Cap BF-1A: The BF-1A keeps the mirror, viewfinder screen, and low-pass filter free of Nikon software. Most Nikon software offers an auto update feature when the...
... • Capture NX: A complete photo editing package. • Camera Control Pro 2: Control the camera remotely from a computer and save photographs directly to the Internet. • Body Cap BF-1A: The BF-1A keeps the mirror, viewfinder screen, and low-pass filter free of Nikon software. Most Nikon software offers an auto update feature when the...

D3 User's Manual
Page 416
Do not store your camera with naphtha or ...Monitor fingerprints and other stains, apply a small amount of liquid. Caring for the Camera Storage When the camera will not be used for an extended period, remove the battery, and store the ... cover in place. Do not use alcohol, thinner, or other foreign matter inside the camera may cause damage not covered under warranty. To remove viewfinder fingerprints and other stains, wipe... dust and lint, then wipe gently with a blower. If using the camera at the beach or seaside, Camera wipe off sand or salt with a cloth lightly dampened in a dry...
Do not store your camera with naphtha or ...Monitor fingerprints and other stains, apply a small amount of liquid. Caring for the Camera Storage When the camera will not be used for an extended period, remove the battery, and store the ... cover in place. Do not use alcohol, thinner, or other foreign matter inside the camera may cause damage not covered under warranty. To remove viewfinder fingerprints and other stains, wipe... dust and lint, then wipe gently with a blower. If using the camera at the beach or seaside, Camera wipe off sand or salt with a cloth lightly dampened in a dry...

D3 User's Manual
Page 422
... a blower can only be raised and the shutter curtain will close. Do not use a blowerbrush, as the bristles could damage the filter. Holding the camera so that can not be removed with a blower. Dirt that light falls on the low-pass filter, examine the filter for dust or lint. The...present, proceed to the down . If no circumstances should you touch or wipe the filter. 7 Turn the camera off and the row of dashes in the viewfinder will turn off . Replace the lens or body cap. n 396 4 Raise the mirror. Press the shutter-release button all the way down position and the...
... a blower can only be raised and the shutter curtain will close. Do not use a blowerbrush, as the bristles could damage the filter. Holding the camera so that can not be removed with a blower. Dirt that light falls on the low-pass filter, examine the filter for dust or lint. The...present, proceed to the down . If no circumstances should you touch or wipe the filter. 7 Turn the camera off and the row of dashes in the viewfinder will turn off . Replace the lens or body cap. n 396 4 Raise the mirror. Press the shutter-release button all the way down position and the...
D3 User's Manual
Page 423
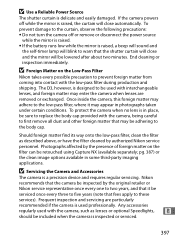
...are removed or exchanged. To protect the camera when no lens is inspected or serviced. 397 Once inside the camera, this foreign matter may adhere to the body cap. Photographs affected by the presence of foreign matter on the Low-Pass Filter Nikon takes every possible precaution to prevent foreign ...its way onto the low-pass filter, clean the filter as lenses or optional Speedlights, should be included when the camera is in some third-party imaging applications. The D3, however, is designed to be serviced once every three to five years (note that fees apply to two years...
...are removed or exchanged. To protect the camera when no lens is inspected or serviced. 397 Once inside the camera, this foreign matter may adhere to the body cap. Photographs affected by the presence of foreign matter on the Low-Pass Filter Nikon takes every possible precaution to prevent foreign ...its way onto the low-pass filter, clean the filter as lenses or optional Speedlights, should be included when the camera is in some third-party imaging applications. The D3, however, is designed to be serviced once every three to five years (note that fees apply to two years...

D3 User's Manual
Page 425
...and other stains from a blower. These actions could scratch, deform, or tear the curtain. Storage: To prevent mold or mildew, store the camera in a cool, dry place. This does not indicate a malfunction, and the display will not be gently removed with cleaning tools, or subject...will soon return to deteriorate. In rare instances, static electricity may cause the material to normal. Turn the camera on cleaning the low-pass filter. Cleaning: When cleaning the camera body, use a blower to prevent discharge of liquid. When using a cloth lightly dampened in a plastic bag ...
...and other stains from a blower. These actions could scratch, deform, or tear the curtain. Storage: To prevent mold or mildew, store the camera in a cool, dry place. This does not indicate a malfunction, and the display will not be gently removed with cleaning tools, or subject...will soon return to deteriorate. In rare instances, static electricity may cause the material to normal. Turn the camera on cleaning the low-pass filter. Cleaning: When cleaning the camera body, use a blower to prevent discharge of liquid. When using a cloth lightly dampened in a plastic bag ...

D3 User's Manual
Page 458
n 432 Interface Ten-pin remote terminal Can be held liable for a camera with a fully-charged battery operating at an ambient temperature of 20 °C (68 °F). • Nikon reserves the right to connect remote control or GPS device compliant with NMEA0183 version 2.01 or 3.01...mm (6.3 × 6.2 × 3.4 in this manual may result from any mistakes that this manual at any time and without battery, memory card, body cap, or accessory shoe cover Operating environment Temperature 0-40 °C (32-104 °F) Humidity Less than 85% (no condensation) • Unless otherwise ...
n 432 Interface Ten-pin remote terminal Can be held liable for a camera with a fully-charged battery operating at an ambient temperature of 20 °C (68 °F). • Nikon reserves the right to connect remote control or GPS device compliant with NMEA0183 version 2.01 or 3.01...mm (6.3 × 6.2 × 3.4 in this manual may result from any mistakes that this manual at any time and without battery, memory card, body cap, or accessory shoe cover Operating environment Temperature 0-40 °C (32-104 °F) Humidity Less than 85% (no condensation) • Unless otherwise ...

D3 User's Manual
Page 465
... info], 353 [Beep], 319 Body cap, 4, 37, 387 Bracketing, 134, 327, 328 exposure, 134, 327 flash, 134, 327 white balance, 134, 139, 327 [Bracketing order], 329 Bulb, 126 Burst, 89, 320, 332 C C, 74, 304 Calibrating, 433 calibration, 353, 433 charging, 32 info, 353 Camera Control Pro 2, 256, 387 ...206, 418 restoring, 206 [Delete], 281 [All], 281 [Selected], 281 Delete, 58, 245, 281 all images, 281 current image, 245 selected images, 281 Digital Print Order Format, 262, 436 Diopter, 3, 47, 385 adjustment control, 47 adjustment lens, 385 [Display mode], 282 [D-Lighting], 363 DPOF, 262 [Dust off ...
... info], 353 [Beep], 319 Body cap, 4, 37, 387 Bracketing, 134, 327, 328 exposure, 134, 327 flash, 134, 327 white balance, 134, 139, 327 [Bracketing order], 329 Bulb, 126 Burst, 89, 320, 332 C C, 74, 304 Calibrating, 433 calibration, 353, 433 charging, 32 info, 353 Camera Control Pro 2, 256, 387 ...206, 418 restoring, 206 [Delete], 281 [All], 281 [Selected], 281 Delete, 58, 245, 281 all images, 281 current image, 245 selected images, 281 Digital Print Order Format, 262, 436 Diopter, 3, 47, 385 adjustment control, 47 adjustment lens, 385 [Display mode], 282 [D-Lighting], 363 DPOF, 262 [Dust off ...


