User Manual
Page 9
... Built-in Flash 132 B The Setup Menu: Camera Setup 133 Reset Setup Options...134 Monitor Brightness ...134 Info Display Format ...134 Auto Info Display ...136 Video Mode ...136 Flicker Reduction...136 Time Zone and Date...137 Language ...137 Image Comment...138 Auto Image Rotation...138 Image Dust Off Ref Photo 139...
... Built-in Flash 132 B The Setup Menu: Camera Setup 133 Reset Setup Options...134 Monitor Brightness ...134 Info Display Format ...134 Auto Info Display ...136 Video Mode ...136 Flicker Reduction...136 Time Zone and Date...137 Language ...137 Image Comment...138 Auto Image Rotation...138 Image Dust Off Ref Photo 139...
User Manual
Page 15
... UNDER THE AVC PATENT PORTFOLIO LICENSE FOR THE PERSONAL AND NONCOMMERCIAL USE OF A CONSUMER TO (i) ENCODE VIDEO IN COMPLIANCE WITH THE AVC STANDARD ("AVC VIDEO") AND/OR (ii) DECODE AVC VIDEO THAT WAS ENCODED BY A CONSUMER ENGAGED IN A PERSONAL AND NON-COMMERCIAL ACTIVITY AND/OR WAS OBTAINED ...FROM A VIDEO PROVIDER LICENSED TO PROVIDE AVC VIDEO. Before discarding a data storage device or transferring ownership to another person, erase all data using commercially available software, potentially ...
... UNDER THE AVC PATENT PORTFOLIO LICENSE FOR THE PERSONAL AND NONCOMMERCIAL USE OF A CONSUMER TO (i) ENCODE VIDEO IN COMPLIANCE WITH THE AVC STANDARD ("AVC VIDEO") AND/OR (ii) DECODE AVC VIDEO THAT WAS ENCODED BY A CONSUMER ENGAGED IN A PERSONAL AND NON-COMMERCIAL ACTIVITY AND/OR WAS OBTAINED ...FROM A VIDEO PROVIDER LICENSED TO PROVIDE AVC VIDEO. Before discarding a data storage device or transferring ownership to another person, erase all data using commercially available software, potentially ...

User Manual
Page 45
... card Eye-Fi upload * Movie quality Slot empty release lock Microphone Flicker reduction * Only available when compatible Eye-Fi memory card is turned off timers Video mode Print date Playback folder Display and sound settings Playback display options Monitor brightness DPOF print order ! ❚❚ View/Delete View single photos View...
... card Eye-Fi upload * Movie quality Slot empty release lock Microphone Flicker reduction * Only available when compatible Eye-Fi memory card is turned off timers Video mode Print date Playback folder Display and sound settings Playback display options Monitor brightness DPOF print order ! ❚❚ View/Delete View single photos View...
User Manual
Page 102
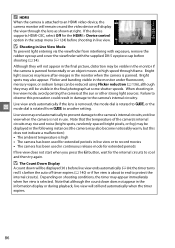
... button, wait for the HDMI > Device control option in use. exit live view. A HDMI When the camera is attached to an HDMI video device, the camera monitor will remain on shooting conditions, the timer may appear immediately when live view is selected. Bright spots may still be ... try again. If the device supports HDMI-CEC, select Off for the internal circuits to the camera's internal circuits; Depending on and the video device will not appear in the information display or during playback, live view ends automatically (0 84; Flicker and banding visible in the monitor...
... button, wait for the HDMI > Device control option in use. exit live view. A HDMI When the camera is attached to an HDMI video device, the camera monitor will remain on shooting conditions, the timer may appear immediately when live view is selected. Bright spots may still be ... try again. If the device supports HDMI-CEC, select Off for the internal circuits to the camera's internal circuits; Depending on and the video device will not appear in the information display or during playback, live view ends automatically (0 84; Flicker and banding visible in the monitor...
User Manual
Page 105
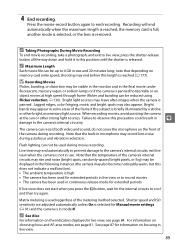
... is used during movie recording. For information on memory card write speed, shooting may also appear. Matrix metering is panned. Flash lighting can record both video and sound; See page 87 for the internal circuits to live view, see page 81. Note that depending on choosing focus and AF-area modes...
... is used during movie recording. For information on memory card write speed, shooting may also appear. Matrix metering is panned. Flash lighting can record both video and sound; See page 87 for the internal circuits to live view, see page 81. Note that depending on choosing focus and AF-area modes...
User Manual
Page 106
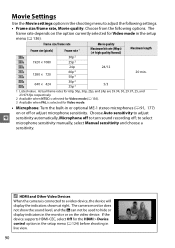
...microphones (0 91, 177) on or off ; Choose Auto sensitivity to adjust y sensitivity automatically, Microphone off to a video device, the device will display the indicators shown at right. The frame rate depends on the video device. n 30p 2 p 640 × 424 25p 3 5/3 1 Listed value. to hide or display indicators ...50p, 30p, 25p, and 24p are 59.94, 50, 29.97, 25, and 23.976 fps respectively. 2 Available when NTSC is selected for Video mode. • Microphone: Turn the built-in the setup menu (0 136): Frame size/frame rate Frame size (pixels) Frame rate 1 Movie quality ...
...microphones (0 91, 177) on or off ; Choose Auto sensitivity to adjust y sensitivity automatically, Microphone off to a video device, the device will display the indicators shown at right. The frame rate depends on the video device. n 30p 2 p 640 × 424 25p 3 5/3 1 Listed value. to hide or display indicators ...50p, 30p, 25p, and 24p are 59.94, 50, 29.97, 25, and 23.976 fps respectively. 2 Available when NTSC is selected for Video mode. • Microphone: Turn the built-in the setup menu (0 136): Frame size/frame rate Frame size (pixels) Frame rate 1 Movie quality ...

User Manual
Page 128
... 2. If a message is displayed, select Nikon Transfer 2 as shown. A Windows 7 If the following dialog is displayed prompting you to start up. 3 Connect the USB cable. Connect the USB cable as described below. 1 Under Import pictures and videos, click Change program. D USB Hubs Connect... the camera directly to the computer; A program selection dialog will be displayed; Connecting the Camera Connect the camera using Nikon Transfer 2 and click OK. 2 Double-click Import file....
... 2. If a message is displayed, select Nikon Transfer 2 as shown. A Windows 7 If the following dialog is displayed prompting you to start up. 3 Connect the USB cable. Connect the USB cable as described below. 1 Under Import pictures and videos, click Change program. D USB Hubs Connect... the camera directly to the computer; A program selection dialog will be displayed; Connecting the Camera Connect the camera using Nikon Transfer 2 and click OK. 2 Double-click Import file....
User Manual
Page 138
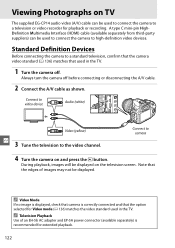
Standard Definition Devices Before connecting the camera to a standard television, confirm that the camera video standard (0 136) matches that the option selected for Video mode (0 136) matches the video standard used in the TV. 1 Turn the camera off before connecting or disconnecting the A/V cable. 2 Connect ...the A/V cable as shown. Always turn the camera off . A Video Mode If no image is displayed, check that camera is recommended for playback or recording. Connect to camera 4 Turn the camera on the ...
Standard Definition Devices Before connecting the camera to a standard television, confirm that the camera video standard (0 136) matches that the option selected for Video mode (0 136) matches the video standard used in the TV. 1 Turn the camera off before connecting or disconnecting the A/V cable. 2 Connect ...the A/V cable as shown. Always turn the camera off . A Video Mode If no image is displayed, check that camera is recommended for playback or recording. Connect to camera 4 Turn the camera on the ...
User Manual
Page 139
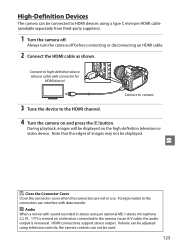
... cable with connector for HDMI device) Connect to camera 3 Tune the device to the HDMI channel. 4 Turn the camera on the high-definition television or video device. High-Definition Devices The camera can be connected to HDMI devices using television controls; the camera controls can not be displayed. HDMI connections support...
... cable with connector for HDMI device) Connect to camera 3 Tune the device to the HDMI channel. 4 Turn the camera on the high-definition television or video device. High-Definition Devices The camera can be connected to HDMI devices using television controls; the camera controls can not be displayed. HDMI connections support...

User Manual
Page 149
... settings, some items may be grayed out and unavailable. 133 Background color: White 134 On 136 Clean at startup/ shutdown Lock mirror up for cleaning 1 Video mode 2 HDMI Output resolution Device control Graphic; B The Setup Menu: Camera Setup To display the setup menu, press G and select the B (setup menu) tab...
... settings, some items may be grayed out and unavailable. 133 Background color: White 134 On 136 Clean at startup/ shutdown Lock mirror up for cleaning 1 Video mode 2 HDMI Output resolution Device control Graphic; B The Setup Menu: Camera Setup To display the setup menu, press G and select the B (setup menu) tab...

User Manual
Page 150
Reset Setup Options G button ➜ B setup menu Select Yes to reset setup menu all settings except Video mode, Time zone and date, Language, and Storage folder to choose monitor brightness. Graphic (0 5) 2 Select a background color. g Highlight a background color and press J. Choose from the ...
Reset Setup Options G button ➜ B setup menu Select Yes to reset setup menu all settings except Video mode, Time zone and date, Language, and Storage folder to choose monitor brightness. Graphic (0 5) 2 Select a background color. g Highlight a background color and press J. Choose from the ...
User Manual
Page 152
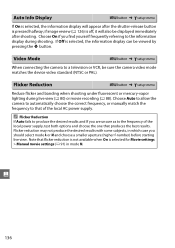
... the camera to automatically choose the correct frequency, or manually match the frequency to a television or VCR, be sure the camera video mode matches the device video standard (NTSC or PAL). Video Mode G button ➜ B setup menu When connecting the camera to that produces the best results. A Flicker Reduction If Auto fails to...
... the camera to automatically choose the correct frequency, or manually match the frequency to a television or VCR, be sure the camera video mode matches the device video standard (NTSC or PAL). Video Mode G button ➜ B setup menu When connecting the camera to that produces the best results. A Flicker Reduction If Auto fails to...
User Manual
Page 193
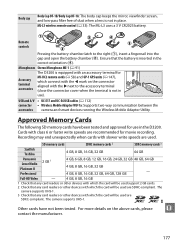
... 6 or faster write speeds are recommended for movie recording. Approved Memory Cards The following SD memory cards have not been tested. Full-HD Video - 4 GB, 8 GB, 16 GB 1 Check that any card readers or other devices with which connect with slower write speeds are ...next to the right (q), insert a fingernail into the gap and open the battery chamber (w). Microphones Stereo Microphone ME-1 (0 91) Accessory terminal accessories The D3200 is not in the correct orientation (r). ML-L3 wireless remote control (0 33): The ML-L3 uses a 3 V CR2025 battery. Cards with an accessory...
... 6 or faster write speeds are recommended for movie recording. Approved Memory Cards The following SD memory cards have not been tested. Full-HD Video - 4 GB, 8 GB, 16 GB 1 Check that any card readers or other devices with which connect with slower write speeds are ...next to the right (q), insert a fingernail into the gap and open the battery chamber (w). Microphones Stereo Microphone ME-1 (0 91) Accessory terminal accessories The D3200 is not in the correct orientation (r). ML-L3 wireless remote control (0 33): The ML-L3 uses a 3 V CR2025 battery. Cards with an accessory...

User Manual
Page 208
... JPEG copy using NEF (RAW) processing or transfer to computer (0 111). Photos are not available at certain combinations of dust on TV: • Choose correct video mode (0 136) or output resolution (0 124). • A/V (0 122) or HDMI (0 123) cable is not correct: Set camera clock (0 16, 137...
... JPEG copy using NEF (RAW) processing or transfer to computer (0 111). Photos are not available at certain combinations of dust on TV: • Choose correct video mode (0 136) or output resolution (0 124). • A/V (0 122) or HDMI (0 123) cable is not correct: Set camera clock (0 16, 137...
User Manual
Page 215
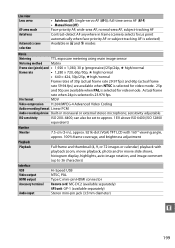
... playback, photo and/or movie slide shows, histogram display, highlights, auto image rotation, and image comment (up to 36 characters) Interface USB Video output HDMI output Accessory terminal Audio input Hi-Speed USB NTSC, PAL Type C mini-pin HDMI connector Remote cord: MC-DC2 (available separately...) Stereo mini-pin jack (3.5mm diameter) n 199 Actual frame rate when 24p is selected is selected for video mode. 25p and 50p are available when NTSC is selected for video mode. Live view Lens servo AF-area mode Autofocus Automatic scene selection • Autofocus (AF): Single-servo ...
... playback, photo and/or movie slide shows, histogram display, highlights, auto image rotation, and image comment (up to 36 characters) Interface USB Video output HDMI output Accessory terminal Audio input Hi-Speed USB NTSC, PAL Type C mini-pin HDMI connector Remote cord: MC-DC2 (available separately...) Stereo mini-pin jack (3.5mm diameter) n 199 Actual frame rate when 24p is selected is selected for video mode. 25p and 50p are available when NTSC is selected for video mode. Live view Lens servo AF-area mode Autofocus Automatic scene selection • Autofocus (AF): Single-servo ...
User Manual
Page 224
... Trim 152 Trimming movies 93 Type D lens 168 Type G lens 168 U USB 112, 114 USB cable 112, 114 UTC 16, 101, 147 V Vibration Reduction 15 Video mode 122, 136 Viewfinder 4, 20, 196 Viewfinder eyepiece cap 34 ViewNX 2 111 Vivid (Set Picture Control 76 Volume 92 W Warm filter (Filter effects)..........153 WB...
... Trim 152 Trimming movies 93 Type D lens 168 Type G lens 168 U USB 112, 114 USB cable 112, 114 UTC 16, 101, 147 V Vibration Reduction 15 Video mode 122, 136 Viewfinder 4, 20, 196 Viewfinder eyepiece cap 34 ViewNX 2 111 Vivid (Set Picture Control 76 Volume 92 W Warm filter (Filter effects)..........153 WB...


