User Manual
Page 3
... up your Nikon digital camera, taking your first pictures, installing software, and transferring pictures to a Television or VCR Beyond Point-and-Shoot Basic Playback The Shooting Menu The Playback Menu The Setup Menu Technical Notes Index i Guide to Digital Photography The Guide to get the most from your camera. Overview Getting to Know the COOLPIX 2000 First...
... up your Nikon digital camera, taking your first pictures, installing software, and transferring pictures to a Television or VCR Beyond Point-and-Shoot Basic Playback The Shooting Menu The Playback Menu The Setup Menu Technical Notes Index i Guide to Digital Photography The Guide to get the most from your camera. Overview Getting to Know the COOLPIX 2000 First...
User Manual
Page 8
...This Manual 2 Familiarization: The Parts of the Camera and Their Functions 4 Where to Find It-Parts of the COOLPIX 2000 4 How to Use It-Camera Controls and Displays 6 First Steps: Getting Ready to Use Your Camera 9 Step 1-Attach the Camera Strap 9 Step 2-Insert Batteries 9 Step 3-...Nikon View 5 30 Making the Connection: Connecting to Your Computer 32 Connecting to a Television or VCR: Television Playback 38 Beyond Point-and-Shoot: Adjusting Camera Settings 39 Focus-Mode Selection: The Button 40 Delaying Shutter Release: Self-Timer Mode 41 Framing Pictures: Optical and Digital...
...This Manual 2 Familiarization: The Parts of the Camera and Their Functions 4 Where to Find It-Parts of the COOLPIX 2000 4 How to Use It-Camera Controls and Displays 6 First Steps: Getting Ready to Use Your Camera 9 Step 1-Attach the Camera Strap 9 Step 2-Insert Batteries 9 Step 3-...Nikon View 5 30 Making the Connection: Connecting to Your Computer 32 Connecting to a Television or VCR: Television Playback 38 Beyond Point-and-Shoot: Adjusting Camera Settings 39 Focus-Mode Selection: The Button 40 Delaying Shutter Release: Self-Timer Mode 41 Framing Pictures: Optical and Digital...
User Manual
Page 11
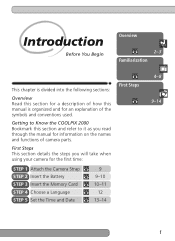
Getting to it as you will take when using your camera for the first time: STEP 1 Attach the Camera Strap STEP 2 Insert the Battery STEP 3 Insert the Memory Card STEP 4 Choose a Language STEP 5 Set the Time and Date 9 9-10 10-11 12 13-14 ... the following sections: Overview Read this section for a description of how this section and refer to Know the COOLPIX 2000 Bookmark this manual is organized and for information on the names and functions of camera parts. First Steps This section details the steps you read through the manual for an explanation of the...
Getting to it as you will take when using your camera for the first time: STEP 1 Attach the Camera Strap STEP 2 Insert the Battery STEP 3 Insert the Memory Card STEP 4 Choose a Language STEP 5 Set the Time and Date 9 9-10 10-11 12 13-14 ... the following sections: Overview Read this section for a description of how this section and refer to Know the COOLPIX 2000 Bookmark this manual is organized and for information on the names and functions of camera parts. First Steps This section details the steps you read through the manual for an explanation of the...
User Manual
Page 12
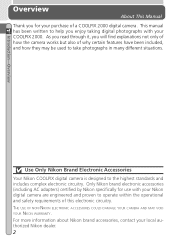
Introduction-Overview Use Only Nikon Brand Electronic Accessories Your Nikon COOLPIX digital camera is designed to help you enjoy taking digital photographs with your local authorized Nikon dealer. 2 Only Nikon brand electronic accessories (including AC adapters) certified by Nikon specifically for your COOLPIX 2000. For more information about Nikon brand accessories, contact your Nikon digital camera are engineered and proven to operate within the operational and...
Introduction-Overview Use Only Nikon Brand Electronic Accessories Your Nikon COOLPIX digital camera is designed to help you enjoy taking digital photographs with your local authorized Nikon dealer. 2 Only Nikon brand electronic accessories (including AC adapters) certified by Nikon specifically for your COOLPIX 2000. For more information about Nikon brand accessories, contact your Nikon digital camera are engineered and proven to operate within the operational and...
User Manual
Page 14
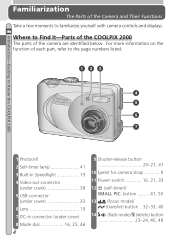
For more information on the function of each part, refer to Find It-Parts of the COOLPIX 2000 The parts of the Camera and Their Functions Take a few moments to familiarize yourself with camera controls and displays. Where to the page numbers listed. 123 4 5 6 7 1 Photocell 2 Self-timer lamp 41 3 Built-in Speedlight 19 4 Video-out...
For more information on the function of each part, refer to Find It-Parts of the COOLPIX 2000 The parts of the Camera and Their Functions Take a few moments to familiarize yourself with camera controls and displays. Where to the page numbers listed. 123 4 5 6 7 1 Photocell 2 Self-timer lamp 41 3 Built-in Speedlight 19 4 Video-out...
User Manual
Page 16
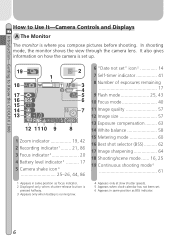
... when shutter-release button is pressed halfway. 3 Appears only when battery is where you compose pictures before shooting. Introduction-Getting to Know the COOLPIX 2000 How to Use It-Camera Controls and Displays A The Monitor The monitor is running low. 4 Appears only at slow shutter speeds. 5 Appears when clock-calendar has not been... mode ...... 16, 25 19 Continuous shooting mode 6 61 1 Appears in same position as BSS indicator. 6 In shooting mode, the monitor shows the view through the camera lens.
... when shutter-release button is pressed halfway. 3 Appears only when battery is where you compose pictures before shooting. Introduction-Getting to Know the COOLPIX 2000 How to Use It-Camera Controls and Displays A The Monitor The monitor is running low. 4 Appears only at slow shutter speeds. 5 Appears when clock-calendar has not been... mode ...... 16, 25 19 Continuous shooting mode 6 61 1 Appears in same position as BSS indicator. 6 In shooting mode, the monitor shows the view through the camera lens.
User Manual
Page 17
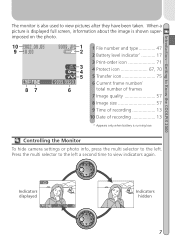
... used to view pictures after they have been taken. Introduction-Getting to Know the COOLPIX 2000 The monitor is running low. Press the multi selector to the left a second time to the left. Controlling the Monitor To hide camera settings or photo info, press the multi selector to view indicators again. When a picture...
... used to view pictures after they have been taken. Introduction-Getting to Know the COOLPIX 2000 The monitor is running low. Press the multi selector to the left a second time to the left. Controlling the Monitor To hide camera settings or photo info, press the multi selector to view indicators again. When a picture...
User Manual
Page 18
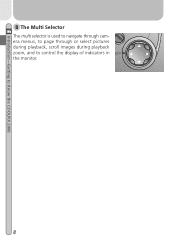
Introduction-Getting to Know the COOLPIX 2000 B The Multi Selector The multi selector is used to navigate through camera menus, to page through or select pictures during playback, scroll images during playback zoom, and to control the display of indicators in the monitor. 8
Introduction-Getting to Know the COOLPIX 2000 B The Multi Selector The multi selector is used to navigate through camera menus, to page through or select pictures during playback, scroll images during playback zoom, and to control the display of indicators in the monitor. 8
User Manual
Page 20
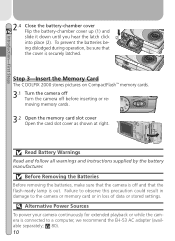
... dislodged during operation, be sure that the camera is out. Failure to observe this precaution could result in damage to a computer, we recommend the EH-53 AC adapter (available separately; 80). 10 Step 3-Insert the Memory Card The COOLPIX 2000 stores pictures on CompactFlash™ memory cards.... 3.1 Turn the camera off Turn the camera off and that the flash-ready lamp is off before inserting or removing memory cards. 3.2 Open...
... dislodged during operation, be sure that the camera is out. Failure to observe this precaution could result in damage to a computer, we recommend the EH-53 AC adapter (available separately; 80). 10 Step 3-Insert the Memory Card The COOLPIX 2000 stores pictures on CompactFlash™ memory cards.... 3.1 Turn the camera off Turn the camera off and that the flash-ready lamp is off before inserting or removing memory cards. 3.2 Open...
User Manual
Page 25
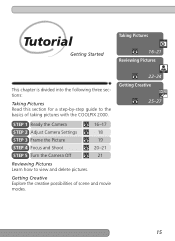
STEP 1 Ready the Camera STEP 2 Adjust Camera Settings STEP 3 Frame the Picture STEP 4 Focus and Shoot STEP 5 Turn the Camera Off 16-17 18 19 20-21 21 Reviewing Pictures Learn how to the basics of scene and movie modes. 22-24 Getting Creative 25-27 15 Tutorial Getting Started Taking Pictures 16-21 Reviewing Pictures This chapter is divided into the following three sections: Taking Pictures Read this section for a step-by-step guide to view and delete pictures. Getting Creative Explore the creative possibilities of taking pictures with the COOLPIX 2000.
STEP 1 Ready the Camera STEP 2 Adjust Camera Settings STEP 3 Frame the Picture STEP 4 Focus and Shoot STEP 5 Turn the Camera Off 16-17 18 19 20-21 21 Reviewing Pictures Learn how to the basics of scene and movie modes. 22-24 Getting Creative 25-27 15 Tutorial Getting Started Taking Pictures 16-21 Reviewing Pictures This chapter is divided into the following three sections: Taking Pictures Read this section for a step-by-step guide to view and delete pictures. Getting Creative Explore the creative possibilities of taking pictures with the COOLPIX 2000.
User Manual
Page 39
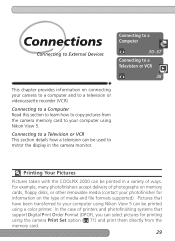
...can be printed in the camera monitor. Printing Your Pictures Pictures taken with the COOLPIX 2000 can be printed using a color printer. For example, many photofinishers accept delivery of photographs on memory cards, floppy disks, or other removable media (contact your computer using Nikon View 5. In the case... of printers and photofinishing systems that have been transferred to your computer using Nikon View 5 can select pictures for information on the type of ways. Pictures that support Digital Print Order Format (DPOF), you can be used to mirror the display in a ...
...can be printed in the camera monitor. Printing Your Pictures Pictures taken with the COOLPIX 2000 can be printed using a color printer. For example, many photofinishers accept delivery of photographs on memory cards, floppy disks, or other removable media (contact your computer using Nikon View 5. In the case... of printers and photofinishing systems that have been transferred to your computer using Nikon View 5 can select pictures for information on the type of ways. Pictures that support Digital Print Order Format (DPOF), you can be used to mirror the display in a ...
User Manual
Page 40
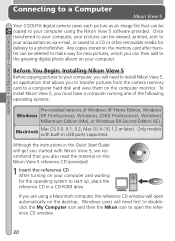
... system to a photofinisher. Macintosh Mac OS 9.0, 9.1, 9.2, Mac OS X (10.1.2 or later). Connections-Connecting to a Computer Connecting to a Computer Nikon View 5 Your COOLPIX digital camera saves each picture as an image file that can be viewed, printed, sent to your acquaintances via e-mail, or saved to a CD or other... running one of the following operating systems: Pre-installed versions of Windows XP Home Edition, Windows Windows XP Professional, Windows 2000 Professional, Windows Millennium Edition (Me), or Windows 98 Second Edition (SE). Any copies stored on the desktop.
... system to a photofinisher. Macintosh Mac OS 9.0, 9.1, 9.2, Mac OS X (10.1.2 or later). Connections-Connecting to a Computer Connecting to a Computer Nikon View 5 Your COOLPIX digital camera saves each picture as an image file that can be viewed, printed, sent to your acquaintances via e-mail, or saved to a CD or other... running one of the following operating systems: Pre-installed versions of Windows XP Home Edition, Windows Windows XP Professional, Windows 2000 Professional, Windows Millennium Edition (Me), or Windows 98 Second Edition (SE). Any copies stored on the desktop.
User Manual
Page 41
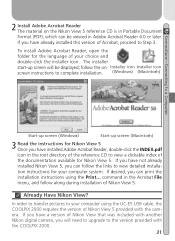
... CD is in Portable Document Format (PDF), which can print the installation instructions using the UC-E5 USB cable, the COOLPIX 2000 requires the version of Nikon View that was included with another Nikon digital camera, you have installed Adobe Acrobat Reader, double-click the INDEX.pdf icon in the Acrobat File menu, and follow along... Acrobat, proceed to view a clickable index of the documentation available for the language of your computer using the Print... If you have not already installed Nikon View 5, you have a version of Nikon View 5 provided with the COOLPIX 2000. 31
... CD is in Portable Document Format (PDF), which can print the installation instructions using the UC-E5 USB cable, the COOLPIX 2000 requires the version of Nikon View that was included with another Nikon digital camera, you have installed Adobe Acrobat Reader, double-click the INDEX.pdf icon in the Acrobat File menu, and follow along... Acrobat, proceed to view a clickable index of the documentation available for the language of your computer using the Print... If you have not already installed Nikon View 5, you have a version of Nikon View 5 provided with the COOLPIX 2000. 31

User Manual
Page 42
... adapter. 32 ture Transfer Protocol (PTP). If you are connecting the camera to your pictures using the supplied UC-E5 USB cable. 1 Choose a USB protocol The COOLPIX 2000 supports two USB proto- ond Edition (SE), or Mac OS 9 (9.0, 9.1, or 9.2) and have installed Nikon View 5, you are ready to transfer photographs and movies to a computer...
... adapter. 32 ture Transfer Protocol (PTP). If you are connecting the camera to your pictures using the supplied UC-E5 USB cable. 1 Choose a USB protocol The COOLPIX 2000 supports two USB proto- ond Edition (SE), or Mac OS 9 (9.0, 9.1, or 9.2) and have installed Nikon View 5, you are ready to transfer photographs and movies to a computer...
User Manual
Page 48
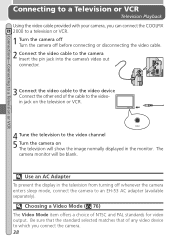
...the video cable provided with your camera, you can connect the COOLPIX 2000 to a television or VCR. 1 Turn the camera off Turn the camera off whenever the camera enters sleep mode, connect the camera to the video channel 5 Turn the camera on the television or VCR. The camera monitor will show the image normally... in the television from turning off before connecting or disconnecting the video cable. 2 Connect the video cable to the camera Insert the pin jack into the camera's video out connector. 3 Connect the video cable to the video device Connect the other end of any video device...
...the video cable provided with your camera, you can connect the COOLPIX 2000 to a television or VCR. 1 Turn the camera off Turn the camera off whenever the camera enters sleep mode, connect the camera to the video channel 5 Turn the camera on the television or VCR. The camera monitor will show the image normally... in the television from turning off before connecting or disconnecting the video cable. 2 Connect the video cable to the camera Insert the pin jack into the camera's video out connector. 3 Connect the video cable to the video device Connect the other end of any video device...
User Manual
Page 57
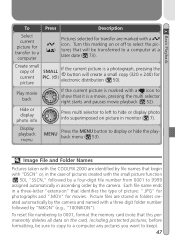
Picture files are stored in folders created automatically by the camera and named with a three digit folder number followed by a four-digit file number from 0001 to hide or display photo info superimposed on picture in a three-letter "extension" that will create a small copy... that identifies the type of pictures created with a icon. Image File and Folder Names Pictures taken with the COOLPIX 2000 are marked with the small picture function ( 50), "SSCN," followed by "NIKON" (e.g., "100NIKON"). To reset file numbering to 0001, format the memory card (note that this marking on ...
Picture files are stored in folders created automatically by the camera and named with a three digit folder number followed by a four-digit file number from 0001 to hide or display photo info superimposed on picture in a three-letter "extension" that will create a small copy... that identifies the type of pictures created with a icon. Image File and Folder Names Pictures taken with the COOLPIX 2000 are marked with the small picture function ( 50), "SSCN," followed by "NIKON" (e.g., "100NIKON"). To reset file numbering to 0001, format the memory card (note that this marking on ...
User Manual
Page 61
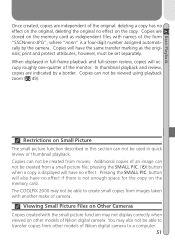
...as independent files with the small picture function may also not be able to a computer. 51 The COOLPIX 2000 may not be created from images taken with another make of camera. Pressing the SMALL PIC. Copies will also have no effect. print and protect attributes, however, ... the memory card as the originals; pressing the SMALL PIC. ( ) button when a copy is displayed will occupy roughly one-quarter of Nikon digital camera to transfer copies from a small picture file; Restrictions on the copy. Copies are stored on the memory card. Basic Playback Once created,...
...as independent files with the small picture function may also not be able to a computer. 51 The COOLPIX 2000 may not be created from images taken with another make of camera. Pressing the SMALL PIC. Copies will also have no effect. print and protect attributes, however, ... the memory card as the originals; pressing the SMALL PIC. ( ) button when a copy is displayed will occupy roughly one-quarter of Nikon digital camera to transfer copies from a small picture file; Restrictions on the copy. Copies are stored on the memory card. Basic Playback Once created,...
User Manual
Page 83
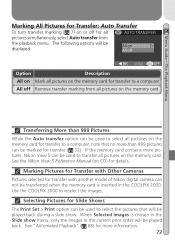
...to transfer all pictures on CD) for details. Marking Pictures for Transfer with another model of Nikon digital camera can be played back during a slide show menu, only the images in the COOLPIX 2000. Transferring More than 999 pictures can be marked for Slide Shows The Print Set > Print ...option can be played back. Selecting Pictures for transfer ( 32). See the Nikon View 5 Reference Manual (on the memory card for transfer...
...to transfer all pictures on CD) for details. Marking Pictures for Transfer with another model of Nikon digital camera can be played back during a slide show menu, only the images in the COOLPIX 2000. Transferring More than 999 pictures can be marked for Slide Shows The Print Set > Print ...option can be played back. Selecting Pictures for transfer ( 32). See the Nikon View 5 Reference Manual (on the memory card for transfer...
User Manual
Page 88
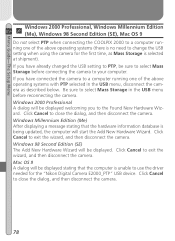
...close the dialog, and then disconnect the camera. 78 Windows Millennium Edition (Me) After displaying a message stating that the computer is no need to change the USB setting when using the camera for the "Nikon Digital Camera E2000_PTP" USB device. Windows 2000 Professional A dialog will start the Add... sure to select Mass Storage before reconnecting the camera. Menu Guide-The Setup Menu Windows 2000 Professional, Windows Millennium Edition (Me), Windows 98 Second Edition (SE), Mac OS 9 Do not select PTP when connecting the COOLPIX 2000 to a computer running one of the above ...
...close the dialog, and then disconnect the camera. 78 Windows Millennium Edition (Me) After displaying a message stating that the computer is no need to change the USB setting when using the camera for the "Nikon Digital Camera E2000_PTP" USB device. Windows 2000 Professional A dialog will start the Add... sure to select Mass Storage before reconnecting the camera. Menu Guide-The Setup Menu Windows 2000 Professional, Windows Millennium Edition (Me), Windows 98 Second Edition (SE), Mac OS 9 Do not select PTP when connecting the COOLPIX 2000 to a computer running one of the above ...
User Manual
Page 89
Technical Notes Camera Care, Options, and Resources This chapter provides tips on cleaning and storing your camera, a list of optional accessories available for the COOLPIX 2000, information on where to get help on line, troubleshooting advice, and camera specifications. 79
Technical Notes Camera Care, Options, and Resources This chapter provides tips on cleaning and storing your camera, a list of optional accessories available for the COOLPIX 2000, information on where to get help on line, troubleshooting advice, and camera specifications. 79


