
L10 / L11 User's Manual
Page 2
D-Lighting technology is a trademark. PictBridge is provided by o Apical Limited. Adobe and Acrobat are trademarks or registered trademarks of their respective holders. All other trade names mentioned in this manual or the other documentation provided with your Nikon product are registered trademarks of Adobe Systems Inc. The SD logo is a trademark of the SD Card Association. Microsoft and Windows are registered trademarks of Apple Computer, Inc. Trademark Information Macintosh, Mac OS, and QuickTime are registered trademarks of Microsoft Corporation.
D-Lighting technology is a trademark. PictBridge is provided by o Apical Limited. Adobe and Acrobat are trademarks or registered trademarks of their respective holders. All other trade names mentioned in this manual or the other documentation provided with your Nikon product are registered trademarks of Adobe Systems Inc. The SD logo is a trademark of the SD Card Association. Microsoft and Windows are registered trademarks of Apple Computer, Inc. Trademark Information Macintosh, Mac OS, and QuickTime are registered trademarks of Microsoft Corporation.

L10 / L11 User's Manual
Page 3
b Scene Mode i More on Playback T Recording and Viewing Movies O Voice Recordings Connecting to Televisions, Computers, and Printers m Shooting, Playback, Setup Menus and Technical Notes i Introduction Preparation for Shooting Basic Photography and Playback: L (Auto) Mode Shooting Suited for the Scene -
b Scene Mode i More on Playback T Recording and Viewing Movies O Voice Recordings Connecting to Televisions, Computers, and Printers m Shooting, Playback, Setup Menus and Technical Notes i Introduction Preparation for Shooting Basic Photography and Playback: L (Auto) Mode Shooting Suited for the Scene -
L10 / L11 User's Manual
Page 4
... or batteries of different makes or types. • If Nikon rechargeable EN-MH1 NiMH batteries are using an AC adapter, be read before using this equipment. Repairs should be taken to pre- Should the camera break open as a set. cautions when handling batteries for ...Batteries are indicated by qualified technicians. After removing or disconnecting the power source, take the product to a Nikon-authorized service representative for inspection. Do not use the camera or AC adapter in the presence of an infant or child. The consequences that should be performed only by...
... or batteries of different makes or types. • If Nikon rechargeable EN-MH1 NiMH batteries are using an AC adapter, be read before using this equipment. Repairs should be taken to pre- Should the camera break open as a set. cautions when handling batteries for ...Batteries are indicated by qualified technicians. After removing or disconnecting the power source, take the product to a Nikon-authorized service representative for inspection. Do not use the camera or AC adapter in the presence of an infant or child. The consequences that should be performed only by...

L10 / L11 User's Manual
Page 5
...could result in burns or fire. Failure to observe this precaution could cause temporary visual impairment. Use appropriate cables When connecting cables to a Nikon-authorized service representative for the pur- pose, to observe this precaution could result in .) from damaged batteries comes in contact with clothing or...the input and output jacks, use only the cables provided or sold by the lens cover or other objects are not pinched by Nikon for inspection. Playing CD-ROMs on or near the battery charger during lightening storms. Failure to maintain compliance with wet hands. ...
...could result in burns or fire. Failure to observe this precaution could cause temporary visual impairment. Use appropriate cables When connecting cables to a Nikon-authorized service representative for the pur- pose, to observe this precaution could result in .) from damaged batteries comes in contact with clothing or...the input and output jacks, use only the cables provided or sold by the lens cover or other objects are not pinched by Nikon for inspection. Playing CD-ROMs on or near the battery charger during lightening storms. Failure to maintain compliance with wet hands. ...

L10 / L11 User's Manual
Page 6
However, there is connected. • Consult the dealer or an experienced radio/television technician for help. COOLPIX L11/L10 Federal Communications Commission (FCC) Radio Frequency Interference Statement This equipment has been tested and found to comply with the instructions, may...and used in accordance with the limits for your equipment. Introduction iv Notices Notice for Customers in Canada CAUTION This Class B digital apparatus complies with Canadian ICES-003. Nikon Inc., 1300 Walt Whitman Road Melville, New York 11747-3064 USA Tel: 631-547-4200 Notice for customers in the ...
However, there is connected. • Consult the dealer or an experienced radio/television technician for help. COOLPIX L11/L10 Federal Communications Commission (FCC) Radio Frequency Interference Statement This equipment has been tested and found to comply with the instructions, may...and used in accordance with the limits for your equipment. Introduction iv Notices Notice for Customers in Canada CAUTION This Class B digital apparatus complies with Canadian ICES-003. Nikon Inc., 1300 Walt Whitman Road Melville, New York 11747-3064 USA Tel: 631-547-4200 Notice for customers in the ...

L10 / L11 User's Manual
Page 7
v Symbol for separate collection at an appropriate collection point. lection in European countries: • This product is to users in European Coun- tries This symbol indicates that this product is desig- nated for Separate Col- The following apply only to be collected separately. Do not dispose of as household waste. • For more information, contact the retailer or the local authorities in charge of waste management. Introduction
v Symbol for separate collection at an appropriate collection point. lection in European countries: • This product is to users in European Coun- tries This symbol indicates that this product is desig- nated for Separate Col- The following apply only to be collected separately. Do not dispose of as household waste. • For more information, contact the retailer or the local authorities in charge of waste management. Introduction
L10 / L11 User's Manual
Page 8
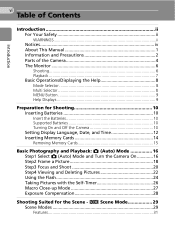
... vi Table of Contents Introduction ii For Your Safety ii WARNINGS ii Notices iv About This Manual 1 Information and Precautions 2 Parts of the Camera 4 The Monitor 6 Shooting 6 Playback 7 Basic Operations/Displaying the Help 8 Mode Selector 8 Multi Selector 8 MENU Button 9 Help Displays ...9 Preparation for Shooting 10 Inserting Batteries 10 Insert the Batteries 10 Supported Batteries 10 Turning On and Off the Camera 10 Setting Display Language, Date, and Time 12 Inserting Memory Cards 14 Removing Memory Cards 15 Basic Photography and Playback: L (Auto...
... vi Table of Contents Introduction ii For Your Safety ii WARNINGS ii Notices iv About This Manual 1 Information and Precautions 2 Parts of the Camera 4 The Monitor 6 Shooting 6 Playback 7 Basic Operations/Displaying the Help 8 Mode Selector 8 Multi Selector 8 MENU Button 9 Help Displays ...9 Preparation for Shooting 10 Inserting Batteries 10 Insert the Batteries 10 Supported Batteries 10 Turning On and Off the Camera 10 Setting Display Language, Date, and Time 12 Inserting Memory Cards 14 Removing Memory Cards 15 Basic Photography and Playback: L (Auto...
L10 / L11 User's Manual
Page 9
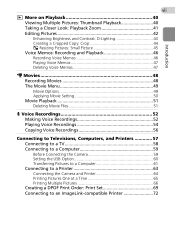
... Televisions, Computers, and Printers 57 Connecting to a TV 58 Connecting to a Computer 59 Before Connecting the Camera 59 Setting the USB Option 60 Transferring Pictures to a Computer 61 Connecting to a Printer 63 Connecting the Camera and Printer 64 Printing Pictures One at a Time 65 Printing Multiple Pictures 66 Creating a DPOF Print Order...
... Televisions, Computers, and Printers 57 Connecting to a TV 58 Connecting to a Computer 59 Before Connecting the Camera 59 Setting the USB Option 60 Transferring Pictures to a Computer 61 Connecting to a Printer 63 Connecting the Camera and Printer 64 Printing Pictures One at a Time 65 Printing Multiple Pictures 66 Creating a DPOF Print Order...
L10 / L11 User's Manual
Page 10
...73 Shooting Options: The Shooting Menu 73 Z Image Mode 74 d White Balance 76 q Continuous 78 A Best Shot Selector (BSS 79 d Color Options 79 Restrictions on Camera Settings 80 Playback Options: The Playback Menu 81 z Slide Show 83 A Delete 84 D Protect 84 E Transfer Marking 85 L Copy 86 Basic... Camera Setup: The Setup Menu 87 R Menus 88 H Quick Startup 89 V Welcome Screen 89 W Date 90 Z Monitor Settings 93 f Date Imprint 94 h Sound Settings 96 h ...
...73 Shooting Options: The Shooting Menu 73 Z Image Mode 74 d White Balance 76 q Continuous 78 A Best Shot Selector (BSS 79 d Color Options 79 Restrictions on Camera Settings 80 Playback Options: The Playback Menu 81 z Slide Show 83 A Delete 84 D Protect 84 E Transfer Marking 85 L Copy 86 Basic... Camera Setup: The Setup Menu 87 R Menus 88 H Quick Startup 89 V Welcome Screen 89 W Date 90 Z Monitor Settings 93 f Date Imprint 94 h Sound Settings 96 h ...

L10 / L11 User's Manual
Page 11
... monitor display samples so that monitor icons can be read it. k Memory Cards Pictures taken with this manual or in the camera monitor, and the names of a Nikon COOLPIX L11/COOLPIX L10 digital camera. Notations • A Secure Digital (SD) memory card is referred to as a "memory card." • The setting at the time of purchase is referred to...
... monitor display samples so that monitor icons can be read it. k Memory Cards Pictures taken with this manual or in the camera monitor, and the names of a Nikon COOLPIX L11/COOLPIX L10 digital camera. Notations • A Secure Digital (SD) memory card is referred to as a "memory card." • The setting at the time of purchase is referred to...
L10 / L11 User's Manual
Page 12
... this electronic circuitry. See the URL below for contact information: http://nikonimaging.com/ Use Only Nikon Brand Electronic Accessories Nikon COOLPIX cameras are designed to the attention of the Nikon representative in any form, by Nikon specifically for use of this Nikon digital camera are engineered and proven to ensure that may result from product malfunction. mitted, transcribed, stored...
... this electronic circuitry. See the URL below for contact information: http://nikonimaging.com/ Use Only Nikon Brand Electronic Accessories Nikon COOLPIX cameras are designed to the attention of the Nikon representative in any form, by Nikon specifically for use of this Nikon digital camera are engineered and proven to ensure that may result from product malfunction. mitted, transcribed, stored...
L10 / L11 User's Manual
Page 13
...by the government is the user's responsibility. Before discarding a data storage device or transferring ownership to be recovered from being in camera memory does not completely erase the original image data. The copying or reproduction of personal image data. Deleted files can sometimes be... if such copies or reproductions are stamped "Sample." Disposing of Data Storage Devices Please note that has been digitally copied or reproduced by means of a scanner, digital camera or other device may be taken to avoid injury or damage to also replace any pictures selected for example...
...by the government is the user's responsibility. Before discarding a data storage device or transferring ownership to be recovered from being in camera memory does not completely erase the original image data. The copying or reproduction of personal image data. Deleted files can sometimes be... if such copies or reproductions are stamped "Sample." Disposing of Data Storage Devices Please note that has been digitally copied or reproduced by means of a scanner, digital camera or other device may be taken to avoid injury or damage to also replace any pictures selected for example...
L10 / L11 User's Manual
Page 14
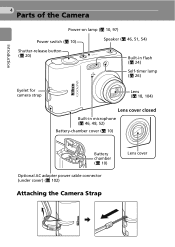
Introduction 4 Parts of the Camera Power-on lamp (c 10, 97) Power switch (c 10) Speaker (c 46, 51, 54) Shutter-release button (c 20) Built-in flash (c 24) Self-timer lamp (c 26) Eyelet for camera strap Lens (c 18, 104) Lens cover closed Built-in microphone (c 46, 48, 52) Battery-chamber cover (c 10) Battery chamber (c 10) Optional AC adapter power cable connector (under cover) (c 102) Attaching the Camera Strap Lens cover
Introduction 4 Parts of the Camera Power-on lamp (c 10, 97) Power switch (c 10) Speaker (c 46, 51, 54) Shutter-release button (c 20) Built-in flash (c 24) Self-timer lamp (c 26) Eyelet for camera strap Lens (c 18, 104) Lens cover closed Built-in microphone (c 46, 48, 52) Battery-chamber cover (c 10) Battery chamber (c 10) Optional AC adapter power cable connector (under cover) (c 102) Attaching the Camera Strap Lens cover

L10 / L11 User's Manual
Page 15
Introduction 5 Opening the connector cover Cable connector Flash lamp (c 24) Indicator lamp (c 52) Connector cover (c 58, 61, 64) Monitor (c 6) i (playback) button (c 22, 40) Zoom buttons (c 18) See also: • t (wide): c 18 • v (tele): c 18 • j (thumbnail playback): c 40 • k (playback zoom): c 41 • l (help): c 9 m button (c 9) Tripod socket Memory card slot cover (c 14) T (delete) button (c 22, 41, 47, 51) Mode selector (c 8, 16, 29, 48) ImageLink connector (c 72) Multi selector (c 8) H: Display self-timer menu (c 26) L: Display macro close-up mode menu ...
Introduction 5 Opening the connector cover Cable connector Flash lamp (c 24) Indicator lamp (c 52) Connector cover (c 58, 61, 64) Monitor (c 6) i (playback) button (c 22, 40) Zoom buttons (c 18) See also: • t (wide): c 18 • v (tele): c 18 • j (thumbnail playback): c 40 • k (playback zoom): c 41 • l (help): c 9 m button (c 9) Tripod socket Memory card slot cover (c 14) T (delete) button (c 22, 41, 47, 51) Mode selector (c 8, 16, 29, 48) ImageLink connector (c 72) Multi selector (c 8) H: Display self-timer menu (c 26) L: Display macro close-up mode menu ...

L10 / L11 User's Manual
Page 16
...COOLPIX L10. Shooting 20 21 A qw 19 f g h i j l 18 C D B A 17 5 p 123 4 6 zABCD 7 L GF q g B 8 9 W 10 C I+1.0 10 s 11 W Y 12 13 9999 16 15 14 1 Shooting mode1.... 16, 29, 48 2 Exposure lock 38 3 Macro close-up mode........ 27 4 Zoom indicator 18, 27 5 Focus indicator 20 6 Flash mode 24 7 Camera... mode. 2 L, d, e, h, and i are available for the monitor indicators during shooting and playback (actual display varies with current camera settings). Introduction 6 The Monitor The following indicators may appear in the monitor during voice recording and voice playback.
...COOLPIX L10. Shooting 20 21 A qw 19 f g h i j l 18 C D B A 17 5 p 123 4 6 zABCD 7 L GF q g B 8 9 W 10 C I+1.0 10 s 11 W Y 12 13 9999 16 15 14 1 Shooting mode1.... 16, 29, 48 2 Exposure lock 38 3 Macro close-up mode........ 27 4 Zoom indicator 18, 27 5 Focus indicator 20 6 Flash mode 24 7 Camera... mode. 2 L, d, e, h, and i are available for the monitor indicators during shooting and playback (actual display varies with current camera settings). Introduction 6 The Monitor The following indicators may appear in the monitor during voice recording and voice playback.

L10 / L11 User's Manual
Page 17
7 Introduction Playback 13 14 15 S 15/05/2007 12:00 1 9999.JPG 2 3 12 E 11 w 10 D P 4 9999 / 9999 9 86 5 7 1 Internal memory indicator . 22 2 Battery level indicator ........ 16 3 File number and type....... 103 4 Volume indicator......... 46, 51 Current frame number/ 5 total number of frames/ .... 22 movie length 51 6 D-Lighting icon 43 7 Movie playback indicator... 51 8 Voice memo icon 46 9 Image mode 74 10 Protect icon 84 11 Print-order icon 70 12 Transfer icon 62, 85 13 Date of recording 12 14 Time of recording 12 15 Movie indicator 51
7 Introduction Playback 13 14 15 S 15/05/2007 12:00 1 9999.JPG 2 3 12 E 11 w 10 D P 4 9999 / 9999 9 86 5 7 1 Internal memory indicator . 22 2 Battery level indicator ........ 16 3 File number and type....... 103 4 Volume indicator......... 46, 51 Current frame number/ 5 total number of frames/ .... 22 movie length 51 6 D-Lighting icon 43 7 Movie playback indicator... 51 8 Voice memo icon 46 9 Image mode 74 10 Protect icon 84 11 Print-order icon 70 12 Transfer icon 62, 85 13 Date of recording 12 14 Time of recording 12 15 Movie indicator 51

L10 / L11 User's Manual
Page 18
... the previous picture (c 22). (I or G) Apply D-Lighting (c 43) Navigating the Menus Return to different subjects of camera settings are shown as indoor parties or night landscapes, and let the camera do the rest. Display the next picture (c 22). (J or H) Move cursor up , self-timer, and exposure ...and functions, the multi selector is also used to the desired mode. Display the sub-menu, move cursor left , and right are controlled by the camera. T: Movie mode (c 48) Record movies. Make selection. * In the manual, the multi selector buttons for moving the cursor or selection up,...
... the previous picture (c 22). (I or G) Apply D-Lighting (c 43) Navigating the Menus Return to different subjects of camera settings are shown as indoor parties or night landscapes, and let the camera do the rest. Display the next picture (c 22). (J or H) Move cursor up , self-timer, and exposure ...and functions, the multi selector is also used to the desired mode. Display the sub-menu, move cursor left , and right are controlled by the camera. T: Movie mode (c 48) Record movies. Make selection. * In the manual, the multi selector buttons for moving the cursor or selection up,...
L10 / L11 User's Manual
Page 19
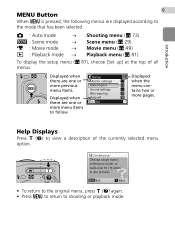
MENU Exit ? Introduction 9 MENU Button When m is pressed, the following menus are one picture). Set up ] at the top of the currently selected menu option. Displayed when there are one or more previous menu items. Displayed when there are displayed according to follow. L : Auto mode → b : Scene mode → T : Movie mode → i : Playback mode → Shooting menu (c 73) Scene menu (c 29) Movie menu (c 49) Playback menu (c 81) To display the setup menu (c 87), choose [Set up Monitor settings Date imprint Sound settings Blur warning Auto off MENU Exit ...
MENU Exit ? Introduction 9 MENU Button When m is pressed, the following menus are one picture). Set up ] at the top of the currently selected menu option. Displayed when there are one or more previous menu items. Displayed when there are displayed according to follow. L : Auto mode → b : Scene mode → T : Movie mode → i : Playback mode → Shooting menu (c 73) Scene menu (c 29) Movie menu (c 49) Playback menu (c 81) To display the setup menu (c 87), choose [Set up Monitor settings Date imprint Sound settings Blur warning Auto off MENU Exit ...
L10 / L11 User's Manual
Page 20
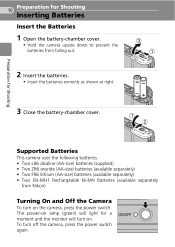
The power-on lamp (green) will light for Shooting 3 Close the battery-chamber cover. 1 2 Supported Batteries This camera uses the following batteries. • Two LR6 alkaline (AA-size) batteries (supplied) • Two ZR6 oxyride (AA-size) batteries (available separately) • Two ...moment and the monitor will turn on . 10 Preparation for Shooting Inserting Batteries Insert the Batteries 1 Open the battery-chamber cover. • Hold the camera upside down to prevent the batteries from Nikon) Turning On and Off the Camera To turn on the camera, press the power switch. To turn off the...
The power-on lamp (green) will light for Shooting 3 Close the battery-chamber cover. 1 2 Supported Batteries This camera uses the following batteries. • Two LR6 alkaline (AA-size) batteries (supplied) • Two ZR6 oxyride (AA-size) batteries (available separately) • Two ...moment and the monitor will turn on . 10 Preparation for Shooting Inserting Batteries Insert the Batteries 1 Open the battery-chamber cover. • Hold the camera upside down to prevent the batteries from Nikon) Turning On and Off the Camera To turn on the camera, press the power switch. To turn off the...
L10 / L11 User's Manual
Page 21
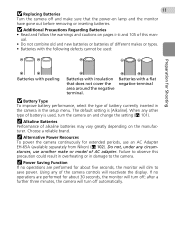
... Type To improve battery performance, select the type of battery currently inserted in the camera in damage to the camera. Do not, under any circumstances, use an AC Adapter EH-65A (available separately from Nikon) (c 102). after a further three minutes, the camera will dim to observe this man- k Alternative Power Resources To power the...
... Type To improve battery performance, select the type of battery currently inserted in the camera in damage to the camera. Do not, under any circumstances, use an AC Adapter EH-65A (available separately from Nikon) (c 102). after a further three minutes, the camera will dim to observe this man- k Alternative Power Resources To power the...
