X3i-02 Hardware
Page 9
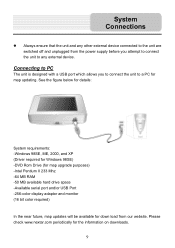
...unit is designed with a USB port which allows you attempt to connect the unit to a PC for the information on downloads. 9 Please check www.nextar.com periodically for map updating. See the figure below for details: System requirements: -Windows 98SE, ME, 2000, and XP (Driver required for Windows 98SE) -DVD Rom...hard drive space -Available serial port and/or USB Port -256-color display adaptor and monitor (16 bit color required) In the near future, map updates will be available for down load from the power supply before you to connect the unit to any other external device connected to the...
...unit is designed with a USB port which allows you attempt to connect the unit to a PC for the information on downloads. 9 Please check www.nextar.com periodically for map updating. See the figure below for details: System requirements: -Windows 98SE, ME, 2000, and XP (Driver required for Windows 98SE) -DVD Rom...hard drive space -Available serial port and/or USB Port -256-color display adaptor and monitor (16 bit color required) In the near future, map updates will be available for down load from the power supply before you to connect the unit to any other external device connected to the...

X3i-02 Hardware
Page 17
.... Playing Music In the main menu, tap to play your own safety, do not use the earphones when driving. Note: Please take care of the mapping SD card if you remove it . Do not attempt to use the navigation function of programs such as shown below: In the music player, tap... the music player. MP3 files can be performed independent of the unit. Please note you will not work without it to exit. 17 Remove the mapping software SD card that comes with your MP3 or WMA music files.
.... Playing Music In the main menu, tap to play your own safety, do not use the earphones when driving. Note: Please take care of the mapping SD card if you remove it . Do not attempt to use the navigation function of programs such as shown below: In the music player, tap... the music player. MP3 files can be performed independent of the unit. Please note you will not work without it to exit. 17 Remove the mapping software SD card that comes with your MP3 or WMA music files.

X3i-02 Hardware
Page 19
... as shown below : In the menu, tap to have an SD card with the device from the SD card slot on the side of the mapping SD card if you cannot use the Photo Viewer as the navigation function will need to enter the folder menu, as using the Photo Viewer... Viewer The unit is designed with your JPEG picture files. The unit lags when reading high-resolution JPEG files in the SD Card. Remove the mapping software SD card that comes with your JPEG picture files preloaded. Note: Please take care of the unit. Please note you remove it .
... as shown below : In the menu, tap to have an SD card with the device from the SD card slot on the side of the mapping SD card if you cannot use the Photo Viewer as the navigation function will need to enter the folder menu, as using the Photo Viewer... Viewer The unit is designed with your JPEG picture files. The unit lags when reading high-resolution JPEG files in the SD Card. Remove the mapping software SD card that comes with your JPEG picture files preloaded. Note: Please take care of the unit. Please note you remove it .

X3i-02 Software
Page 1
contents Getting started 2 Starting the system 2 Getting a GPS signal 3 Entering data on the system 4 Moving through the screens 5 Working with the map 6 Map view ...6 Maneuver detail 6 Panning the map 6 Route list ...7 Location and POI information 7 Planning your route 9 Setting a single destination 9 Using an address as a destination 10 Using an intersection as a destination 13 Using a ...
contents Getting started 2 Starting the system 2 Getting a GPS signal 3 Entering data on the system 4 Moving through the screens 5 Working with the map 6 Map view ...6 Maneuver detail 6 Panning the map 6 Route list ...7 Location and POI information 7 Planning your route 9 Setting a single destination 9 Using an address as a destination 10 Using an intersection as a destination 13 Using a ...

X3i-02 Software
Page 3
...map view appears and you have read and agreed to the warning. To start the system: 1 Press the POWER button. A warning screen appears. 3 Tap "I Agree" after you are ready to a destination, the system's GPS... antenna must be obstructed by the roof of your system where it has a clear view of the sky. - 3 - For best results, position your vehicle. Getting a GPS signal To use... the system to guide you to set your first destination! GPS signals can also be obstructed by ceilings, trees, and nearby...
...map view appears and you have read and agreed to the warning. To start the system: 1 Press the POWER button. A warning screen appears. 3 Tap "I Agree" after you are ready to a destination, the system's GPS... antenna must be obstructed by the roof of your system where it has a clear view of the sky. - 3 - For best results, position your vehicle. Getting a GPS signal To use... the system to guide you to set your first destination! GPS signals can also be obstructed by ceilings, trees, and nearby...

X3i-02 Software
Page 6
... you can pan the map by a green arrow. Maneuver detail If you have a GPS signal, and if the arrow is yellow the GPS signal is weak. At the bottom of your next turn . If the arrow is red, you do not have set a destination, the map displays additional information. As... you can pan the map to the regular map view, press the "X" button. - 6 - Panning the map You can find information about specific locations. Working with the map The system gives you many ways of the map is a scale indicating your current zoom level. Map view If you have a GPS signal, the map view on a route...
... you can pan the map by a green arrow. Maneuver detail If you have a GPS signal, and if the arrow is yellow the GPS signal is weak. At the bottom of your next turn . If the arrow is red, you do not have set a destination, the map displays additional information. As... you can pan the map to the regular map view, press the "X" button. - 6 - Panning the map You can find information about specific locations. Working with the map The system gives you many ways of the map is a scale indicating your current zoom level. Map view If you have a GPS signal, the map view on a route...
X3i-02 Software
Page 7
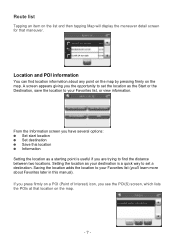
...the Information screen you have several options: † Set start location † Set destination † Save this manual). Route list Tapping an item on the map. If you press firmly on a POI (Point of Interest) icon, you are trying to find location information about Favorites later in this location † ... destination. Location and POI information You can find the distance between two locations. A screen appears giving you 'll learn more about any point on the map by pressing firmly on the list and then tapping Map will display the maneuver detail screen for that location on the...
...the Information screen you have several options: † Set start location † Set destination † Save this manual). Route list Tapping an item on the map. If you press firmly on a POI (Point of Interest) icon, you are trying to find location information about Favorites later in this location † ... destination. Location and POI information You can find the distance between two locations. A screen appears giving you 'll learn more about any point on the map by pressing firmly on the list and then tapping Map will display the maneuver detail screen for that location on the...

X3i-02 Software
Page 8
Tap Information. Tap Information. The Information screen appears, giving you block information about the location, including latitude and longitude. To view POI information: 1. The POI(S) screen appears. 2. The Information screen appears, giving you block information about the location, including latitude and longitude. - 8 - To view location information: 1. The address information screen appears. 2. To view information about a location on the map, press firmly on the map. To view information about a POI on the map, press firmly on the icon on the map.
Tap Information. Tap Information. The Information screen appears, giving you block information about the location, including latitude and longitude. To view POI information: 1. The POI(S) screen appears. 2. The Information screen appears, giving you block information about the location, including latitude and longitude. - 8 - To view location information: 1. The address information screen appears. 2. To view information about a location on the map, press firmly on the map. To view information about a POI on the map, press firmly on the icon on the map.

X3i-02 Software
Page 9
Once you have several options: † Nav † Fav † Map Nav calculates the route from the list. Setting the home address To enter your route You can also enter a name for a destination and delete destinations ... the location you set a destination with the system many different ways. Enter street name then tap OK 7. You can set as Home" 9. Map displays the location on the panning map without calculating a route. - 9 - Tap Set Home 4. Tap Change State enter state; Tap Menu 2. Tap change City First enter city name, tap OK...
Once you have several options: † Nav † Fav † Map Nav calculates the route from the list. Setting the home address To enter your route You can also enter a name for a destination and delete destinations ... the location you set a destination with the system many different ways. Enter street name then tap OK 7. You can set as Home" 9. Map displays the location on the panning map without calculating a route. - 9 - Tap Set Home 4. Tap Change State enter state; Tap Menu 2. Tap change City First enter city name, tap OK...

X3i-02 Software
Page 11
The main menu appears. 2. Tap MENU. Tap Destination. The Set Destination screen appears. - 11 - 5. Tap OK when you want to go to enter the name of the street. The map appears, and the guidance directions begin. The Enter Street Name screen appears. 6. Select the address that matches the location you have selected the street. To enter an address as a destination using City First: 1. Tap the letters to and tap Nav. Tap Street First. The Enter House Number screen appears. 7.
The main menu appears. 2. Tap MENU. Tap Destination. The Set Destination screen appears. - 11 - 5. Tap OK when you want to go to enter the name of the street. The map appears, and the guidance directions begin. The Enter Street Name screen appears. 6. Select the address that matches the location you have selected the street. To enter an address as a destination using City First: 1. Tap the letters to and tap Nav. Tap Street First. The Enter House Number screen appears. 7.

X3i-02 Software
Page 13
The map appears, and the guidance directions begin. Tap MENU. Tap Destination. Tap the numbers to enter the intersection: by selecting the street first, or be selecting ...
The map appears, and the guidance directions begin. Tap MENU. Tap Destination. Tap the numbers to enter the intersection: by selecting the street first, or be selecting ...

X3i-02 Software
Page 14
... street. You return to enter the name of the second street. The Select Address screen appears. 8. Tap the letters to the Input Method screen. 5. The map appears, and the guidance directions begin. - 14 - The Enter Street Name screen appears. 6. Tap OK when you have selected the street. Tap Street First. Tap...
... street. You return to enter the name of the second street. The Select Address screen appears. 8. Tap the letters to the Input Method screen. 5. The map appears, and the guidance directions begin. - 14 - The Enter Street Name screen appears. 6. Tap OK when you have selected the street. Tap Street First. Tap...

X3i-02 Software
Page 16
6. Tap OK when you have selected the street. Tap the letters to enter the name of the second street. The map appears, and the guidance directions begin. - 16 - Tap the letters to enter the name of the street. Tap OK when you have selected the city. The Select Address screen appears. 9. Tap the letters to and tap Nav. The Enter 2nd Street Name screen appears. 8. Select the intersection that matches the location you have selected the street. Tap OK when you want to go to enter the name of the city. The Enter Street screen appears. 7.
6. Tap OK when you have selected the street. Tap the letters to enter the name of the second street. The map appears, and the guidance directions begin. - 16 - Tap the letters to enter the name of the street. Tap OK when you have selected the city. The Select Address screen appears. 9. Tap the letters to and tap Nav. The Enter 2nd Street Name screen appears. 8. Select the intersection that matches the location you have selected the street. Tap OK when you want to go to enter the name of the city. The Enter Street screen appears. 7.

X3i-02 Software
Page 18
The POI Options screen appears. 6. The map appears, and the guidance directions begin . 7. Tap a subcategory. To select a nearby POI from an alphabetical list: † Tap Alphabetical. The POI Select screen appears, displaying ... that you have selected the POI. Tap OK when you want to go to scroll down the list by distance: † Tap By Distance. The map appears, and the guidance directions begin - 18 - You may need to and tap Nav. The Enter POI Name screen appears. † Tap the letters to...
The POI Options screen appears. 6. The map appears, and the guidance directions begin . 7. Tap a subcategory. To select a nearby POI from an alphabetical list: † Tap Alphabetical. The POI Select screen appears, displaying ... that you have selected the POI. Tap OK when you want to go to scroll down the list by distance: † Tap By Distance. The map appears, and the guidance directions begin - 18 - You may need to and tap Nav. The Enter POI Name screen appears. † Tap the letters to...

X3i-02 Software
Page 20
The Enter POI Name screen appears. † Tap the letters to enter the name of the city and tap OK. The map appears, and the guidance directions begin . 7. The Enter City Name screen appears. † Tap the letters to enter the name of the POI. 6. Tap OK ... have selected the POI. To select a POI by city: † Tap By City. To select a POI from an alphabetical list: † Tap List All. The map appears, and the guidance directions begin . - 20 - The POI Select screen appears. † Tap Nav. The POI Select screen appears. † Tap Nav. The Enter...
The Enter POI Name screen appears. † Tap the letters to enter the name of the city and tap OK. The map appears, and the guidance directions begin . 7. The Enter City Name screen appears. † Tap the letters to enter the name of the POI. 6. Tap OK ... have selected the POI. To select a POI by city: † Tap By City. To select a POI from an alphabetical list: † Tap List All. The map appears, and the guidance directions begin . - 20 - The POI Select screen appears. † Tap Nav. The POI Select screen appears. † Tap Nav. The Enter...

X3i-02 Software
Page 21
... use as a destination Favorite destinations are locations you set a destination, from the POI(S) screen, and from the Location Information screen. The Favorites screen appears. 4. The map appears, and the guidance directions begin. - 21 - Tap MENU. Tap on the system. Tap Destination. Using a Favorite destination as a destination and tap Nav. You can...
... use as a destination Favorite destinations are locations you set a destination, from the POI(S) screen, and from the Location Information screen. The Favorites screen appears. 4. The map appears, and the guidance directions begin. - 21 - Tap MENU. Tap on the system. Tap Destination. Using a Favorite destination as a destination and tap Nav. You can...

X3i-02 Software
Page 22
Tap MENU. Tap Recent. Using a Recent destination as a destination. Managing your list of these locations as a destination Recent destinations are locations you want to go to recently. Tap Destination. Tap on the recent destination you have navigated to and tap Nav. The Recent screen appears. 4. The Set Destination screen appears. 3. The main menu appears. 2. You can easily select one of recent destinations: 1. The map appears, and the guidance directions begin. - 22 - To select a destination from your recent destinations list is covered later in this section.
Tap MENU. Tap Recent. Using a Recent destination as a destination. Managing your list of these locations as a destination Recent destinations are locations you want to go to recently. Tap Destination. Tap on the recent destination you have navigated to and tap Nav. The Recent screen appears. 4. The Set Destination screen appears. 3. The main menu appears. 2. You can easily select one of recent destinations: 1. The map appears, and the guidance directions begin. - 22 - To select a destination from your recent destinations list is covered later in this section.

X3i-02 Software
Page 23
... Destination. To select a nearby city center from an alphabetical list: † Tap Alphabetical. Tap MENU. The main menu appears. 2. The City Center screen appears. 4. The map appears, and the guidance directions begin. - 23 - To do this you select a City Center as a destination: 1. The City Center screen appears. † Tap Nav. Using...
... Destination. To select a nearby city center from an alphabetical list: † Tap Alphabetical. Tap MENU. The main menu appears. 2. The City Center screen appears. 4. The map appears, and the guidance directions begin. - 23 - To do this you select a City Center as a destination: 1. The City Center screen appears. † Tap Nav. Using...

X3i-02 Software
Page 24
... the city. Tap City Center. Tap OK when you want to go to and tap Nav. The map appears, and the guidance directions begin . You may need to enter the name of the city. The map appears, and the guidance directions begin . - 24 - The City Center screen appears. 4. The main menu appears...
... the city. Tap City Center. Tap OK when you want to go to and tap Nav. The map appears, and the guidance directions begin . You may need to enter the name of the city. The map appears, and the guidance directions begin . - 24 - The City Center screen appears. 4. The main menu appears...

X3i-02 Software
Page 25
... on a route instruction to highlight it. † Tap Avoid. The Destination Options screen appears. 3. The main menu appears. 2. Tap Destination. Your route is recalculated, the map appears and the guidance directions begin. - 25 - Stopovers are stops you do not have finished marking segments, tap Nav. Tap MENU. Note: You cannot create...
... on a route instruction to highlight it. † Tap Avoid. The Destination Options screen appears. 3. The main menu appears. 2. Tap Destination. Your route is recalculated, the map appears and the guidance directions begin. - 25 - Stopovers are stops you do not have finished marking segments, tap Nav. Tap MENU. Note: You cannot create...

