X3 - Quick Start Guide
Page 1
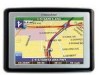
... A\ W "TY Mani MOM anti OJ Zoo; 3-1 Current lioad-t- YONGE ST HWY-11 8: 3AM FM 00 20 'f ST 18 lcm F41 lim/h Intimated Time of the mounting bracket. 2. r1.11P: gr . PM' cfts;t irAlTf LE AVE C.l..4ARD VIEW BLVD-- Slide the mounwigcradle onto the end of Nrnrid 1 Total li. ib... mount to windshield,prtss the suction cup to dashboard.use the included adhesive dick. z S O1 Unit View Description Ci IOW Keypad Operation and Screen Icons Next '...
... A\ W "TY Mani MOM anti OJ Zoo; 3-1 Current lioad-t- YONGE ST HWY-11 8: 3AM FM 00 20 'f ST 18 lcm F41 lim/h Intimated Time of the mounting bracket. 2. r1.11P: gr . PM' cfts;t irAlTf LE AVE C.l..4ARD VIEW BLVD-- Slide the mounwigcradle onto the end of Nrnrid 1 Total li. ib... mount to windshield,prtss the suction cup to dashboard.use the included adhesive dick. z S O1 Unit View Description Ci IOW Keypad Operation and Screen Icons Next '...
X3-02 Hardware Manual
Page 6
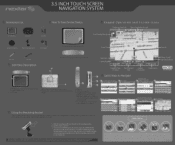
Accessories Accessories List ITEM NAME Instruction Manual Car Adaptor QTY 2 1 Mounting Bracket 1 USB Cable 1 Mounting Cradle 1 Stylus 1 Dashboard Mount Disk 1 Pouch 1 NOTE Accessories and their parts numbers are subject to modification without prior notice due to improvements. 5
Accessories Accessories List ITEM NAME Instruction Manual Car Adaptor QTY 2 1 Mounting Bracket 1 USB Cable 1 Mounting Cradle 1 Stylus 1 Dashboard Mount Disk 1 Pouch 1 NOTE Accessories and their parts numbers are subject to modification without prior notice due to improvements. 5
X3-02 Hardware Manual
Page 7
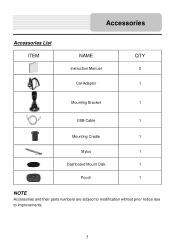
Contents Important Safety Instructions Accessories View of Main Unit System Connections Power Supply Preparation General Setup Playing Music Photo Viewer Use of the Mount Accessories Troubleshooting Specifications 1 5 7 8 9 10 14 16 18 19 20 6
Contents Important Safety Instructions Accessories View of Main Unit System Connections Power Supply Preparation General Setup Playing Music Photo Viewer Use of the Mount Accessories Troubleshooting Specifications 1 5 7 8 9 10 14 16 18 19 20 6
X3-02 Hardware Manual
Page 19
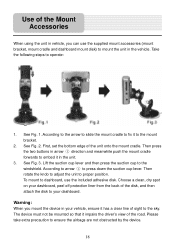
... cup lever and then press the suction cup to dashboard, use the supplied mount accessories (mount bracket, mount cradle and dashboard mount disk) to fix it in the vehicle. To mount to the windshield. The device must not be mounted so that it has a clear line of sight to the sky. Please ...take extra precaution to press down the suction cup lever. Use of the Mount Accessories When using the unit in vehicle, you mount the device in your dashboard. See Fig. 2. According to arrow ① to ensure the airbags are not obstructed by...
... cup lever and then press the suction cup to dashboard, use the supplied mount accessories (mount bracket, mount cradle and dashboard mount disk) to fix it in the vehicle. To mount to the windshield. The device must not be mounted so that it has a clear line of sight to the sky. Please ...take extra precaution to press down the suction cup lever. Use of the Mount Accessories When using the unit in vehicle, you mount the device in your dashboard. See Fig. 2. According to arrow ① to ensure the airbags are not obstructed by...


