ME Hardware Manual
Page 1
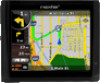
... and detailed map guide you to persons. Your mobile navigation system assures that may be of sufficient magnitude to constitute a risk of electric to your Nextar GPS Navigator.
... and detailed map guide you to persons. Your mobile navigation system assures that may be of sufficient magnitude to constitute a risk of electric to your Nextar GPS Navigator.
ME Hardware Manual
Page 2
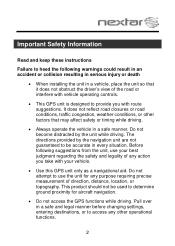
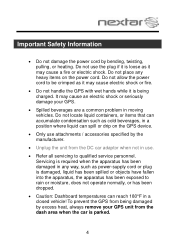
Important Safety Information Read and keep these instructions Failure to heed the following suggestions from the unit, use the unit for aircraft navigation. Do not access the GPS functions while driving. Do not become distracted by the navigation unit are not guaranteed to determine ground proximity for any other factors that it does not obstruct the driver's view of any action you with your best judgment regarding the safety and legality of the road or interfere with vehicle operating controls. This GPS unit is designed to access any purpose ...
Important Safety Information Read and keep these instructions Failure to heed the following suggestions from the unit, use the unit for aircraft navigation. Do not access the GPS functions while driving. Do not become distracted by the navigation unit are not guaranteed to determine ground proximity for any other factors that it does not obstruct the driver's view of any action you with your best judgment regarding the safety and legality of the road or interfere with vehicle operating controls. This GPS unit is designed to access any purpose ...
ME Hardware Manual
Page 3
... harsh chemicals (such as the unit may harm the internal electronics of the unit. Warning: To reduce the risk of products provided by NEXTAR. No user serviceable parts inside.
... harsh chemicals (such as the unit may harm the internal electronics of the unit. Warning: To reduce the risk of products provided by NEXTAR. No user serviceable parts inside.
ME Hardware Manual
Page 4
Do not place any way, such as cold beverages, in use attachments / accessories specified by the manufacturer. Unplug the unit from being charged. It may cause a fire or electric shock. Servicing is loose as it may cause electric shock or fire. Do not handle the GPS with wet hands while it may cause an electric shock or seriously damage your GPS unit from the dash area when the car is damaged, liquid has been spilled or objects have fallen into the apparatus, the apparatus has been exposed to be crimped as it is being damaged by ...
Do not place any way, such as cold beverages, in use attachments / accessories specified by the manufacturer. Unplug the unit from being charged. It may cause a fire or electric shock. Servicing is loose as it may cause electric shock or fire. Do not handle the GPS with wet hands while it may cause an electric shock or seriously damage your GPS unit from the dash area when the car is damaged, liquid has been spilled or objects have fallen into the apparatus, the apparatus has been exposed to be crimped as it is being damaged by ...
ME Hardware Manual
Page 5
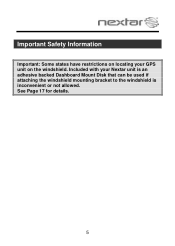
See Page 17 for details. 5 Included with your GPS unit on locating your Nextar unit is an adhesive backed Dashboard Mount Disk that can be used if attaching the windshield mounting bracket to the windshield is inconvenient or not allowed. Important Safety Information Important: Some states have restrictions on the windshield.
See Page 17 for details. 5 Included with your GPS unit on locating your Nextar unit is an adhesive backed Dashboard Mount Disk that can be used if attaching the windshield mounting bracket to the windshield is inconvenient or not allowed. Important Safety Information Important: Some states have restrictions on the windshield.
ME Hardware Manual
Page 6
Connect the equipment into an outlet on , the user is connected. Consult the dealer or an experienced radio/TV technician for Class B digital device, pursuant to part 15 of the FCC Rules. This equipment has been tested and found to comply with limits for help. 6 These limits are designed to provide reasonable protection against harmful interference in accordance with part 15 of the FCC Rules. This equipment generates, uses and can radiate radio frequency energy and, if not installed and used in a residential installation. Operation is subject to the following ...
Connect the equipment into an outlet on , the user is connected. Consult the dealer or an experienced radio/TV technician for Class B digital device, pursuant to part 15 of the FCC Rules. This equipment has been tested and found to comply with limits for help. 6 These limits are designed to provide reasonable protection against harmful interference in accordance with part 15 of the FCC Rules. This equipment generates, uses and can radiate radio frequency energy and, if not installed and used in a residential installation. Operation is subject to the following ...
ME Hardware Manual
Page 7
FCC & UL Compliance This Class B digital apparatus complies with Canadian ICES-003. UL MAKES NO REPRESENTATIONS, WARRANTIES OR CERTIFICATIONS WHATSOEVER REGARDING THE PERFORMANCE OR RELIABILITY OF ANY GPS RELATED FUNCTIONS OF THIS PRODUCT. 7 CAUTION: Underwriters Laboratories Inc. ("UL") has not tested the performance or reliability of the Global Positioning System ("GPS") hardware, operating software or other aspects of the GPS hardware and GPS operating software. UL has only tested for fire, shock or casualty hazards as outlined in UL's Standard(s) for Safety. UL Certification does ...
FCC & UL Compliance This Class B digital apparatus complies with Canadian ICES-003. UL MAKES NO REPRESENTATIONS, WARRANTIES OR CERTIFICATIONS WHATSOEVER REGARDING THE PERFORMANCE OR RELIABILITY OF ANY GPS RELATED FUNCTIONS OF THIS PRODUCT. 7 CAUTION: Underwriters Laboratories Inc. ("UL") has not tested the performance or reliability of the Global Positioning System ("GPS") hardware, operating software or other aspects of the GPS hardware and GPS operating software. UL has only tested for fire, shock or casualty hazards as outlined in UL's Standard(s) for Safety. UL Certification does ...
ME Hardware Manual
Page 8
Table of Contents Introduction Important Safety Information 1 FCC & UL Compliance 6 Getting Familiar With Your Hardware Main Unit 9 Accessories 11 Power Adaptor 12 System Connections 14 Using the Windshield Mounting Bracket 17 Using Your Navigator General Setup 19 Playing Music 27 Photo Viewer 30 Service & Support Troubleshooting 34 Specifications 37 Copyright 38 8
Table of Contents Introduction Important Safety Information 1 FCC & UL Compliance 6 Getting Familiar With Your Hardware Main Unit 9 Accessories 11 Power Adaptor 12 System Connections 14 Using the Windshield Mounting Bracket 17 Using Your Navigator General Setup 19 Playing Music 27 Photo Viewer 30 Service & Support Troubleshooting 34 Specifications 37 Copyright 38 8
ME Hardware Manual
Page 9
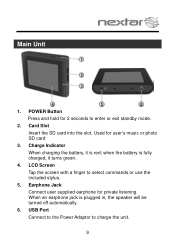
Card Slot Insert the SD card into the slot. Charge Indicator When charging the battery, it turns green. 4. POWER Button Press and hold for user's music or photo SD card 3. When an earphone jack is red; Used for 2 seconds to enter or exit standby mode. 2. when the battery is fully charged, it is plugged in, the speaker will be turned off automatically. 6. LCD Screen Tap the screen with a finger to charge the unit. 9 USB Port Connect to the Power Adaptor to select commands or use the included stylus. 5. Main Unit 1. Earphone Jack Connect user supplied earphone for ...
Card Slot Insert the SD card into the slot. Charge Indicator When charging the battery, it turns green. 4. POWER Button Press and hold for user's music or photo SD card 3. When an earphone jack is red; Used for 2 seconds to enter or exit standby mode. 2. when the battery is fully charged, it is plugged in, the speaker will be turned off automatically. 6. LCD Screen Tap the screen with a finger to charge the unit. 9 USB Port Connect to the Power Adaptor to select commands or use the included stylus. 5. Main Unit 1. Earphone Jack Connect user supplied earphone for ...
ME Hardware Manual
Page 10
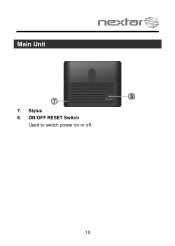
Main Unit 7. Stylus 8. ON/OFF RESET Switch Used to switch power on or off. 10
Main Unit 7. Stylus 8. ON/OFF RESET Switch Used to switch power on or off. 10

ME Hardware Manual
Page 11
Accessories The Following Items Are Included With Your GPS Unit Instruction Manual Quick-Start Guide Warranty Card Car Adaptor Windshield Mounting Bracket Magnetic Cradle Stylus Dashboard Mount Disk Carry pouch 11
Accessories The Following Items Are Included With Your GPS Unit Instruction Manual Quick-Start Guide Warranty Card Car Adaptor Windshield Mounting Bracket Magnetic Cradle Stylus Dashboard Mount Disk Carry pouch 11

ME Hardware Manual
Page 12
Connect the Car Adaptor Power Plug to the vehicle's 5V accessory/ cigarette socket, as shown below. Do not access the controls of the road. When connected with a Car Adaptor for charging the internal battery and for powering the unit while in a vehicle. Attention Set up your view of the GPS unit while driving. Mount the unit so that it 's not charging. 12 Power Adaptor Using the Power Adaptor The GPS unit is supplied with adaptor, the LCD screen will be brighter than when it does not obstruct your destination and other end to ...
Connect the Car Adaptor Power Plug to the vehicle's 5V accessory/ cigarette socket, as shown below. Do not access the controls of the road. When connected with a Car Adaptor for charging the internal battery and for powering the unit while in a vehicle. Attention Set up your view of the GPS unit while driving. Mount the unit so that it 's not charging. 12 Power Adaptor Using the Power Adaptor The GPS unit is supplied with adaptor, the LCD screen will be brighter than when it does not obstruct your destination and other end to ...
ME Hardware Manual
Page 13
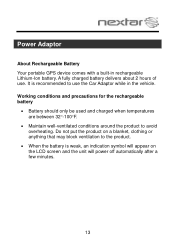
Working conditions and precautions for the rechargeable battery Battery should only be used and charged when temperatures are between 32-100F. Maintain well-ventilated conditions around the product to the product. When the battery is recommended to use . Do not put the product on a blanket, clothing or anything that may block ventilation to avoid overheating. It is weak, an indication symbol will appear on the LCD screen and the unit will power off automatically after a few minutes. 13 A fully charged battery delivers...
Working conditions and precautions for the rechargeable battery Battery should only be used and charged when temperatures are between 32-100F. Maintain well-ventilated conditions around the product to the product. When the battery is recommended to use . Do not put the product on a blanket, clothing or anything that may block ventilation to avoid overheating. It is weak, an indication symbol will appear on the LCD screen and the unit will power off automatically after a few minutes. 13 A fully charged battery delivers...
ME Hardware Manual
Page 14
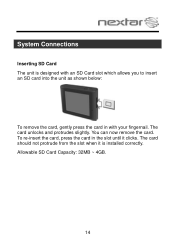
To re-insert the card, press the card in the slot until it is designed with an SD Card slot which allows you to insert an SD card into the unit as shown below: To remove the card, gently press the card in with your fingernail. Allowable SD Card Capacity: 32MB ~ 4GB. 14 System Connections Inserting SD Card The unit is installed correctly. The card should not protrude from the slot when it clicks. The card unlocks and protrudes slightly. You can now remove the card.
To re-insert the card, press the card in the slot until it is designed with an SD Card slot which allows you to insert an SD card into the unit as shown below: To remove the card, gently press the card in with your fingernail. Allowable SD Card Capacity: 32MB ~ 4GB. 14 System Connections Inserting SD Card The unit is installed correctly. The card should not protrude from the slot when it clicks. The card unlocks and protrudes slightly. You can now remove the card.

ME Hardware Manual
Page 15
Turn down the volume before you connect the earphones, and then raise the volume to the right side of the unit for private listening. When earphones are connected, the speaker will automatically turn off. Note: Overly loud volume could damage your hearing. System Connections Connecting to Earphones You may connect earphones to a comfortable level. Important: Most state and local laws prohibit the driver from wearing earphones while operating a vehicle on public roads. 15
Turn down the volume before you connect the earphones, and then raise the volume to the right side of the unit for private listening. When earphones are connected, the speaker will automatically turn off. Note: Overly loud volume could damage your hearing. System Connections Connecting to Earphones You may connect earphones to a comfortable level. Important: Most state and local laws prohibit the driver from wearing earphones while operating a vehicle on public roads. 15
ME Hardware Manual
Page 16
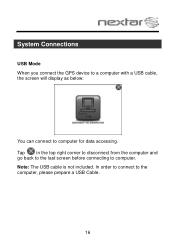
In order to connect to computer for data accessing. System Connections USB Mode When you connect the GPS device to a computer with a USB cable, the screen will display as below: You can connect to the computer, please prepare a USB Cable. 16 Tap in the top right corner to disconnect from the computer and go back to the last screen before connecting to computer. Note: The USB cable is not included.
In order to connect to computer for data accessing. System Connections USB Mode When you connect the GPS device to a computer with a USB cable, the screen will display as below: You can connect to the computer, please prepare a USB Cable. 16 Tap in the top right corner to disconnect from the computer and go back to the last screen before connecting to computer. Note: The USB cable is not included.
ME Hardware Manual
Page 17
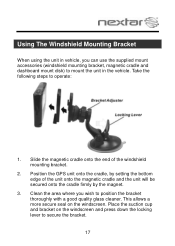
Using The Windshield Mounting Bracket When using the unit in vehicle, you wish to mount the unit in the vehicle. Clean the area where you can use the supplied mount accessories (windshield mounting bracket, magnetic cradle and dashboard mount disk) to position the bracket thoroughly with a good quality glass cleaner. Position the GPS unit onto the cradle, by the magnet. 3. Slide the magnetic cradle onto the end of the unit onto the magnetic cradle and the unit will be secured onto the cradle firmly by setting the bottom edge of the windshield mounting bracket. 2. Place the ...
Using The Windshield Mounting Bracket When using the unit in vehicle, you wish to mount the unit in the vehicle. Clean the area where you can use the supplied mount accessories (windshield mounting bracket, magnetic cradle and dashboard mount disk) to position the bracket thoroughly with a good quality glass cleaner. Position the GPS unit onto the cradle, by the magnet. 3. Slide the magnetic cradle onto the end of the unit onto the magnetic cradle and the unit will be secured onto the cradle firmly by setting the bottom edge of the windshield mounting bracket. 2. Place the ...
ME Hardware Manual
Page 18
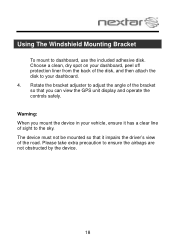
The device must not be mounted so that you mount the device in your vehicle, ensure it impairs the driver's view of the disk, and then attach the disk to the sky. Choose a clean, dry spot on your dashboard. 4. Warning: When you can view the GPS unit display and operate the controls safely. Please take extra precaution to adjust the angle of the bracket so that it has a clear line of sight to your dashboard, peel off protection liner from the back of the road. Rotate the bracket adjuster to ensure the airbags are not obstructed by the device. 18 Using The Windshield ...
The device must not be mounted so that you mount the device in your vehicle, ensure it impairs the driver's view of the disk, and then attach the disk to the sky. Choose a clean, dry spot on your dashboard. 4. Warning: When you can view the GPS unit display and operate the controls safely. Please take extra precaution to adjust the angle of the bracket so that it has a clear line of sight to your dashboard, peel off protection liner from the back of the road. Rotate the bracket adjuster to ensure the airbags are not obstructed by the device. 18 Using The Windshield ...
ME Hardware Manual
Page 19
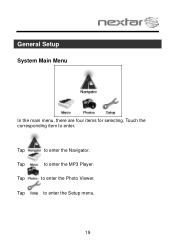
General Setup System Main Menu In the main menu, there are four items for selecting. Tap to enter the MP3 Player. Tap to enter the Photo Viewer. Tap to enter the Navigator. Tap to enter the Setup menu. 19 Touch the corresponding item to enter.
General Setup System Main Menu In the main menu, there are four items for selecting. Tap to enter the MP3 Player. Tap to enter the Photo Viewer. Tap to enter the Navigator. Tap to enter the Setup menu. 19 Touch the corresponding item to enter.
ME Hardware Manual
Page 20
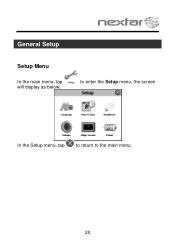
General Setup Setup Menu In the main menu, tap will display as below: to enter the Setup menu, the screen In the Setup menu, tap to return to the main menu. 20
General Setup Setup Menu In the main menu, tap will display as below: to enter the Setup menu, the screen In the Setup menu, tap to return to the main menu. 20