Quick Start Guide
Page 1
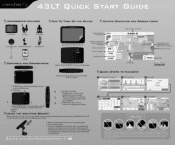
... for any other person ever exceed the amount paid by Nextar's negligence, or for the latest changes to your view of the claim. Some states restrict windshield mounting of the mounting bracket. 2. In no event will Nextar be reset. 4. QUICK STEPS TO NAVIGATE Press Menu, ...; Or- In no event will Nextar's liability or damages to operate: 1. ACCESSORIES INCLUDED cb How TO TURN ON THE DEVICE KEYPAD OPERATION AND SCREEN ICONS 4.3" GPS Device Car Adaptor • Dashboard Mount Disk Windshield Mounting Bracket Mounting Cradle Live Traffic Receiver rt.teXt0i. uo MAPS Styli SD...
... for any other person ever exceed the amount paid by Nextar's negligence, or for the latest changes to your view of the claim. Some states restrict windshield mounting of the mounting bracket. 2. In no event will Nextar be reset. 4. QUICK STEPS TO NAVIGATE Press Menu, ...; Or- In no event will Nextar's liability or damages to operate: 1. ACCESSORIES INCLUDED cb How TO TURN ON THE DEVICE KEYPAD OPERATION AND SCREEN ICONS 4.3" GPS Device Car Adaptor • Dashboard Mount Disk Windshield Mounting Bracket Mounting Cradle Live Traffic Receiver rt.teXt0i. uo MAPS Styli SD...
Hardware Manual
Page 5
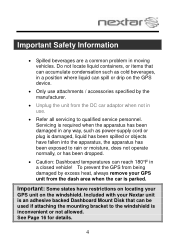
...Dashboard temperatures can spill or drip on the windshield. To prevent the GPS from being damaged by excess heat, always remove your Nextar unit is an adhesive backed Dashboard Mount Disk that can be used if attaching the mounting bracket to qualified service personnel. See Page 16 for details. 4 Do not...the unit from the dash area when the car is damaged, liquid has been spilled or objects have restrictions on locating your GPS unit on the GPS device. Only use . Refer all servicing to the windshield is inconvenient or not allowed. Included with...
...Dashboard temperatures can spill or drip on the windshield. To prevent the GPS from being damaged by excess heat, always remove your Nextar unit is an adhesive backed Dashboard Mount Disk that can be used if attaching the mounting bracket to qualified service personnel. See Page 16 for details. 4 Do not...the unit from the dash area when the car is damaged, liquid has been spilled or objects have restrictions on locating your GPS unit on the GPS device. Only use . Refer all servicing to the windshield is inconvenient or not allowed. Included with...
Hardware Manual
Page 8
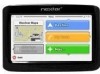
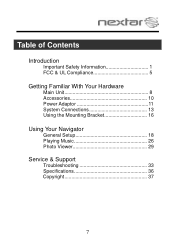
Table of Contents Introduction Important Safety Information 1 FCC & UL Compliance 5 Getting Familiar With Your Hardware Main Unit 8 Accessories 10 Power Adaptor 11 System Connections 13 Using the Mounting Bracket 16 Using Your Navigator General Setup 18 Playing Music 26 Photo Viewer 29 Service & Support Troubleshooting 33 Specifications 36 Copyright 37 7
Table of Contents Introduction Important Safety Information 1 FCC & UL Compliance 5 Getting Familiar With Your Hardware Main Unit 8 Accessories 10 Power Adaptor 11 System Connections 13 Using the Mounting Bracket 16 Using Your Navigator General Setup 18 Playing Music 26 Photo Viewer 29 Service & Support Troubleshooting 33 Specifications 36 Copyright 37 7
Hardware Manual
Page 11
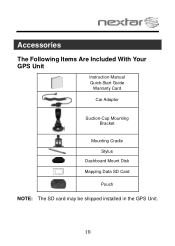
Accessories The Following Items Are Included With Your GPS Unit Instruction Manual Quick-Start Guide Warranty Card Car Adaptor Suction-Cup Mounting Bracket Mounting Cradle Stylus Dashboard Mount Disk Mapping Data SD Card Pouch NOTE: The SD card may be shipped installed in the GPS Unit. 10
Accessories The Following Items Are Included With Your GPS Unit Instruction Manual Quick-Start Guide Warranty Card Car Adaptor Suction-Cup Mounting Bracket Mounting Cradle Stylus Dashboard Mount Disk Mapping Data SD Card Pouch NOTE: The SD card may be shipped installed in the GPS Unit. 10
Hardware Manual
Page 17
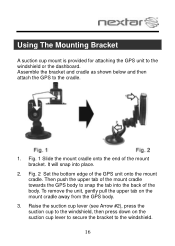
...of the body. Assemble the bracket and cradle as shown below and then attach the GPS to the windshield or the dashboard. Then push the upper tab of the mount cradle towards the GPS body to the windshield. 16 Fig. 1 Slide the mount cradle onto the end of the mount bracket. It will snap into ...the back of the GPS unit onto the mount cradle. To remove the unit, gently pull the upper tab...
...of the body. Assemble the bracket and cradle as shown below and then attach the GPS to the windshield or the dashboard. Then push the upper tab of the mount cradle towards the GPS body to the windshield. 16 Fig. 1 Slide the mount cradle onto the end of the mount bracket. It will snap into ...the back of the GPS unit onto the mount cradle. To remove the unit, gently pull the upper tab...
Hardware Manual
Page 18
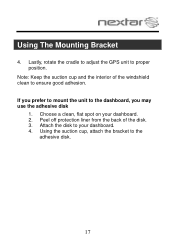
Choose a clean, flat spot on your dashboard. 4. Lastly, rotate the cradle to adjust the GPS unit to the dashboard, you may use the adhesive disk 1. Attach the disk to your dashboard. 2. If you prefer to mount the unit to proper position. Peel off protection liner from the back of the windshield clean to the adhesive disk. 17 Note: Keep the suction cup and the interior of the disk. 3. Using the suction cup, attach the bracket to ensure good adhesion. Using The Mounting Bracket 4.
Choose a clean, flat spot on your dashboard. 4. Lastly, rotate the cradle to adjust the GPS unit to the dashboard, you may use the adhesive disk 1. Attach the disk to your dashboard. 2. If you prefer to mount the unit to proper position. Peel off protection liner from the back of the windshield clean to the adhesive disk. 17 Note: Keep the suction cup and the interior of the disk. 3. Using the suction cup, attach the bracket to ensure good adhesion. Using The Mounting Bracket 4.


