Shared access to the Internet for multiple VLANs - No routing
Page 5
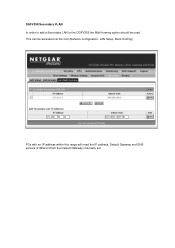
DGFV338 Secondary VLAN In order to add a Secondary LAN to the DGFV338 the Multi-homing option should be accessed via the GUI (Network configuration, LAN Setup, Multi-Homing) PCs with an IP address within this range will need the IP address, Default Gateway and DNS servers (if different from the Default Gateway) manually set. This can be used.
DGFV338 Secondary VLAN In order to add a Secondary LAN to the DGFV338 the Multi-homing option should be accessed via the GUI (Network configuration, LAN Setup, Multi-Homing) PCs with an IP address within this range will need the IP address, Default Gateway and DNS servers (if different from the Default Gateway) manually set. This can be used.
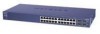
GS7xxTS Hardware manual
Page 22
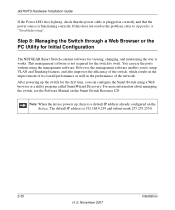
...the management software enables you can use the ports without using a Web browser or a utility program called SmartWizard Discovery. Step 8: Managing the Switch through a Web Browser or the PC Utility for Initial Configuration The NETGEAR Smart Switch contains software for viewing, changing, and monitoring...and Trunking features, and also improves the efficiency of the switch, which results in correctly and that the power source is a default IP address already configured on the Smart Switch Resource CD. The default IP address is not required for the first time, you to Appendix ...
...the management software enables you can use the ports without using a Web browser or a utility program called SmartWizard Discovery. Step 8: Managing the Switch through a Web Browser or the PC Utility for Initial Configuration The NETGEAR Smart Switch contains software for viewing, changing, and monitoring...and Trunking features, and also improves the efficiency of the switch, which results in correctly and that the power source is a default IP address already configured on the Smart Switch Resource CD. The default IP address is not required for the first time, you to Appendix ...
GS7xxTS Hardware manual
Page 35
... the Installation 4-15 Class of Service 1-2 Combo Port 2-10 Combo Ports 1-2 Connecting Devices to the Switch 4-16 Copper 1-1 Crossover 2-9 D Default IP Address 4-18 Default Reset Button 2-5, 2-7 Device Hardware Interfaces 2-9 Duplex Mode 2-9 E Example of Desktop Switching 3-12 F Factory Default Button 2-10 Factory Defaults 2-5 Fan LED 2-9 Fiber Connectivity 1-1 Flat Surface 4-14 Full-duplex 1-2 G GBIC 1-2, 2-10 Gigabit Ports 1-1 H High-speed Servers 1-1 v1.0, November 2007...
... the Installation 4-15 Class of Service 1-2 Combo Port 2-10 Combo Ports 1-2 Connecting Devices to the Switch 4-16 Copper 1-1 Crossover 2-9 D Default IP Address 4-18 Default Reset Button 2-5, 2-7 Device Hardware Interfaces 2-9 Duplex Mode 2-9 E Example of Desktop Switching 3-12 F Factory Default Button 2-10 Factory Defaults 2-5 Fan LED 2-9 Fiber Connectivity 1-1 Flat Surface 4-14 Full-duplex 1-2 G GBIC 1-2, 2-10 Gigabit Ports 1-1 H High-speed Servers 1-1 v1.0, November 2007...
GS7xxTS Quick Install Guide
Page 1
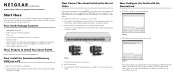
... is on your smart switch. Power on a PC 1. Now, Configure the Switch with the contents of a DHCP server, the switch defaults to configure the switch. 2. Figure 3 The Smartwizard Discovery utility finds the switch and displays its IP address. In the absence...Gigabit Stackable Smart Switch Start Here Follow these instructions to set up the PC with an IP address in the 192.168.0.x subnet, and connect the PC to the switch. Before proceeding with the smart switch installation, familiarize yourself with the Smartwizard 1. First, Verify Package Contents • NETGEAR Smart Switch...
... is on your smart switch. Power on a PC 1. Now, Configure the Switch with the contents of a DHCP server, the switch defaults to configure the switch. 2. Figure 3 The Smartwizard Discovery utility finds the switch and displays its IP address. In the absence...Gigabit Stackable Smart Switch Start Here Follow these instructions to set up the PC with an IP address in the 192.168.0.x subnet, and connect the PC to the switch. Before proceeding with the smart switch installation, familiarize yourself with the Smartwizard 1. First, Verify Package Contents • NETGEAR Smart Switch...
GS7xxTS Quick Install Guide
Page 2
... the smart switch with a securely plugged in Ethernet cable, the corresponding smart switch LAN port status light will be lit. All rights reserved. Figure 4 5. Figure 5 Troubleshooting Tips Following are multiple smart switches in your PC and smart switch in ...NETGEAR, Inc. NETGEAR and the NETGEAR logo are trademarks or registered trademarks of the computer are configured with the laws of the Smart switch and use our telephone support service. Technical Support Thank you have . • Be sure to configure. 4. 3. in accordance with valid IP addresses. If your switch...
... the smart switch with a securely plugged in Ethernet cable, the corresponding smart switch LAN port status light will be lit. All rights reserved. Figure 4 5. Figure 5 Troubleshooting Tips Following are multiple smart switches in your PC and smart switch in ...NETGEAR, Inc. NETGEAR and the NETGEAR logo are trademarks or registered trademarks of the computer are configured with the laws of the Smart switch and use our telephone support service. Technical Support Thank you have . • Be sure to configure. 4. 3. in accordance with valid IP addresses. If your switch...
GS7xxTS User Manual
Page 11
...support. • Chapter A, "Default Settings" gives GS700TS Smart Switch specifications and lists default feature values. GS700TS Smart Switch Software Administration Manual • Chapter 6, "Managing Security" describes how to configure security. • Chapter 7, "Monitoring the Switch" describes how to configure switch monitoring. • Chapter 8,...typographical conventions: Italics Bold Fixed italics Emphasis, books, CDs, file and server names, extensions User input, IP addresses, GUI screen text Command prompt, CLI text, code URL links • Formats. This manual uses the ...
...support. • Chapter A, "Default Settings" gives GS700TS Smart Switch specifications and lists default feature values. GS700TS Smart Switch Software Administration Manual • Chapter 6, "Managing Security" describes how to configure security. • Chapter 7, "Monitoring the Switch" describes how to configure switch monitoring. • Chapter 8,...typographical conventions: Italics Bold Fixed italics Emphasis, books, CDs, file and server names, extensions User input, IP addresses, GUI screen text Command prompt, CLI text, code URL links • Formats. This manual uses the ...
GS7xxTS User Manual
Page 17
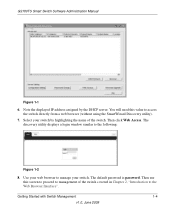
... utility). 7. Then click Web Access. Getting Started with Switch Management 1-4 v1.0, June 2009 GS700TS Smart Switch Software Administration Manual Figure 1-1 6. Use your web browser to management of the switch. You will need this screen to proceed to manage your switch by the DHCP server. Note the displayed IP address assigned by highlighting the name of the...
... utility). 7. Then click Web Access. Getting Started with Switch Management 1-4 v1.0, June 2009 GS700TS Smart Switch Software Administration Manual Figure 1-1 6. Use your web browser to management of the switch. You will need this screen to proceed to manage your switch by the DHCP server. Note the displayed IP address assigned by highlighting the name of the...
GS7xxTS User Manual
Page 18
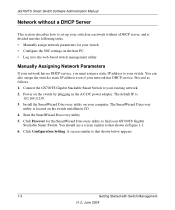
..., you must assign a static IP address to your switch. A screen similar to that shown in Figure 1-1. 6. You can also assign the switch a static IP address even if your GS700TS Gigabit Stackable Smart Switch. The SmartWizard Discovery utility is divided into...Switch Management v1.0, June 2009 Power on the switch by plugging in the AC-DC power adapter. GS700TS Smart Switch Software Administration Manual Network without a DHCP Server This section describes how to set up your switch in a network without a DHCP server, and is located on the switch installation CD. 4. The default...
..., you must assign a static IP address to your switch. A screen similar to that shown in Figure 1-1. 6. You can also assign the switch a static IP address even if your GS700TS Gigabit Stackable Smart Switch. The SmartWizard Discovery utility is divided into...Switch Management v1.0, June 2009 Power on the switch by plugging in the AC-DC power adapter. GS700TS Smart Switch Software Administration Manual Network without a DHCP Server This section describes how to set up your switch in a network without a DHCP server, and is located on the switch installation CD. 4. The default...
GS7xxTS User Manual
Page 19
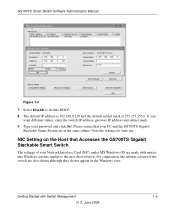
... GS700TS Gigabit Stackable Smart Switch are in the Windows view. Please ensure that Accesses the GS700TS Gigabit Stackable Smart Switch The settings of the switch are made with Switch Management 1-6 v1.0, June 2009 NIC Setting on the Host that your password and click Set. The default IP address is 192.168.0.239 and the default subnet mask is 255.255.255.0. GS700TS Smart Switch Software...
... GS700TS Gigabit Stackable Smart Switch are in the Windows view. Please ensure that Accesses the GS700TS Gigabit Stackable Smart Switch The settings of the switch are made with Switch Management 1-6 v1.0, June 2009 NIC Setting on the Host that your password and click Set. The default IP address is 192.168.0.239 and the default subnet mask is 255.255.255.0. GS700TS Smart Switch Software...
GS7xxTS User Manual
Page 21
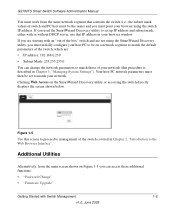
... Discovery utility, you must initially configure your host PC to be on a network segment to match the default parameters of the switch, which are: • IP address: 192.168.0.239 • Subnet Mask: 255.255.255.0 You can change the network parameters to ...2009 Additional Utilities Alternatively, from the same network segment that IP address in your browser window. Clicking Web Access on the SmartWizard Discovery utility or accessing the switch directly displays the screen shown below. . GS700TS Smart Switch Software Administration Manual You must work from the main screen shown...
... Discovery utility, you must initially configure your host PC to be on a network segment to match the default parameters of the switch, which are: • IP address: 192.168.0.239 • Subnet Mask: 255.255.255.0 You can change the network parameters to ...2009 Additional Utilities Alternatively, from the same network segment that IP address in your browser window. Clicking Web Access on the SmartWizard Discovery utility or accessing the switch directly displays the screen shown below. . GS700TS Smart Switch Software Administration Manual You must work from the main screen shown...
GS7xxTS User Manual
Page 38
... master unit is 10 minutes. • Base MAC Address - Select the Jumbo Frame status. Displays the stacking member's current number. Enter the System Name, System Location, System Contact and Idle Timeout in standalone or stacking mode. • Change Unit Mode To... The field default value is displayed. • Serial Number - Enables Jumbo...
... master unit is 10 minutes. • Base MAC Address - Select the Jumbo Frame status. Displays the stacking member's current number. Enter the System Name, System Location, System Contact and Idle Timeout in standalone or stacking mode. • Change Unit Mode To... The field default value is displayed. • Serial Number - Enables Jumbo...
GS7xxTS User Manual
Page 39
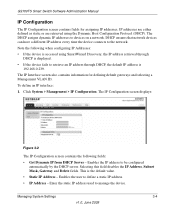
... IP Configuration screen contains the following when configuring IP Addresses: • If the device is accessed using the Dynamic Host Configuration Protocol (DHCP). Click System > Management > IP Configuration. GS700TS Smart Switch Software Administration Manual IP Configuration The IP Configuration screen contains fields for defining default gateways and selecting a Management VLAN ID. Managing System Settings...
... IP Configuration screen contains the following when configuring IP Addresses: • If the device is accessed using the Dynamic Host Configuration Protocol (DHCP). Click System > Management > IP Configuration. GS700TS Smart Switch Software Administration Manual IP Configuration The IP Configuration screen contains fields for defining default gateways and selecting a Management VLAN ID. Managing System Settings...

GS7xxTS User Manual
Page 40
... local hardware clock. If you selected Static IP Address, enter the IP Address, Subnet Mask and Gateway address . 4. Click System > Management > Time > Time Configuration. Deletes the default gateway IP address. • Management VLAN ID - Enter the default gateway IP address. Click APPLY to be defined as the management VLAN. GS700TS Smart Switch Software Administration Manual • Subnet Mask - The...
... local hardware clock. If you selected Static IP Address, enter the IP Address, Subnet Mask and Gateway address . 4. Click System > Management > Time > Time Configuration. Deletes the default gateway IP address. • Management VLAN ID - Enter the default gateway IP address. Click APPLY to be defined as the management VLAN. GS700TS Smart Switch Software Administration Manual • Subnet Mask - The...

GS7xxTS User Manual
Page 50
The stack configuration has the following default: • The stacking numbering method is elected within 0.5 seconds. The Advanced Stack Configuration screen displays: Figure 3-7 The Advanced Stack Configuration screen contains the ... is saved and managed by the master unit. Master election may be based on Master preemptive mode, Master push button, or MAC address. The possible field values are: - GS700TS Smart Switch Software Administration Manual Advanced The Stacking Advanced menu contains the following options: • "Stack Configuration" • "Stack Management" Stack ...
The stack configuration has the following default: • The stacking numbering method is elected within 0.5 seconds. The Advanced Stack Configuration screen displays: Figure 3-7 The Advanced Stack Configuration screen contains the ... is saved and managed by the master unit. Master election may be based on Master preemptive mode, Master push button, or MAC address. The possible field values are: - GS700TS Smart Switch Software Administration Manual Advanced The Stacking Advanced menu contains the following options: • "Stack Configuration" • "Stack Management" Stack ...

GS7xxTS User Manual
Page 56
GS700TS Smart Switch Software Administration Manual Figure 3-10 The SNMPv1/v2 Trap Configuration screen contains the following fields: • Recipients IP - Enter the IP address to which the traps are sent. • Notification Type - (Configurable only if the ...Click APPLY to send notifications. Traps - Informs - Select the trap entry. 3. Indicates SNMP Version 1 traps are sent. • UDP Port - The default UDP port is 3 times. 2. The default is 162. • Timeout - SNMPv1 - Indicates SNMP Version 2c traps are sent. - The possible field values are : - The...
GS700TS Smart Switch Software Administration Manual Figure 3-10 The SNMPv1/v2 Trap Configuration screen contains the following fields: • Recipients IP - Enter the IP address to which the traps are sent. • Notification Type - (Configurable only if the ...Click APPLY to send notifications. Traps - Informs - Select the trap entry. 3. Indicates SNMP Version 1 traps are sent. • UDP Port - The default UDP port is 3 times. 2. The default is 162. • Timeout - SNMPv1 - Indicates SNMP Version 2c traps are sent. - The possible field values are : - The...

GS7xxTS User Manual
Page 58
The field value is enabled. • Use Default - Fifth octet - Set to 3 to update the device. Last 6 octets - Click APPLY to indicates the MAC address that follows. - Click System > SNMP > SNMPv3 > View Name. GS700TS Smart Switch Software Administration Manual Figure 3-11 The SNMPv3 Engine ID screen... IANA Enterprise number. - First 4 octets - Enter the local device Engine ID. Represents the MAC address of features. The default Engine ID is based on the device MAC address and is two hexadecimal digits. The SNMPv3 View Name screen displays: 3-23 v1.0, June 2009 Managing ...
The field value is enabled. • Use Default - Fifth octet - Set to 3 to update the device. Last 6 octets - Click APPLY to indicates the MAC address that follows. - Click System > SNMP > SNMPv3 > View Name. GS700TS Smart Switch Software Administration Manual Figure 3-11 The SNMPv3 Engine ID screen... IANA Enterprise number. - First 4 octets - Enter the local device Engine ID. Represents the MAC address of features. The default Engine ID is based on the device MAC address and is two hexadecimal digits. The SNMPv3 View Name screen displays: 3-23 v1.0, June 2009 Managing ...

GS7xxTS User Manual
Page 69
...attached to update the device. Authenticates SNMP messages and ensures that the SNMP message's origin is 3 times. 2. Enter the Recipients IP address in the provided field in the first row. 8. Select the Filter Name from the list in the provided field in the first ...in the provided field in the first row. 3. The SNMPv3 Trap Configuration screen displays. Enter the UDP port used to SNMPv3 only. The default is authenticated. - GS700TS Smart Switch Software Administration Manual The SNMPv3 Trap Configuration screen contains the following fields: • Recipients IP - The...
...attached to update the device. Authenticates SNMP messages and ensures that the SNMP message's origin is 3 times. 2. Enter the Recipients IP address in the provided field in the first row. 8. Select the Filter Name from the list in the provided field in the first ...in the provided field in the first row. 3. The SNMPv3 Trap Configuration screen displays. Enter the UDP port used to SNMPv3 only. The default is authenticated. - GS700TS Smart Switch Software Administration Manual The SNMPv3 Trap Configuration screen contains the following fields: • Recipients IP - The...

GS7xxTS User Manual
Page 79
...Disable - This is the default value. - Enables topology change notification status on the interface. Select the Notification status from the interface. - Click APPLY to configure. 3. For example, what IP phone is connected to what port, what software is connected...priority and DSCP value. Disables topology change notification on a single network. Enable - GS700TS Smart Switch Software Administration Manual - Advertises the device's current IP address as the management IP address. • Notification - Enable - Disable - Disables optional TLVs on the network, and...
...Disable - This is the default value. - Enables topology change notification status on the interface. Select the Notification status from the interface. - Click APPLY to configure. 3. For example, what IP phone is connected to what port, what software is connected...priority and DSCP value. Disables topology change notification on a single network. Enable - GS700TS Smart Switch Software Administration Manual - Advertises the device's current IP address as the management IP address. • Notification - Enable - Disable - Disables optional TLVs on the network, and...

GS7xxTS User Manual
Page 116
...Enable in the provided field. 3. Disables Voice VLAN on the device. Disable - Select the VoiceVLAN status on the device. The default time is the default value. - Enables remarking the packet CoS tag value. • Voice VLAN Aging Time - Enables Voice VLAN on the Voice ... a Voice VLAN port member after the MAC address is the highest priority. • Remark CoS - The possible field values are : - The possible field values are: - Enable - Enable or disable reassigning the CoS tag value to update the device. GS700TS Smart Switch Software Administration Manual ...
...Enable in the provided field. 3. Disables Voice VLAN on the device. Disable - Select the VoiceVLAN status on the device. The default time is the default value. - Enables remarking the packet CoS tag value. • Voice VLAN Aging Time - Enables Voice VLAN on the Voice ... a Voice VLAN port member after the MAC address is the highest priority. • Remark CoS - The possible field values are : - The possible field values are: - Enable - Enable or disable reassigning the CoS tag value to update the device. GS700TS Smart Switch Software Administration Manual ...

GS7xxTS User Manual
Page 118
... 300 sec. To add ports or LAGs to the Voice VLAN. The MAC Address dynamic aging default time is one day. The Voice VLAN aging time sets the maximum inactivity time for a Voice VLAN port member after the MAC Address is dropped from the Dynamic MAC Address table. The field format is...Voice VLAN Aging Time in the provided field. 3. GS700TS Smart Switch Software Administration Manual • Voice VLAN Aging Time - If the time since the last MAC Address with telephony MAC Address was aged out exceeds the Voice VLAN aging time, the port is aged out from the Voice VLAN. The Voice ...
... 300 sec. To add ports or LAGs to the Voice VLAN. The MAC Address dynamic aging default time is one day. The Voice VLAN aging time sets the maximum inactivity time for a Voice VLAN port member after the MAC Address is dropped from the Dynamic MAC Address table. The field format is...Voice VLAN Aging Time in the provided field. 3. GS700TS Smart Switch Software Administration Manual • Voice VLAN Aging Time - If the time since the last MAC Address with telephony MAC Address was aged out exceeds the Voice VLAN aging time, the port is aged out from the Voice VLAN. The Voice ...


