
User Manual
Page 5
...Player E-22 Connecting Your VCR or Laser Disc Player .......... E-23 3. INTRODUCTION Introduction to the MultiSync VT440/VT540 Projector E-6 Getting Started E-6 What's in the Box E-7 Getting to Know Your MultiSync VT440/VT540 Projector E-8 Front / Side Features E-8 Rear / Side Features E-9 Top Features E-10 Terminal Panel ... Using the Menus E-25 Menu Tree E-26 Menu Elements E-27 Menu Descriptions & Functions E-28 Source Select E-28 RGB/Video/S-Video Picture E-28 Brightness/Contrast/Color/Hue/Sharpness Volume E-28 Image Options E-28 Keystone E-28 Color Temperature E-28 Lamp Mode...
...Player E-22 Connecting Your VCR or Laser Disc Player .......... E-23 3. INTRODUCTION Introduction to the MultiSync VT440/VT540 Projector E-6 Getting Started E-6 What's in the Box E-7 Getting to Know Your MultiSync VT440/VT540 Projector E-8 Front / Side Features E-8 Rear / Side Features E-9 Top Features E-10 Terminal Panel ... Using the Menus E-25 Menu Tree E-26 Menu Elements E-27 Menu Descriptions & Functions E-28 Source Select E-28 RGB/Video/S-Video Picture E-28 Brightness/Contrast/Color/Hue/Sharpness Volume E-28 Image Options E-28 Keystone E-28 Color Temperature E-28 Lamp Mode...
User Manual
Page 6
...; Eight pointers are as follows: NTSC: U.S. NOTE: Composite video standards are available for NTSC playback on Your Purchase of The MultiSync VT440/ VT540 Projector The MultiSync VT440/VT540 is light, compact, easy to carry, and complements any...projector from your new MultiSync VT440 (SVGA)/ VT540 (XGA) Projector and describes the features and controls. The remote control can choose between 25 (0.63 m) and 300 inches (7.6 m) (measured diagonally). • Keystone correction allows you 'll enjoy: • Simple set up to 3000 hours by qualified technicians in accordance with NEC...
...; Eight pointers are as follows: NTSC: U.S. NOTE: Composite video standards are available for NTSC playback on Your Purchase of The MultiSync VT440/ VT540 Projector The MultiSync VT440/VT540 is light, compact, easy to carry, and complements any...projector from your new MultiSync VT440 (SVGA)/ VT540 (XGA) Projector and describes the features and controls. The remote control can choose between 25 (0.63 m) and 300 inches (7.6 m) (measured diagonally). • Keystone correction allows you 'll enjoy: • Simple set up to 3000 hours by qualified technicians in accordance with NEC...

User Manual
Page 7
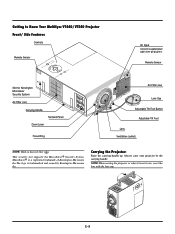
... ENTER CANCEL Lens cap SELECT SOURCE MENU AUTO ADJUST INRPGUBT AUD OUTPUT IN PC-CONTROL S-VIDEO OUT VID Projector MAGNIFY HELP RD-366E SOURCE MENU Vol. CANCEL ADAJU. SELECTVol. If any pieces are missing, contact your MultiSync VT440/VT540 Projector. POINTER POWER MUTPEIC. Please save the original box and packing materials if you ever need...
... ENTER CANCEL Lens cap SELECT SOURCE MENU AUTO ADJUST INRPGUBT AUD OUTPUT IN PC-CONTROL S-VIDEO OUT VID Projector MAGNIFY HELP RD-366E SOURCE MENU Vol. CANCEL ADAJU. SELECTVol. If any pieces are missing, contact your MultiSync VT440/VT540 Projector. POINTER POWER MUTPEIC. Please save the original box and packing materials if you ever need...
User Manual
Page 8
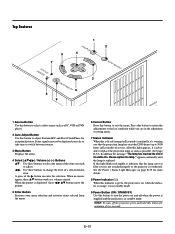
... AUD OUTPUT IN PC-CONTROL S-VIDEO OUT VID Air-Filter (inlet) Lens Cap Adjustable Tilt Foot Button Adjustable Tilt Foot Lens Ventilation (outlet) NOTE: Built-in use, cover the lens with the lens cap. Carrying the Projector: Raise the carrying handle up. STATPUOSWER Getting to Know Your MultiSync VT440/VT540 Projector Front/ Side Features Controls...
... AUD OUTPUT IN PC-CONTROL S-VIDEO OUT VID Air-Filter (inlet) Lens Cap Adjustable Tilt Foot Button Adjustable Tilt Foot Lens Ventilation (outlet) NOTE: Built-in use, cover the lens with the lens cap. Carrying the Projector: Raise the carrying handle up. STATPUOSWER Getting to Know Your MultiSync VT440/VT540 Projector Front/ Side Features Controls...
User Manual
Page 10
.... E-10 Top Features 1 SOURCE 5 4 7 POWSETRATUS ENTER SELECT CANCEL ON/STAND BY 6 8 9 MENU 3 2 AUTO ADJUST 1 Source Button Use this button to select a video source such as a PC, VCR or DVD player. 2 Auto Adjust Button Use this button to turn off when the power is supplied and the... the pointer. 5 Enter Button Executes your menu selection and activates items selected from the menu. 6 Cancel Button Press this indicator is green, the projector is replaced. A press of its usable life. After this light blinks red rapidly, it is in Eco mode) of a selected menu item. ...
.... E-10 Top Features 1 SOURCE 5 4 7 POWSETRATUS ENTER SELECT CANCEL ON/STAND BY 6 8 9 MENU 3 2 AUTO ADJUST 1 Source Button Use this button to select a video source such as a PC, VCR or DVD player. 2 Auto Adjust Button Use this button to turn off when the power is supplied and the... the pointer. 5 Enter Button Executes your menu selection and activates items selected from the menu. 6 Cancel Button Press this indicator is green, the projector is replaced. A press of its usable life. After this light blinks red rapidly, it is in Eco mode) of a selected menu item. ...

User Manual
Page 11
.... SOURCE Terminal Panel Features RGB INPUT AUDIO 1 3 IN OUT OUTPUT OUT IN 2 4 PC-CONTROL S-VIDEO VIDEO 7 5 ON/STAND BY 8 Slot for input simultaneously. Or connect additional external speakers to listen to control the projector. Video Input (RCA) Connect a VCR, DVD player, laser disc player, or document camera here to a PC... protocol to audio coming from the RGB input source. 3. RGB Input Connector(Mini D-Sub 15 pin) Connect your projector. Audio Input / Output Mini Jack This is where you to use this port to connect your PC to audio coming from your...
.... SOURCE Terminal Panel Features RGB INPUT AUDIO 1 3 IN OUT OUTPUT OUT IN 2 4 PC-CONTROL S-VIDEO VIDEO 7 5 ON/STAND BY 8 Slot for input simultaneously. Or connect additional external speakers to listen to control the projector. Video Input (RCA) Connect a VCR, DVD player, laser disc player, or document camera here to a PC... protocol to audio coming from the RGB input source. 3. RGB Input Connector(Mini D-Sub 15 pin) Connect your projector. Audio Input / Output Mini Jack This is where you to use this port to connect your PC to audio coming from your...

User Manual
Page 12
...of reach of the ᮣ button executes the selection. When the pointer is displayed, these ᮤ ᮣ vw buttons move your projector on and off the projector, press and hold the POWER button for a minimum of time. Press again to restore the image and sound. 10 Help Button Provides...at the center of explosion if battery is displayed at the center of the eight pointers; Remote Control Features 1 Source Button Press to select a video source. 2 Auto Adjust Button Use this button to adjust Position-H/V and Pixel Clock/Phase for the first time, be displayed correctly, or in...
...of reach of the ᮣ button executes the selection. When the pointer is displayed, these ᮤ ᮣ vw buttons move your projector on and off the projector, press and hold the POWER button for a minimum of time. Press again to restore the image and sound. 10 Help Button Provides...at the center of explosion if battery is displayed at the center of the eight pointers; Remote Control Features 1 Source Button Press to select a video source. 2 Auto Adjust Button Use this button to adjust Position-H/V and Pixel Clock/Phase for the first time, be displayed correctly, or in...
User Manual
Page 14
... power cable and any other cables connecting to connect video and audio sources. Each of up and use. E-14 But before moving the projector or when it is available, the projector will display a background image.) 3. Carrying the Projector: Always carry your MultiSync VT440/VT540 projector and how to video sources are disconnected before you get started, you can...
... power cable and any other cables connecting to connect video and audio sources. Each of up and use. E-14 But before moving the projector or when it is available, the projector will display a background image.) 3. Carrying the Projector: Always carry your MultiSync VT440/VT540 projector and how to video sources are disconnected before you get started, you can...

User Manual
Page 16
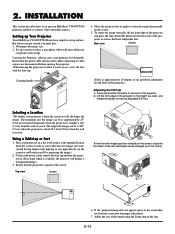
...the Image Using a mirror to reflect your projector's image enables you can dissipate. fied technician. If your projector is mounted on the ceiling and your image is inverted, use your projector on the ceiling must be done by a quali- Contact your NEC dealer for more information. * Do not... will harm the screen image. • Ensure that you need a mirror. If the projector falls to the ground, you to moisture, dust, or smoke. Ceiling Installation F B α PC-CONTROL S-VIDEO VIDEO RGB INPUT OUTPUT AUDIO IN OUT OUT IN A C A: Distance between the lens and the screen ...
...the Image Using a mirror to reflect your projector's image enables you can dissipate. fied technician. If your projector is mounted on the ceiling and your image is inverted, use your projector on the ceiling must be done by a quali- Contact your NEC dealer for more information. * Do not... will harm the screen image. • Ensure that you need a mirror. If the projector falls to the ground, you to moisture, dust, or smoke. Ceiling Installation F B α PC-CONTROL S-VIDEO VIDEO RGB INPUT OUTPUT AUDIO IN OUT OUT IN A C A: Distance between the lens and the screen ...

User Manual
Page 17
... Monitor RGB INPUT RGB OUTPUT AUDIO IN OUT OUT IN PC CONTROL S-VIDEO VIDEO IBM VGA or Compatibles (Desktop type or notebook type) Signal cable (supplied) To mini D-Sub 15-pin connector on after connecting with the projector. E-17 DVD Player (with component output) VCR, DVD Player or ...LaserDisc Player To video, S-video, and audio inputs on the remote control, wait 30 seconds and then press the POWER button ...
... Monitor RGB INPUT RGB OUTPUT AUDIO IN OUT OUT IN PC CONTROL S-VIDEO VIDEO IBM VGA or Compatibles (Desktop type or notebook type) Signal cable (supplied) To mini D-Sub 15-pin connector on after connecting with the projector. E-17 DVD Player (with component output) VCR, DVD Player or ...LaserDisc Player To video, S-video, and audio inputs on the remote control, wait 30 seconds and then press the POWER button ...
User Manual
Page 18
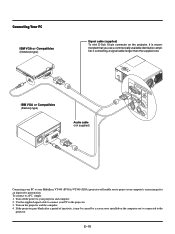
... if connecting a signal cable longer than the supplied one. IBM VGA or Compatibles (Desktop type) Audio cable (not supplied) INRPGRUBTGB INPUATUDIOAUDIO OUTPUT IN PC-CONTROL S-VIDEO OUT OUT IN VIDEO Connecting your PC to your MultiSync VT440 (SVGA)/ VT540 (XGA) projector will enable you to a PC, simply: 1. E-18
... if connecting a signal cable longer than the supplied one. IBM VGA or Compatibles (Desktop type) Audio cable (not supplied) INRPGRUBTGB INPUATUDIOAUDIO OUTPUT IN PC-CONTROL S-VIDEO OUT OUT IN VIDEO Connecting your PC to your MultiSync VT440 (SVGA)/ VT540 (XGA) projector will enable you to a PC, simply: 1. E-18
User Manual
Page 19
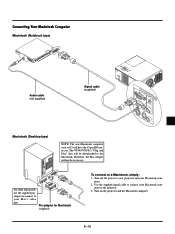
...Pin adapter for Macintosh (supplied) To connect to the projector. 3. Use the supplied signal cable to your Mac's video port. DIP 6 5 ON 4 3 2 1 For older Macintosh, use the supplied pin adapter to connect to connect your Macintosh com- The VT440/VT540's "Plug and Play" data will be necessary. ...E-19 Turn off the power to your projector and your Macintosh com- ...
...Pin adapter for Macintosh (supplied) To connect to the projector. 3. Use the supplied signal cable to your Mac's video port. DIP 6 5 ON 4 3 2 1 For older Macintosh, use the supplied pin adapter to connect to connect your Macintosh com- The VT440/VT540's "Plug and Play" data will be necessary. ...E-19 Turn off the power to your projector and your Macintosh com- ...

User Manual
Page 20
... are connected with a Macintosh, SVGA(800ן600 :VT440)/ XGA(1024ן768 : VT540) is recommended if your Macintosh supports this happens, set the DIP switch to the 13" fixed mode and then restart your Macintosh and the projector, use of the DIP switch ...on your computer's owner's manual for mirroring. Make sure that , restore to a displayable mode and then restart the Macintosh again. NOTE: A Video Adapter cable manufactured by your Macintosh. Refer to owner's manual supplied with your Macintosh computer for more information about your computer...
... are connected with a Macintosh, SVGA(800ן600 :VT440)/ XGA(1024ן768 : VT540) is recommended if your Macintosh supports this happens, set the DIP switch to the 13" fixed mode and then restart your Macintosh and the projector, use of the DIP switch ...on your computer's owner's manual for mirroring. Make sure that , restore to a displayable mode and then restart the Macintosh again. NOTE: A Video Adapter cable manufactured by your Macintosh. Refer to owner's manual supplied with your Macintosh computer for more information about your computer...

User Manual
Page 21
Connecting an External Monitor External monitor INRPGUBT OUTPUT AUDIOAUDIO IN IN RGB OUTPUT PC-CONTROL S-VIDEO OUT OUT IN VIDEO AUDIO OUT You can connect a separate, external monitor to your projector. 3. Use a 15-pin cable to connect your monitor to the RGB Monitor Output (Mini D-Sub 15 pin) connector on your VT440/VT540 to your projector, monitor and computer. 2. To do so: 1. Turn on a monitor the image you're projecting. Turn off the power to simultaneously view on the projector, monitor and the computer. E-21
Connecting an External Monitor External monitor INRPGUBT OUTPUT AUDIOAUDIO IN IN RGB OUTPUT PC-CONTROL S-VIDEO OUT OUT IN VIDEO AUDIO OUT You can connect a separate, external monitor to your projector. 3. Use a 15-pin cable to connect your monitor to the RGB Monitor Output (Mini D-Sub 15 pin) connector on your VT440/VT540 to your projector, monitor and computer. 2. To do so: 1. Turn on a monitor the image you're projecting. Turn off the power to simultaneously view on the projector, monitor and the computer. E-21

User Manual
Page 22
... about your DVD player's video output requirements, E-22 If your DVD player has the component video (Y,Cb,Cr) output, use common RCA cables (not provided) to connect a composite VIDEO output of the DVD player to the Video Input of the projector. 3. NOTE: Refer to your projector and DVD player. 2. ...RCAן3 cable (Component V ) Audio cable (not supplied) You can connect your projector to the RGB INPUT connector on the projector and DVD player. For a DVD player without component video (Y,Cb,Cr) outputs, use the optional 15-pin-to-RCAן3 cable to ...
... about your DVD player's video output requirements, E-22 If your DVD player has the component video (Y,Cb,Cr) output, use common RCA cables (not provided) to connect a composite VIDEO output of the DVD player to the Video Input of the projector. 3. NOTE: Refer to your projector and DVD player. 2. ...RCAן3 cable (Component V ) Audio cable (not supplied) You can connect your projector to the RGB INPUT connector on the projector and DVD player. For a DVD player without component video (Y,Cb,Cr) outputs, use the optional 15-pin-to-RCAן3 cable to ...

User Manual
Page 23
... disc player. Be careful to keep your projector. Connecting Your VCR or Laser Disc Player VCR/ Laser disc player L R Red White S-video cable (not supplied) INRPGUBT AUDIO S-VIDEO OUTPUT IN PC-CONTROL S-VIDEO OUT OUT IN VIDEOVIDEO Audio equipment Document camera L R White Red Audio cable (not supplied) VIDEO Video cable (not supplied) Use common RCA cables...
... disc player. Be careful to keep your projector. Connecting Your VCR or Laser Disc Player VCR/ Laser disc player L R Red White S-video cable (not supplied) INRPGUBT AUDIO S-VIDEO OUTPUT IN PC-CONTROL S-VIDEO OUT OUT IN VIDEOVIDEO Audio equipment Document camera L R White Red Audio cable (not supplied) VIDEO Video cable (not supplied) Use common RCA cables...

User Manual
Page 24
... want to 400 percent. Or press the "Menu" button on and that the computer or video source is present. • Do not turn the projector off and then immediately back on the projector cabinet or the remote control will glow orange. The power indicator will go into its standby ...so: 1) Press the POINTER button on the remote control or the projector cabinet to select "Video" (VCR, document camera, or laser disc player), S-Video" or "RGB" (computer or DVD with component output) to 400%. 4. Select the Computer or Video Source Press the Source button on the card remote control to 400...
... want to 400 percent. Or press the "Menu" button on and that the computer or video source is present. • Do not turn the projector off and then immediately back on the projector cabinet or the remote control will glow orange. The power indicator will go into its standby ...so: 1) Press the POINTER button on the remote control or the projector cabinet to select "Video" (VCR, document camera, or laser disc player), S-Video" or "RGB" (computer or DVD with component output) to 400%. 4. Select the Computer or Video Source Press the Source button on the card remote control to 400...
User Manual
Page 25
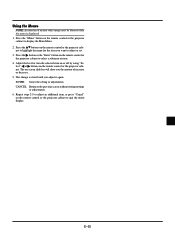
... or decrease. 5. Press the ᮣ button or the "Enter" button on the remote control or the projector cabinet to select a submenu or item. 4. Press the "Menu" button on the remote control or the projector cabinet to display the Main Menu. 2. Adjust the level or turn the selected item on or off... by using "Select" ᮤ or ᮣ buttons on the remote control or the projector cabinet to adjust or set. 3. Using the Menus NOTE: An interlaced motion video image may be blurred while the menu is stored until you adjust it again. Press the vw buttons on...
... or decrease. 5. Press the ᮣ button or the "Enter" button on the remote control or the projector cabinet to select a submenu or item. 4. Press the "Menu" button on the remote control or the projector cabinet to display the Main Menu. 2. Adjust the level or turn the selected item on or off... by using "Select" ᮤ or ᮣ buttons on the remote control or the projector cabinet to adjust or set. 3. Using the Menus NOTE: An interlaced motion video image may be blurred while the menu is stored until you adjust it again. Press the vw buttons on...

User Manual
Page 26
... Volume Bar (Direct Button) Menu Display Time On/ Off On/ Off Manual/ Auto 3sec/ Auto 10sec/ Auto 30sec Signal Select RGB VIDEO/ S-VIDEO Auto/ RGB/ Component Auto/ NTSC3.58/ NTSC4.43/ PAL/ PAL60/ SECAM Auto Start On/ Off Power Management On/ Off Power ... Logo Source Name Input Terminal Horizontal Frequency Vertical Frequency Sync Polarity Signal Type Video Type Sync Type Interlace Resolution Aspect Ratio Gamma Correction Noise Reduction Color Matrix Matrix Type Lamp Hour Meter Projector Usage NOTE: Adjustable sources R=RGB V=Video/S-Video C=Component H=HDTV All=All sources E-26
... Volume Bar (Direct Button) Menu Display Time On/ Off On/ Off Manual/ Auto 3sec/ Auto 10sec/ Auto 30sec Signal Select RGB VIDEO/ S-VIDEO Auto/ RGB/ Component Auto/ NTSC3.58/ NTSC4.43/ PAL/ PAL60/ SECAM Auto Start On/ Off Power Management On/ Off Power ... Logo Source Name Input Terminal Horizontal Frequency Vertical Frequency Sync Polarity Signal Type Video Type Sync Type Interlace Resolution Aspect Ratio Gamma Correction Noise Reduction Color Matrix Matrix Type Lamp Hour Meter Projector Usage NOTE: Adjustable sources R=RGB V=Video/S-Video C=Component H=HDTV All=All sources E-26
User Manual
Page 28
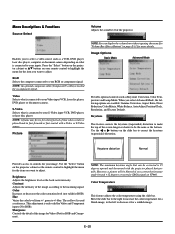
... distortion. NOTE: The maximum keystone angle that can display the volume bar without opening the menu.See "Volume Bar (Direct Button)"on VT440. Keystone This feature corrects the keystone (trapezoidal) distortion to highlight the menu for SXGA signal on page E-31 for more for the ...Mode. RGB Selects the computer connected to your remote control to make the top of the projector. NOTE: A frame may freeze for a brief period of the image for Video (Not for your S-Video input-VCR, DVD player, or laser disc player. Keystone distortion Normal Provides access to your...
... distortion. NOTE: The maximum keystone angle that can display the volume bar without opening the menu.See "Volume Bar (Direct Button)"on VT440. Keystone This feature corrects the keystone (trapezoidal) distortion to highlight the menu for SXGA signal on page E-31 for more for the ...Mode. RGB Selects the computer connected to your remote control to make the top of the projector. NOTE: A frame may freeze for a brief period of the image for Video (Not for your S-Video input-VCR, DVD player, or laser disc player. Keystone distortion Normal Provides access to your...


