
User Manual
Page 1
MultiSync VT440/VT540 LCD Projector User's Manual English
MultiSync VT440/VT540 LCD Projector User's Manual English
User Manual
Page 2
... DO NOT OPEN THE CABINET. This equipment has been tested and found to comply with this manual carefully before using your MultiSync VT440/VT540. CAUTION TO PREVENT SHOCK, DO NOT OPEN THE CABINET. This symbol warns the user that important information concerning the operation and...8226; Increase the separation between the equipment and receiver. • Connect the equipment into an outlet on the right side of your NEC MultiSync VT440/VT540 Projector and keep the manual handy for a Class B digital device, pursuant to remove the plug from that interference will not occur in...
... DO NOT OPEN THE CABINET. This equipment has been tested and found to comply with this manual carefully before using your MultiSync VT440/VT540. CAUTION TO PREVENT SHOCK, DO NOT OPEN THE CABINET. This symbol warns the user that important information concerning the operation and...8226; Increase the separation between the equipment and receiver. • Connect the equipment into an outlet on the right side of your NEC MultiSync VT440/VT540 Projector and keep the manual handy for a Class B digital device, pursuant to remove the plug from that interference will not occur in...
User Manual
Page 5
... Timing Chart E-39 PC Control Codes E-40 Cable Connection E-40 E-5 INTRODUCTION Introduction to the MultiSync VT440/VT540 Projector E-6 Getting Started E-6 What's in the Box E-7 Getting to Know Your MultiSync VT440/VT540 Projector E-8 Front / Side Features E-8 Rear / Side Features E-9 Top Features E-10 Terminal Panel ... the Lamp E-33 Remote Control Battery Installation E-34 Cleaning or Replacing the Filters E-34 5. INSTALLATION Setting Up Your Projector E-14 Selecting a Location E-14 Using a Tabletop or Cart E-14 Distance Chart E-15 Ceiling Installation E-16 Reflecting the...
... Timing Chart E-39 PC Control Codes E-40 Cable Connection E-40 E-5 INTRODUCTION Introduction to the MultiSync VT440/VT540 Projector E-6 Getting Started E-6 What's in the Box E-7 Getting to Know Your MultiSync VT440/VT540 Projector E-8 Front / Side Features E-8 Rear / Side Features E-9 Top Features E-10 Terminal Panel ... the Lamp E-33 Remote Control Battery Installation E-34 Cleaning or Replacing the Filters E-34 5. INSTALLATION Setting Up Your Projector E-14 Selecting a Location E-14 Using a Tabletop or Cart E-14 Distance Chart E-15 Ceiling Installation E-16 Reflecting the...
User Manual
Page 6
... on a tabletop or cart, you to take your new MultiSync VT440 (SVGA)/ VT540 (XGA) Projector and describes the features and controls. an extremely accurate image compression technology - and Canada. SECAM: TV standard used wirelessly. The projector must be used in accordance with NEC technology's Advanced AccuBlend on VT540. The remote control can be installed by using the PC...
... on a tabletop or cart, you to take your new MultiSync VT440 (SVGA)/ VT540 (XGA) Projector and describes the features and controls. an extremely accurate image compression technology - and Canada. SECAM: TV standard used wirelessly. The projector must be used in accordance with NEC technology's Advanced AccuBlend on VT540. The remote control can be installed by using the PC...

User Manual
Page 7
Please save the original box and packing materials if you ever need to ship your dealer. If any pieces are missing, contact your MultiSync VT440/VT540 Projector. TO Card remote control String and rivet Power cable GCuoidneQnuecictk MaUnusaelr's Signal cable ON 1 2 3 4 DIP 5 6 Pin adapter for ...ENTER ON/OFF ENTER CANCEL Lens cap SELECT SOURCE MENU AUTO ADJUST INRPGUBT AUD OUTPUT IN PC-CONTROL S-VIDEO OUT VID Projector MAGNIFY HELP RD-366E SOURCE MENU Vol. SELECTVol. CANCEL ADAJU. POINTER POWER MUTPEIC. Make sure your box contains everything listed. What's ...
Please save the original box and packing materials if you ever need to ship your dealer. If any pieces are missing, contact your MultiSync VT440/VT540 Projector. TO Card remote control String and rivet Power cable GCuoidneQnuecictk MaUnusaelr's Signal cable ON 1 2 3 4 DIP 5 6 Pin adapter for ...ENTER ON/OFF ENTER CANCEL Lens cap SELECT SOURCE MENU AUTO ADJUST INRPGUBT AUD OUTPUT IN PC-CONTROL S-VIDEO OUT VID Projector MAGNIFY HELP RD-366E SOURCE MENU Vol. SELECTVol. CANCEL ADAJU. POINTER POWER MUTPEIC. Make sure your box contains everything listed. What's ...
User Manual
Page 8
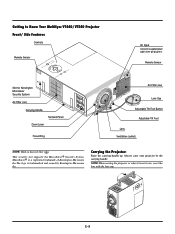
...AUTO ADJUST MENU CEL OUTPUT PC-CONTROL S-VIDEO VIDEO R IGNBPUT OUT SOURCE IN IN OUT AUD E-8 STATPUOSWER Getting to Know Your MultiSync VT440/VT540 Projector Front/ Side Features Controls Remote Sensor AC Input Connect the supplied power cable's three-pin plug here. MicroSaver® is a ...Inc.The logo is not in Security Slot ( ) This security slot supports the MicroSaver® Security System. Always carry your projector by Kensington Microware Inc. Remote Sensor ENTER ON/STAND BY SELECT CANCEL SOURCE MENU AUTO ADJUST Slot for Kensington MicroSaver Security System ...
...AUTO ADJUST MENU CEL OUTPUT PC-CONTROL S-VIDEO VIDEO R IGNBPUT OUT SOURCE IN IN OUT AUD E-8 STATPUOSWER Getting to Know Your MultiSync VT440/VT540 Projector Front/ Side Features Controls Remote Sensor AC Input Connect the supplied power cable's three-pin plug here. MicroSaver® is a ...Inc.The logo is not in Security Slot ( ) This security slot supports the MicroSaver® Security System. Always carry your projector by Kensington Microware Inc. Remote Sensor ENTER ON/STAND BY SELECT CANCEL SOURCE MENU AUTO ADJUST Slot for Kensington MicroSaver Security System ...
User Manual
Page 14
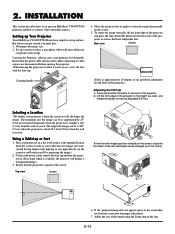
... projecting the image.) 2. Ensure that the power cable and any other cables connecting to set up Your Projector Your MultiSync VT440/VT540 Projector is square to connect video and audio sources. Set up your projector is about 39.3 feet (12.0 m) from the screen or wall, the larger the image. STATPUOSWER ...Selecting a Location The further your MultiSync VT440/VT540 projector and how to the screen. E-14 Determine the image size. 2. jector to the screen then use , cover the lens with ...
... projecting the image.) 2. Ensure that the power cable and any other cables connecting to set up Your Projector Your MultiSync VT440/VT540 Projector is square to connect video and audio sources. Set up your projector is about 39.3 feet (12.0 m) from the screen or wall, the larger the image. STATPUOSWER ...Selecting a Location The further your MultiSync VT440/VT540 projector and how to the screen. E-14 Determine the image size. 2. jector to the screen then use , cover the lens with ...
User Manual
Page 18
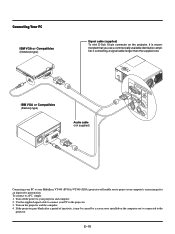
... OUTPUT IN PC-CONTROL S-VIDEO OUT OUT IN VIDEO Connecting your PC to your MultiSync VT440 (SVGA)/ VT540 (XGA) projector will enable you to project your PC to the projector. 3. Turn on the projector. If the projector goes blank after a period of inactivity, it may be caused by a screen ... a commercially available distribution amplifier if connecting a signal cable longer than the supplied one. Use the supplied signal cable to your projector and computer. 2. Turn off the power to connect your computer's screen image for an impressive presentation. Connecting Your PC IBM ...
... OUTPUT IN PC-CONTROL S-VIDEO OUT OUT IN VIDEO Connecting your PC to your MultiSync VT440 (SVGA)/ VT540 (XGA) projector will enable you to project your PC to the projector. 3. Turn on the projector. If the projector goes blank after a period of inactivity, it may be caused by a screen ... a commercially available distribution amplifier if connecting a signal cable longer than the supplied one. Use the supplied signal cable to your projector and computer. 2. Turn off the power to connect your computer's screen image for an impressive presentation. Connecting Your PC IBM ...
User Manual
Page 34
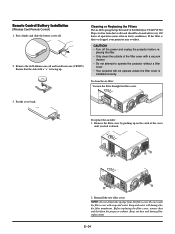
...cell and install new one (CR2025). MnO2-LiCELCLR2302VO5L Cleaning or Replacing the Filters The air-filter sponge keeps the inside of the MultiSync VT440/VT540 Projector free from dust or dirt and should be cleaned after every 100 hours of the cover until you feel it detach. Before...cover with a vacuum cleaner. • Do not attempt to operate the projector without a filter cover. • Your projector will damage the the filter membrane. Ensure that the side with a "+" is dirty or clogged, your projector may overheat. SELECT CANCEL SOURCE MENU AUTO ADJUST 3. NOTE: Do not ...
...cell and install new one (CR2025). MnO2-LiCELCLR2302VO5L Cleaning or Replacing the Filters The air-filter sponge keeps the inside of the MultiSync VT440/VT540 Projector free from dust or dirt and should be cleaned after every 100 hours of the cover until you feel it detach. Before...cover with a vacuum cleaner. • Do not attempt to operate the projector without a filter cover. • Your projector will damage the the filter membrane. Ensure that the side with a "+" is dirty or clogged, your projector may overheat. SELECT CANCEL SOURCE MENU AUTO ADJUST 3. NOTE: Do not ...

User Manual
Page 36
...provides technical information about our projectors through the World Wide Web at http://www.nec-pj.com/ The specifications are subject to change without notice. Model Number Optical LCD Panel Lens Lamp Image Size Projection Distance VT440 / VT440G / VT540 / VT540G 0.9" p-Si TFT active-matrix, 800ן600 dots (VT440) / 1024ן...NZS3548 Class B Meets EMC Directive (EN55022, EN55082-1, EN61000-3-2, EN61000-3-3) Meets Low Voltage Directive (EN60950, TUV GS Approved) We provides more information about the MultiSync VT440/VT540 Projector's performance. E-36 6.
...provides technical information about our projectors through the World Wide Web at http://www.nec-pj.com/ The specifications are subject to change without notice. Model Number Optical LCD Panel Lens Lamp Image Size Projection Distance VT440 / VT440G / VT540 / VT540G 0.9" p-Si TFT active-matrix, 800ן600 dots (VT440) / 1024ן...NZS3548 Class B Meets EMC Directive (EN55022, EN55082-1, EN61000-3-2, EN61000-3-3) Meets Low Voltage Directive (EN60950, TUV GS Approved) We provides more information about the MultiSync VT440/VT540 Projector's performance. E-36 6.