
User Manual
Page 7
...Mode 40 European Union Directives Conformance Statement . . 41 Caring for Installation and Connection 6 Installing the Handsfree Car Kit 7 Using Your Car Kit 16 Linking Your Car Kit and Bluetooth Enabled Device . . . . 17 Making and Receiving Calls 21 Listening to Music 24 Using the Wired ...Audio Input 26 Disconnecting the Car Kit from Your Bluetooth Device . 27 Appendix A - Troubleshooting 29 Appendix B - UIM Indicator Light Status 35 Appendix C - Contents Welcome 1 Package Contents 2 Installing the Handsfree Car Kit 6 Guidelines for the Environment by Recycling ...
...Mode 40 European Union Directives Conformance Statement . . 41 Caring for Installation and Connection 6 Installing the Handsfree Car Kit 7 Using Your Car Kit 16 Linking Your Car Kit and Bluetooth Enabled Device . . . . 17 Making and Receiving Calls 21 Listening to Music 24 Using the Wired ...Audio Input 26 Disconnecting the Car Kit from Your Bluetooth Device . 27 Appendix A - Troubleshooting 29 Appendix B - UIM Indicator Light Status 35 Appendix C - Contents Welcome 1 Package Contents 2 Installing the Handsfree Car Kit 6 Guidelines for the Environment by Recycling ...

User Manual
Page 8
If needed, contact the vehicle manufacturer for Installation and Connection • Only qualified personnel should install this car kit. Always use the supplied mounting hardware. • Mounted components and attached wires or cables must not interfere with great force. ...objects, including communication equipment, in the area over the air bag or in -line connectors easily accessible. 6 Installing the Handsfree Car Kit Installing the Handsfree Car Kit Guidelines for air bag information specific to the vehicle. Because of the wide variety of vehicle types and models it may be ...
If needed, contact the vehicle manufacturer for Installation and Connection • Only qualified personnel should install this car kit. Always use the supplied mounting hardware. • Mounted components and attached wires or cables must not interfere with great force. ...objects, including communication equipment, in the area over the air bag or in -line connectors easily accessible. 6 Installing the Handsfree Car Kit Installing the Handsfree Car Kit Guidelines for air bag information specific to the vehicle. Because of the wide variety of vehicle types and models it may be ...

User Manual
Page 9
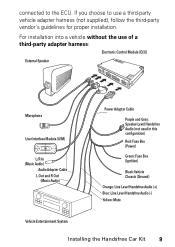
...installation, unpack, assemble, and test all components on a service bench. Installing the Electronic Control Module (ECU) Mount the ECU securely. Installing the Handsfree Car Kit Caution: This car kit must be mounting the UIM, microphone, speaker, and ECU. Plug everything into the ECU, and then mount the ECU. • The... car kit has separate output paths for full system operation. Mount the UIM, speaker and microphone and route the cables to prevent fire or other...
...installation, unpack, assemble, and test all components on a service bench. Installing the Electronic Control Module (ECU) Mount the ECU securely. Installing the Handsfree Car Kit Caution: This car kit must be mounting the UIM, microphone, speaker, and ECU. Plug everything into the ECU, and then mount the ECU. • The... car kit has separate output paths for full system operation. Mount the UIM, speaker and microphone and route the cables to prevent fire or other...

User Manual
Page 10
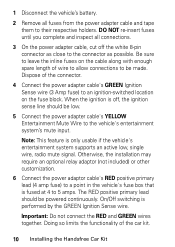
... is under the dash. Do not place it behind or within large areas of the T605 handsfree audio into the vehicle entertainment system. Barcode Mounting Surface Mounting Surface Barcode For optimal Bluetooth performance, mount the ECU so that allows integration of metal. Note: A vehicle adapter ...pin black connector (for power and line-level audio) and 2-pin black connector (for speaker-level audio) are 8 Installing the Handsfree Car Kit The best location for cable connections. The box must not interfere with the barcode faces away from dirt and moisture, have adequate space for...
... is under the dash. Do not place it behind or within large areas of the T605 handsfree audio into the vehicle entertainment system. Barcode Mounting Surface Mounting Surface Barcode For optimal Bluetooth performance, mount the ECU so that allows integration of metal. Note: A vehicle adapter ...pin black connector (for power and line-level audio) and 2-pin black connector (for speaker-level audio) are 8 Installing the Handsfree Car Kit The best location for cable connections. The box must not interfere with the barcode faces away from dirt and moisture, have adequate space for...
User Manual
Page 11
...: Fuse Box (Ignition) Black: Vehicle Chassis (Ground) Orange: Line Level Handsfree Audio (+) Blue: Line Level Handsfree Audio (-) Yellow: Mute Vehicle Entertainment System Installing the Handsfree Car Kit 9
...: Fuse Box (Ignition) Black: Vehicle Chassis (Ground) Orange: Line Level Handsfree Audio (+) Blue: Line Level Handsfree Audio (-) Yellow: Mute Vehicle Entertainment System Installing the Handsfree Car Kit 9
User Manual
Page 12
... cable along with enough spare length of wire to allow connections to an ignition-switched location on the fuse block. Dispose of the car kit. 10 Installing the Handsfree Car Kit When the ignition is fused at 4 to the connector as close to 5 amps. Note: This feature is performed by the GREEN Ignition Sense...
... cable along with enough spare length of wire to allow connections to an ignition-switched location on the fuse block. Dispose of the car kit. 10 Installing the Handsfree Car Kit When the ignition is fused at 4 to the connector as close to 5 amps. Note: This feature is performed by the GREEN Ignition Sense...
User Manual
Page 13
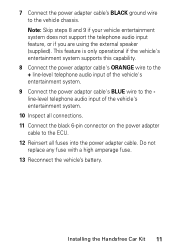
Installing the Handsfree Car Kit 11 This feature is only operational if the vehicle's entertainment system supports this capability. 8 Connect the power adaptor cable's ORANGE wire to the + line-level ...
Installing the Handsfree Car Kit 11 This feature is only operational if the vehicle's entertainment system supports this capability. 8 Connect the power adaptor cable's ORANGE wire to the + line-level ...

User Manual
Page 14
Installing the Microphone Note: Always use the supplied mounting hardware. Note: The microphone must be positioned properly or the car kit WILL NOT perform optimally. 1 Mount the microphone in a suitable location using either screw, velcro, or clip. • The preferred spot to mount the microphone is... from mounting the microphone on door pillars or windows that can transmit exterior wind noise to it. • Microphone should not be attached to the car's visor. 2 Route the microphone cable down the side of the windshield, through the dash, and to the ECU. 3 Connect the microphone to the ECU. ...
Installing the Microphone Note: Always use the supplied mounting hardware. Note: The microphone must be positioned properly or the car kit WILL NOT perform optimally. 1 Mount the microphone in a suitable location using either screw, velcro, or clip. • The preferred spot to mount the microphone is... from mounting the microphone on door pillars or windows that can transmit exterior wind noise to it. • Microphone should not be attached to the car's visor. 2 Route the microphone cable down the side of the windshield, through the dash, and to the ECU. 3 Connect the microphone to the ECU. ...
User Manual
Page 15
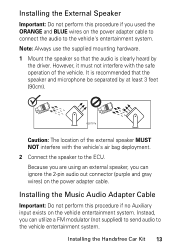
It is recommended that the audio is clearly heard by at least 3 feet (90cm). 020707a Caution: The location of the vehicle. Installing the Handsfree Car Kit 13 However, it must not interfere with the safe operation of the external speaker MUST NOT interfere with the vehicle's air bag deployment. 2 Connect the ...
It is recommended that the audio is clearly heard by at least 3 feet (90cm). 020707a Caution: The location of the vehicle. Installing the Handsfree Car Kit 13 However, it must not interfere with the safe operation of the external speaker MUST NOT interfere with the vehicle's air bag deployment. 2 Connect the ...

User Manual
Page 16
... cable to the vehicle entertainment system's Auxiliary input using an appropriate adapter if needed (not supplied). 4 Connect the 8-pin connector on . 14 Installing the Handsfree Car Kit
... cable to the vehicle entertainment system's Auxiliary input using an appropriate adapter if needed (not supplied). 4 Connect the 8-pin connector on . 14 Installing the Handsfree Car Kit

User Manual
Page 17
Caution: Clean the mounting surface thoroughly to ensure good adhesion. • The mounted UIM MUST NOT create a visual distraction. • DO NOT mount the UIM on the rear of the driver. 3 Connect the UIM to the ECU. 2 Remove the backing on the steering wheel. • The UIM must be in easy reach of the UIM and press the UIM firmly into place. Installing the Handsfree Car Kit 15
Caution: Clean the mounting surface thoroughly to ensure good adhesion. • The mounted UIM MUST NOT create a visual distraction. • DO NOT mount the UIM on the rear of the driver. 3 Connect the UIM to the ECU. 2 Remove the backing on the steering wheel. • The UIM must be in easy reach of the UIM and press the UIM firmly into place. Installing the Handsfree Car Kit 15

User Manual
Page 18
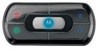
... Used for status as shown below. When call is active. The UIM provides both buttons to set up and use your T605 Bluetooth Handsfree Car Kit. Using Your Car Kit The User Interface Module (UIM) enables you to perform operations, and an indicator light for making and receiving calls •...music while the call is ended, music is resumed 16 Using Your Car Kit red (END) button Multi-function (MFB) button blue (UP ARROW) button green (SEND) button blue (DOWN ARROW) button indicator light Your T605 car kit has two operating modes: Connected mode and Music mode. Mode selection is...
... Used for status as shown below. When call is active. The UIM provides both buttons to set up and use your T605 Bluetooth Handsfree Car Kit. Using Your Car Kit The User Interface Module (UIM) enables you to perform operations, and an indicator light for making and receiving calls •...music while the call is ended, music is resumed 16 Using Your Car Kit red (END) button Multi-function (MFB) button blue (UP ARROW) button green (SEND) button blue (DOWN ARROW) button indicator light Your T605 car kit has two operating modes: Connected mode and Music mode. Mode selection is...

User Manual
Page 19
...or two music devices). Using Your Car Kit 17 Note: For safety reasons, it with your device by creating a paired link. You establish a Bluetooth link between your car kit and your Bluetooth-enabled device. When you set up a paired link, the car kit remembers your device and automatically connects to... system is enabled • Music player operations can be performed from UIM or music player Linking Your Car Kit and Bluetooth Enabled Device Before you can use your Bluetooth car kit, you must first link it is recommended that the pairing process be performed in a stationary vehicle.
...or two music devices). Using Your Car Kit 17 Note: For safety reasons, it with your device by creating a paired link. You establish a Bluetooth link between your car kit and your Bluetooth-enabled device. When you set up a paired link, the car kit remembers your device and automatically connects to... system is enabled • Music player operations can be performed from UIM or music player Linking Your Car Kit and Bluetooth Enabled Device Before you can use your Bluetooth car kit, you must first link it is recommended that the pairing process be performed in a stationary vehicle.
User Manual
Page 20
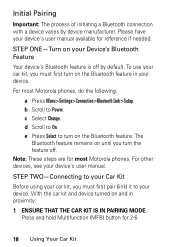
... default. c Select Change. The Bluetooth feature remains on the Bluetooth feature. For most Motorola phones. e Press Select to your car kit, you must first turn the feature off by device manufacturer. Note: These steps are for 2-6 18 Using Your Car Kit d Scroll to Power. STEP TWO-Connecting to your Car Kit Before using your car kit, you must first pair (link...
... default. c Select Change. The Bluetooth feature remains on the Bluetooth feature. For most Motorola phones. e Press Select to your car kit, you must first turn the feature off by device manufacturer. Note: These steps are for 2-6 18 Using Your Car Kit d Scroll to Power. STEP TWO-Connecting to your Car Kit Before using your car kit, you must first pair (link...
User Manual
Page 21
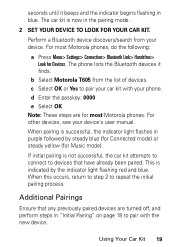
...Motorola T605 from your device. Note: These steps are turned off, and perform steps in the pairing mode. 2 SET YOUR DEVICE TO LOOK FOR YOUR CAR KIT. c Select OK or Yes to pair with your device's user manual. If initial pairing is now in "Initial Pairing" on page 18 to pair your car kit...process. This is successful, the indicator light flashes in blue. Using Your Car Kit 19 Additional Pairings Ensure that have already been paired. seconds until it finds. The phone lists the Bluetooth devices it beeps and the indicator begins flashing in purple followed by the ...
...Motorola T605 from your device. Note: These steps are turned off, and perform steps in the pairing mode. 2 SET YOUR DEVICE TO LOOK FOR YOUR CAR KIT. c Select OK or Yes to pair with your device's user manual. If initial pairing is now in "Initial Pairing" on page 18 to pair your car kit...process. This is successful, the indicator light flashes in blue. Using Your Car Kit 19 Additional Pairings Ensure that have already been paired. seconds until it finds. The phone lists the Bluetooth devices it beeps and the indicator begins flashing in purple followed by the ...
User Manual
Page 22
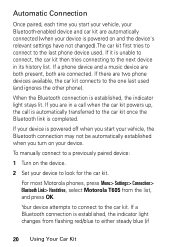
... next device in a call when the car kit powers up, the call is completed. For most Motorola phones, press Menu> Settings> Connection> Bluetooth Link> Handsfree, select Motorola T605 from flashing red/blue to the car kit once the Bluetooth link is automatically transferred to either steady blue (if 20 Using Your Car Kit If a Bluetooth connection is powered on and the device...
... next device in a call when the car kit powers up, the call is completed. For most Motorola phones, press Menu> Settings> Connection> Bluetooth Link> Handsfree, select Motorola T605 from flashing red/blue to the car kit once the Bluetooth link is automatically transferred to either steady blue (if 20 Using Your Car Kit If a Bluetooth connection is powered on and the device...

User Manual
Page 23
...making and receiving calls from your connected phone using your Bluetooth-enabled phone. Using Your Car Kit 21 Make a Call Phone: On-in idle T605: On Press green (SEND) button. Redial Last Number Phone: On-in idle (Hand Dial) T605: On Enter phone number on phone, press Send ... Press and hold green (SEND) button for 2-6 seconds, wait for details). Making and Receiving Calls Your T605 car kit allows you must first create a paired link (see "Linking Your Car Kit and Bluetooth Enabled Device" on phone, phone dials call . Make a Call Phone: On-in Connected mode. connected to a...
...making and receiving calls from your connected phone using your Bluetooth-enabled phone. Using Your Car Kit 21 Make a Call Phone: On-in idle T605: On Press green (SEND) button. Redial Last Number Phone: On-in idle (Hand Dial) T605: On Enter phone number on phone, press Send ... Press and hold green (SEND) button for 2-6 seconds, wait for details). Making and Receiving Calls Your T605 car kit allows you must first create a paired link (see "Linking Your Car Kit and Bluetooth Enabled Device" on phone, phone dials call . Make a Call Phone: On-in Connected mode. connected to a...
User Manual
Page 24
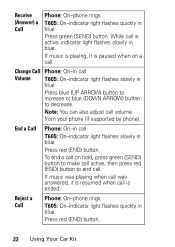
... press green (SEND) button to make call . If music is playing, it is resumed when call T605: On-indicator light flashes slowly in blue Press red (END) button. 22 Using Your Car Kit End a Call Phone: On-in call is active, indicator light flashes slowly in blue Press green (SEND...) button. While call volume from your phone (if supported by phone). Receive (Answer) a Call Phone: On-phone rings T605: On-indicator light flashes quickly in ...
... press green (SEND) button to make call . If music is playing, it is resumed when call T605: On-indicator light flashes slowly in blue Press red (END) button. 22 Using Your Car Kit End a Call Phone: On-in call is active, indicator light flashes slowly in blue Press green (SEND...) button. While call volume from your phone (if supported by phone). Receive (Answer) a Call Phone: On-phone rings T605: On-indicator light flashes quickly in ...

User Manual
Page 25
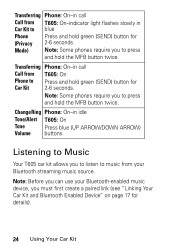
... muted, indicator light flashes slowly in purple Answer Second Incoming Call Phone: On-in call, 2nd call incoming T605: On-indicator light flashes quickly in blue Press MFB button. Switch Between Two Calls (Active and On Hold)... Phone: On-in call, 2nd call on hold , answers incoming call. Press and hold T605: On-indicator light flashes slowly in Incoming or blue On Hold Calls) - Link Two Phone: On-in call... call on hold MFB button for 2-6 seconds. 3-way Conference Using Your Car Kit 23 When call incoming T605: On-indicator light flashes quickly in blue.
... muted, indicator light flashes slowly in purple Answer Second Incoming Call Phone: On-in call, 2nd call incoming T605: On-indicator light flashes quickly in blue Press MFB button. Switch Between Two Calls (Active and On Hold)... Phone: On-in call, 2nd call on hold , answers incoming call. Press and hold T605: On-indicator light flashes slowly in Incoming or blue On Hold Calls) - Link Two Phone: On-in call... call on hold MFB button for 2-6 seconds. 3-way Conference Using Your Car Kit 23 When call incoming T605: On-indicator light flashes quickly in blue.
User Manual
Page 26
...: Before you must first create a paired link (see "Linking Your Car Kit and Bluetooth Enabled Device" on page 17 for details). 24 Using Your Car Kit Change Ring Phone: On-in Car Kit to blue Phone Press and hold the MFB button twice. Listening to Music Your T605 car kit allows you to Press and hold the MFB button twice...
...: Before you must first create a paired link (see "Linking Your Car Kit and Bluetooth Enabled Device" on page 17 for details). 24 Using Your Car Kit Change Ring Phone: On-in Car Kit to blue Phone Press and hold the MFB button twice. Listening to Music Your T605 car kit allows you to Press and hold the MFB button twice...


