
User Guide
Page 2
... a stable surface. • It is recommended that the customer install an AC surge protector in a shock or fire hazard. • Route power supply cords so that complies with all devices connected to the modem also be exposed to local regulations. • Operate this device .... when using an AC surge protector. • Postpone installation until there is no part of the supplied cables between systems components. To ensure regulatory and safety compliance, use only the provided power and interface cables and install them . Pay particular attention to cords where they are ...
... a stable surface. • It is recommended that the customer install an AC surge protector in a shock or fire hazard. • Route power supply cords so that complies with all devices connected to the modem also be exposed to local regulations. • Operate this device .... when using an AC surge protector. • Postpone installation until there is no part of the supplied cables between systems components. To ensure regulatory and safety compliance, use only the provided power and interface cables and install them . Pay particular attention to cords where they are ...

User Guide
Page 3
... reasonable protection against harmful interference in the installation and troubleshooting instructions. Do not spray cleaners directly on , the user is encouraged to try to correct the interference by Motorola for a Class B digital device, pursuant...installed and used in accordance with 47 CFR Parts 2 and 15 of the FCC Rules. If this product near a swimming pool. • Upon completion of any servicing other than that the SB6120 SURFboard® DOCSIS® 3.0 Cable Modem complies with the instructions, may cause undesired operation. FCC DECLARATION OF CONFORMITY Motorola...
... reasonable protection against harmful interference in the installation and troubleshooting instructions. Do not spray cleaners directly on , the user is encouraged to try to correct the interference by Motorola for a Class B digital device, pursuant...installed and used in accordance with 47 CFR Parts 2 and 15 of the FCC Rules. If this product near a swimming pool. • Upon completion of any servicing other than that the SB6120 SURFboard® DOCSIS® 3.0 Cable Modem complies with the instructions, may cause undesired operation. FCC DECLARATION OF CONFORMITY Motorola...

User Guide
Page 5
... or maintenance of the Software. iv SOFTWARE LICENSE SB6120 SURFboard DOCSIS 3.0 Cable Modem Motorola, Inc. IF YOU DO NOT AGREE TO ALL OF THE TERMS OF THIS LICENSE (I) DO NOT INSTALL OR USE THE SOFTWARE AND (II) RETURN THE CABLE DATA PRODUCT AND THE SOFTWARE (COLLECTIVELY, "PRODUCT...READ THIS SOFTWARE LICENSE ("LICENSE") CAREFULLY BEFORE YOU INSTALL, DOWNLOAD, OR USE ANY APPLICATION SOFTWARE, USB DRIVER SOFTWARE, FIRMWARE, AND RELATED DOCUMENTATION ("SOFTWARE") PROVIDED WITH MOTOROLA'S CABLE DATA PRODUCT (THE "CABLE DATA PRODUCT"). BY INSTALLING OR USING THE SOFTWARE, YOU AGREE TO BE ...
... or maintenance of the Software. iv SOFTWARE LICENSE SB6120 SURFboard DOCSIS 3.0 Cable Modem Motorola, Inc. IF YOU DO NOT AGREE TO ALL OF THE TERMS OF THIS LICENSE (I) DO NOT INSTALL OR USE THE SOFTWARE AND (II) RETURN THE CABLE DATA PRODUCT AND THE SOFTWARE (COLLECTIVELY, "PRODUCT...READ THIS SOFTWARE LICENSE ("LICENSE") CAREFULLY BEFORE YOU INSTALL, DOWNLOAD, OR USE ANY APPLICATION SOFTWARE, USB DRIVER SOFTWARE, FIRMWARE, AND RELATED DOCUMENTATION ("SOFTWARE") PROVIDED WITH MOTOROLA'S CABLE DATA PRODUCT (THE "CABLE DATA PRODUCT"). BY INSTALLING OR USING THE SOFTWARE, YOU AGREE TO BE ...

User Guide
Page 7
... ...1 Front Panel...2 Rear Panel ...3 Bottom Label on the SB6120 ...4 2 Installation ...5 Before You Begin...5 Precautions ...6 Signing Up for Service...7 Computer System Requirements...7 Ethernet Card ...7 Additional Requirements...7 Cabling and Startup for the SB6120...8 Wall Mounting Your SB6120...9 Wall Mounting Template ...11 Configuring TCP/IP ...12 Configuring TCP...in Windows Vista 23 Configuring TCP Window Size...25 3 Troubleshooting...26 Power Recycle Your SB6120...26 Front-Panel Lights and Error Conditions...27 4 Contact Us...28 5 Frequently Asked Questions ...29 6 Glossary...31 vi
... ...1 Front Panel...2 Rear Panel ...3 Bottom Label on the SB6120 ...4 2 Installation ...5 Before You Begin...5 Precautions ...6 Signing Up for Service...7 Computer System Requirements...7 Ethernet Card ...7 Additional Requirements...7 Cabling and Startup for the SB6120...8 Wall Mounting Your SB6120...9 Wall Mounting Template ...11 Configuring TCP/IP ...12 Configuring TCP...in Windows Vista 23 Configuring TCP Window Size...25 3 Troubleshooting...26 Power Recycle Your SB6120...26 Front-Panel Lights and Error Conditions...27 4 Contact Us...28 5 Frequently Asked Questions ...29 6 Glossary...31 vi

User Guide
Page 8
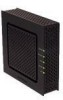
... your SB6120 cable modem, informs you of useful terms with an Ethernet adapter directly to the Internet. It provides high-speed access to common questions about the SB6120 cable modem. 6 Glossary - provides an overview and links for a service. 3 Troubleshooting - Just open your cable modem is always online. provides suggestions to install your SB6120 cable modem, lists the items you have a new Motorola SB6120 SURFboard®...
... your SB6120 cable modem, informs you of useful terms with an Ethernet adapter directly to the Internet. It provides high-speed access to common questions about the SB6120 cable modem. 6 Glossary - provides an overview and links for a service. 3 Troubleshooting - Just open your cable modem is always online. provides suggestions to install your SB6120 cable modem, lists the items you have a new Motorola SB6120 SURFboard®...

User Guide
Page 12
...TV is connected to the cable outlet, you begin the installation, check that connects to an AC electrical outlet Ethernet, Fast Ethernet, and Gigabit Ethernet cable SB6120 Quick Installation Guide Connects to the Ethernet...Cabling and Startup for the SB6120 • Wall Mounting Your SB6120 • Configuring TCP/IP Before You Begin Before you may need a 75-ohm coaxial cable with the SB6120 You must have the latest service packs and patches installed on your computer for advice on obtaining these components. 5 Contact your SB6120 SURFboard DOCSIS 3.0 Cable Modem. The coaxial cable...
...TV is connected to the cable outlet, you begin the installation, check that connects to an AC electrical outlet Ethernet, Fast Ethernet, and Gigabit Ethernet cable SB6120 Quick Installation Guide Connects to the Ethernet...Cabling and Startup for the SB6120 • Wall Mounting Your SB6120 • Configuring TCP/IP Before You Begin Before you may need a 75-ohm coaxial cable with the SB6120 You must have the latest service packs and patches installed on your computer for advice on obtaining these components. 5 Contact your SB6120 SURFboard DOCSIS 3.0 Cable Modem. The coaxial cable...
User Guide
Page 13
... and damage the product. 6 Exposure of the cables to Motorola. To avoid damaging the cable modem with a clean, dry cloth. This product is for indoor use cleaning fluid or similar chemicals. Do not open the unit. Do not route the Ethernet cable outside of the unit. 2 INSTALLATION Precautions Postpone SB6120 cable modem installation until there is capable of operating in...
... and damage the product. 6 Exposure of the cables to Motorola. To avoid damaging the cable modem with a clean, dry cloth. This product is for indoor use cleaning fluid or similar chemicals. Do not open the unit. Do not route the Ethernet cable outside of the unit. 2 INSTALLATION Precautions Postpone SB6120 cable modem installation until there is capable of operating in...
User Guide
Page 14
...™, Windows Vista®, Macintosh®, Linux®, or UNIX® operating systems. Caution! Computer System Requirements Your SB6120 SURFboard DOCSIS 3.0 Cable Modem is needed to access the Internet and other online services. Additional Requirements Your computer must have any special system requirements? •...the cable modem. You must meet the following questions: • Do you need to provide the MAC address printed on the bar code label marked HFC MAC ID on the bottom of your operating system installed with any files I need to download after connecting the SB6120?...
...™, Windows Vista®, Macintosh®, Linux®, or UNIX® operating systems. Caution! Computer System Requirements Your SB6120 SURFboard DOCSIS 3.0 Cable Modem is needed to access the Internet and other online services. Additional Requirements Your computer must have any special system requirements? •...the cable modem. You must meet the following questions: • Do you need to provide the MAC address printed on the bar code label marked HFC MAC ID on the bottom of your operating system installed with any files I need to download after connecting the SB6120?...

User Guide
Page 15
...INSTALLATION • Minimum 256 MB RAM recommended • 10 MB available hard disk space There are no web browser restrictions for Configuring TCP/IP. Connect one end of the coaxial cable to the CABLE connector on the cable modem. Connect the provided Ethernet cable to avoid damaging them. 3. Connect the other end of the coaxial cable... to the SB6120. 8 Hand-tighten the connectors to the cable modem and ...
...INSTALLATION • Minimum 256 MB RAM recommended • 10 MB available hard disk space There are no web browser restrictions for Configuring TCP/IP. Connect one end of the coaxial cable to the CABLE connector on the cable modem. Connect the provided Ethernet cable to avoid damaging them. 3. Connect the other end of the coaxial cable... to the SB6120. 8 Hand-tighten the connectors to the cable modem and ...

User Guide
Page 16
... disconnected from the back of the SB6120 before starting the installation. 9 Wall Mounting Your SB6120 If you mount your SB6120 on the wall, you must : • Locate the unit as specified by the local or national codes governing residential or business cable TV and communications services. • Follow all cables are connected with bonded channels. If...
... disconnected from the back of the SB6120 before starting the installation. 9 Wall Mounting Your SB6120 If you mount your SB6120 on the wall, you must : • Locate the unit as specified by the local or national codes governing residential or business cable TV and communications services. • Follow all cables are connected with bonded channels. If...

User Guide
Page 17
...1. Be sure No Scaling is the correct size. 5. Be sure you print the template at least 1 1/2 inches (3.8 cm). 2 INSTALLATION You can mount the SB6120 horizontally or vertically. Do the following illustration. 10 Measure the printed template with a flat underside and maximum screw head diameter of 9.0 mm ...only, select Current page as shown in the following to a depth of it is selected for the mounting holes. 7. Drill the holes to mount your SB6120 on your computer, depending upon your operating system. Use M3.5 x 38 mm (#6 x 11/2 inch) screws with a ruler to paper size. 3....
...1. Be sure No Scaling is the correct size. 5. Be sure you print the template at least 1 1/2 inches (3.8 cm). 2 INSTALLATION You can mount the SB6120 horizontally or vertically. Do the following illustration. 10 Measure the printed template with a flat underside and maximum screw head diameter of 9.0 mm ...only, select Current page as shown in the following to a depth of it is selected for the mounting holes. 7. Drill the holes to mount your SB6120 on your computer, depending upon your operating system. Use M3.5 x 38 mm (#6 x 11/2 inch) screws with a ruler to paper size. 3....
User Guide
Page 18
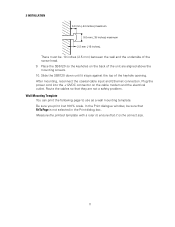
2 INSTALLATION 6.0 mm (.24 inches) maximum 9.0 mm (.35 inches) maximum 2.5 mm (.10 inches). There must be sure that Fit To Page is the correct size. 11 In ... template. Slide the SB6120 down until it stops against the top of the screw head. 9. Route the cables so that it at 100% scale. Plug the power cord into the +12VDC connector on the back of the unit are not a safety problem. Place the SB6120 so the keyholes on the cable modem and the electrical...
2 INSTALLATION 6.0 mm (.24 inches) maximum 9.0 mm (.35 inches) maximum 2.5 mm (.10 inches). There must be sure that Fit To Page is the correct size. 11 In ... template. Slide the SB6120 down until it stops against the top of the screw head. 9. Route the cables so that it at 100% scale. Plug the power cord into the +12VDC connector on the back of the unit are not a safety problem. Place the SB6120 so the keyholes on the cable modem and the electrical...

User Guide
Page 19
... for TCP/IP, which is a protocol for the operating system you must verify the IP address. Perform one of the following for communication between computers. 2 INSTALLATION Configuring TCP/IP Make sure all client computers are running: • Configuring TCP/IP in Windows 2000 • Configuring TCP/IP in Windows XP •...
... for TCP/IP, which is a protocol for the operating system you must verify the IP address. Perform one of the following for communication between computers. 2 INSTALLATION Configuring TCP/IP Make sure all client computers are running: • Configuring TCP/IP in Windows 2000 • Configuring TCP/IP in Windows XP •...

User Guide
Page 20
... in the applicable Macintosh or UNIX user documentation. PCs having only one network interface may be represented as 1, 2, or 3 represents PCs with multiple network interfaces. 2 INSTALLATION • Verifying the IP Address in Windows Vista • For Macintosh or UNIX systems, follow , a connection number such as "Local Area Connection." 3. In the steps...
... in the applicable Macintosh or UNIX user documentation. PCs having only one network interface may be represented as 1, 2, or 3 represents PCs with multiple network interfaces. 2 INSTALLATION • Verifying the IP Address in Windows Vista • For Macintosh or UNIX systems, follow , a connection number such as "Local Area Connection." 3. In the steps...

User Guide
Page 21
2 INSTALLATION 4. You can skip to display the Local Area Connection number Properties window. If Internet Protocol (TCP/IP) is in the list of components, TCP/IP is displayed. 5. Click Properties to step 8. 14 Information similar to the following is installed.
2 INSTALLATION 4. You can skip to display the Local Area Connection number Properties window. If Internet Protocol (TCP/IP) is in the list of components, TCP/IP is displayed. 5. Click Properties to step 8. 14 Information similar to the following is installed.

User Guide
Page 22
If Internet Protocol (TCP/IP) is displayed. 8. The Select Network Protocol window is not in the list of components, click Install. Click Internet Protocol (TCP/IP), and then click OK. The Local Area Connection number Properties window is displayed. 7. The Select Network Component Type window is redisplayed. 15 Click Protocol and then click Add. 2 INSTALLATION 6.
If Internet Protocol (TCP/IP) is displayed. 8. The Select Network Protocol window is not in the list of components, click Install. Click Internet Protocol (TCP/IP), and then click OK. The Local Area Connection number Properties window is displayed. 7. The Select Network Component Type window is redisplayed. 15 Click Protocol and then click Add. 2 INSTALLATION 6.

User Guide
Page 23
2 INSTALLATION 9. Click OK to restart the computer and click OK again. 14. Configuring TCP/IP in Windows 2000 or Windows XP. Be sure Obtain an IP ...
2 INSTALLATION 9. Click OK to restart the computer and click OK again. 14. Configuring TCP/IP in Windows 2000 or Windows XP. Be sure Obtain an IP ...

User Guide
Page 24
Right-click the network connection. You can skip to display the Network and Internet Connections window. 4. Be sure Internet Protocol (TCP/IP) is displayed, be sure to display the LAN or High-Speed connections. Click Network and Internet Connections to step 7. 5. 2 INSTALLATION 3. If more than one connection is checked. 17 Click Network Connections to select the one for your network interface. 6. Select Properties from the drop-down menu to display the Local Area Connection Properties window.
Right-click the network connection. You can skip to display the Network and Internet Connections window. 4. Be sure Internet Protocol (TCP/IP) is displayed, be sure to display the LAN or High-Speed connections. Click Network and Internet Connections to step 7. 5. 2 INSTALLATION 3. If more than one connection is checked. 17 Click Network Connections to select the one for your network interface. 6. Select Properties from the drop-down menu to display the Local Area Connection Properties window.

User Guide
Page 25
Make sure Obtain an IP address automatically and Obtain DNS server address automatically are selected. 9. Select Internet Protocol (TCP/IP) and click Properties to exit the Local Area Connection Properties window. Click OK to display the Internet Protocol (TCP/IP) Properties window. 8. 2 INSTALLATION 7. When you complete the TCP/IP configuration, go to save the TCP/IP settings and exit the TCP/IP Properties window. 10. Click OK to Verifying the IP Address in Windows 2000 or Windows XP. 18
Make sure Obtain an IP address automatically and Obtain DNS server address automatically are selected. 9. Select Internet Protocol (TCP/IP) and click Properties to exit the Local Area Connection Properties window. Click OK to display the Internet Protocol (TCP/IP) Properties window. 8. 2 INSTALLATION 7. When you complete the TCP/IP configuration, go to save the TCP/IP settings and exit the TCP/IP Properties window. 10. Click OK to Verifying the IP Address in Windows 2000 or Windows XP. 18

User Guide
Page 26
2 INSTALLATION Configuring TCP/IP in Windows Vista 1. Double-click Network and Sharing Center. 19 Double-click Network and Internet. 4. Click Control Panel. 3. On the Windows desktop, click Start to display the Start window. 2.
2 INSTALLATION Configuring TCP/IP in Windows Vista 1. Double-click Network and Sharing Center. 19 Double-click Network and Internet. 4. Click Control Panel. 3. On the Windows desktop, click Start to display the Start window. 2.


