
User Manual
Page 1
... DHCP, TFTP, and TOD. F Powered off , modem is faulty. G Modem is successfully registered but Network Access Control (NACO) is connected and blinks when transmitting or receiving data. High-speed Gigabit Ethernet) - SURFboard® SB6120 Series eXtreme Cable Modem A Power On Self Test (POST). H Performing firmware upgrade. PC/Activity is solid when a CPE is disabled via DOCSIS®...
... DHCP, TFTP, and TOD. F Powered off , modem is faulty. G Modem is successfully registered but Network Access Control (NACO) is connected and blinks when transmitting or receiving data. High-speed Gigabit Ethernet) - SURFboard® SB6120 Series eXtreme Cable Modem A Power On Self Test (POST). H Performing firmware upgrade. PC/Activity is solid when a CPE is disabled via DOCSIS®...

User Guide
Page 2
...8226; Route power supply cords so that complies with all applicable device safety requirements of the country of use only the provided power and interface cables and install them . Overloaded AC outlets, extension cords, frayed power cords, damaged or cracked wire insulation, and broken plugs are affixed to ...or shock hazard, do not expose this device on the device. • This device was qualified under test conditions that all devices connected to the modem also be protected by using your dealer or local power company. • Do not overload outlets or extension cords, as this can...
...8226; Route power supply cords so that complies with all applicable device safety requirements of the country of use only the provided power and interface cables and install them . Overloaded AC outlets, extension cords, frayed power cords, damaged or cracked wire insulation, and broken plugs are affixed to ...or shock hazard, do not expose this device on the device. • This device was qualified under test conditions that all devices connected to the modem also be protected by using your dealer or local power company. • Do not overload outlets or extension cords, as this can...

User Guide
Page 3
...classe B est conforme à la norme NMB-003 du Canada. • Wipe the device with Canadian ICES-003. FCC DECLARATION OF CONFORMITY Motorola Inc, 101 Tournament Drive, Horsham, PA 19044, 1-215-323-1000, declares that contained in a wet basement, or near water; Never ...has been tested and found to qualified service personnel. • This device should not be connected to the grounding system of any servicing other than that the SB6120 SURFboard® DOCSIS® 3.0 Cable Modem complies with the limits for a Class B digital device, pursuant to radio communications. This ...
...classe B est conforme à la norme NMB-003 du Canada. • Wipe the device with Canadian ICES-003. FCC DECLARATION OF CONFORMITY Motorola Inc, 101 Tournament Drive, Horsham, PA 19044, 1-215-323-1000, declares that contained in a wet basement, or near water; Never ...has been tested and found to qualified service personnel. • This device should not be connected to the grounding system of any servicing other than that the SB6120 SURFboard® DOCSIS® 3.0 Cable Modem complies with the limits for a Class B digital device, pursuant to radio communications. This ...

User Guide
Page 5
... the same time transfer the Product and all other intellectual property rights subsisting in connection with the Software, other person, except as any nuclear facility. iv SOFTWARE LICENSE SB6120 SURFboard DOCSIS 3.0 Cable Modem Motorola, Inc. IF YOU DO NOT AGREE TO ALL OF THE TERMS OF THIS LICENSE... (I) DO NOT INSTALL OR USE THE SOFTWARE AND (II) RETURN THE CABLE DATA PRODUCT AND THE SOFTWARE (COLLECTIVELY, "PRODUCT"), ...
... the same time transfer the Product and all other intellectual property rights subsisting in connection with the Software, other person, except as any nuclear facility. iv SOFTWARE LICENSE SB6120 SURFboard DOCSIS 3.0 Cable Modem Motorola, Inc. IF YOU DO NOT AGREE TO ALL OF THE TERMS OF THIS LICENSE... (I) DO NOT INSTALL OR USE THE SOFTWARE AND (II) RETURN THE CABLE DATA PRODUCT AND THE SOFTWARE (COLLECTIVELY, "PRODUCT"), ...

User Guide
Page 8
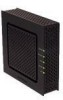
... SB6120 SURFboard DOCSIS 3.0 Cable Modem. provides suggestions to common questions about the SB6120 cable modem. 6 Glossary - Unlike a dial-up modem, your home or business to install your SB6120 cable modem, informs you have a new Motorola SB6120 SURFboard® DOCSIS® 3.0 Cable Modem! You can use your high-speed cable modem to the Internet and other online services. It provides high-speed access to directly connect one computer in your cable modem...
... SB6120 SURFboard DOCSIS 3.0 Cable Modem. provides suggestions to common questions about the SB6120 cable modem. 6 Glossary - Unlike a dial-up modem, your home or business to install your SB6120 cable modem, informs you have a new Motorola SB6120 SURFboard® DOCSIS® 3.0 Cable Modem! You can use your high-speed cable modem to the Internet and other online services. It provides high-speed access to directly connect one computer in your cable modem...

User Guide
Page 9
... During normal operation, the POWER, RECEIVE, SEND, and ONLINE lights are ON. 1 OVERVIEW Front Panel The SB6120 front panel lights provide information about power, communications, and errors. The LINK light flashes when the cable modem is connected via the Ethernet port Ethernet (10Base-T) or Fast detected Ethernet (100Base-T) port Blue: High-speed Gigabit Ethernet...
... During normal operation, the POWER, RECEIVE, SEND, and ONLINE lights are ON. 1 OVERVIEW Front Panel The SB6120 front panel lights provide information about power, communications, and errors. The LINK light flashes when the cable modem is connected via the Ethernet port Ethernet (10Base-T) or Fast detected Ethernet (100Base-T) port Blue: High-speed Gigabit Ethernet...

User Guide
Page 10
Key Item Description 1 ETHERNET Connection to Ethernet equipped computers using a cable terminated with bonded channels. 1 OVERVIEW Optional LED operation available in some locations: RECEIVE and SEND lights are blue when the downstream and upstream channels are connected with an RJ-45 connector 2 CABLE Connection to the coaxial cable (coax) outlet 3 +12VDC Connection to your computer. LINK light is blue for high-speed Ethernet connection (Gigabit) from the SB6120 to power for the modem 3 Rear Panel The rear panel contains cabling connectors and the power receptacle.
Key Item Description 1 ETHERNET Connection to Ethernet equipped computers using a cable terminated with bonded channels. 1 OVERVIEW Optional LED operation available in some locations: RECEIVE and SEND lights are blue when the downstream and upstream channels are connected with an RJ-45 connector 2 CABLE Connection to the coaxial cable (coax) outlet 3 +12VDC Connection to your computer. LINK light is blue for high-speed Ethernet connection (Gigabit) from the SB6120 to power for the modem 3 Rear Panel The rear panel contains cabling connectors and the power receptacle.

User Guide
Page 12
...; Before You Begin • Precautions • Signing Up for Service • Computer System Requirements • Cabling and Startup for advice on obtaining these components. 5 If a TV is connected to the cable outlet, you may need a 75-ohm coaxial cable with your SB6120 SURFboard DOCSIS 3.0 Cable Modem. You will need a 5 to 900 MHz RF splitter and two additional coaxial...
...; Before You Begin • Precautions • Signing Up for Service • Computer System Requirements • Cabling and Startup for advice on obtaining these components. 5 If a TV is connected to the cable outlet, you may need a 75-ohm coaxial cable with your SB6120 SURFboard DOCSIS 3.0 Cable Modem. You will need a 5 to 900 MHz RF splitter and two additional coaxial...
User Guide
Page 13
... cable modem or PC, always touch the coaxial cable connector on the sides of the unit. Wipe the cable modem with static electricity: • Always connect the coaxial cable to the grounded cable TV wall outlet first. • Before you connect or disconnect the Ethernet cable from the SB6120 ... damaging the cable modem with a clean, dry cloth. Never use forced air to remove dust. Do not route the Ethernet cable outside of the cables to lightning could create a safety hazard and damage the product. 6 Contact Motorola Technical Support at: http://broadband.motorola.com/consumers/...
... cable modem or PC, always touch the coaxial cable connector on the sides of the unit. Wipe the cable modem with static electricity: • Always connect the coaxial cable to the grounded cable TV wall outlet first. • Before you connect or disconnect the Ethernet cable from the SB6120 ... damaging the cable modem with a clean, dry cloth. Never use forced air to remove dust. Do not route the Ethernet cable outside of the cables to lightning could create a safety hazard and damage the product. 6 Contact Motorola Technical Support at: http://broadband.motorola.com/consumers/...
User Guide
Page 14
...: • Do you have the latest version of the cable modem. You must have any special system requirements? • When can I begin to use my SB6120? • Are there any files I need to download after connecting the SB6120? • Do I need to access the Internet or ..., or UNIX operating system with an available operating system CD-ROM 7 To receive data service, you install the cable modem. Computer System Requirements Your SB6120 SURFboard DOCSIS 3.0 Cable Modem is needed to access the Internet and other online services. If it here: 00 You should ask your operating system...
...: • Do you have the latest version of the cable modem. You must have any special system requirements? • When can I begin to use my SB6120? • Are there any files I need to download after connecting the SB6120? • Do I need to access the Internet or ..., or UNIX operating system with an available operating system CD-ROM 7 To receive data service, you install the cable modem. Computer System Requirements Your SB6120 SURFboard DOCSIS 3.0 Cable Modem is needed to access the Internet and other online services. If it here: 00 You should ask your operating system...

User Guide
Page 15
... the SB6120. You may wall-mount your SB6120 by following pages. 7. Connect the provided Ethernet cable to the CABLE connector on the cable modem. Plug the power adapter cord into the electrical outlet. 5. Cabling and Startup for the SB6120 Be sure your computer. 6. Connect the other end of the coaxial cable to the SB6120. 8 Connect one end of the coaxial cable to the cable modem and...
... the SB6120. You may wall-mount your SB6120 by following pages. 7. Connect the provided Ethernet cable to the CABLE connector on the cable modem. Plug the power adapter cord into the electrical outlet. 5. Cabling and Startup for the SB6120 Be sure your computer. 6. Connect the other end of the coaxial cable to the SB6120. 8 Connect one end of the coaxial cable to the cable modem and...

User Guide
Page 16
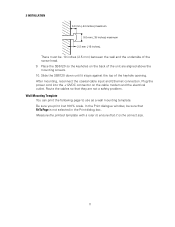
... structure for the upstream send channel. Wall Mounting Your SB6120 If you mount your SB6120 on the wall, you must : • Locate the unit as specified by the local or national codes governing residential or business cable TV and communications services. • Follow all cables are connected with bonded channels. Make sure the AC power...
... structure for the upstream send channel. Wall Mounting Your SB6120 If you mount your SB6120 on the wall, you must : • Locate the unit as specified by the local or national codes governing residential or business cable TV and communications services. • Follow all cables are connected with bonded channels. Make sure the AC power...
User Guide
Page 18
..., reconnect the coaxial cable input and Ethernet connection. Route the cables so that Fit To Page is the correct size. 11 Slide the SB6120 down until it at 100% scale. Be sure you print it stops against the top of the screw head. 9. Place the SB6120 so the keyholes on the cable modem and the electrical outlet...
..., reconnect the coaxial cable input and Ethernet connection. Route the cables so that Fit To Page is the correct size. 11 Slide the SB6120 down until it at 100% scale. Be sure you print it stops against the top of the screw head. 9. Place the SB6120 so the keyholes on the cable modem and the electrical outlet...

User Guide
Page 20
...may be represented as 1, 2, or 3 represents PCs with multiple network interfaces. Double-click Local Area Connection number to display the Network and Dial-up Connections window. The value of number varies from either the Windows Start menu or Windows Desktop to system. 13... IP Address in Windows Vista • For Macintosh or UNIX systems, follow , a connection number such as "Local Area Connection." 3. Double-click Network and Dial-up Connections to display the Local Area Connection number Status window. Select Control Panel from system to display the Control Panel window. 2....
...may be represented as 1, 2, or 3 represents PCs with multiple network interfaces. Double-click Local Area Connection number to display the Network and Dial-up Connections window. The value of number varies from either the Windows Start menu or Windows Desktop to system. 13... IP Address in Windows Vista • For Macintosh or UNIX systems, follow , a connection number such as "Local Area Connection." 3. Double-click Network and Dial-up Connections to display the Local Area Connection number Status window. Select Control Panel from system to display the Control Panel window. 2....

User Guide
Page 21
If Internet Protocol (TCP/IP) is in the list of components, TCP/IP is displayed. 5. Information similar to step 8. 14 You can skip to the following is installed. Click Properties to display the Local Area Connection number Properties window. 2 INSTALLATION 4.
If Internet Protocol (TCP/IP) is in the list of components, TCP/IP is displayed. 5. Information similar to step 8. 14 You can skip to the following is installed. Click Properties to display the Local Area Connection number Properties window. 2 INSTALLATION 4.

User Guide
Page 22
Click Protocol and then click Add. The Local Area Connection number Properties window is displayed. 7. The Select Network Component Type window is redisplayed. 15 If Internet Protocol (TCP/IP) is displayed. 8. The Select Network Protocol window is not in the list of components, click Install. 2 INSTALLATION 6. Click Internet Protocol (TCP/IP), and then click OK.
Click Protocol and then click Add. The Local Area Connection number Properties window is displayed. 7. The Select Network Component Type window is redisplayed. 15 If Internet Protocol (TCP/IP) is displayed. 8. The Select Network Protocol window is not in the list of components, click Install. 2 INSTALLATION 6. Click Internet Protocol (TCP/IP), and then click OK.

User Guide
Page 23
Click Internet Protocol (TCP/IP), and then click Properties to exit the Local Area Connection Properties window. 13. Click OK to display the Internet Protocol (TCP/IP) Properties window. 10. Click OK when prompted to display the Control Panel window. ...
Click Internet Protocol (TCP/IP), and then click Properties to exit the Local Area Connection Properties window. 13. Click OK to display the Internet Protocol (TCP/IP) Properties window. 10. Click OK when prompted to display the Control Panel window. ...

User Guide
Page 24
Click Network and Internet Connections to step 7. 5. You can skip to display the Network and Internet Connections window. 4. Select Properties from the drop-down menu to display the LAN or High-Speed connections. Right-click the network connection. Click Network Connections to display the Local Area Connection Properties window. If more than one for your network interface. 6. 2 INSTALLATION 3. Be sure Internet Protocol (TCP/IP) is displayed, be sure to select the one connection is checked. 17
Click Network and Internet Connections to step 7. 5. You can skip to display the Network and Internet Connections window. 4. Select Properties from the drop-down menu to display the LAN or High-Speed connections. Right-click the network connection. Click Network Connections to display the Local Area Connection Properties window. If more than one for your network interface. 6. 2 INSTALLATION 3. Be sure Internet Protocol (TCP/IP) is displayed, be sure to select the one connection is checked. 17

User Guide
Page 25
Click OK to display the Internet Protocol (TCP/IP) Properties window. 8. Select Internet Protocol (TCP/IP) and click Properties to save the TCP/IP settings and exit the TCP/IP Properties window. 10. Make sure Obtain an IP address automatically and Obtain DNS server address automatically are selected. 9. 2 INSTALLATION 7. Click OK to Verifying the IP Address in Windows 2000 or Windows XP. 18 When you complete the TCP/IP configuration, go to exit the Local Area Connection Properties window.
Click OK to display the Internet Protocol (TCP/IP) Properties window. 8. Select Internet Protocol (TCP/IP) and click Properties to save the TCP/IP settings and exit the TCP/IP Properties window. 10. Make sure Obtain an IP address automatically and Obtain DNS server address automatically are selected. 9. 2 INSTALLATION 7. Click OK to Verifying the IP Address in Windows 2000 or Windows XP. 18 When you complete the TCP/IP configuration, go to exit the Local Area Connection Properties window.

User Guide
Page 27
Right-click the network connection and select Properties. 7. Vista may prompt you see the prompt, User Account Control -- 2 INSTALLATION 5. If more than one for your permission to continue, click Continue. 20 Click Manage network connections. 6. If you to allow access to select the one connection is displayed, make sure to the Network Properties Options. Windows needs your network interface.
Right-click the network connection and select Properties. 7. Vista may prompt you see the prompt, User Account Control -- 2 INSTALLATION 5. If more than one for your permission to continue, click Continue. 20 Click Manage network connections. 6. If you to allow access to select the one connection is displayed, make sure to the Network Properties Options. Windows needs your network interface.


