User Manual
Page 3
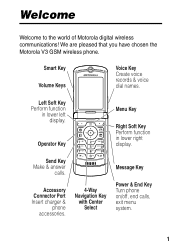
Left Soft Key Perform function in lower right display. Send Key Make & answer calls. Accessory Connector Port Insert charger & phone accessories. 4-Way Navigation Key with Center Select Message Key Power & End Key Turn phone on/off, end calls, exit menu system. 1 Smart Key Volume Keys Voice Key Create voice records & voice dial names. Operator Key 040128o Menu Key Right Soft Key Perform function in lower left display. We are pleased that you have chosen the Motorola V3 GSM wireless phone. Welcome Welcome to the world of Motorola digital wireless communications!
Left Soft Key Perform function in lower right display. Send Key Make & answer calls. Accessory Connector Port Insert charger & phone accessories. 4-Way Navigation Key with Center Select Message Key Power & End Key Turn phone on/off, end calls, exit menu system. 1 Smart Key Volume Keys Voice Key Create voice records & voice dial names. Operator Key 040128o Menu Key Right Soft Key Perform function in lower left display. We are pleased that you have chosen the Motorola V3 GSM wireless phone. Welcome Welcome to the world of Motorola digital wireless communications!

User Manual
Page 4
... self-portrait photo with camera when flip is closed ) Send Photo Description Press CAMERA (+) to activate the camera, point lens at subject, press CAPTURE (+) to a phone number or email address: Take photo, then press STORE (+) > Send In Message. 2 Send a photo to take a photo. Check It Out!
... self-portrait photo with camera when flip is closed ) Send Photo Description Press CAMERA (+) to activate the camera, point lens at subject, press CAPTURE (+) to a phone number or email address: Take photo, then press STORE (+) > Send In Message. 2 Send a photo to take a photo. Check It Out!

User Manual
Page 5
Feature Set Photo as Phonebook Entry. Send a multimedia message with pictures, animations, 032380o sounds, and videos: E > Create Message > New Multimedia Msg Set up a Bluetooth® wireless connection to allow picture caller ID: Take photo, then press STORE (+) > Apply as Picture ID Send Multimedia Message Wireless Connection Description Assign a photo to a phonebook entry to a headset accessory, car kit, or external device: M > Settings > Connection > Bluetooth Link > Setup > Power > On, press BACK (-), press > Handsfree > [Look For Devices] 3
Feature Set Photo as Phonebook Entry. Send a multimedia message with pictures, animations, 032380o sounds, and videos: E > Create Message > New Multimedia Msg Set up a Bluetooth® wireless connection to allow picture caller ID: Take photo, then press STORE (+) > Apply as Picture ID Send Multimedia Message Wireless Connection Description Assign a photo to a phonebook entry to a headset accessory, car kit, or external device: M > Settings > Connection > Bluetooth Link > Setup > Power > On, press BACK (-), press > Handsfree > [Look For Devices] 3
User Manual
Page 6
...-331-6456 (United States) 1-888-390-6456 (TTY/TDD United States for hearing impaired) 1-800-461-4575 (Canada) MOTOROLA and the Stylized M Logo are made in the radio phone, not expressly approved by Motorola, will void the user's authority to change or modify any kind, either express or implied, including, but not limited...
...-331-6456 (United States) 1-888-390-6456 (TTY/TDD United States for hearing impaired) 1-800-461-4575 (Canada) MOTOROLA and the Stylized M Logo are made in the radio phone, not expressly approved by Motorola, will void the user's authority to change or modify any kind, either express or implied, including, but not limited...
User Manual
Page 7
...the SIM Card 9 Battery Tips 10 Installing the Battery 11 Charging the Battery 11 Turning Your Phone On 13 Turning Your Phone Off 13 Adjusting Volume 14 Making a Call 14 Answering a Call 15 Viewing Your Phone Number 15 Highlight Features 16 Taking and Sending a Photo 16 Sending a Multimedia Message 19 Using... a Bluetooth® Wireless Connection 23 Learning to Use Your Phone 26 Using the Display 26 Using the 4-Way Navigation Key 31 Using the Operator Key 31 Using the Message Key 31 Using Menus 32...
...the SIM Card 9 Battery Tips 10 Installing the Battery 11 Charging the Battery 11 Turning Your Phone On 13 Turning Your Phone Off 13 Adjusting Volume 14 Making a Call 14 Answering a Call 15 Viewing Your Phone Number 15 Highlight Features 16 Taking and Sending a Photo 16 Sending a Multimedia Message 19 Using... a Bluetooth® Wireless Connection 23 Learning to Use Your Phone 26 Using the Display 26 Using the 4-Way Navigation Key 31 Using the Operator Key 31 Using the Message Key 31 Using Menus 32...
User Manual
Page 8
...Style 54 Changing the Call Alert 55 Setting the Time and Date 55 Setting a Wallpaper Image 56 Setting a Screen Saver Image 57 Changing Phone Skin 58 Setting a Phone Theme 58 Setting Answer Options 59 Setting Display Brightness 60 Adjusting the Backlight 60 Setting Display Timeout 61 Storing Your Name and... Phone Number 61 Calling Features 62 Turning Off a Call Alert 62 Viewing Recent Calls 62 Redialing a Number 64 Using Automatic Redial 64 ...
...Style 54 Changing the Call Alert 55 Setting the Time and Date 55 Setting a Wallpaper Image 56 Setting a Screen Saver Image 57 Changing Phone Skin 58 Setting a Phone Theme 58 Setting Answer Options 59 Setting Display Brightness 60 Adjusting the Backlight 60 Setting Display Timeout 61 Storing Your Name and... Phone Number 61 Calling Features 62 Turning Off a Call Alert 62 Viewing Recent Calls 62 Redialing a Number 64 Using Automatic Redial 64 ...
User Manual
Page 9
Phone Features 72 Main Menu 72 Settings Menu 73 Feature Quick Reference 74 Calling Features 74 Messages 75 Phonebook 76 Personalizing Features 80 Instant Messaging 81 Chat 82 Email 83 Menu Features 83 Special Dialing Features 84 Call Monitoring 85 Handsfree Features 86 Data and Fax Calls 87 Bluetooth® Wireless Connections 88 Network Features 89 Personal Organizer Features 90 Security 91 News and Entertainment 92 Troubleshooting 95 Specific Absorption Rate Data 96 European Union Directives Conformance Statement. . 98 Index 99 7
Phone Features 72 Main Menu 72 Settings Menu 73 Feature Quick Reference 74 Calling Features 74 Messages 75 Phonebook 76 Personalizing Features 80 Instant Messaging 81 Chat 82 Email 83 Menu Features 83 Special Dialing Features 84 Call Monitoring 85 Handsfree Features 86 Data and Fax Calls 87 Bluetooth® Wireless Connections 88 Network Features 89 Personal Organizer Features 90 Security 91 News and Entertainment 92 Troubleshooting 95 Specific Absorption Rate Data 96 European Union Directives Conformance Statement. . 98 Index 99 7
User Manual
Page 10
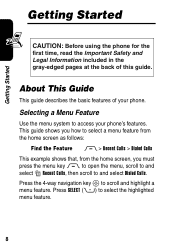
... Information included in the gray-edged pages at the back of this guide. 032259o About This Guide This guide describes the basic features of your phone's features. Press the 4-way navigation key S to select the highlighted menu feature. 8 Press SELECT (+) to scroll and highlight a menu feature. Selecting a Menu Feature Use the..., from the home screen, you must press the menu key M to open the menu, scroll to and select s Recent Calls, then scroll to access your phone.
... Information included in the gray-edged pages at the back of this guide. 032259o About This Guide This guide describes the basic features of your phone's features. Press the 4-way navigation key S to select the highlighted menu feature. 8 Press SELECT (+) to scroll and highlight a menu feature. Selecting a Menu Feature Use the..., from the home screen, you must press the menu key M to open the menu, scroll to and select s Recent Calls, then scroll to access your phone.
User Manual
Page 11
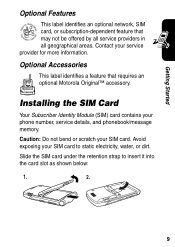
... provider for more information. Getting Started Optional Features This label identifies an optional network, SIM 032380o card, or subscription-dependent feature that requires an optional Motorola Original™ accessory. Contact your phone number, service details, and phonebook/message memory.
... provider for more information. Getting Started Optional Features This label identifies an optional network, SIM 032380o card, or subscription-dependent feature that requires an optional Motorola Original™ accessory. Contact your phone number, service details, and phonebook/message memory.

User Manual
Page 12
..., temperature, features, and accessories you notice a change in your battery life, it is normal for proper battery disposal. Contact your phone, read the battery safety information in the "Safety and General Information" section included in the gray-edged pages at the back of batteries... charging times. If you use. • Always use Motorola Original batteries and chargers. Before using non-Motorola batteries and/or chargers. • New batteries or batteries stored for a long time may explode. Always take your phone with you when you leave your battery, keep it uncharged...
..., temperature, features, and accessories you notice a change in your battery life, it is normal for proper battery disposal. Contact your phone, read the battery safety information in the "Safety and General Information" section included in the gray-edged pages at the back of batteries... charging times. If you use. • Always use Motorola Original batteries and chargers. Before using non-Motorola batteries and/or chargers. • New batteries or batteries stored for a long time may explode. Always take your phone with you when you leave your battery, keep it uncharged...
User Manual
Page 13
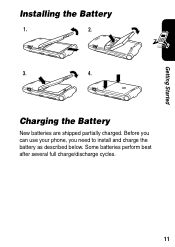
Charging the Battery New batteries are shipped partially charged. Getting Started Installing the Battery 1. 2. 3. 4. Some batteries perform best after several full charge/discharge cycles. 11 Before you can use your phone, you need to install and charge the battery as described below.
Charging the Battery New batteries are shipped partially charged. Getting Started Installing the Battery 1. 2. 3. 4. Some batteries perform best after several full charge/discharge cycles. 11 Before you can use your phone, you need to install and charge the battery as described below.

User Manual
Page 14
This will not damage the battery. 12 Note: It may take up to 10 seconds for you to the phone after charging is complete. Note: You can safely leave the travel charger and angle connector. Action 1 Insert the travel charger plug into the detachable ...connector plug into the USB connector port on your phone indicates Charge Complete, remove the travel charger connected to use the phone with an attached battery charger or phone accessory. Getting Started Tip: The angle connector provided with your phone makes it easier for your phone to provide a visible or audible indication that the...
This will not damage the battery. 12 Note: It may take up to 10 seconds for you to the phone after charging is complete. Note: You can safely leave the travel charger and angle connector. Action 1 Insert the travel charger plug into the detachable ...connector plug into the USB connector port on your phone indicates Charge Complete, remove the travel charger connected to use the phone with an attached battery charger or phone accessory. Getting Started Tip: The angle connector provided with your phone makes it easier for your phone to provide a visible or audible indication that the...
User Manual
Page 15
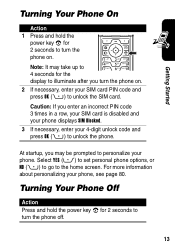
.... 13 Caution: If you enter an incorrect PIN code 3 times in a row, your SIM card is disabled and your phone displays SIM Blocked. 3 If necessary, enter your 4-digit unlock code and press OK (+) to the home screen. At startup, you may take up to 4 seconds ...for 2 seconds to unlock the SIM card. Getting Started Turning Your Phone On Action 1 Press and hold the power key P for the display to illuminate after you turn the phone on . Turning Your Phone Off Action Press and hold the power key P for 2 seconds to personalize your...
.... 13 Caution: If you enter an incorrect PIN code 3 times in a row, your SIM card is disabled and your phone displays SIM Blocked. 3 If necessary, enter your 4-digit unlock code and press OK (+) to the home screen. At startup, you may take up to 4 seconds ...for 2 seconds to unlock the SIM card. Getting Started Turning Your Phone On Action 1 Press and hold the power key P for the display to illuminate after you turn the phone on . Turning Your Phone Off Action Press and hold the power key P for 2 seconds to personalize your...

User Manual
Page 16
Making a Call You must be in the home screen to silent alert. Press it again to switch to dial a phone number (see page 26). Press the up " the phone when you are finished Tip: You can also close the phone flip to end the call. 14 Press 1 keypad keys 2N 3O To dial the... phone number make the call end the call • increase or decrease ringer volume when the home screen is visible (flip must be open) Tip: At ...
Making a Call You must be in the home screen to silent alert. Press it again to switch to dial a phone number (see page 26). Press the up " the phone when you are finished Tip: You can also close the phone flip to end the call. 14 Press 1 keypad keys 2N 3O To dial the... phone number make the call end the call • increase or decrease ringer volume when the home screen is visible (flip must be open) Tip: At ...
User Manual
Page 17
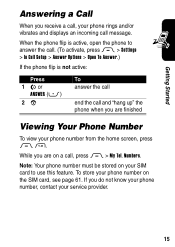
... press M > My Tel. To store your service provider. 15 Numbers. If you do not know your phone number, contact your phone number on the SIM card, see page 61. When the phone flip is active, open the phone to answer the call. (To activate, press M > Settings > In Call Setup > Answer Options > Open... To Answer.) If the phone flip is not active: Press 1 N or ANSWER (-) 2O To answer the call end the call and "hang up" the phone when you are on your SIM card to use this feature. Getting Started Answering a Call When...
... press M > My Tel. To store your service provider. 15 Numbers. If you do not know your phone number, contact your phone number on the SIM card, see page 61. When the phone flip is active, open the phone to answer the call. (To activate, press M > Settings > In Call Setup > Answer Options > Open... To Answer.) If the phone flip is not active: Press 1 N or ANSWER (-) 2O To answer the call end the call and "hang up" the phone when you are on your SIM card to use this feature. Getting Started Answering a Call When...
User Manual
Page 18
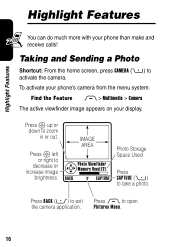
... and Sending a Photo Shortcut: From the home screen, press CAMERA (+) to take a photo. To activate your phone's camera from the menu system: Find the Feature M > Multimedia > Camera The active viewfinder image appears on your phone than make and receive calls! Press S up or down to open the camera application. Press BACK (-) to...
... and Sending a Photo Shortcut: From the home screen, press CAMERA (+) to take a photo. To activate your phone's camera from the menu system: Find the Feature M > Multimedia > Camera The active viewfinder image appears on your phone than make and receive calls! Press S up or down to open the camera application. Press BACK (-) to...
User Manual
Page 19
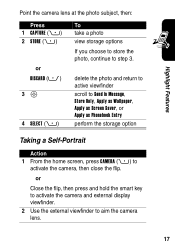
or Close the flip, then press and hold the smart key to activate the camera and external display viewfinder. 2 Use the external viewfinder to step 3. Highlight Features Point the camera lens at the photo subject, then: Press 1 CAPTURE (+) 2 STORE (+) or DISCARD (-) 3S 4 SELECT (+) To take a photo view storage options If you choose to store the photo, continue to aim the camera lens. 17 delete the photo and return to active viewfinder scroll to Send in Message, Store Only, Apply as Wallpaper, Apply as Screen Saver, or Apply as Phonebook Entry perform the storage option Taking a Self-...
or Close the flip, then press and hold the smart key to activate the camera and external display viewfinder. 2 Use the external viewfinder to step 3. Highlight Features Point the camera lens at the photo subject, then: Press 1 CAPTURE (+) 2 STORE (+) or DISCARD (-) 3S 4 SELECT (+) To take a photo view storage options If you choose to store the photo, continue to aim the camera lens. 17 delete the photo and return to active viewfinder scroll to Send in Message, Store Only, Apply as Wallpaper, Apply as Screen Saver, or Apply as Phonebook Entry perform the storage option Taking a Self-...
User Manual
Page 20
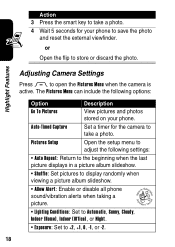
...picture album slideshow. • Shuffle: Set pictures to display randomly when viewing a picture album slideshow. • Allow Alert: Enable or disable all phone sound/vibration alerts when taking a 032380o picture. • Lighting Conditions: Set to Automatic, Sunny, Cloudy, Indoor (Home), Indoor (Office), or ... smart key to take a photo. 4 Wait 5 seconds for the camera to take a photo. Auto-Timed Capture Set a timer for your phone. Pictures Setup Open the setup menu to adjust the following options: Option Description Go To Pictures View pictures and photos stored on your...
...picture album slideshow. • Shuffle: Set pictures to display randomly when viewing a picture album slideshow. • Allow Alert: Enable or disable all phone sound/vibration alerts when taking a 032380o picture. • Lighting Conditions: Set to Automatic, Sunny, Cloudy, Indoor (Home), Indoor (Office), or ... smart key to take a photo. 4 Wait 5 seconds for the camera to take a photo. Auto-Timed Capture Set a timer for your phone. Pictures Setup Open the setup menu to adjust the following options: Option Description Go To Pictures View pictures and photos stored on your...
User Manual
Page 21
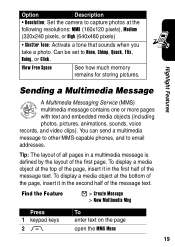
... with text and embedded media objects (including photos, pictures, animations, sounds, voice records, and video clips). You can send a multimedia message to other MMS-capable phones, and to None, Chimp, Quack, Flix, Boing, or Click. Tip: The layout of all pages in a multimedia message is defined by the layout of the...
... with text and embedded media objects (including photos, pictures, animations, sounds, voice records, and video clips). You can send a multimedia message to other MMS-capable phones, and to None, Chimp, Quack, Flix, Boing, or Click. Tip: The layout of all pages in a multimedia message is defined by the layout of the...

User Manual
Page 22
open the MMS Menu to insert a new page scroll to Insert display a list of items you can insert scroll to Picture, Voice Record, Sound, Video, New Page, Quick Note, or Contact Info select the file type highlight the file you can insert scroll to New Page insert a new page after the current page Repeat steps 1 to 8 to step 9. Highlight Features Press 3S 4 SELECT (+) 5S 6 SELECT (+) 7S 8 SELECT (+) 9M 10 S 11 SELECT (+) 12 S 13 SELECT (+) To scroll to Insert display a list of items you want insert the file To add another page to the message, continue to enter contents for the new page....
open the MMS Menu to insert a new page scroll to Insert display a list of items you can insert scroll to Picture, Voice Record, Sound, Video, New Page, Quick Note, or Contact Info select the file type highlight the file you can insert scroll to New Page insert a new page after the current page Repeat steps 1 to 8 to step 9. Highlight Features Press 3S 4 SELECT (+) 5S 6 SELECT (+) 7S 8 SELECT (+) 9M 10 S 11 SELECT (+) 12 S 13 SELECT (+) To scroll to Insert display a list of items you want insert the file To add another page to the message, continue to enter contents for the new page....
