
User Guide
Page 3
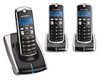
MD7250 User Guide Table of Contents FCC Information...iv Important Safety Instructions viii Welcome ...1 Handset Overview ...2 Base Unit Overview ...3 Getting Started...4 Battery Safety Instructions...4 Installing the Battery ...5 Charging the Handset Battery 6 Installing the Base Unit...7 Basic Operations...9 Handset Indicators ...9 Base Unit LEDs...9 Making a Call...10 Answering Calls ...10 Ending a Call ...10 i
MD7250 User Guide Table of Contents FCC Information...iv Important Safety Instructions viii Welcome ...1 Handset Overview ...2 Base Unit Overview ...3 Getting Started...4 Battery Safety Instructions...4 Installing the Battery ...5 Charging the Handset Battery 6 Installing the Base Unit...7 Basic Operations...9 Handset Indicators ...9 Base Unit LEDs...9 Making a Call...10 Answering Calls ...10 Ending a Call ...10 i
User Guide
Page 4
MD7250 User Guide Speakerphone Operation ...10 Adjust Handset Volume ...11 Redial Function ...11 Mute Function...11 Setting the Date and Time 12 Locate a Misplaced Handset 12 Display Language...13 Customizing Your Handset...14 Ringer Volume ...14 Ringer Tone...14 Setting the Intercom Tone 15 Naming Your Handset...15 Key Tone...15 Setting the Auto Answer Feature 16 Customizing Your Base Unit ...17 Dialing Method...17 Deregister Handset...17 ii
MD7250 User Guide Speakerphone Operation ...10 Adjust Handset Volume ...11 Redial Function ...11 Mute Function...11 Setting the Date and Time 12 Locate a Misplaced Handset 12 Display Language...13 Customizing Your Handset...14 Ringer Volume ...14 Ringer Tone...14 Setting the Intercom Tone 15 Naming Your Handset...15 Key Tone...15 Setting the Auto Answer Feature 16 Customizing Your Base Unit ...17 Dialing Method...17 Deregister Handset...17 ii
User Guide
Page 7
... telephone line may be provided to the telephone line. The Ringer Equivalence Number (REN) is part of devices that has the format US: AAAEQ##TXXXX. Canadian Compliance This Class B digital apparatus complies with Part 68 of the FCC rules and the requirements adopted by the Administrative Council for this information must be connected to an incoming call. If requested, this product is used...
... telephone line may be provided to the telephone line. The Ringer Equivalence Number (REN) is part of devices that has the format US: AAAEQ##TXXXX. Canadian Compliance This Class B digital apparatus complies with Part 68 of the FCC rules and the requirements adopted by the Administrative Council for this information must be connected to an incoming call. If requested, this product is used...
User Guide
Page 8
... advance notice is also compliant. See installation instructions for information. The telephone company may request that is not practical, the telephone company will be connected to maintain uninterrupted service. This equipment uses the following USOC jack: RJ11C. If the equipment is causing harm to the telephone network, the telephone company may make necessary modifications to a compatible modular jack that you disconnect the...
... advance notice is also compliant. See installation instructions for information. The telephone company may request that is not practical, the telephone company will be connected to maintain uninterrupted service. This equipment uses the following USOC jack: RJ11C. If the equipment is causing harm to the telephone network, the telephone company may make necessary modifications to a compatible modular jack that you disconnect the...

User Guide
Page 9
...this phone has been tested and meets the FCC RF exposure guidelines when used with FCC RF exposure guidelines. The Ringer Equivalence Number (REN) is an indication of the maximum number of devices allowed to be determined by turning the equipment on an interface may... subject only to the telephone line, ensure the installation of the cordless phone does not disable your alarm equipment. vii Use of Conformity This product meets the applicable Industry Canada technical specifications. MD7250 User Guide If your home has specially wired alarm equipment connected to the requirement that...
...this phone has been tested and meets the FCC RF exposure guidelines when used with FCC RF exposure guidelines. The Ringer Equivalence Number (REN) is an indication of the maximum number of devices allowed to be determined by turning the equipment on an interface may... subject only to the telephone line, ensure the installation of the cordless phone does not disable your alarm equipment. vii Use of Conformity This product meets the applicable Industry Canada technical specifications. MD7250 User Guide If your home has specially wired alarm equipment connected to the requirement that...

User Guide
Page 10
...base unit and handset are not sure of the type of power supply in your home, consult your telephone equipment, basic safety precautions should always be operated only from the type of fire, electric shock, and injury, including the following: 1. viii Follow all instructions. 2. Read and understand all warnings and instructions marked on the power cord. Do not use...allow anything to reduce the risk of power source indicated on the marking label. MD7250 User Guide Important Safety Instructions When using your dealer or local power company. 8. Unplug this product on an...
...base unit and handset are not sure of the type of power supply in your home, consult your telephone equipment, basic safety precautions should always be operated only from the type of fire, electric shock, and injury, including the following: 1. viii Follow all instructions. 2. Read and understand all warnings and instructions marked on the power cord. Do not use...allow anything to reduce the risk of power source indicated on the marking label. MD7250 User Guide Important Safety Instructions When using your dealer or local power company. 8. Unplug this product on an...

User Guide
Page 11
... wall outlets and extension cords, as improper adjustment of fire or electric shock. 13. Never spill liquid of electric shock, do not disassemble this product through slots in the base or handset, as they may result in damage and often requires extensive work by following conditions: • When the power supply cord or plug is subsequently used. 12. MD7250 User Guide...
... wall outlets and extension cords, as improper adjustment of fire or electric shock. 13. Never spill liquid of electric shock, do not disassemble this product through slots in the base or handset, as they may result in damage and often requires extensive work by following conditions: • When the power supply cord or plug is subsequently used. 12. MD7250 User Guide...

User Guide
Page 14
LCD display 3. Mute/Delete 7. Change number format 11. Phone Off/Cancel 13. MD7250 User Guide Handset Overview 1. Phonebook shortcut/Scroll up 15. Caller ID shortcut/Scroll down 4. Redial/Pause 10. Intercom 8. Phone On/Flash 5. Speakerphone 12. Headset jack (2.5 mm) 14. Shift key 6. Select/Menu 2 Earpiece 2. Microphone 9.
LCD display 3. Mute/Delete 7. Change number format 11. Phone Off/Cancel 13. MD7250 User Guide Handset Overview 1. Phonebook shortcut/Scroll up 15. Caller ID shortcut/Scroll down 4. Redial/Pause 10. Intercom 8. Phone On/Flash 5. Speakerphone 12. Headset jack (2.5 mm) 14. Shift key 6. Select/Menu 2 Earpiece 2. Microphone 9.

User Guide
Page 18
... activate when you recharge the battery. 6 The initial battery charge time is powered by a rechargeable NiMH battery pack. The features are fully functional after you press the keys), charge the handset. If your cordless telephone is 10-12 hours. MD7250 User Guide Charging the Handset Battery The handset of eight hours should be sufficient. NOTE: When in LOW BATTERY mode, the keypad sounds, backlighting, and speakerphone features will not work.
... activate when you recharge the battery. 6 The initial battery charge time is powered by a rechargeable NiMH battery pack. The features are fully functional after you press the keys), charge the handset. If your cordless telephone is 10-12 hours. MD7250 User Guide Charging the Handset Battery The handset of eight hours should be sufficient. NOTE: When in LOW BATTERY mode, the keypad sounds, backlighting, and speakerphone features will not work.
User Guide
Page 21
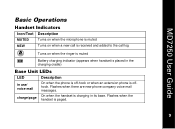
... User Guide Basic Operations Handset Indicators Icon/Text Description MUTED Turns on when the microphone is muted NEW Turns on when a new call is received and added to the call log Turns on when the ringer is muted E Battery charging indicator (appears when handset is placed in the charging cradle) Base Unit LEDs LED Description in its base. charge/page On when the handset is charging in use/ voice mail On when the phone is off-hook or when an extension phone...
... User Guide Basic Operations Handset Indicators Icon/Text Description MUTED Turns on when the microphone is muted NEW Turns on when a new call is received and added to the call log Turns on when the ringer is muted E Battery charging indicator (appears when handset is placed in the charging cradle) Base Unit LEDs LED Description in its base. charge/page On when the handset is charging in use/ voice mail On when the phone is off-hook or when an extension phone...

User Guide
Page 22
... the handset in speakerphone. Speakerphone Operation Each handset has a built-in the base unit, to make corrections. This feature allows you subscribe to call . Press the OFF/CANCEL key to the first call waiting, press the ON/FLASH key to use the speakerphone feature). Answering Calls Press ON/FLASH, or v. When you hear the dial tone, dial the number. -OREnter the phone number, and then press ON/FLASH. The phone number appears on the handset (or the v key to answer the second call , press the v key...
... the handset in speakerphone. Speakerphone Operation Each handset has a built-in the base unit, to make corrections. This feature allows you subscribe to call . Press the OFF/CANCEL key to the first call waiting, press the ON/FLASH key to use the speakerphone feature). Answering Calls Press ON/FLASH, or v. When you hear the dial tone, dial the number. -OREnter the phone number, and then press ON/FLASH. The phone number appears on the handset (or the v key to answer the second call , press the v key...

User Guide
Page 23
MD7250 User Guide Adjust Handset Volume While on the display. 2. MUTED appears on a call . 1. Mute Function NOTE: The mute feature is pressed, a double beep will sound when you reach the beginning or the end of the redial list. 3. A double beep will sound. Press the OFF/CANCEL key to dial the highlighted number. Redial Function 1. Press the ON/FLASH or v key to exit the redial review list without dialing a number. NOTE: If the...
MD7250 User Guide Adjust Handset Volume While on the display. 2. MUTED appears on a call . 1. Mute Function NOTE: The mute feature is pressed, a double beep will sound when you reach the beginning or the end of the redial list. 3. A double beep will sound. Press the OFF/CANCEL key to dial the highlighted number. Redial Function 1. Press the ON/FLASH or v key to exit the redial review list without dialing a number. NOTE: If the...

User Guide
Page 24
... PAGE key to enter the needed information. 5. Press SELECT/MENU. 2. Press SELECT/MENU to the main menu. NOTE: There is only one PAGE button, and it is located on the base unit. 12 Press OFF/CANCEL twice to return to store the information. 6. Scroll to set. 4. Scroll to and select the option (TIME SETTING, DATE SETTING, DATE FORMAT) you wish to and select DATE/TIME. 3. MD7250 User Guide Setting the Date...
... PAGE key to enter the needed information. 5. Press SELECT/MENU. 2. Press SELECT/MENU to the main menu. NOTE: There is only one PAGE button, and it is located on the base unit. 12 Press OFF/CANCEL twice to return to store the information. 6. Scroll to set. 4. Scroll to and select the option (TIME SETTING, DATE SETTING, DATE FORMAT) you wish to and select DATE/TIME. 3. MD7250 User Guide Setting the Date...

User Guide
Page 26
... the display indicate the volume level. 4. The ring tone plays and the volume bar increases or decreases as you wish to view and play samples of the set ring tone plays at the current volume setting. Scroll to and select HANDSET SETUP. 3. Scroll to and select HANDSET SETUP. 3. Use the up and down scroll keys to and select RINGER VOLUME. Scroll to increase or decrease the volume setting. Press SELECT/MENU. 2. MD7250 User Guide...
... the display indicate the volume level. 4. The ring tone plays and the volume bar increases or decreases as you wish to view and play samples of the set ring tone plays at the current volume setting. Scroll to and select HANDSET SETUP. 3. Scroll to and select HANDSET SETUP. 3. Use the up and down scroll keys to and select RINGER VOLUME. Scroll to increase or decrease the volume setting. Press SELECT/MENU. 2. MD7250 User Guide...

User Guide
Page 27
... Use the scroll keys to enter the new name of each available intercom tone. 5. Naming Your Handset 1. Use the keypad to view and play samples of your handset at the ENTER NAME: prompt. 5. Scroll to and select KEY TONE. 4. Select ON or OFF using the scroll keys. Press SELECT/MENU when you find a tone you wish to and select HANDSET SETUP. 3. Scroll to choose. MD7250 User Guide Setting the Intercom Tone...
... Use the scroll keys to enter the new name of each available intercom tone. 5. Naming Your Handset 1. Use the keypad to view and play samples of your handset at the ENTER NAME: prompt. 5. Scroll to and select KEY TONE. 4. Select ON or OFF using the scroll keys. Press SELECT/MENU when you find a tone you wish to and select HANDSET SETUP. 3. Scroll to choose. MD7250 User Guide Setting the Intercom Tone...

User Guide
Page 28
MD7250 User Guide Setting the Auto Answer Feature The Auto Answer Feature setting allows your handsets to and select HANDSET SETUP. 3. Press SELECT/MENU. 2. Scroll to answer an incoming call (external or intercom) when the handset is removed from the charging cradle. 1. Use the scroll keys to and select AUTO ANSWER. 4. Scroll to turn the feature ON or OFF. OK appears on the display, confirming the new setting. 16
MD7250 User Guide Setting the Auto Answer Feature The Auto Answer Feature setting allows your handsets to and select HANDSET SETUP. 3. Press SELECT/MENU. 2. Scroll to answer an incoming call (external or intercom) when the handset is removed from the charging cradle. 1. Use the scroll keys to and select AUTO ANSWER. 4. Scroll to turn the feature ON or OFF. OK appears on the display, confirming the new setting. 16

User Guide
Page 30
MD7250 User Guide Phonebook Operations Your handset stores up to the left of the cursor. 4. Scroll to 50 numbers with names; Use the scroll keys to move the cursor to 32 digits for the number and 16 characters for the new contact at the ENTER NUMBER prompt. Use the MUTE/DELETE key to erase characters to the left of the cursor. each memory location holds up to and select PHONEBOOK. 2. Storing a New Entry...
MD7250 User Guide Phonebook Operations Your handset stores up to the left of the cursor. 4. Scroll to 50 numbers with names; Use the scroll keys to move the cursor to 32 digits for the number and 16 characters for the new contact at the ENTER NUMBER prompt. Use the MUTE/DELETE key to erase characters to the left of the cursor. each memory location holds up to and select PHONEBOOK. 2. Storing a New Entry...

User Guide
Page 33
... 50 caller ID entries. Caller ID/Call Waiting Caller ID Your handset is also capable of displaying caller ID information in conjunction with your local telephone company to use the features. • If no caller ID information is displayed so you do not subscribe to answer the incoming call or continue with your current conversation. appears. 4. OK appears on the display. MD7250 User Guide Delete a Single Phonebook Entry 1. On the display, CONFIRM...
... 50 caller ID entries. Caller ID/Call Waiting Caller ID Your handset is also capable of displaying caller ID information in conjunction with your local telephone company to use the features. • If no caller ID information is displayed so you do not subscribe to answer the incoming call or continue with your current conversation. appears. 4. OK appears on the display. MD7250 User Guide Delete a Single Phonebook Entry 1. On the display, CONFIRM...

User Guide
Page 39
... using your phone. The phone doesn't work at www.motorola.com/cordless. Try moving the base unit to the base unit, or relocate it. • The layout of range. No dial tone • First, try all • Make sure the power cord is plugged firmly into the base unit and electrical outlet. • Make sure the phone cord is plugged firmly into the base unit and the telephone wall jack. • Make sure the battery...
... using your phone. The phone doesn't work at www.motorola.com/cordless. Try moving the base unit to the base unit, or relocate it. • The layout of range. No dial tone • First, try all • Make sure the power cord is plugged firmly into the base unit and electrical outlet. • Make sure the phone cord is plugged firmly into the base unit and the telephone wall jack. • Make sure the battery...

User Guide
Page 40
... User Guide The handset does not ring when you receive a call • Make sure you have the ringer activated. (See Ringer Tone and Ringer Volume sections.) • Make sure the telephone line cord is plugged firmly into the base unit and the telephone wall jack. • Make sure the power cord is plugged into the same circuit as the base unit can sometimes cause interference. Connect power to the base. 2. Wait approximately 60 seconds for Your Cordless Phone...
... User Guide The handset does not ring when you receive a call • Make sure you have the ringer activated. (See Ringer Tone and Ringer Volume sections.) • Make sure the telephone line cord is plugged firmly into the base unit and the telephone wall jack. • Make sure the power cord is plugged into the same circuit as the base unit can sometimes cause interference. Connect power to the base. 2. Wait approximately 60 seconds for Your Cordless Phone...


