User Guide
Page 7
... and Interference Information xi Getting Started 1 Battery Safety Instructions 1 Charging the Battery 1 Setting Up the Handset 3 Setting Up the Base 5 Installation 9 Installing the Phone on a Desk 9 Installing the Phone on the Wall 10 Installing or Removing the Belt Clip 11 Using the Telephone 13 Making a Call 13 Answering a Call 13 Adjusting the...
... and Interference Information xi Getting Started 1 Battery Safety Instructions 1 Charging the Battery 1 Setting Up the Handset 3 Setting Up the Base 5 Installation 9 Installing the Phone on a Desk 9 Installing the Phone on the Wall 10 Installing or Removing the Belt Clip 11 Using the Telephone 13 Making a Call 13 Answering a Call 13 Adjusting the...

User Guide
Page 9
... that proper ventilation is required, contact the Motorola address found in water. 3. Use a damp cloth for example, near a bath tub, kitchen sink, or swimming pool). 4. If service or repair work is provided at the installation site. 2. Avoid using your cordless phone to reduce the risk of fire, electric ... UL Listed or CSA Certified Telecommunication Line Cord. Place the power cord so that may result in the vicinity of the phone unblocked. Never insert objects of this cordless phone to persons or property: 1. Caution: To reduce the risk of fire, use this user's guide. 8. Do not...
... that proper ventilation is required, contact the Motorola address found in water. 3. Use a damp cloth for example, near a bath tub, kitchen sink, or swimming pool). 4. If service or repair work is provided at the installation site. 2. Avoid using your cordless phone to reduce the risk of fire, electric ... UL Listed or CSA Certified Telecommunication Line Cord. Place the power cord so that may result in the vicinity of the phone unblocked. Never insert objects of this cordless phone to persons or property: 1. Caution: To reduce the risk of fire, use this user's guide. 8. Do not...

User Guide
Page 10
...those controls that is damaged or frayed. • Liquid has been spilled into the product. • The product has been exposed to clean this phone using only the power source that are unsure of other controls may fall, causing serious damage to normal operation. 7. Do not use chemicals or ... often require extensive work to restore the product to the product. 6. Installation Guidelines 1. This product may result in performance. Do not install this cordless phone immediately from the wall. Do not place this product with your home, consult with a soft, damp cloth.
...those controls that is damaged or frayed. • Liquid has been spilled into the product. • The product has been exposed to clean this phone using only the power source that are unsure of other controls may fall, causing serious damage to normal operation. 7. Do not use chemicals or ... often require extensive work to restore the product to the product. 6. Installation Guidelines 1. This product may result in performance. Do not install this cordless phone immediately from the wall. Do not place this product with your home, consult with a soft, damp cloth.
User Guide
Page 11
To avoid interference to nearby appliances, do not place the base of the cordless phone on electricity, you should have at least 20 cm from nearby persons. ix Because cordless phones operate on or near a TV, microwave oven, or VCR. Caution: To maintain compliance with this unit. Safety Info 8. Use only the power supply that isn't cordless, in case the power in your home that came with the FCC's RF exposure guidelines, place the base unit at least one phone in your home goes out. 10. Using other power supplies may damage the unit. 9.
To avoid interference to nearby appliances, do not place the base of the cordless phone on electricity, you should have at least 20 cm from nearby persons. ix Because cordless phones operate on or near a TV, microwave oven, or VCR. Caution: To maintain compliance with this unit. Safety Info 8. Use only the power supply that isn't cordless, in case the power in your home that came with the FCC's RF exposure guidelines, place the base unit at least one phone in your home goes out. 10. Using other power supplies may damage the unit. 9.

User Guide
Page 14
...be required. If you connect your line. Where prior notice is subject to the telephone line, ensure the installation of this cordless phone does not disable your telephone company or a qualified installer. Contact the state public utility commission, public service commission or corporation commission... such action, the telephone company may be given to the telephone company upon permanent disconnection of your telephone from your cordless telephone to correct the situation xii FCC Info Rights of service may temporarily disconnect service immediately. The FCC requires that ...
...be required. If you connect your line. Where prior notice is subject to the telephone line, ensure the installation of this cordless phone does not disable your telephone company or a qualified installer. Contact the state public utility commission, public service commission or corporation commission... such action, the telephone company may be given to the telephone company upon permanent disconnection of your telephone from your cordless telephone to correct the situation xii FCC Info Rights of service may temporarily disconnect service immediately. The FCC requires that ...
User Guide
Page 19
... in fire, which could result in injury. • Caution: There is a risk of properly and may need . Use only the battery that came with your phone or an authorized replacement recommended by -step instructions you will need to be released, resulting in explosion. • The rechargeable batteries that could be recycled... answer calls, you must be disposed of explosion if you replace the battery with an incorrect battery type. Getting Started Before you can use your cordless phone to your battery's label for proper disposal methods.
... in fire, which could result in injury. • Caution: There is a risk of properly and may need . Use only the battery that came with your phone or an authorized replacement recommended by -step instructions you will need to be released, resulting in explosion. • The rechargeable batteries that could be recycled... answer calls, you must be disposed of explosion if you replace the battery with an incorrect battery type. Getting Started Before you can use your cordless phone to your battery's label for proper disposal methods.

User Guide
Page 21
If you live in an area with 10-digit dialing (3-digit area code + 7-digit phone number), or if you subscribe to caller ID service with your phone company: Enter your phone company: 3 Getting Started Setting Up the Handset 1 Press flash. 2 Set the language: \ English ] French ^ Spanish 3 Press flash. 4 If you live ...digit dialing and you do not subscribe to caller ID service with your 3-digit area code and press flash. Attention: Do not plug the phone cord into the phone jack until the battery is fully charged. 6 For the initial charge, charge the battery for at least 16 hours.
If you live in an area with 10-digit dialing (3-digit area code + 7-digit phone number), or if you subscribe to caller ID service with your phone company: Enter your phone company: 3 Getting Started Setting Up the Handset 1 Press flash. 2 Set the language: \ English ] French ^ Spanish 3 Press flash. 4 If you live ...digit dialing and you do not subscribe to caller ID service with your 3-digit area code and press flash. Attention: Do not plug the phone cord into the phone jack until the battery is fully charged. 6 For the initial charge, charge the battery for at least 16 hours.

User Guide
Page 23
... available in an area with 7-digit dialing and you subscribe to caller ID service with your phone company: Press flash to go to the next prompt (do not subscribe to caller ID service with your phone company: Enter your 3-digit area code and press flash. Setting Up the Base 1 Press flash. ... French (Français) ESP = Spanish (Español) 3 Press flash. 4 If you live in an area with 10-digit dialing (3-digit area code + 7-digit phone number), or if you select it is recommended that you always choose touch tone dialing unless it . \ Ring tone 1 ] Ring tone 2 ^ Musical 6 Press flash. 7 ...
... available in an area with 7-digit dialing and you subscribe to caller ID service with your phone company: Press flash to go to the next prompt (do not subscribe to caller ID service with your phone company: Enter your 3-digit area code and press flash. Setting Up the Base 1 Press flash. ... French (Français) ESP = Spanish (Español) 3 Press flash. 4 If you live in an area with 10-digit dialing (3-digit area code + 7-digit phone number), or if you select it is recommended that you always choose touch tone dialing unless it . \ Ring tone 1 ] Ring tone 2 ^ Musical 6 Press flash. 7 ...
User Guide
Page 27
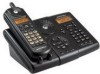
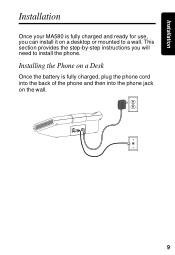
Installing the Phone on a Desk Once the battery is fully charged and ready for use, you will need to a wall. This section provides the step-by-step instructions you can install it on the wall. 9 Installation Installation Once your MA580 is fully charged, plug the phone cord into the back of the phone and then into the phone jack on a desktop or mounted to install the phone.
Installing the Phone on a Desk Once the battery is fully charged and ready for use, you will need to a wall. This section provides the step-by-step instructions you can install it on the wall. 9 Installation Installation Once your MA580 is fully charged, plug the phone cord into the back of the phone and then into the phone jack on a desktop or mounted to install the phone.
User Guide
Page 28
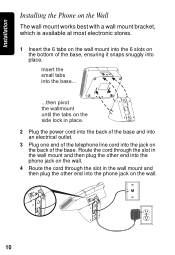
Route the cord through the slot in the wall mount and then plug the other end into the phone jack on the wall. 4 Route the cord through the slot in place. 2 Plug the power cord into the back of the base and into an ... wallmount until the tabs on the side lock in the wall mount and then plug the other end into the phone jack on the back of the base. Installation Installing the Phone on the Wall The wall mount works best with a wall mount bracket, which is available at most electronic stores. 1 Insert...
Route the cord through the slot in the wall mount and then plug the other end into the phone jack on the wall. 4 Route the cord through the slot in place. 2 Plug the power cord into the back of the base and into an ... wallmount until the tabs on the side lock in the wall mount and then plug the other end into the phone jack on the back of the base. Installation Installing the Phone on the Wall The wall mount works best with a wall mount bracket, which is available at most electronic stores. 1 Insert...
User Guide
Page 32
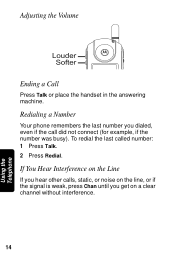
Adjusting the Volume Ending a Call Press Talk or place the handset in the answering machine. Redialing a Number Your phone remembers the last number you get on the line, or if the signal is weak, press Chan until you dialed, even if the call did not connect (for example, if the number was busy). If You Hear Interference on the Line If you hear other calls, static, or noise on a clear channel without interference. 14 Using the Telephone To redial the last called number: 1 Press Talk. 2 Press Redial.
Adjusting the Volume Ending a Call Press Talk or place the handset in the answering machine. Redialing a Number Your phone remembers the last number you get on the line, or if the signal is weak, press Chan until you dialed, even if the call did not connect (for example, if the number was busy). If You Hear Interference on the Line If you hear other calls, static, or noise on a clear channel without interference. 14 Using the Telephone To redial the last called number: 1 Press Talk. 2 Press Redial.
User Guide
Page 34
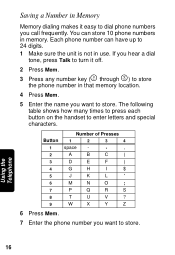
... to press each button on the handset to 24 digits. 1 Make sure the unit is not in use. Each phone number can store 10 phone numbers in memory. W X Y Z 6 Press Mem. 7 Enter the phone number you want to store. Using the Telephone 16 You can have up to enter letters and special characters. Saving... a Number in Memory Memory dialing makes it off. 2 Press Mem. 3 Press any number key (Ñ through É) to store the phone number in that memory location. 4 Press Mem. 5 Enter the name you want to store. P Q R S T U V ?
... to press each button on the handset to 24 digits. 1 Make sure the unit is not in use. Each phone number can store 10 phone numbers in memory. W X Y Z 6 Press Mem. 7 Enter the phone number you want to store. Using the Telephone 16 You can have up to enter letters and special characters. Saving... a Number in Memory Memory dialing makes it off. 2 Press Mem. 3 Press any number key (Ñ through É) to store the phone number in that memory location. 4 Press Mem. 5 Enter the name you want to store. P Q R S T U V ?

User Guide
Page 35
... your account number and PIN in the number). Dialing a Number from the phonebook during the call instead of entering them during a phone call. Using Automated Dialing You can store your 17 Using the Telephone For example, if you frequently access your bank account information over the... phone, you can retreive numeric information (like a PIN or credit card number) from Memory 1 Press Talk. 2 Press Mem. 3 Press the number key (Ñ...
... your account number and PIN in the number). Dialing a Number from the phonebook during the call instead of entering them during a phone call. Using Automated Dialing You can store your 17 Using the Telephone For example, if you frequently access your bank account information over the... phone, you can retreive numeric information (like a PIN or credit card number) from Memory 1 Press Talk. 2 Press Mem. 3 Press the number key (Ñ...

User Guide
Page 36
...;, scroll to the number you want to delete. 3 Press mute. 4 When Delete Entry? To scroll through the list of the following keys to access your phone service provider. is not in use. Using Caller ID When you receive a call, the handset display shows one of calls, press ò or ú. PIN... \ Mem ] Mem ^ Deleting Numbers from Memory 1 Press Mem. 2 Using ò and ú, scroll to the number you want to dial. 18 Using the Telephone Your phone can hold up to cancel the delete and keep the number in memory.
...;, scroll to the number you want to delete. 3 Press mute. 4 When Delete Entry? To scroll through the list of the following keys to access your phone service provider. is not in use. Using Caller ID When you receive a call, the handset display shows one of calls, press ò or ú. PIN... \ Mem ] Mem ^ Deleting Numbers from Memory 1 Press Mem. 2 Using ò and ú, scroll to the number you want to dial. 18 Using the Telephone Your phone can hold up to cancel the delete and keep the number in memory.
User Guide
Page 38
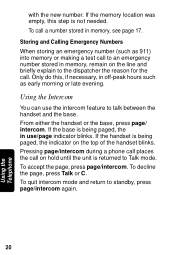
... page/intercom. To call . Storing and Calling Emergency Numbers When storing an emergency number (such as early morning or late evening. Pressing page/intercom during a phone call places the call to an emergency number stored in memory, remain on the line and briefly explain to Talk mode. If the memory location...
... page/intercom. To call . Storing and Calling Emergency Numbers When storing an emergency number (such as early morning or late evening. Pressing page/intercom during a phone call places the call to an emergency number stored in memory, remain on the line and briefly explain to Talk mode. If the memory location...
User Guide
Page 42
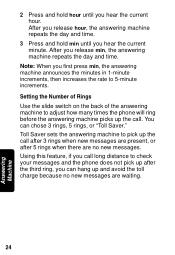
..., or "Toll Saver." Setting the Number of Rings Use the slide switch on the back of the answering machine to adjust how many times the phone will ring before the answering machine picks up the call long distance to 5-minute increments. Note: When you release min, the answering machine repeats the... minute. After you first press min, the answering machine announces the minutes in 1-minute increments, then increases the rate to check your messages and the phone does not pick up and avoid the toll charge because no new messages.
..., or "Toll Saver." Setting the Number of Rings Use the slide switch on the back of the answering machine to adjust how many times the phone will ring before the answering machine picks up the call long distance to 5-minute increments. Note: When you release min, the answering machine repeats the... minute. After you first press min, the answering machine announces the minutes in 1-minute increments, then increases the rate to check your messages and the phone does not pick up and avoid the toll charge because no new messages.

User Guide
Page 44
... to skip backward to delete message Checking Messages from a Handset 1 Press chan. 2 Scroll to delete the message Checking Messages Remotely If you have a touch-tone phone, you can access your messages remotely. 1 Call your home. 2 When the answering machine picks up the call, press * and then enter your security ID number...
... to skip backward to delete message Checking Messages from a Handset 1 Press chan. 2 Scroll to delete the message Checking Messages Remotely If you have a touch-tone phone, you can access your messages remotely. 1 Call your home. 2 When the answering machine picks up the call, press * and then enter your security ID number...
User Guide
Page 45
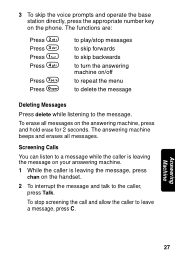
... the answering machine, press and hold erase for 2 seconds. To stop messages to skip forwards to skip backwards to turn the answering machine on the phone. The answering machine beeps and erases all messages on the handset. 2 To interrupt the message and talk to leave a message, press C. To erase all messages...
... the answering machine, press and hold erase for 2 seconds. To stop messages to skip forwards to skip backwards to turn the answering machine on the phone. The answering machine beeps and erases all messages on the handset. 2 To interrupt the message and talk to leave a message, press C. To erase all messages...


